
User Guide
Page 15
... turn on the TV 104 Setting the sleep timer 105 Setting No Signal Power Down 106 Displaying TV status information 106 Viewing support information 107 Resetting to Factory Defaults 107 Power failure 108 Chapter 7: Picture and Sound Controls 109 Selecting the picture size 109 Native 110 4:3 111 Full 111 TheaterWide 1 112...
... turn on the TV 104 Setting the sleep timer 105 Setting No Signal Power Down 106 Displaying TV status information 106 Viewing support information 107 Resetting to Factory Defaults 107 Power failure 108 Chapter 7: Picture and Sound Controls 109 Selecting the picture size 109 Native 110 4:3 111 Full 111 TheaterWide 1 112...
User Guide
Page 16
... Cinema Mode 119 MPEG NR 119 DNR 119 Auto Brightness Sensor 120 Backlight Adjustment Pro 120 ColorMaster 121 Base Color Adjustment 121 Color temperature 122 Resetting to the factory default 122 Setting the expert picture settings 122 Test Pattern 122 RGB Filter 123 White Balance 123 Locking the picture settings 124...
... Cinema Mode 119 MPEG NR 119 DNR 119 Auto Brightness Sensor 120 Backlight Adjustment Pro 120 ColorMaster 121 Base Color Adjustment 121 Color temperature 122 Resetting to the factory default 122 Setting the expert picture settings 122 Test Pattern 122 RGB Filter 123 White Balance 123 Locking the picture settings 124...
User Guide
Page 37
... standardized for reception of highdefinition video signals. NOTE To ensure that some devices may not operate properly with high-bandwidth digital content protection, which is reset properly: ❖ When turning on your electronic components, turn off the HDMI® or DVI device first, and then the TV. Because this is an...
... standardized for reception of highdefinition video signals. NOTE To ensure that some devices may not operate properly with high-bandwidth digital content protection, which is reset properly: ❖ When turning on your electronic components, turn off the HDMI® or DVI device first, and then the TV. Because this is an...
User Guide
Page 51
NOTE ❖ You can stop Initial Setup by pressing the EXIT button. However, if you do not finish Initial Setup, the Initial Setup screen will appear every time you first turn on your TV. Chapter 4 Initial Setup and Menu Initial setup When you turn on or reset the TV, the Initial Setup window appears. To finish Initial Setup, see "Changing initial settings" on page 64. ❖ The EXIT button does not work until Menu Language/Country, Time Zone/Daylight Saving Time, and Store/Home Mode have been set. 51
NOTE ❖ You can stop Initial Setup by pressing the EXIT button. However, if you do not finish Initial Setup, the Initial Setup screen will appear every time you first turn on your TV. Chapter 4 Initial Setup and Menu Initial setup When you turn on or reset the TV, the Initial Setup window appears. To finish Initial Setup, see "Changing initial settings" on page 64. ❖ The EXIT button does not work until Menu Language/Country, Time Zone/Daylight Saving Time, and Store/Home Mode have been set. 51

User Guide
Page 71
... wish to set Auto Input 1 Press the MENU button. 2 Select SETTINGS, PREFERENCES, Mode Select Key Setup, and then press the OK button. To reset Auto Input ❖ Select Reset, and then press the OK button. To set . 5 Press the ( / arrow) buttons to the ANT/CABLE input. To turn off Auto Input ❖...
... wish to set Auto Input 1 Press the MENU button. 2 Select SETTINGS, PREFERENCES, Mode Select Key Setup, and then press the OK button. To reset Auto Input ❖ Select Reset, and then press the OK button. To set . 5 Press the ( / arrow) buttons to the ANT/CABLE input. To turn off Auto Input ❖...

User Guide
Page 82
... feature is set to On, a message displays on the screen when a 3D signal is deleted, 3D Safety Settings are grayed out, and the settings are reset to select 3D Start Message. NOTE ❖ The PIN code cannot be set to enter your 4-digit PIN code. 5 Select Change PIN or Delete PIN...
... feature is set to On, a message displays on the screen when a 3D signal is deleted, 3D Safety Settings are grayed out, and the settings are reset to select 3D Start Message. NOTE ❖ The PIN code cannot be set to enter your 4-digit PIN code. 5 Select Change PIN or Delete PIN...

User Guide
Page 91
... Blocking TV programs and movies by rating (V-Chip) Some TV programs and movies include signals that classify the content of Parental Controls and Locks are reset. NOTE The PIN code cannot be set to the ratings you delete the PIN code, the settings of the program (as unsuitable for younger viewers...
... Blocking TV programs and movies by rating (V-Chip) Some TV programs and movies include signals that classify the content of Parental Controls and Locks are reset. NOTE The PIN code cannot be set to the ratings you delete the PIN code, the settings of the program (as unsuitable for younger viewers...
User Guide
Page 103
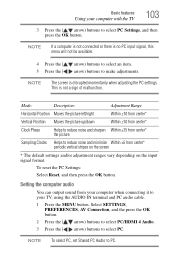
... available. 4 Press the ( / arrow) buttons to select an item. 5 Press the ( / arrow) buttons to your computer when connecting it to make adjustments. To reset the PC Settings: Select Reset, and then press the OK button. Setting the computer audio You can output sound from center* the picture Sampling Clocks Helps to select...
... available. 4 Press the ( / arrow) buttons to select an item. 5 Press the ( / arrow) buttons to your computer when connecting it to make adjustments. To reset the PC Settings: Select Reset, and then press the OK button. Setting the computer audio You can output sound from center* the picture Sampling Clocks Helps to select...
User Guide
Page 107
...the OK button. Select GET HELP, System Information. 2 Press the OK button to Factory Defaults You can reset all settings and channels. 1 Press the MENU button. To cancel the reset: The following additional information (only available for ANT/CABLE input) will display for digital channels, press the INFO... button again. Select SETTINGS, SETUP, Reset TV, and then press the OK button. 2 Enter your PIN code (if a PIN code has been set or received) ❖ Current ...
...the OK button. Select GET HELP, System Information. 2 Press the OK button to Factory Defaults You can reset all settings and channels. 1 Press the MENU button. To cancel the reset: The following additional information (only available for ANT/CABLE input) will display for digital channels, press the INFO... button again. Select SETTINGS, SETUP, Reset TV, and then press the OK button. 2 Enter your PIN code (if a PIN code has been set or received) ❖ Current ...

User Guide
Page 116
... want to On To adjust the picture quality: 1 Press the MENU button. A confirmation screen appears. 3 Press the ( / arrow) buttons to adjust the setting. To reset to 0. (Settings are stored in memory.) NOTE Some settings cannot be reduced. Press the EXIT button. Select SETTINGS, PICTURE..., Reset, and then press the OK button. You can adjust the picture quality separately for each input. ❖ Depending on a Sharpness value, the Edge Enhancer ...
... want to On To adjust the picture quality: 1 Press the MENU button. A confirmation screen appears. 3 Press the ( / arrow) buttons to adjust the setting. To reset to 0. (Settings are stored in memory.) NOTE Some settings cannot be reduced. Press the EXIT button. Select SETTINGS, PICTURE..., Reset, and then press the OK button. You can adjust the picture quality separately for each input. ❖ Depending on a Sharpness value, the Edge Enhancer ...

User Guide
Page 121
... the ( / arrow) buttons to adjust. 1 Press the MENU button. ColorMaster™ The ColorMaster™ feature allows you to the factory defaults, select Reset on the screen. ❖ To reset the adjustments of base colors appears. The Base Color Adjustment screen appears. Base Color Adjustment When ColorMaster™ is set to Off, this...
... the ( / arrow) buttons to adjust. 1 Press the MENU button. ColorMaster™ The ColorMaster™ feature allows you to the factory defaults, select Reset on the screen. ❖ To reset the adjustments of base colors appears. The Base Color Adjustment screen appears. Base Color Adjustment When ColorMaster™ is set to Off, this...

User Guide
Page 122
... OK button. 2 Press the ( / arrow) buttons to 10 (cool). Press the EXIT button. The adjustment range is 0 (warm) to select Reset, and then press the OK button. Select SETTINGS, PICTURE, Expert Picture Settings, and then press the OK button. 2 Select Test Pattern. Press the ...5 to select a color. 122 Picture and Sound Controls Setting the expert picture settings 3 Press the ( / arrow) buttons to adjust other colors. To reset the adjustments to +5. Color temperature 1 Press the MENU button. A confirmation screen appears. 3 Select Yes, and then press the OK button. When you can...
... OK button. 2 Press the ( / arrow) buttons to 10 (cool). Press the EXIT button. The adjustment range is 0 (warm) to select Reset, and then press the OK button. Select SETTINGS, PICTURE, Expert Picture Settings, and then press the OK button. 2 Select Test Pattern. Press the ...5 to select a color. 122 Picture and Sound Controls Setting the expert picture settings 3 Press the ( / arrow) buttons to adjust other colors. To reset the adjustments to +5. Color temperature 1 Press the MENU button. A confirmation screen appears. 3 Select Yes, and then press the OK button. When you can...
User Guide
Page 137
... not use , contact your network administrator or internet service provider. NOTE If you manually set the DNS address(es). Your Internet Service Provider should be reset to the previous value. 7 Press the ( / arrow) buttons to On. If you . ❖ The settings in Auto Setup are linked to Off, and manually set...
... not use , contact your network administrator or internet service provider. NOTE If you manually set the DNS address(es). Your Internet Service Provider should be reset to the previous value. 7 Press the ( / arrow) buttons to On. If you . ❖ The settings in Auto Setup are linked to Off, and manually set...

User Guide
Page 138
... you input an incompatible number and press the OK button, the field number will be between 0 and 255. NOTE DNS address field numbers must be reset to the previous value. 7 Press the ( / arrow) buttons to highlight Secondary DNS Address, and edit in the same way as Primary DNS Address. If you...
... you input an incompatible number and press the OK button, the field number will be between 0 and 255. NOTE DNS address field numbers must be reset to the previous value. 7 Press the ( / arrow) buttons to highlight Secondary DNS Address, and edit in the same way as Primary DNS Address. If you...
User Guide
Page 154
...; Changing the ANT/CABLE In setting ❖ Changing the Country setting ❖ Changing the Device Type or Input under the IR Blaster Setup menu ❖ Reset MediaGuide Operating the MediaGuide 1 Press GUIDE on the remote control or select the MediaGuide from the ePORTAL from the Apps screen. 2 The MediaGuide screen will...
...; Changing the ANT/CABLE In setting ❖ Changing the Country setting ❖ Changing the Device Type or Input under the IR Blaster Setup menu ❖ Reset MediaGuide Operating the MediaGuide 1 Press GUIDE on the remote control or select the MediaGuide from the ePORTAL from the Apps screen. 2 The MediaGuide screen will...
User Guide
Page 156
You can use the SearchAll feature in the ePORTAL, see "ePORTAL SearchAll" on the remote control. 2 Select NETWORK>Smart Apps Setup>Reset MediaGuide. 3 Press the OK button. Celebrity detail menus contain different items such as the TV programming, use the Search menu, within the ...TV or Movie menus. NOTE The actual menus displayed on the detail screen vary depending on the service that item. Reset MediaGuide To reset the MediaGuide, please follow these steps: 1 Press the MENU button on page 142. To search using a keyword: 1 Select the Search option ...
You can use the SearchAll feature in the ePORTAL, see "ePORTAL SearchAll" on the remote control. 2 Select NETWORK>Smart Apps Setup>Reset MediaGuide. 3 Press the OK button. Celebrity detail menus contain different items such as the TV programming, use the Search menu, within the ...TV or Movie menus. NOTE The actual menus displayed on the detail screen vary depending on the service that item. Reset MediaGuide To reset the MediaGuide, please follow these steps: 1 Press the MENU button on page 142. To search using a keyword: 1 Select the Search option ...
User Guide
Page 157
... from the setting menu. NOTE If the MediaGuide cannot launch or is not guaranteed for example) NOTE ❖ Connectivity is not functioning correctly, reset the MediaGuide using the MediaShare (Media Player) feature. There are two ways to quickly access video, music, and image files located on a MediaShare...or your home network. The Media Server is not available while using the instructions above. The TV will turn off automatically. Toshiba cannot and does not grant such permission. Advanced features Using the SmartTV features 157 4 Select Yes and press the OK button.
... from the setting menu. NOTE If the MediaGuide cannot launch or is not guaranteed for example) NOTE ❖ Connectivity is not functioning correctly, reset the MediaGuide using the MediaShare (Media Player) feature. There are two ways to quickly access video, music, and image files located on a MediaShare...or your home network. The Media Server is not available while using the instructions above. The TV will turn off automatically. Toshiba cannot and does not grant such permission. Advanced features Using the SmartTV features 157 4 Select Yes and press the OK button.
User Guide
Page 176
...hold POWER button on the remote control or TV control panel and you cause a static discharge when touching the TV and the TV fails to reset the TV. Black box on page 87. The closed caption feature is set to troubleshoot the problem. If you cannot turn off using this ...chapter or visit the Toshiba technical support Web site at support.toshiba.com for possible causes/solutions for several seconds to function, simply unplug the TV from the AC wall outlet, wait approximately one...
...hold POWER button on the remote control or TV control panel and you cause a static discharge when touching the TV and the TV fails to reset the TV. Black box on page 87. The closed caption feature is set to troubleshoot the problem. If you cannot turn off using this ...chapter or visit the Toshiba technical support Web site at support.toshiba.com for possible causes/solutions for several seconds to function, simply unplug the TV from the AC wall outlet, wait approximately one...

User Guide
Page 177
... 177 Other problems. If your TV's problem is not addressed in this Troubleshooting chapter or the recommended solution has not worked, use the Reset Factory Defaults procedure, see "Resetting to an input on the TV, no picture appears when you select that particular input source. If 2D images are not correct, the...
... 177 Other problems. If your TV's problem is not addressed in this Troubleshooting chapter or the recommended solution has not worked, use the Reset Factory Defaults procedure, see "Resetting to an input on the TV, no picture appears when you select that particular input source. If 2D images are not correct, the...

User Guide
Page 179
... cannot tune digital channels, check the antenna configuration, see "Unlocking programs" on page 51. If the TV still does not act as expected, perform the Reset Factory Defaults procedure, see "Connecting a digital audio system" on page 34. ❖ Turn off and unplug the TV from memory. If the problem Check the...
... cannot tune digital channels, check the antenna configuration, see "Unlocking programs" on page 51. If the TV still does not act as expected, perform the Reset Factory Defaults procedure, see "Connecting a digital audio system" on page 34. ❖ Turn off and unplug the TV from memory. If the problem Check the...


