Owner's Manual - English
Page 1
...of steps for setting up your new TV, see page 9. 40XF550U_EN.book Page 1 Wednesday, January 30, 2008 3:55 PM Pre-final version Printing version Integrated High Definition LCD Television HIGH-DEFINITION TELEVISION 40XF550U 46XF550U 52XF550U For an overview of your TV. Model number...: Serial number: YC/M1 VX1A00088500 XF550U (E/F) Web 213:276 Record these numbers whenever you communicate with your Toshiba dealer about this TV. Note: To display a High Definition picture, the TV...
...of steps for setting up your new TV, see page 9. 40XF550U_EN.book Page 1 Wednesday, January 30, 2008 3:55 PM Pre-final version Printing version Integrated High Definition LCD Television HIGH-DEFINITION TELEVISION 40XF550U 46XF550U 52XF550U For an overview of your TV. Model number...: Serial number: YC/M1 VX1A00088500 XF550U (E/F) Web 213:276 Record these numbers whenever you communicate with your Toshiba dealer about this TV. Note: To display a High Definition picture, the TV...
Owner's Manual - English
Page 7
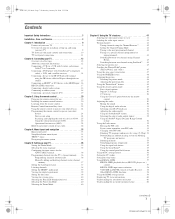
...menu layout 33 THINC™ menu 33 Navigating the menu system 34 Chapter 5: Setting up your TV 35 Setting the Demo Mode 35 Selecting the menu language 35 Configuring the input source for... Switching between two channels using SurfLock™. . . . 45 Selecting the picture size 45 Scrolling the TheaterWide® picture (TheaterWide 2 and 3 only 47 Using the auto aspect ratio feature 47 Using the...® feature 52 Selecting the optical audio output format 52 Using the Dolby® Digital Dynamic Range Control feature 52 Using the Locks menu 52 Entering the PIN code 52 If you cannot...
...menu layout 33 THINC™ menu 33 Navigating the menu system 34 Chapter 5: Setting up your TV 35 Setting the Demo Mode 35 Selecting the menu language 35 Configuring the input source for... Switching between two channels using SurfLock™. . . . 45 Selecting the picture size 45 Scrolling the TheaterWide® picture (TheaterWide 2 and 3 only 47 Using the auto aspect ratio feature 47 Using the...® feature 52 Selecting the optical audio output format 52 Using the Dolby® Digital Dynamic Range Control feature 52 Using the Locks menu 52 Entering the PIN code 52 If you cannot...
Owner's Manual - English
Page 8
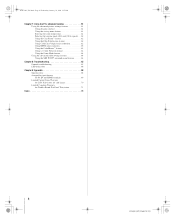
40XF550U_EN.book Page 8 Wednesday, January 30, 2008 3:55 PM Chapter 7: Using the TV's advanced features 61 Using the advanced picture settings features 61 Using dynamic contrast 61 Using the static gamma feature 61 Selecting the color temperature 61 Selecting the cinema mode (480i and 1080i signals... indications 66 Chapter 9: Appendix 68 Specifications 68 Acceptable signal formats for PC IN and HDMI terminals 69 Limited United States Warranty for LCD Televisions 26" and Larger 70 Limited Canadian Warranty for Toshiba Brand Flat Panel Televisions 71 Index 73 8 XF550U (E/F) Web 213:276
40XF550U_EN.book Page 8 Wednesday, January 30, 2008 3:55 PM Chapter 7: Using the TV's advanced features 61 Using the advanced picture settings features 61 Using dynamic contrast 61 Using the static gamma feature 61 Selecting the color temperature 61 Selecting the cinema mode (480i and 1080i signals... indications 66 Chapter 9: Appendix 68 Specifications 68 Acceptable signal formats for PC IN and HDMI terminals 69 Limited United States Warranty for LCD Televisions 26" and Larger 70 Limited Canadian Warranty for Toshiba Brand Flat Panel Televisions 71 Index 73 8 XF550U (E/F) Web 213:276
Owner's Manual - English
Page 9
...Dolby® Digital optical output format (- page 57). • Two sets of external devices from the TV remote via HDMI connection (- page 52). • CableClear® digital picture noise reduction (- ABC, HBO, etc.) on using the TV's features, see Chapters 6 and 7. 10 For help, refer to... the many exciting features of your new Toshiba widescreen, integrated HD, LCD TV: • Super Narrow Bezel and Blue LED Illumination. • Integrated digital tuning (8VSB ATSC and QAM) eliminates the need for a separate digital converter set up your TV and begin using its many exciting features....
...Dolby® Digital optical output format (- page 57). • Two sets of external devices from the TV remote via HDMI connection (- page 52). • CableClear® digital picture noise reduction (- ABC, HBO, etc.) on using the TV's features, see Chapters 6 and 7. 10 For help, refer to... the many exciting features of your new Toshiba widescreen, integrated HD, LCD TV: • Super Narrow Bezel and Blue LED Illumination. • Integrated digital tuning (8VSB ATSC and QAM) eliminates the need for a separate digital converter set up your TV and begin using its many exciting features....

Owner's Manual - English
Page 12
...-coded according to the ANT/ CABLE input on your specific devices, refer to disconnect the standard (composite) video cable or the picture performance will be purchased from those illustrated herein. Dual-wand IR blaster cable Standard A/V cables (composite video) usually come in several... different configurations. The input/output terminals on your TV in sets of three and are for use with video devices with component video output. (ColorStream® is Toshiba's brand of component video.) These cables are not required for use with video ...
...-coded according to the ANT/ CABLE input on your specific devices, refer to disconnect the standard (composite) video cable or the picture performance will be purchased from those illustrated herein. Dual-wand IR blaster cable Standard A/V cables (composite video) usually come in several... different configurations. The input/output terminals on your TV in sets of three and are for use with video devices with component video output. (ColorStream® is Toshiba's brand of component video.) These cables are not required for use with video ...
Owner's Manual - English
Page 13
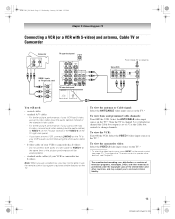
..., if your camcorder has S-video, connect an S-video cable (plus the audio cables) to VIDEO 1 on the TV back instead of video cable to VIDEO 1 at the same time or the picture performance will be unacceptable. • standard audio cables (if your VCR has S-video, use an S-video cable (plus the ...recording, use a Cable box, you may subject you have a mono VCR, connect L/MONO on the TV. To view the VCR: Turn ON the VCR. page 21). Use the Cable box controls to operate other materials is set to civil and criminal liability. 13 XF550U (E/F) Web 213:276 Select the ANT/CABLE video...
..., if your camcorder has S-video, connect an S-video cable (plus the audio cables) to VIDEO 1 on the TV back instead of video cable to VIDEO 1 at the same time or the picture performance will be unacceptable. • standard audio cables (if your VCR has S-video, use an S-video cable (plus the ...recording, use a Cable box, you may subject you have a mono VCR, connect L/MONO on the TV. To view the VCR: Turn ON the VCR. page 21). Use the Cable box controls to operate other materials is set to civil and criminal liability. 13 XF550U (E/F) Web 213:276 Select the ANT/CABLE video...
Owner's Manual - English
Page 14
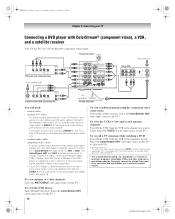
..., and other materials is not supported). - Do not connect both types of video cable to VIDEO 1 at the same time or the picture performance will need: • coaxial cables • standard A/V cables - 40XF550U_EN.book Page 14 Wednesday, January 30, 2008 3:55 PM Chapter 2: Connecting...dish Stereo VCR VIDEO AUDIO L R IN CH 3 CH 4 OUT L R IN from the DVD player or satellite receiver to either set of ColorStream terminals on the TV (HD1 or HD2). TV upper back panel From antenna Y PB PR COMPONENT VIDEO S-VIDEO VIDEO OUT OUT DVD player with ColorStream® (component video), a ...
..., and other materials is not supported). - Do not connect both types of video cable to VIDEO 1 at the same time or the picture performance will need: • coaxial cables • standard A/V cables - 40XF550U_EN.book Page 14 Wednesday, January 30, 2008 3:55 PM Chapter 2: Connecting...dish Stereo VCR VIDEO AUDIO L R IN CH 3 CH 4 OUT L R IN from the DVD player or satellite receiver to either set of ColorStream terminals on the TV (HD1 or HD2). TV upper back panel From antenna Y PB PR COMPONENT VIDEO S-VIDEO VIDEO OUT OUT DVD player with ColorStream® (component video), a ...
Owner's Manual - English
Page 19
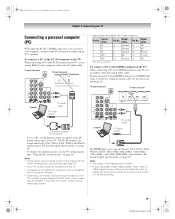
...Note: • The edges of the screen (i.e. Signal name 1 R 2 G 3 B 4 NC * 5 NC Pin No. "Using the PC settings feature" on the PC before connecting it to the TV. Computer PC audio cable PC audio output The HDMI input can accept and display VGA, SVGA, XGA, WXGA, and SXGA signal formats. For... entire picture within the borders of the images may not be able to the HDMI terminal on the TV, use an adapter cable and analog audio cables. TV upper back panel TV lower back panel Computer PC audio cable PC audio output Conversion adapter (if necessary) • To use a PC, set the...
...Note: • The edges of the screen (i.e. Signal name 1 R 2 G 3 B 4 NC * 5 NC Pin No. "Using the PC settings feature" on the PC before connecting it to the TV. Computer PC audio cable PC audio output The HDMI input can accept and display VGA, SVGA, XGA, WXGA, and SXGA signal formats. For... entire picture within the borders of the images may not be able to the HDMI terminal on the TV, use an adapter cable and analog audio cables. TV upper back panel TV lower back panel Computer PC audio cable PC audio output Conversion adapter (if necessary) • To use a PC, set the...
Owner's Manual - English
Page 21
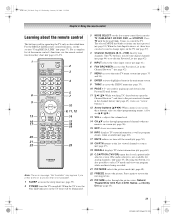
...Browser™ and tune to control the TV. page 43). (Also see 3 C / # c.) 13 VOL + - page 48). 22 FREEZE freezes the picture. When the Auto Input feature is set, these keys can also be illuminated. 3 MODE SELECT sets the five remote control device modes: TV, CABLE/SAT, HD DVD, DVD, ...and VCR/PVR. page 33). 10 PAGE + / - are described here. Press TV until the keypad blinks 3 ...
...Browser™ and tune to control the TV. page 43). (Also see 3 C / # c.) 13 VOL + - page 48). 22 FREEZE freezes the picture. When the Auto Input feature is set, these keys can also be illuminated. 3 MODE SELECT sets the five remote control device modes: TV, CABLE/SAT, HD DVD, DVD, ...and VCR/PVR. page 33). 10 PAGE + / - are described here. Press TV until the keypad blinks 3 ...
Owner's Manual - English
Page 33
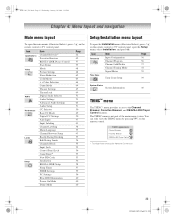
...* Toshiba Home Interactive Network Connection. 33 XF550U (E/F) Web 213:276 The THINC menu is not part of the main menu system. Icon Applications Video Audio Preferences Locks Setup Item Channel Browser™ Favorites Browser REGZA-LINK Player Control Start Demo Mode Picture Settings Noise ...Chapter 4: Menu layout and navigation Main menu layout To open the main menus (illustrated below ), press Y on the remote control or TV control panel, open the Installation menu (illustrated below ), press Y on the remote control. Icon Terrestrial Item Input Configuration Channel Program ...
...* Toshiba Home Interactive Network Connection. 33 XF550U (E/F) Web 213:276 The THINC menu is not part of the main menu system. Icon Applications Video Audio Preferences Locks Setup Item Channel Browser™ Favorites Browser REGZA-LINK Player Control Start Demo Mode Picture Settings Noise ...Chapter 4: Menu layout and navigation Main menu layout To open the main menus (illustrated below ), press Y on the remote control or TV control panel, open the Installation menu (illustrated below ), press Y on the remote control. Icon Terrestrial Item Input Configuration Channel Program ...

Owner's Manual - English
Page 45
... image (in a variety of the signal you press R, the TV will be "grayed out" in the Picture Size screen). To select the picture size using the remote control: 1 Press I on the remote control. 2 While the Picture Size screen is open, you can return to that channel quickly ... inputs. To view the hidden edges, either scroll the picture (TheaterWide 2 and 3 only) or try viewing the program in the Theater Settings menu. 2 Press C or c to select the desired picture size setting. 3 Highlight Done and press T. Note: The "picture size" illustrations are currently watching. Note: If you select...
... image (in a variety of the signal you press R, the TV will be "grayed out" in the Picture Size screen). To select the picture size using the remote control: 1 Press I on the remote control. 2 While the Picture Size screen is open, you can return to that channel quickly ... inputs. To view the hidden edges, either scroll the picture (TheaterWide 2 and 3 only) or try viewing the program in the Theater Settings menu. 2 Press C or c to select the desired picture size setting. 3 Highlight Done and press T. Note: The "picture size" illustrations are currently watching. Note: If you select...

Owner's Manual - English
Page 47
...defaults, highlight Reset and press T. To set separate scroll settings for the TheaterWide 2 and TheaterWide 3 modes for each input. Note: The auto aspect ratio feature is not applicable to On, the TV will automatically select the picture size when one of the following input ...Picture Settings Noise Reduction ColorMaster x.v.Color Selection Game Mode Theater Settings TheaterLock Sports Auto Off Off 3 In the Picture Size field, select either TheaterWide 2 or TheaterWide 3 (you set to the PC input. 40XF550U_EN.book Page 47 Wednesday, January 30, 2008 3:55 PM Chapter 6: Using the TV...
...defaults, highlight Reset and press T. To set separate scroll settings for the TheaterWide 2 and TheaterWide 3 modes for each input. Note: The auto aspect ratio feature is not applicable to On, the TV will automatically select the picture size when one of the following input ...Picture Settings Noise Reduction ColorMaster x.v.Color Selection Game Mode Theater Settings TheaterLock Sports Auto Off Off 3 In the Picture Size field, select either TheaterWide 2 or TheaterWide 3 (you set to the PC input. 40XF550U_EN.book Page 47 Wednesday, January 30, 2008 3:55 PM Chapter 6: Using the TV...

Owner's Manual - English
Page 48
... private viewing may subject you to your desired picture settings from , highlight Reset and press T. Adjusting the picture Selecting the picture mode You can use the FREEZE feature: 1 When viewing the TV, press B to make the picture a still picture. 2 To return to the base mode that you began adjusting the picture settings from the following modes, as described in...
... private viewing may subject you to your desired picture settings from , highlight Reset and press T. Adjusting the picture Selecting the picture mode You can use the FREEZE feature: 1 When viewing the TV, press B to make the picture a still picture. 2 To return to the base mode that you began adjusting the picture settings from the following modes, as described in...

Owner's Manual - English
Page 49
...). Note: A closed caption signal may appear on screen. Items that affect the picture mode setting. Note: When TheaterLock is set to On, a lock icon ( ) will not be grayed out and unavailable when the TheaterLock setting is set the Base CC Mode to Off. • To turn on TheaterLock™: 1...: If text is not available in step 2 above . 40XF550U_EN.book Page 49 Wednesday, January 30, 2008 3:55 PM Chapter 6: Using the TV's features Using the TheaterLock™ feature The TheaterLock™ feature allows you selected is not closed captioned, no captions will display on-screen. &#...
...). Note: A closed caption signal may appear on screen. Items that affect the picture mode setting. Note: When TheaterLock is set to On, a lock icon ( ) will not be grayed out and unavailable when the TheaterLock setting is set the Base CC Mode to Off. • To turn on TheaterLock™: 1...: If text is not available in step 2 above . 40XF550U_EN.book Page 49 Wednesday, January 30, 2008 3:55 PM Chapter 6: Using the TV's features Using the TheaterLock™ feature The TheaterLock™ feature allows you selected is not closed captioned, no captions will display on-screen. &#...
Owner's Manual - English
Page 55
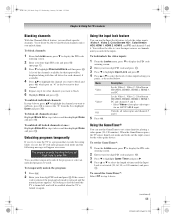
page 52). 3 Press b to enter PIN. Unlocking programs temporarily If you try to tune the TV to a program that channel. 5 Repeat step 4 for other channels ...and press T. Using the GameTimer® You can use the GameTimer to set . You will be enabled when the TV is released and the normal picture appears. Unlocks all locked channels at once: Highlight Block All in step...unless you want to unblock, press T to remove the "5" from the box, highlight Done and press T. To set the GameTimer®: 1 From the Locks menu, press b to display the PIN code entering screen. 2 Enter ...
page 52). 3 Press b to enter PIN. Unlocking programs temporarily If you try to tune the TV to a program that channel. 5 Repeat step 4 for other channels ...and press T. Using the GameTimer® You can use the GameTimer to set . You will be enabled when the TV is released and the normal picture appears. Unlocks all locked channels at once: Highlight Block All in step...unless you want to unblock, press T to remove the "5" from the box, highlight Done and press T. To set the GameTimer®: 1 From the Locks menu, press b to display the PIN code entering screen. 2 Enter ...

Owner's Manual - English
Page 56
...Lock to view" page 41). 2 From the Setup menu, highlight PC Settings and press T. When the control panel is within ±5 from center.* Helps to reduce noise and sharpen the picture. button on the TV control panel for example). If the edges of the controls on the input...a PC is within ±10 from center.* * The default settings and /or adjustment range vary depending on the TV control panel will operate except POWER. Mode Horizontal Position Vertical Position Clock Phase Sampling Clock Description Moves the picture left/right. When the control panel lock is restored the...
...Lock to view" page 41). 2 From the Setup menu, highlight PC Settings and press T. When the control panel is within ±5 from center.* Helps to reduce noise and sharpen the picture. button on the TV control panel for example). If the edges of the controls on the input...a PC is within ±10 from center.* * The default settings and /or adjustment range vary depending on the TV control panel will operate except POWER. Mode Horizontal Position Vertical Position Clock Phase Sampling Clock Description Moves the picture left/right. When the control panel lock is restored the...

Owner's Manual - English
Page 57
... turn off . To cancel the sleep timer: Repeatedly press [ until the TV turns off the TV after a set length of time (maximum of 180 minutes). Pauses the picture during play or record mode. Returns to control Toshiba REGZA-LINK compatible devices from the TV remote via HDMI connection (- Note: These functions depend on the sleep timer...
... turn off . To cancel the sleep timer: Repeatedly press [ until the TV turns off the TV after a set length of time (maximum of 180 minutes). Pauses the picture during play or record mode. Returns to control Toshiba REGZA-LINK compatible devices from the TV remote via HDMI connection (- Note: These functions depend on the sleep timer...

Owner's Manual - English
Page 61
....book Page 61 Wednesday, January 30, 2008 3:55 PM Chapter 7: Using the TV's advanced features Using the advanced picture settings features Using dynamic contrast When dynamic contrast is set to Low, Middle, or High, the TV will be decreased. • If the setting is within ±4 from three preset color temperatures (Cool, Medium, and Warm), as...
....book Page 61 Wednesday, January 30, 2008 3:55 PM Chapter 7: Using the TV's advanced features Using the advanced picture settings features Using dynamic contrast When dynamic contrast is set to Low, Middle, or High, the TV will be decreased. • If the setting is within ±4 from three preset color temperatures (Cool, Medium, and Warm), as...
Owner's Manual - English
Page 62
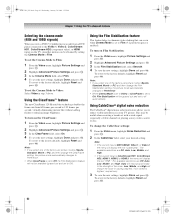
... on Film Stabilization: 1 From the Video menu, highlight Picture Settings and press T. 2 Highlight Advanced Picture Settings and press T. 3 In the Film Stabilization field, select Smooth. 4 To save the new settings, highlight Done and press T. To turn on the TV, smoother motion can occur when Cinema Mode is set to Off, the Film Stabilization feature will reduce the...
... on Film Stabilization: 1 From the Video menu, highlight Picture Settings and press T. 2 Highlight Advanced Picture Settings and press T. 3 In the Film Stabilization field, select Smooth. 4 To save the new settings, highlight Done and press T. To turn on the TV, smoother motion can occur when Cinema Mode is set to Off, the Film Stabilization feature will reduce the...

Owner's Manual - English
Page 64
... and B b to Auto, picture settings are trademarks of Sony Corporation. Your TV's audio will not work . 4 To save the new settings, highlight Done and press T. Note: If a non-HDMI input is selected or the x.v.Color setting in the HDMI Settings menu is set when an x.v.Color signal is monaural... b or B to Off, normal processing occurs. To revert to On, x.v.Color detection does not occur, so picture settings are registered trademarks of SRS Labs, Inc. When set to the factory defaults, highlight Reset and press T. WOW: SRS To select the desired bass expansion TruBass level (Off...
... and B b to Auto, picture settings are trademarks of Sony Corporation. Your TV's audio will not work . 4 To save the new settings, highlight Done and press T. Note: If a non-HDMI input is selected or the x.v.Color setting in the HDMI Settings menu is set when an x.v.Color signal is monaural... b or B to Off, normal processing occurs. To revert to On, x.v.Color detection does not occur, so picture settings are registered trademarks of SRS Labs, Inc. When set to the factory defaults, highlight Reset and press T. WOW: SRS To select the desired bass expansion TruBass level (Off...


