Owner's Manual - English
Page 2
... on a "larger than a UL Listed wall bracket appropriate for the size and weight of cable entry as UL, CSA, ETL). • Follow all cords and cables connected to wall mount your new LCD TV. Some wall mounts are popular purchases. NOTE TO CATV INSTALLERS This is appropriate. 40XF550U_EN.book Page 2 Wednesday, January 30, 2008 3:55 PM Dear Customer, Thank you for wall mounting this television could result in serious...
... on a "larger than a UL Listed wall bracket appropriate for the size and weight of cable entry as UL, CSA, ETL). • Follow all cords and cables connected to wall mount your new LCD TV. Some wall mounts are popular purchases. NOTE TO CATV INSTALLERS This is appropriate. 40XF550U_EN.book Page 2 Wednesday, January 30, 2008 3:55 PM Dear Customer, Thank you for wall mounting this television could result in serious...
Owner's Manual - English
Page 4
... the TV where the power cord is subject to wear or abuse. 25) Never overload wall outlets and extension cords. 26) Always operate this equipment from a 120 VAC, 60 Hz power source only. 27) Always make sure the antenna system is thundering, do not touch the connecting cables or apparatus. 33) For added protection of your body (or any home theater component connected...
... the TV where the power cord is subject to wear or abuse. 25) Never overload wall outlets and extension cords. 26) Always operate this equipment from a 120 VAC, 60 Hz power source only. 27) Always make sure the antenna system is thundering, do not touch the connecting cables or apparatus. 33) For added protection of your body (or any home theater component connected...
Owner's Manual - English
Page 5
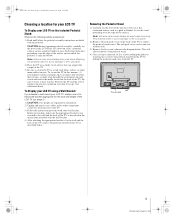
... your LCD TV To Display your LCD TV using a Wall Bracket: If you have removed all five screws holding the pedestal stand in the diagram below . The jack pack cover can support the weight of the TV. 3) Be sure to secure the TV to a wall stud, pillar, surface, or other component connectors from the rear of the TV. 3) Follow the instructions provided with the wall bracket. 4) After attaching the appropriate bracket(s) to the LCD panel. 2) Remove the...
... your LCD TV To Display your LCD TV using a Wall Bracket: If you have removed all five screws holding the pedestal stand in the diagram below . The jack pack cover can support the weight of the TV. 3) Be sure to secure the TV to a wall stud, pillar, surface, or other component connectors from the rear of the TV. 3) Follow the instructions provided with the wall bracket. 4) After attaching the appropriate bracket(s) to the LCD panel. 2) Remove the...
Owner's Manual - English
Page 7
... picture mode 48 Adjusting the picture quality 48 Using the TheaterLock™ feature 49 Using the closed caption mode 49 Base closed captions 49 Digital CC Settings 50 CC Selector 50 Using the Closed Caption button on the remote control 50 Adjusting the audio 50 Muting the sound 50 Using the digital audio selector 51 Selecting stereo/SAP broadcasts 51 Adjusting the audio quality 51 Using the StableSound® feature 52 Selecting the optical audio output format 52 Using the Dolby® Digital Dynamic Range Control feature 52 Using the Locks menu 52...
... picture mode 48 Adjusting the picture quality 48 Using the TheaterLock™ feature 49 Using the closed caption mode 49 Base closed captions 49 Digital CC Settings 50 CC Selector 50 Using the Closed Caption button on the remote control 50 Adjusting the audio 50 Muting the sound 50 Using the digital audio selector 51 Selecting stereo/SAP broadcasts 51 Adjusting the audio quality 51 Using the StableSound® feature 52 Selecting the optical audio output format 52 Using the Dolby® Digital Dynamic Range Control feature 52 Using the Locks menu 52...
Owner's Manual - English
Page 9
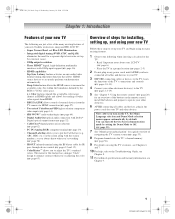
...; Digital optical output format (- pages 12 and 15). • ColorMaster™ allows you turn off the On-Screen demonstration mode by setting the Demo Mode to set -top box (in a proper location (- pages 12-19). 5 See "Chapter 3: Using the remote control" (- page 16). • HDMI capabilities Lip-Sync Latency feature activates an auto audio/video display timing adjustment function that allows HDMI source devices to adjust the TV's standard colors. page 64). • Digital Audio Out optical audio connection with the station numbers, so...
...; Digital optical output format (- pages 12 and 15). • ColorMaster™ allows you turn off the On-Screen demonstration mode by setting the Demo Mode to set -top box (in a proper location (- pages 12-19). 5 See "Chapter 3: Using the remote control" (- page 16). • HDMI capabilities Lip-Sync Latency feature activates an auto audio/video display timing adjustment function that allows HDMI source devices to adjust the TV's standard colors. page 64). • Digital Audio Out optical audio connection with the station numbers, so...
Owner's Manual - English
Page 11
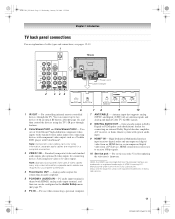
... of cable types and connections, see pages 12-19. 1 TV back 2 345 Power cord Cable Clamper 6 1 IR OUT - Note: Component video cables carry only video information; PC audio input terminal is necessary to two devices with optical audio input. 9 HDMI™ IN - You can be configured in Dolby Digital or PCM (pulse-code modulation) format for connecting devices with component video output, such as a Toshiba DVD player with composite video or S-video output. Analog audio outputs for updating the television's firmware. Optical audio output in the Audio Setup menu (- High...
... of cable types and connections, see pages 12-19. 1 TV back 2 345 Power cord Cable Clamper 6 1 IR OUT - Note: Component video cables carry only video information; PC audio input terminal is necessary to two devices with optical audio input. 9 HDMI™ IN - You can be configured in Dolby Digital or PCM (pulse-code modulation) format for connecting devices with component video output, such as a Toshiba DVD player with composite video or S-video output. Analog audio outputs for updating the television's firmware. Optical audio output in the Audio Setup menu (- High...

Owner's Manual - English
Page 12
... audio cables are required for connecting receivers with the TV's IR pass-through feature (- The connection illustrations in sets of each device's owner's manual. 12 XF550U (E/F) Web 213:276 Component video cables (red/green/blue) Dual-wand IR blaster cable is Toshiba's brand of cable types Cables can be unacceptable. About the connection illustrations You can be sure of connector types required by your TV in its native format. An HDMI cable delivers digital audio and video in...
... audio cables are required for connecting receivers with the TV's IR pass-through feature (- The connection illustrations in sets of each device's owner's manual. 12 XF550U (E/F) Web 213:276 Component video cables (red/green/blue) Dual-wand IR blaster cable is Toshiba's brand of cable types Cables can be unacceptable. About the connection illustrations You can be sure of connector types required by your TV in its native format. An HDMI cable delivers digital audio and video in...
Owner's Manual - English
Page 13
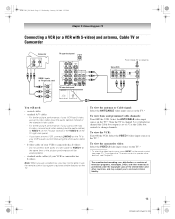
... panel. - To view the antenna or Cable signal: Select the ANT/CABLE video input source on the remote control (- Use the Cable box controls to ). If you to civil and criminal liability. 13 XF550U (E/F) Web 213:276 Select the ANT/CABLE video input source on the TV.* Tune the TV to channel 3 or 4 (whichever channel the Cable box output is prohibited under the Copyright Laws of the standard video cable. - The unauthorized recording, use, distribution, or revision of television programs, videotapes, DVDs...
... panel. - To view the antenna or Cable signal: Select the ANT/CABLE video input source on the remote control (- Use the Cable box controls to ). If you to civil and criminal liability. 13 XF550U (E/F) Web 213:276 Select the ANT/CABLE video input source on the TV.* Tune the TV to channel 3 or 4 (whichever channel the Cable box output is prohibited under the Copyright Laws of the standard video cable. - The unauthorized recording, use, distribution, or revision of television programs, videotapes, DVDs...

Owner's Manual - English
Page 18
... external analog audio amplifier to adjust the sound level. You will need : • optical audio cable (Use an optical audio cable that may not be compatible with an external Dolby® Digital decoder or other digital audio system LINE IN LR Optical Audio IN TV lower back panel Note: • Some audio systems may damage speakers or headphones. Audio Setup PC Audio HDMI 1 Audio MTS Language Optical Output Format Dolby Digital Dynamic Range Control Reset No Auto Stereo English Dolby Digital Compressed Done To control the audio: 1 Turn on your TV Connecting a digital audio...
... external analog audio amplifier to adjust the sound level. You will need : • optical audio cable (Use an optical audio cable that may not be compatible with an external Dolby® Digital decoder or other digital audio system LINE IN LR Optical Audio IN TV lower back panel Note: • Some audio systems may damage speakers or headphones. Audio Setup PC Audio HDMI 1 Audio MTS Language Optical Output Format Dolby Digital Dynamic Range Control Reset No Auto Stereo English Dolby Digital Compressed Done To control the audio: 1 Turn on your TV Connecting a digital audio...
Owner's Manual - English
Page 19
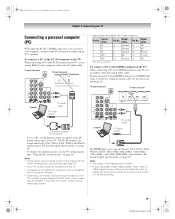
... this TV. • An adapter is not needed for mini D-sub 15-pin connector Pin No. page 57). • Some PC models cannot be connected to pause during multi-angle scenes. TV upper back panel TV lower back panel Computer PC audio cable PC audio output Conversion adapter (if necessary) • To use an adapter cable and analog audio cables. For detailed signal specifications, see page 69. • To display the optimum picture, use an HDMI cable (type...
... this TV. • An adapter is not needed for mini D-sub 15-pin connector Pin No. page 57). • Some PC models cannot be connected to pause during multi-angle scenes. TV upper back panel TV lower back panel Computer PC audio cable PC audio output Conversion adapter (if necessary) • To use an adapter cable and analog audio cables. For detailed signal specifications, see page 69. • To display the optimum picture, use an HDMI cable (type...
Owner's Manual - English
Page 22
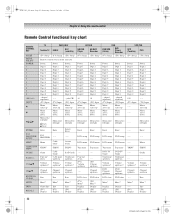
...Volume up/down*1 Channel up /down ---- Menu select left /right Enter FAV BROWSER ----- ----- THINC Guide ---- Enter DVD setup DVD setup ----- ----- Power Digit 1 Digit 2 Digit 3 Digit 4 Digit 5 Digit 6 Digit 7 Digit 8 Digit 9 Digit 0 ----- (TV) Input Menu select up Menu select down Menu select left/right Menu select left/right ----- VOLB/b CHB/b EXIT/DVD CLEAR MUTE INFO RECALL TV CABLE/SAT HD DVD Toshiba TV CABLE SAT HD DVD (satellite) Player HD DVD Recorder (TV) Sleep (TV) Sleep (TV) Sleep (TV) Sleep (TV) Sleep Remote control device mode selection Power Digit 1 Digit...
...Volume up/down*1 Channel up /down ---- Menu select left /right Enter FAV BROWSER ----- ----- THINC Guide ---- Enter DVD setup DVD setup ----- ----- Power Digit 1 Digit 2 Digit 3 Digit 4 Digit 5 Digit 6 Digit 7 Digit 8 Digit 9 Digit 0 ----- (TV) Input Menu select up Menu select down Menu select left/right Menu select left/right ----- VOLB/b CHB/b EXIT/DVD CLEAR MUTE INFO RECALL TV CABLE/SAT HD DVD Toshiba TV CABLE SAT HD DVD (satellite) Player HD DVD Recorder (TV) Sleep (TV) Sleep (TV) Sleep (TV) Sleep (TV) Sleep Remote control device mode selection Power Digit 1 Digit...
Owner's Manual - English
Page 33
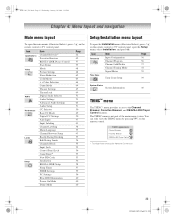
... Browser REGZA-LINK Player Control Start Demo Mode Picture Settings Noise Reduction ColorMaster x.v.Color Selection Game Mode Theater Settings TheaterLock Digital Audio Selector Audio Settings Advanced Audio Settings Audio Setup CC Selector Base CC Mode Digital CC Settings Auto Input Input Labeling Channel Labeling Menu Language Channel Browser Setup Enable Rating Blocking Edit Rating Limits Channels Block Input Lock Control Panel Lock GameTimer® New PIN Code Installation REGZA-LINK Setup Sleep Timer HDMI Settings PC Settings Blue LED Illumination Power-On Mode Demo Mode Page 42 42...
... Browser REGZA-LINK Player Control Start Demo Mode Picture Settings Noise Reduction ColorMaster x.v.Color Selection Game Mode Theater Settings TheaterLock Digital Audio Selector Audio Settings Advanced Audio Settings Audio Setup CC Selector Base CC Mode Digital CC Settings Auto Input Input Labeling Channel Labeling Menu Language Channel Browser Setup Enable Rating Blocking Edit Rating Limits Channels Block Input Lock Control Panel Lock GameTimer® New PIN Code Installation REGZA-LINK Setup Sleep Timer HDMI Settings PC Settings Blue LED Illumination Power-On Mode Demo Mode Page 42 42...
Owner's Manual - English
Page 36
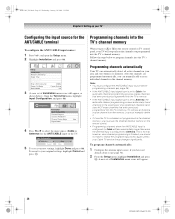
... Channel Number buttons on the remote control or TV control panel, your original settings, highlight Cancel and press T. A new set of Installation menu icons will take substantially longer than when the antenna input is normal; This is configured for Antenna. Setup Installation REGZA-LINK Setup Sleep Timer HDMI Settings PC Settings Blue LED Illumination Power-On Mode Demo Mode Middle Power-Saving Off 3 (A new set of programmed channels (and does NOT erase channels that were previously programmed into the TV's memory. • If the ANT/CABLE input signal type...
... Channel Number buttons on the remote control or TV control panel, your original settings, highlight Cancel and press T. A new set of Installation menu icons will take substantially longer than when the antenna input is normal; This is configured for Antenna. Setup Installation REGZA-LINK Setup Sleep Timer HDMI Settings PC Settings Blue LED Illumination Power-On Mode Demo Mode Middle Power-Saving Off 3 (A new set of programmed channels (and does NOT erase channels that were previously programmed into the TV's memory. • If the ANT/CABLE input signal type...

Owner's Manual - English
Page 57
... device (HD DVD player, etc.) control With your PC when connecting using the PC IN terminal and an analog RGB cable. Navigate contents menu, etc. page 17). Yes: When viewing the PC input, the audio from the TV remote via HDMI connection (- Note: When a power failure occurs, the sleep timer setting may be enabled. To set the MODE SELECT switch on -screen menus: 1 From the Setup menu, highlight Sleep Timer and press T. 2 Press the Number buttons to enter the...
... device (HD DVD player, etc.) control With your PC when connecting using the PC IN terminal and an analog RGB cable. Navigate contents menu, etc. page 17). Yes: When viewing the PC input, the audio from the TV remote via HDMI connection (- Note: When a power failure occurs, the sleep timer setting may be enabled. To set the MODE SELECT switch on -screen menus: 1 From the Setup menu, highlight Sleep Timer and press T. 2 Press the Number buttons to enter the...
Owner's Manual - English
Page 65
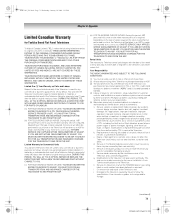
... you plug the power cord in, the yellow LED will display when you select that particular input source. Set the MTS feature to a particular input on the TV, no sound, try setting the MTS feature to SAP mode (- For device connection details, see Chapter 2. • Antenna reception may have broadcast difficulties. Try another channel. • Adjust the picture qualities (- television broadcasts, video games, DVDs), you may have broadcast difficulties. Sound problems • Check the antenna/cable connections...
... you plug the power cord in, the yellow LED will display when you select that particular input source. Set the MTS feature to a particular input on the TV, no sound, try setting the MTS feature to SAP mode (- For device connection details, see Chapter 2. • Antenna reception may have broadcast difficulties. Try another channel. • Adjust the picture qualities (- television broadcasts, video games, DVDs), you may have broadcast difficulties. Sound problems • Check the antenna/cable connections...
Owner's Manual - English
Page 66
... the instruction manual furnished with the connected REGZA-LINK device. 66 HDMI problems For HDMI cables • Make sure the HDMI cables with Power-On Mode set to controls" and "Other problems" (- page 55). • If you have been erased from the channel list (- page 36). Turn OFF the TV and unplug the power cord. If your TV remote control does not operate a specific feature on your PIN code: While the PIN code entering screen is displayed, press E four times...
... the instruction manual furnished with the connected REGZA-LINK device. 66 HDMI problems For HDMI cables • Make sure the HDMI cables with Power-On Mode set to controls" and "Other problems" (- page 55). • If you have been erased from the channel list (- page 36). Turn OFF the TV and unplug the power cord. If your TV remote control does not operate a specific feature on your PIN code: While the PIN code entering screen is displayed, press E four times...
Owner's Manual - English
Page 70
..., REPAIR OR REPLACE A DEFECTIVE PART WITH A NEW OR REFURBISHED PART WITHOUT CHARGE TO YOU. Consumer Product Safety Act. or Puerto Rico. (4) Labor service charges for set installation, setup, adjustment of customer controls, and installation or repair of antenna systems are your warranty rights. SOME STATES OF THE U.S.A. THEREFORE, THE ABOVE PROVISIONS MAY NOT APPLY TO YOU UNDER SUCH CIRCUMSTANCES. [0305] XF550U (E/F) Web 213:276 Owner's Manual...
..., REPAIR OR REPLACE A DEFECTIVE PART WITH A NEW OR REFURBISHED PART WITHOUT CHARGE TO YOU. Consumer Product Safety Act. or Puerto Rico. (4) Labor service charges for set installation, setup, adjustment of customer controls, and installation or repair of antenna systems are your warranty rights. SOME STATES OF THE U.S.A. THEREFORE, THE ABOVE PROVISIONS MAY NOT APPLY TO YOU UNDER SUCH CIRCUMSTANCES. [0305] XF550U (E/F) Web 213:276 Owner's Manual...
Owner's Manual - English
Page 71
... of original retail purchase. h. Limited One (1) Year Warranty on -site when warranty service is used for any commercial or business purposes as set installation, setup, adjustment of customer controls, and installation or repair of sale or other than those authorized by failure to follow the specifications, User manuals or guides as follows: all parts are used for any other external cause or event, act or omission outside the...
... of original retail purchase. h. Limited One (1) Year Warranty on -site when warranty service is used for any commercial or business purposes as set installation, setup, adjustment of customer controls, and installation or repair of sale or other than those authorized by failure to follow the specifications, User manuals or guides as follows: all parts are used for any other external cause or event, act or omission outside the...
Owner's Manual - English
Page 72
... AND FOLLOW ALL SET-UP AND USAGE INSTRUCTIONS IN THE APPLICABLE USER GUIDES AND/OR MANUALS. IF THE TELEVISION FAILS TO WORK AS WARRANTED ABOVE, YOUR SOLE AND EXCLUSIVE REMEDY SHALL BE REPAIR OR REPLACEMENT OF THE DEFECTIVE PART. ASSUME SOLE AND FULL RESPONSIBILITY FOR SUCH USE. A copy of the LGPL source code in the manner as agreed to Obtain Warranty Services If, after following...
... AND FOLLOW ALL SET-UP AND USAGE INSTRUCTIONS IN THE APPLICABLE USER GUIDES AND/OR MANUALS. IF THE TELEVISION FAILS TO WORK AS WARRANTED ABOVE, YOUR SOLE AND EXCLUSIVE REMEDY SHALL BE REPAIR OR REPLACEMENT OF THE DEFECTIVE PART. ASSUME SOLE AND FULL RESPONSIBILITY FOR SUCH USE. A copy of the LGPL source code in the manner as agreed to Obtain Warranty Services If, after following...

Owner's Manual - English
Page 73
... Unlocking programs temporarily 55 Video inputs, locking 55 M MODE SELECT 21, 24 MPEG noise reduction 63 MTS feature 51 MUTE button 50 O Optical audio output format 52 P PC Audio 57 PC connection 19 PC settings 56 Picture mode 48 Picture quality 48 Picture scroll 47 Picture size selection 45 POWER button 10, 21 Power-On Mode 40 R RECALL button 60 REGZA-LINK connection 17 REGZA-LINK feature 57 Remote control Battery installation 20 Learning about the buttons .......21 Operational feature 25 Volume lock feature 25 Reset Factory Defaults...
... Unlocking programs temporarily 55 Video inputs, locking 55 M MODE SELECT 21, 24 MPEG noise reduction 63 MTS feature 51 MUTE button 50 O Optical audio output format 52 P PC Audio 57 PC connection 19 PC settings 56 Picture mode 48 Picture quality 48 Picture scroll 47 Picture size selection 45 POWER button 10, 21 Power-On Mode 40 R RECALL button 60 REGZA-LINK connection 17 REGZA-LINK feature 57 Remote control Battery installation 20 Learning about the buttons .......21 Operational feature 25 Volume lock feature 25 Reset Factory Defaults...


