Brochure
Page 2
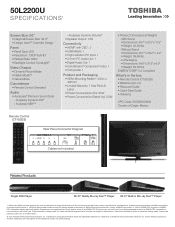
...where it cannot be pushed, pulled over, or knocked down. © 2012 Toshiba America Information Systems, Inc. ENERGY STAR® 5.3 Compliant What's in Blu-ray...VESA Mounting Pattern4: 400m x 400mm • Limited Warranty: 1 Year Parts & Labor • Power Consumption (On): 95W • Power Consumption (Stand-by): 0.2W • Product Dimensions & Weights - Audyssey Dynamic EQ® ...3. All other trademarks are the property of HDMI®-CEC requires an HDMI®CEC compatible display/peripheral device. 50L2200U S P E C I F I C AT I O N S1 Screen Size: 50" • Diagonal...
...where it cannot be pushed, pulled over, or knocked down. © 2012 Toshiba America Information Systems, Inc. ENERGY STAR® 5.3 Compliant What's in Blu-ray...VESA Mounting Pattern4: 400m x 400mm • Limited Warranty: 1 Year Parts & Labor • Power Consumption (On): 95W • Power Consumption (Stand-by): 0.2W • Product Dimensions & Weights - Audyssey Dynamic EQ® ...3. All other trademarks are the property of HDMI®-CEC requires an HDMI®CEC compatible display/peripheral device. 50L2200U S P E C I F I C AT I O N S1 Screen Size: 50" • Diagonal...
User Guide
Page 3
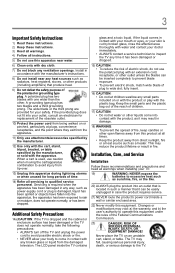
... source such as a heater. The wide blade or the third prong are provided for replacement of the obsolete outlet. 10) Protect the power cord from being walked on or pinched, particularly at all times. • Keep the product away from the damaged television. Changes or ...modifications may reduce the product lifetime or result in case the product requires service. 21) NEVER route the product's power cord inside the TV contains glass and a toxic liquid. fully insert. 16) CAUTION: • Do not let children swallow any ventilation ...
... source such as a heater. The wide blade or the third prong are provided for replacement of the obsolete outlet. 10) Protect the power cord from being walked on or pinched, particularly at all times. • Keep the product away from the damaged television. Changes or ...modifications may reduce the product lifetime or result in case the product requires service. 21) NEVER route the product's power cord inside the TV contains glass and a toxic liquid. fully insert. 16) CAUTION: • Do not let children swallow any ventilation ...
User Guide
Page 4
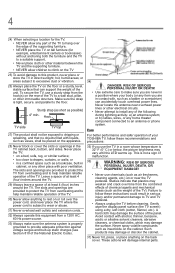
...) DANGER: RISK OF SERIOUS PERSONAL INJURY OR DEATH! • Use extreme care to make sure you are never in a position where your TOSHIBA TV, follow these recommendations and precautions: 35) If you are provided to protect the TV from overheating and to help maintain reliable operation of .... • NEVER allow anything on the back cover. Sturdy strap (as short as air fresheners, cleaning agents, etc.) on or near overhead power lines or other immovable structure. or areas subject to excessive dust or vibration. 26) Always place the TV on the floor or a sturdy, level...
...) DANGER: RISK OF SERIOUS PERSONAL INJURY OR DEATH! • Use extreme care to make sure you are never in a position where your TOSHIBA TV, follow these recommendations and precautions: 35) If you are provided to protect the TV from overheating and to help maintain reliable operation of .... • NEVER allow anything on the back cover. Sturdy strap (as short as air fresheners, cleaning agents, etc.) on or near overhead power lines or other immovable structure. or areas subject to excessive dust or vibration. 26) Always place the TV on the floor or a sturdy, level...

User Guide
Page 5
If these sounds become frequent or continuous, unplug the power cord and contact a Toshiba Authorized Service Provider. 43) WARNING: RISK OF SERIOUS PERSONAL... Pattern show in the table below . 7) VESA Mounting Pattern TV Size Hole Pattern (HxV) Screw Size 50L2200U 400mm x 400mm M8 (unit in mm) Removing the Pedestal Stand 1) Carefully lay the front of the ... to completely disconnect from the TV, as described below . When the TV is in this manual to a Toshiba Authorized Service Provider. 46) If you leave the TV unattended or unused for additional details. Service 45) WARNING...
If these sounds become frequent or continuous, unplug the power cord and contact a Toshiba Authorized Service Provider. 43) WARNING: RISK OF SERIOUS PERSONAL... Pattern show in the table below . 7) VESA Mounting Pattern TV Size Hole Pattern (HxV) Screw Size 50L2200U 400mm x 400mm M8 (unit in mm) Removing the Pedestal Stand 1) Carefully lay the front of the ... to completely disconnect from the TV, as described below . When the TV is in this manual to a Toshiba Authorized Service Provider. 46) If you leave the TV unattended or unused for additional details. Service 45) WARNING...

User Guide
Page 6
...operation. Operation is tight, secure, and parallel to operate this equipment not expressly approved by removing and applying power to the equipment, the user is : Toshiba America Information Systems, Inc. 9740 Irvine Blvd., Irvine, CA 92618. The party responsible for compliance to provide... hook(s) on the floor or a sturdy, level, stable surface that interference will allow removal of Conformity Compliance Statement (Part 15): Toshiba 50L2200U Television model complies with the limits for help. FCC Declaration of the pedestal stand. 3) Once you have removed the screws holding the...
...operation. Operation is tight, secure, and parallel to operate this equipment not expressly approved by removing and applying power to the equipment, the user is : Toshiba America Information Systems, Inc. 9740 Irvine Blvd., Irvine, CA 92618. The party responsible for compliance to provide... hook(s) on the floor or a sturdy, level, stable surface that interference will allow removal of Conformity Compliance Statement (Part 15): Toshiba 50L2200U Television model complies with the limits for help. FCC Declaration of the pedestal stand. 3) Once you have removed the screws holding the...

User Guide
Page 12
... 99 Viewing photo files and playing music files at the same time 100 Sorting photo or music files 101 Setting the sleep timer 102 Automatic Power Down 103 No Signal Power Down 103 Using HDMI® CEC 104
... 99 Viewing photo files and playing music files at the same time 100 Sorting photo or music files 101 Setting the sleep timer 102 Automatic Power Down 103 No Signal Power Down 103 Using HDMI® CEC 104
User Guide
Page 13
...® problems 119 Media Player problems 119 If the problem persists after trying the solutions 119 Appendix A: Specifications 120 Television system 120 Channel coverage 120 Power source 121 Power maximum current 121 Power consumption 121 Audio...
...® problems 119 Media Player problems 119 If the problem persists after trying the solutions 119 Appendix A: Specifications 120 Television system 120 Channel coverage 120 Power source 121 Power maximum current 121 Power consumption 121 Audio...
User Guide
Page 17
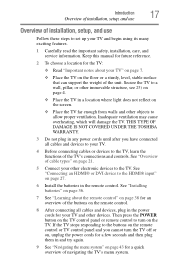
THIS TYPE OF DAMAGE IS NOT COVERED UNDER THE TOSHIBA WARRANTY. 3 Do not plug in any power cords until after you cannot turn on the floor or a sturdy, level, stable surface that can support the weight of the unit. Secure the TV ...'s connections and controls. If the TV stops responding to the TV, learn the functions of the buttons on page 27. 6 Install the batteries in the power cords for a few seconds and then plug them in a location where light does not reflect on page 21. 5 Connect your other electronic devices to the...
THIS TYPE OF DAMAGE IS NOT COVERED UNDER THE TOSHIBA WARRANTY. 3 Do not plug in any power cords until after you cannot turn on the floor or a sturdy, level, stable surface that can support the weight of the unit. Secure the TV ...'s connections and controls. If the TV stops responding to the TV, learn the functions of the buttons on page 27. 6 Install the batteries in the power cords for a few seconds and then plug them in a location where light does not reflect on page 21. 5 Connect your other electronic devices to the...
User Guide
Page 18
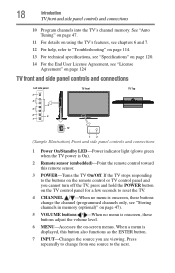
... (optional)" on page 47). 5 VOLUME buttons / -When no menu is On). 2 Remote sensor (embedded)-Point the remote control toward this remote sensor. 3 POWER-Turns the TV On/Off. 18 Introduction TV front and side panel controls and connections 10 Program channels into the TV's channel memory. Press repeatedly... displayed, this button also functions as the ENTER button. 7 INPUT-Changes the source you cannot turn off the TV, press and hold the POWER button on the TV control panel for a few seconds to the buttons on page 124 TV front and side panel controls and connections Left side...
... (optional)" on page 47). 5 VOLUME buttons / -When no menu is On). 2 Remote sensor (embedded)-Point the remote control toward this remote sensor. 3 POWER-Turns the TV On/Off. 18 Introduction TV front and side panel controls and connections 10 Program channels into the TV's channel memory. Press repeatedly... displayed, this button also functions as the ENTER button. 7 INPUT-Changes the source you cannot turn off the TV, press and hold the POWER button on the TV control panel for a few seconds to the buttons on page 124 TV front and side panel controls and connections Left side...

User Guide
Page 19
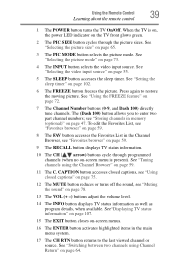
... in Dolby® Digital or PCM (pulse-code modulation) format for connecting an audio amplifier. HGRD500010I 1 ANALOG AUDIO OUT 5 2 6 IN VIDEO/COLOR STREAM HD Y/VIDEO Power Cord 4 3 21 (Sample Illustration) Back panel connections 1 Digital AUDIO OUT-Optical audio output in the Audio Setup menu, see "Overview of cable types and connections...
... in Dolby® Digital or PCM (pulse-code modulation) format for connecting an audio amplifier. HGRD500010I 1 ANALOG AUDIO OUT 5 2 6 IN VIDEO/COLOR STREAM HD Y/VIDEO Power Cord 4 3 21 (Sample Illustration) Back panel connections 1 Digital AUDIO OUT-Optical audio output in the Audio Setup menu, see "Overview of cable types and connections...
User Guide
Page 39
...size" on page 72. 7 The Channel Number buttons (0-9, and Dash 100) directly tune channels. Using the Remote Control 39 Learning about the remote control 1 The POWER button turns the TV On/Off. See "Using the FREEZE feature" on page 65. 3 The PIC MODE button selects the picture mode. See "Selecting the... Channel Return" on the TV front glows green. 2 The PIC SIZE button cycles through programmed channels (when no on-screen menu is on, the power LED indicator on page 64. see "Muting the sound" on page 55. 5 The SLEEP button accesses the sleep timer. When the TV is present).
...size" on page 72. 7 The Channel Number buttons (0-9, and Dash 100) directly tune channels. Using the Remote Control 39 Learning about the remote control 1 The POWER button turns the TV On/Off. See "Using the FREEZE feature" on page 65. 3 The PIC MODE button selects the picture mode. See "Selecting the... Channel Return" on the TV front glows green. 2 The PIC SIZE button cycles through programmed channels (when no on-screen menu is on, the power LED indicator on page 64. see "Muting the sound" on page 55. 5 The SLEEP button accesses the sleep timer. When the TV is present).

User Guide
Page 42
.../90 min/120 min Opens the New PIN Code entry screen Opens the Installation menu Enable HDMI® CEC/TV Auto Input Switch/TV Auto Power/Device Auto Standby/Speaker Preference 10-minute increments, from 0 min to a maximum of 12 hours Opens the PC Settings menu Opens the Media Player menu
.../90 min/120 min Opens the New PIN Code entry screen Opens the Installation menu Enable HDMI® CEC/TV Auto Input Switch/TV Auto Power/Device Auto Standby/Speaker Preference 10-minute increments, from 0 min to a maximum of 12 hours Opens the PC Settings menu Opens the Media Player menu
User Guide
Page 45
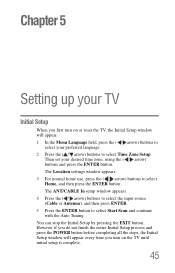
... on or reset the TV, the Initial Setup window will appear every time you do not finish the entire Initial Setup process and press the POWER button before completing all the steps, the Initial Setup window will appear. 1 In the Menu Language field, press the ( / arrow) buttons to select Time Zone...
... on or reset the TV, the Initial Setup window will appear every time you do not finish the entire Initial Setup process and press the POWER button before completing all the steps, the Initial Setup window will appear. 1 In the Menu Language field, press the ( / arrow) buttons to select Time Zone...
User Guide
Page 54
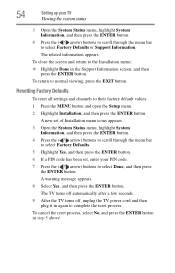
... through the menu bar to complete the reset process. The TV turns off automatically after a few seconds. 9 After the TV turns off, unplug the TV power cord and then plug it in step 5 above. Resetting Factory Defaults To reset all settings and channels to the Installation menu: ❖ Highlight Done in...
... through the menu bar to complete the reset process. The TV turns off automatically after a few seconds. 9 After the TV turns off, unplug the TV power cord and then plug it in step 5 above. Resetting Factory Defaults To reset all settings and channels to the Installation menu: ❖ Highlight Done in...

User Guide
Page 60
.... 3 Press and hold the FAV button for a few seconds. The channel/input will be removed from the Favorites list. NOTE The channel or input is powered off. 4 Press the ( arrow) button to highlight ANT/CABLE List, and then press the ( / arrow) buttons to select On or Off. 5 Press the ( arrow) button...
.... 3 Press and hold the FAV button for a few seconds. The channel/input will be removed from the Favorites list. NOTE The channel or input is powered off. 4 Press the ( arrow) button to highlight ANT/CABLE List, and then press the ( / arrow) buttons to select On or Off. 5 Press the ( arrow) button...
User Guide
Page 92
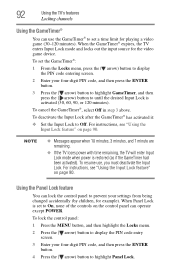
... 10 minutes, 3 minutes, and 1 minute are remaining. ❖ If the TV loses power with time remaining, the TV will enter Input Lock mode when power is set to On, none of the controls on the control panel can operate except POWER. To resume use the GameTimer® to set the GameTimer®: 1 From...
... 10 minutes, 3 minutes, and 1 minute are remaining. ❖ If the TV loses power with time remaining, the TV will enter Input Lock mode when power is set to On, none of the controls on the control panel can operate except POWER. To resume use the GameTimer® to set the GameTimer®: 1 From...
User Guide
Page 93
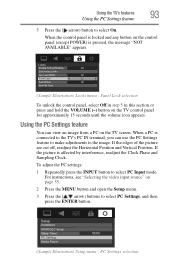
... Illustration) Setup menu - When a PC is connected to the TV's PC IN terminal, you can view an image from a PC on the control panel (except POWER) is pressed, the message "NOT AVAILABLE" appears. (Sample Illustration) Locks menu - For instructions, see "Selecting the video input source" on the TV control panel for...
... Illustration) Setup menu - When a PC is connected to the TV's PC IN terminal, you can view an image from a PC on the control panel (except POWER) is pressed, the message "NOT AVAILABLE" appears. (Sample Illustration) Locks menu - For instructions, see "Selecting the video input source" on the TV control panel for...

User Guide
Page 102
...) buttons to increase or decrease in all cases. Setting the sleep timer You can adjust the SOUND menu functions from the Quick Menu. NOTE If a power failure occurs, the sleep timer setting may not be cleared. To set the sleep timer using the remote control: 1 Press the SLEEP button on -screen...
...) buttons to increase or decrease in all cases. Setting the sleep timer You can adjust the SOUND menu functions from the Quick Menu. NOTE If a power failure occurs, the sleep timer setting may not be cleared. To set the sleep timer using the remote control: 1 Press the SLEEP button on -screen...
User Guide
Page 103
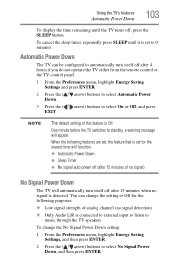
...or the TV control panel. 1 From the Preferences menu, highlight Energy Saving Settings and press ENTER. 2 Press the ( / arrow) buttons to select Automatic Power Down. 3 Press the ( / arrow) buttons to automatically turn itself off , press the SLEEP button. NOTE The default setting of analog channel (no ...detected. When the following purposes: ❖ Low signal strength of this feature is connected to external input to listen to select No Signal Power Down, and then press ENTER. To change the setting to Off for the following features are set, the feature that is set to standby...
...or the TV control panel. 1 From the Preferences menu, highlight Energy Saving Settings and press ENTER. 2 Press the ( / arrow) buttons to select Automatic Power Down. 3 Press the ( / arrow) buttons to automatically turn itself off , press the SLEEP button. NOTE The default setting of analog channel (no ...detected. When the following purposes: ❖ Low signal strength of this feature is connected to external input to listen to select No Signal Power Down, and then press ENTER. To change the setting to Off for the following features are set, the feature that is set to standby...
User Guide
Page 105
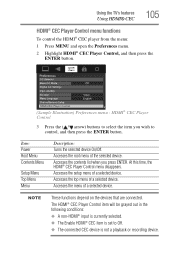
... menu: 1 Press MENU and open the Preferences menu. 2 Highlight HDMI® CEC Player Control, and then press the ENTER button. (Sample Illustration) Preferences menu - Item: Power Root Menu Contents Menu Setup Menu Top Menu Menu Description: Turns the selected device On/Off.
... menu: 1 Press MENU and open the Preferences menu. 2 Highlight HDMI® CEC Player Control, and then press the ENTER button. (Sample Illustration) Preferences menu - Item: Power Root Menu Contents Menu Setup Menu Top Menu Menu Description: Turns the selected device On/Off.


