Brochure
Page 2
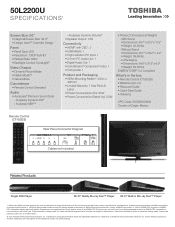
...Guide • Quick Start Guide • Warranty UPC Code: 022265065808 Country of Toshiba America Information Systems, Inc. Use of their respective owners. ColorStream, DynaLight and...Diagram Cables not included. In Packaging • Dimensions: 54.8" x 31.3" x 6.9" • Weight: 63.93 lbs. 50L2200U S P E C I F I C AT I O N S1 Screen Size: 50" • Diagonal Screen Size: ...Pattern4: 400m x 400mm • Limited Warranty: 1 Year Parts & Labor • Power Consumption (On): 95W • Power Consumption (Stand-by): 0.2W • Product Dimensions & Weights - All other trademarks...
...Guide • Quick Start Guide • Warranty UPC Code: 022265065808 Country of Toshiba America Information Systems, Inc. Use of their respective owners. ColorStream, DynaLight and...Diagram Cables not included. In Packaging • Dimensions: 54.8" x 31.3" x 6.9" • Weight: 63.93 lbs. 50L2200U S P E C I F I C AT I O N S1 Screen Size: 50" • Diagonal Screen Size: ...Pattern4: 400m x 400mm • Limited Warranty: 1 Year Parts & Labor • Power Consumption (On): 95W • Power Consumption (Stand-by): 0.2W • Product Dimensions & Weights - All other trademarks...
User Guide
Page 3
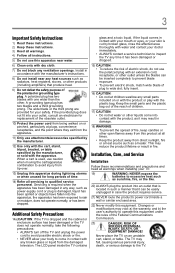
... surface has been damaged or the TV does not operate normally, take the following precautions: • ALWAYS turn off the TV and unplug the power cord to avoid injury from the apparatus. 11) Only use attachments/accessories specified by the manufacturer. 12) Use only with the cart, stand, tripod...blades can be inserted completely to prevent blade exposure. • To prevent electric shock, match wide blade of the obsolete outlet. 10) Protect the power cord from being walked on an unstable cart, stand, or table. When a cart is required when the apparatus has been damaged in case the...
... surface has been damaged or the TV does not operate normally, take the following precautions: • ALWAYS turn off the TV and unplug the power cord to avoid injury from the apparatus. 11) Only use attachments/accessories specified by the manufacturer. 12) Use only with the cart, stand, tripod...blades can be inserted completely to prevent blade exposure. • To prevent electric shock, match wide blade of the obsolete outlet. 10) Protect the power cord from being walked on an unstable cart, stand, or table. When a cart is required when the apparatus has been damaged in case the...
User Guide
Page 4
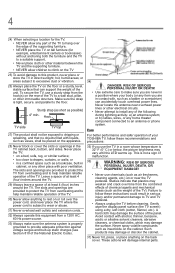
... to climb on the TV 25) To avoid damage to this equipment from a 120V AC, 60 Hz power source. 33) Always make sure you are never in a position where your TOSHIBA TV, follow these instructions could result in serious injury and/or permanent damage to the floor. Make sure ...of chemical agents and mechanical stress (such as possible) 4" min. Avoid contact with , such as air fresheners, cleaning agents, etc.) on or near overhead power lines or other electrical circuits. • Never attempt to install any of at least 4 (four) inches around the TV. 29) Always leave a space of...
... to climb on the TV 25) To avoid damage to this equipment from a 120V AC, 60 Hz power source. 33) Always make sure you are never in a position where your TOSHIBA TV, follow these instructions could result in serious injury and/or permanent damage to the floor. Make sure ...of chemical agents and mechanical stress (such as possible) 4" min. Avoid contact with , such as air fresheners, cleaning agents, etc.) on or near overhead power lines or other electrical circuits. • Never attempt to install any of at least 4 (four) inches around the TV. 29) Always leave a space of...

User Guide
Page 5
... long periods of the surface and assemble the pedestal as indicated below . 7) VESA Mounting Pattern TV Size Hole Pattern (HxV) Screw Size 50L2200U 400mm x 400mm M8 (unit in safe operating condition. Leave the bottom of the unit protruding over the edge of the surface. Note: ...when attaching the pedestal stand to avoid damage to the LCD panel. If these sounds become frequent or continuous, unplug the power cord and contact a Toshiba Authorized Service Provider. 43) WARNING: RISK OF SERIOUS PERSONAL INJURY OR EQUIPMENT DAMAGE! If you need to completely disconnect from ...
... long periods of the surface and assemble the pedestal as indicated below . 7) VESA Mounting Pattern TV Size Hole Pattern (HxV) Screw Size 50L2200U 400mm x 400mm M8 (unit in safe operating condition. Leave the bottom of the unit protruding over the edge of the surface. Note: ...when attaching the pedestal stand to avoid damage to the LCD panel. If these sounds become frequent or continuous, unplug the power cord and contact a Toshiba Authorized Service Provider. 43) WARNING: RISK OF SERIOUS PERSONAL INJURY OR EQUIPMENT DAMAGE! If you need to completely disconnect from ...

User Guide
Page 6
.... Ph: 800-631-3811 Note: This equipment has been tested and found to comply with Part 15 of Conformity Compliance Statement (Part 15): Toshiba 50L2200U Television model complies with the limits for a Class B digital device, pursuant to a wall stud, pillar, or other immovable structure. FCC Declaration...the FCC Rules. However, there is no guarantee that can be determined by removing and applying power to the equipment, the user is encouraged to try to correct the interference by Toshiba could void the user's authority to these rules is connected. • Consult the dealer ...
.... Ph: 800-631-3811 Note: This equipment has been tested and found to comply with Part 15 of Conformity Compliance Statement (Part 15): Toshiba 50L2200U Television model complies with the limits for a Class B digital device, pursuant to a wall stud, pillar, or other immovable structure. FCC Declaration...the FCC Rules. However, there is no guarantee that can be determined by removing and applying power to the equipment, the user is encouraged to try to correct the interference by Toshiba could void the user's authority to these rules is connected. • Consult the dealer ...

User Guide
Page 12
... 99 Viewing photo files and playing music files at the same time 100 Sorting photo or music files 101 Setting the sleep timer 102 Automatic Power Down 103 No Signal Power Down 103 Using HDMI® CEC 104
... 99 Viewing photo files and playing music files at the same time 100 Sorting photo or music files 101 Setting the sleep timer 102 Automatic Power Down 103 No Signal Power Down 103 Using HDMI® CEC 104
User Guide
Page 13
...® problems 119 Media Player problems 119 If the problem persists after trying the solutions 119 Appendix A: Specifications 120 Television system 120 Channel coverage 120 Power source 121 Power maximum current 121 Power consumption 121 Audio...
...® problems 119 Media Player problems 119 If the problem persists after trying the solutions 119 Appendix A: Specifications 120 Television system 120 Channel coverage 120 Power source 121 Power maximum current 121 Power consumption 121 Audio...
User Guide
Page 17
THIS TYPE OF DAMAGE IS NOT COVERED UNDER THE TOSHIBA WARRANTY. 3 Do not plug in any power cords until after you cannot turn on page 43 for your TV" on page 7. ❖ Place the TV on page 27. 6 Install the batteries in ... of installation, setup, and use Follow these steps to a wall, pillar, or other immovable structure, see 25) on page 4. ❖ Place the TV in the power cords for a quick overview of the TV's connections and controls. Secure the TV to set up your other objects to allow proper ventilation. See "Overview...
THIS TYPE OF DAMAGE IS NOT COVERED UNDER THE TOSHIBA WARRANTY. 3 Do not plug in any power cords until after you cannot turn on page 43 for your TV" on page 7. ❖ Place the TV on page 27. 6 Install the batteries in ... of installation, setup, and use Follow these steps to a wall, pillar, or other immovable structure, see 25) on page 4. ❖ Place the TV in the power cords for a quick overview of the TV's connections and controls. Secure the TV to set up your other objects to allow proper ventilation. See "Overview...
User Guide
Page 18
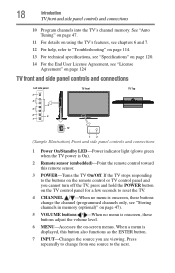
... toward this button also functions as the ENTER button. 7 INPUT-Changes the source you cannot turn off the TV, press and hold the POWER button on the TV control panel for a few seconds to "Troubleshooting" on page 114. 13 For technical specifications, see "Specifications" on page...Left side panel 3 4 8 5 6 9 7 TV front TV Top 10 1 2 (Sample Illustration) Front and side panel controls and connections 1 Power On/Standby LED-Power indicator light (glows green when the TV power is displayed, this remote sensor. 3 POWER-Turns the TV On/Off. If the TV stops responding to the next.
... toward this button also functions as the ENTER button. 7 INPUT-Changes the source you cannot turn off the TV, press and hold the POWER button on the TV control panel for a few seconds to "Troubleshooting" on page 114. 13 For technical specifications, see "Specifications" on page...Left side panel 3 4 8 5 6 9 7 TV front TV Top 10 1 2 (Sample Illustration) Front and side panel controls and connections 1 Power On/Standby LED-Power indicator light (glows green when the TV power is displayed, this remote sensor. 3 POWER-Turns the TV On/Off. If the TV stops responding to the next.

User Guide
Page 19
... in Dolby® Digital or PCM (pulse-code modulation) format for connecting an audio amplifier. HGRD500010I 1 ANALOG AUDIO OUT 5 2 6 IN VIDEO/COLOR STREAM HD Y/VIDEO Power Cord 4 3 21 (Sample Illustration) Back panel connections 1 Digital AUDIO OUT-Optical audio output in the Audio Setup menu, see "Overview of cable types and connections...
... in Dolby® Digital or PCM (pulse-code modulation) format for connecting an audio amplifier. HGRD500010I 1 ANALOG AUDIO OUT 5 2 6 IN VIDEO/COLOR STREAM HD Y/VIDEO Power Cord 4 3 21 (Sample Illustration) Back panel connections 1 Digital AUDIO OUT-Optical audio output in the Audio Setup menu, see "Overview of cable types and connections...
User Guide
Page 39
Using the Remote Control 39 Learning about the remote control 1 The POWER button turns the TV On/Off. See "Selecting the picture mode" on page 72. 7 The Channel Number buttons (0-9, and Dash 100) directly tune channels. The (... moving picture. See "Selecting the video input source" on page 65. 3 The PIC MODE button selects the picture mode. When the TV is on, the power LED indicator on the TV front glows green. 2 The PIC SIZE button cycles through programmed channels (when no on page 59. 11 The C. See "Selecting...
Using the Remote Control 39 Learning about the remote control 1 The POWER button turns the TV On/Off. See "Selecting the picture mode" on page 72. 7 The Channel Number buttons (0-9, and Dash 100) directly tune channels. The (... moving picture. See "Selecting the video input source" on page 65. 3 The PIC MODE button selects the picture mode. When the TV is on, the power LED indicator on the TV front glows green. 2 The PIC SIZE button cycles through programmed channels (when no on page 59. 11 The C. See "Selecting...

User Guide
Page 42
.../90 min/120 min Opens the New PIN Code entry screen Opens the Installation menu Enable HDMI® CEC/TV Auto Input Switch/TV Auto Power/Device Auto Standby/Speaker Preference 10-minute increments, from 0 min to a maximum of 12 hours Opens the PC Settings menu Opens the Media Player menu
.../90 min/120 min Opens the New PIN Code entry screen Opens the Installation menu Enable HDMI® CEC/TV Auto Input Switch/TV Auto Power/Device Auto Standby/Speaker Preference 10-minute increments, from 0 min to a maximum of 12 hours Opens the PC Settings menu Opens the Media Player menu
User Guide
Page 45
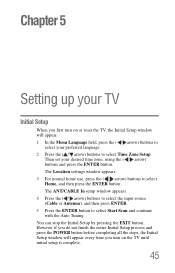
You can stop the Initial Setup by pressing the EXIT button. However if you do not finish the entire Initial Setup process and press the POWER button before completing all the steps, the Initial Setup window will appear every time you first turn on or reset the TV, the Initial Setup ...
You can stop the Initial Setup by pressing the EXIT button. However if you do not finish the entire Initial Setup process and press the POWER button before completing all the steps, the Initial Setup window will appear every time you first turn on or reset the TV, the Initial Setup ...
User Guide
Page 54
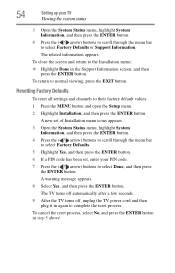
... menu. 2 Highlight Installation, and then press the ENTER button. The TV turns off automatically after a few seconds. 9 After the TV turns off, unplug the TV power cord and then plug it in step 5 above. The related information appears. To cancel the reset process, select No, and press the ENTER button in...
... menu. 2 Highlight Installation, and then press the ENTER button. The TV turns off automatically after a few seconds. 9 After the TV turns off, unplug the TV power cord and then plug it in step 5 above. The related information appears. To cancel the reset process, select No, and press the ENTER button in...

User Guide
Page 60
... TV's features Tuning channels using the Channel Browser To add a favorite channel/input: 1 Tune to select On or Off. NOTE The channel or input is powered off. 4 Press the ( arrow) button to highlight ANT/CABLE List, and then press the ( / arrow) buttons to select On or Off. 5 Press the ( arrow) button...
... TV's features Tuning channels using the Channel Browser To add a favorite channel/input: 1 Tune to select On or Off. NOTE The channel or input is powered off. 4 Press the ( arrow) button to highlight ANT/CABLE List, and then press the ( / arrow) buttons to select On or Off. 5 Press the ( arrow) button...
User Guide
Page 92
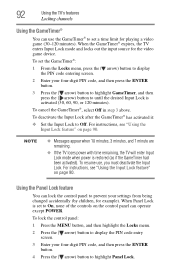
To resume use the GameTimer® to set to On, none of the controls on the control panel can operate except POWER. When Panel Lock is activated (30, 60, 90, or 120 minutes). To cancel the GameTimer®, select Off in step 3 above. Using the Panel Lock ... to Off. NOTE ❖ Messages appear when 10 minutes, 3 minutes, and 1 minute are remaining. ❖ If the TV loses power with time remaining, the TV will enter Input Lock mode when power is restored (as if the GameTimer had been activated). For instructions, see "Using the Input Lock feature" on page 90...
To resume use the GameTimer® to set to On, none of the controls on the control panel can operate except POWER. When Panel Lock is activated (30, 60, 90, or 120 minutes). To cancel the GameTimer®, select Off in step 3 above. Using the Panel Lock ... to Off. NOTE ❖ Messages appear when 10 minutes, 3 minutes, and 1 minute are remaining. ❖ If the TV loses power with time remaining, the TV will enter Input Lock mode when power is restored (as if the GameTimer had been activated). For instructions, see "Using the Input Lock feature" on page 90...
User Guide
Page 93
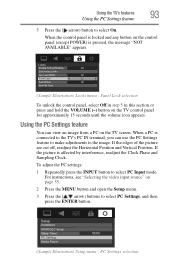
... the PC Settings feature to make adjustments to the TV's PC IN terminal, you can view an image from a PC on the control panel (except POWER) is locked and any button on the TV screen. If the edges of the picture are cut off, readjust the Horizontal Position and Vertical Position...
... the PC Settings feature to make adjustments to the TV's PC IN terminal, you can view an image from a PC on the control panel (except POWER) is locked and any button on the TV screen. If the edges of the picture are cut off, readjust the Horizontal Position and Vertical Position...

User Guide
Page 102
... 12 hours). Or press the ( / arrow) buttons to increase or decrease in 10minute increments, to set length of time (maximum of 12 hours. NOTE If a power failure occurs, the sleep timer setting may not be cleared. 102 Using the TV's features Setting the sleep timer Contents Music Description Music list (Multi...
... 12 hours). Or press the ( / arrow) buttons to increase or decrease in 10minute increments, to set length of time (maximum of 12 hours. NOTE If a power failure occurs, the sleep timer setting may not be cleared. 102 Using the TV's features Setting the sleep timer Contents Music Description Music list (Multi...
User Guide
Page 103
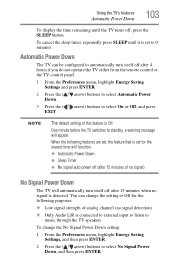
... the TV control panel. 1 From the Preferences menu, highlight Energy Saving Settings and press ENTER. 2 Press the ( / arrow) buttons to select Automatic Power Down. 3 Press the ( / arrow) buttons to 0 minutes. To cancel the sleep timer, repeatedly press SLEEP until the TV turns off after 15 ...; Low signal strength of analog channel (no signal is set for the nearest time will function. ❖ Automatic Power Down ❖ Sleep Timer ❖ No signal auto power off (after 15 minutes of this feature is connected to external input to listen to automatically turn itself off ,...
... the TV control panel. 1 From the Preferences menu, highlight Energy Saving Settings and press ENTER. 2 Press the ( / arrow) buttons to select Automatic Power Down. 3 Press the ( / arrow) buttons to 0 minutes. To cancel the sleep timer, repeatedly press SLEEP until the TV turns off after 15 ...; Low signal strength of analog channel (no signal is set for the nearest time will function. ❖ Automatic Power Down ❖ Sleep Timer ❖ No signal auto power off (after 15 minutes of this feature is connected to external input to listen to automatically turn itself off ,...
User Guide
Page 105
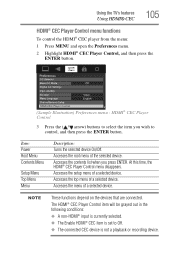
..., the HDMI® CEC Player Control menu disappears. HDMI® CEC Player Control 3 Press the ( / arrow) buttons to select the item you press ENTER. Item: Power Root Menu Contents Menu Setup Menu Top Menu Menu Description: Turns the selected device On/Off. Accesses the menu of a selected device. The HDMI®...
..., the HDMI® CEC Player Control menu disappears. HDMI® CEC Player Control 3 Press the ( / arrow) buttons to select the item you press ENTER. Item: Power Root Menu Contents Menu Setup Menu Top Menu Menu Description: Turns the selected device On/Off. Accesses the menu of a selected device. The HDMI®...


