
User Guide
Page 2
...For additional antenna grounding information, see 33) and 34) on your ability to walls with steel studs or old cinder block construction. TOSHIBA Cares! • The consumer electronics industry is appropriate for the size and weight of this apparatus must be pulled or grabbed by an...displays can easily be heavy. See item 26) on page 5. NEC, which provides guidelines for proper grounding and, in accordance with furniture and television sets. • Don't place flat panel displays on a "larger than life" flat panel display. If you enjoy your LED TV, carefully read and...
...For additional antenna grounding information, see 33) and 34) on your ability to walls with steel studs or old cinder block construction. TOSHIBA Cares! • The consumer electronics industry is appropriate for the size and weight of this apparatus must be pulled or grabbed by an...displays can easily be heavy. See item 26) on page 5. NEC, which provides guidelines for proper grounding and, in accordance with furniture and television sets. • Don't place flat panel displays on a "larger than life" flat panel display. If you enjoy your LED TV, carefully read and...
User Guide
Page 7
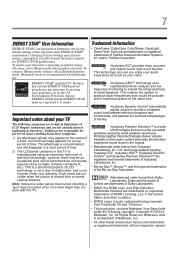
...of their respective owners. Note: Interactive video games that earn the ENERGY STAR prevent green house gas emissions by meeting strict guidelines set by Bitstream, Inc. Trademark Information • ClearFrame, CableClear, ColorStream, DynaLight, GameTimer, SurfLock are registered U.S. ENERGY STAR®...Display technology and are trademarks or registered trademarks of HDMI Licensing, LLC in this television meet ENERGY STAR® requirements. and/or Toshiba Corporation. •Audyssey EQ® provides clear, accurate, and natural sound right out of Bitstream, Inc. • All ...
...of their respective owners. Note: Interactive video games that earn the ENERGY STAR prevent green house gas emissions by meeting strict guidelines set by Bitstream, Inc. Trademark Information • ClearFrame, CableClear, ColorStream, DynaLight, GameTimer, SurfLock are registered U.S. ENERGY STAR®...Display technology and are trademarks or registered trademarks of HDMI Licensing, LLC in this television meet ENERGY STAR® requirements. and/or Toshiba Corporation. •Audyssey EQ® provides clear, accurate, and natural sound right out of Bitstream, Inc. • All ...
User Guide
Page 10
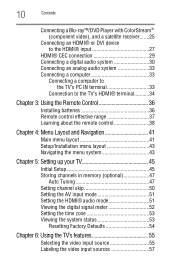
.../Installation menu layout 43 Navigating the menu system 43 Chapter 5: Setting up your TV 45 Initial Setup 45 Storing channels in memory (optional 47 Auto Tuning 47 Setting channel skip 50 Setting the AV input mode 51 Setting the HDMI® audio mode 51 Viewing the digital signal meter... 52 Setting the time zone 53 Viewing the system status 53 Resetting Factory Defaults 54 Chapter...
.../Installation menu layout 43 Navigating the menu system 43 Chapter 5: Setting up your TV 45 Initial Setup 45 Storing channels in memory (optional 47 Auto Tuning 47 Setting channel skip 50 Setting the AV input mode 51 Setting the HDMI® audio mode 51 Viewing the digital signal meter... 52 Setting the time zone 53 Viewing the system status 53 Resetting Factory Defaults 54 Chapter...

User Guide
Page 11
... 72 Adjusting the picture 73 Selecting the picture mode 73 Adjusting the picture quality 74 Using closed captions 75 Base closed captions 75 Digital CC settings 76 CC Selector 77 Adjusting the audio 78 Muting the sound 78 Using the digital audio selector 78
... 72 Adjusting the picture 73 Selecting the picture mode 73 Adjusting the picture quality 74 Using closed captions 75 Base closed captions 75 Digital CC settings 76 CC Selector 77 Adjusting the audio 78 Muting the sound 78 Using the digital audio selector 78

User Guide
Page 12
... temporarily 90 Using the input lock feature 90 Locking channels 91 Using the GameTimer 92 Using the panel lock feature 92 Using the PC settings feature 93 Setting the PC Audio 94 Using the Media Player 95 Auto Start function 96 To open the Media Player 96 Viewing photo files 98 Playing... music files 99 Viewing photo files and playing music files at the same time 100 Sorting photo or music files 101 Setting the sleep timer 102 Automatic Power Down 103 No Signal Power Down 103 Using HDMI® CEC 104
... temporarily 90 Using the input lock feature 90 Locking channels 91 Using the GameTimer 92 Using the panel lock feature 92 Using the PC settings feature 93 Setting the PC Audio 94 Using the Media Player 95 Auto Start function 96 To open the Media Player 96 Viewing photo files 98 Playing... music files 99 Viewing photo files and playing music files at the same time 100 Sorting photo or music files 101 Setting the sleep timer 102 Automatic Power Down 103 No Signal Power Down 103 Using HDMI® CEC 104
User Guide
Page 13
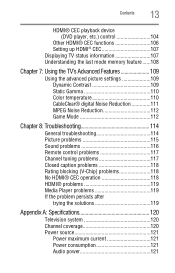
...; CEC 107 Displaying TV status information 107 Understanding the last mode memory feature ......108 Chapter 7: Using the TV's Advanced Features 109 Using the advanced picture settings 109 Dynamic Contrast 109 Static Gamma 110 Color temperature 110 CableClear® digital Noise Reduction 111 MPEG Noise Reduction 112 Game Mode 112 Chapter 8: Troubleshooting...
...; CEC 107 Displaying TV status information 107 Understanding the last mode memory feature ......108 Chapter 7: Using the TV's Advanced Features 109 Using the advanced picture settings 109 Dynamic Contrast 109 Static Gamma 110 Color temperature 110 CableClear® digital Noise Reduction 111 MPEG Noise Reduction 112 Game Mode 112 Chapter 8: Troubleshooting...

User Guide
Page 16
... HDMI® connection. See "Connecting a computer to the HDMI® input" on page 33. ❖ HDMI® CEC-Allows control of your new Toshiba wide screen, integrated HD, LED TV: ❖ Integrated digital tuning (8VSB ATSC and QAM)- See "Using HDMI® CEC" on page 95. ❖...; ENERGY STAR® qualified. Eliminates the need for a separate digital converter set-top box (in most cases). ❖ 1920 x 1080 output resolution ❖ Two HDMI®-Digital, High-Definition Multimedia Interfaces with Dolby® Digital ...
... HDMI® connection. See "Connecting a computer to the HDMI® input" on page 33. ❖ HDMI® CEC-Allows control of your new Toshiba wide screen, integrated HD, LED TV: ❖ Integrated digital tuning (8VSB ATSC and QAM)- See "Using HDMI® CEC" on page 95. ❖...; ENERGY STAR® qualified. Eliminates the need for a separate digital converter set-top box (in most cases). ❖ 1920 x 1080 output resolution ❖ Two HDMI®-Digital, High-Definition Multimedia Interfaces with Dolby® Digital ...
User Guide
Page 17
...objects to allow proper ventilation. Inadequate ventilation may cause overheating, which will damage the TV. THIS TYPE OF DAMAGE IS NOT COVERED UNDER THE TOSHIBA WARRANTY. 3 Do not plug in the power cords for an overview of the buttons on the TV. If the TV stops responding to ...overview of navigating the TV's menu system. Introduction 17 Overview of installation, setup, and use Overview of installation, setup, and use Follow these steps to set up your other electronic devices to the TV. Keep this manual for future reference. 2 To choose a location for the TV: ❖ Read "Important...
...objects to allow proper ventilation. Inadequate ventilation may cause overheating, which will damage the TV. THIS TYPE OF DAMAGE IS NOT COVERED UNDER THE TOSHIBA WARRANTY. 3 Do not plug in the power cords for an overview of the buttons on the TV. If the TV stops responding to ...overview of navigating the TV's menu system. Introduction 17 Overview of installation, setup, and use Overview of installation, setup, and use Follow these steps to set up your other electronic devices to the TV. Keep this manual for future reference. 2 To choose a location for the TV: ❖ Read "Important...

User Guide
Page 19
...® Digital or PCM (pulse-code modulation) format for connecting an audio amplifier. TV back panel connections For explanations of cable types and connections, see "Setting the PC Audio" on page 94. 4 ColorStream® HD-High-resolution component video input and shared composite video input.
...® Digital or PCM (pulse-code modulation) format for connecting an audio amplifier. TV back panel connections For explanations of cable types and connections, see "Setting the PC Audio" on page 94. 4 ColorStream® HD-High-resolution component video input and shared composite video input.
User Guide
Page 22
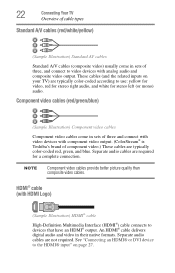
... than composite video cables. Component video cables (red/green/blue) (Sample Illustration) Component video cables Component video cables come in sets of component video.) These cables are typically color-coded red, green, and blue. An HDMI® cable delivers digital audio ...white/yellow) (Sample Illustration) Standard AV cables Standard A/V cables (composite video) usually come in sets of three and connect with video devices with component video output. (ColorStream® is Toshiba's brand of three, and connect to video devices with analog audio and composite video output.
... than composite video cables. Component video cables (red/green/blue) (Sample Illustration) Component video cables Component video cables come in sets of component video.) These cables are typically color-coded red, green, and blue. An HDMI® cable delivers digital audio ...white/yellow) (Sample Illustration) Standard AV cables Standard A/V cables (composite video) usually come in sets of three and connect with video devices with component video output. (ColorStream® is Toshiba's brand of three, and connect to video devices with analog audio and composite video output.
User Guide
Page 24
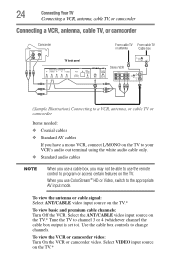
... or cable signal: Select ANT/CABLE video input source on the TV.* Tune the TV to channel 3 or 4 (whichever channel the cable box output is set to). Use the cable box controls to the appropriate AV input mode. Select the ANT/CABLE video input source on the TV.* To view basic...
... or cable signal: Select ANT/CABLE video input source on the TV.* Tune the TV to channel 3 or 4 (whichever channel the cable box output is set to). Use the cable box controls to the appropriate AV input mode. Select the ANT/CABLE video input source on the TV.* To view basic...

User Guide
Page 27
...analog audio cables are not required (see "Connection to the TV's HDMI® terminal" on page 123. compliant[1] consumer electronic devices (such as a set-top box or DVD player with the HDMI® Logo ( ). ❖ HDMI® cables transfer both video and audio. NOTE To connect a ...48 kHz. TV side panel 1 2 Playback device (Sample Illustration) Connecting an HDMI® or DVI device to accept HDCP (High- See "Setting the HDMI® audio mode" on your TV receives digital audio and uncompressed digital video from an HDMI® source device, or uncompressed digital ...
...analog audio cables are not required (see "Connection to the TV's HDMI® terminal" on page 123. compliant[1] consumer electronic devices (such as a set-top box or DVD player with the HDMI® Logo ( ). ❖ HDMI® cables transfer both video and audio. NOTE To connect a ...48 kHz. TV side panel 1 2 Playback device (Sample Illustration) Connecting an HDMI® or DVI device to accept HDCP (High- See "Setting the HDMI® audio mode" on your TV receives digital audio and uncompressed digital video from an HDMI® source device, or uncompressed digital ...
User Guide
Page 28
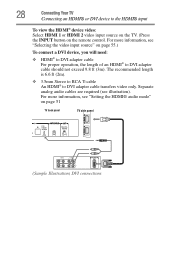
... recommended length is 6.6 ft (2m). ❖ 3.5mm Stereo to RCA Y-cable An HDMI® to DVI adapter cable transfers video only. For more information, see "Setting the HDMI® audio mode" on the remote control. For more information, see illustration).
... recommended length is 6.6 ft (2m). ❖ 3.5mm Stereo to RCA Y-cable An HDMI® to DVI adapter cable transfers video only. For more information, see "Setting the HDMI® audio mode" on the remote control. For more information, see illustration).
User Guide
Page 30
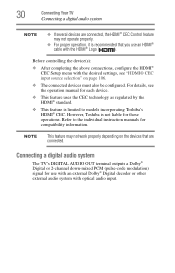
Before controlling the device(s): ❖ After completing the above connections, configure the HDMI® CEC Setup menu with the desired settings, see the operation manual for those operations. Connecting a digital audio system The TV's DIGITAL AUDIO OUT terminal outputs a Dolby®... to the individual instruction manuals for use an HDMI® cable with the HDMI® Logo ( ). Refer to models incorporating Toshiba's HDMI® CEC. However, Toshiba is not liable for each device. ❖ This feature uses the CEC technology as regulated by the HDMI® standard. &#...
Before controlling the device(s): ❖ After completing the above connections, configure the HDMI® CEC Setup menu with the desired settings, see the operation manual for those operations. Connecting a digital audio system The TV's DIGITAL AUDIO OUT terminal outputs a Dolby®... to the individual instruction manuals for use an HDMI® cable with the HDMI® Logo ( ). Refer to models incorporating Toshiba's HDMI® CEC. However, Toshiba is not liable for each device. ❖ This feature uses the CEC technology as regulated by the HDMI® standard. &#...
User Guide
Page 32
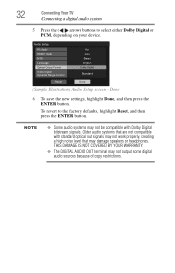
... audio systems that may not output some digital audio sources because of copy restrictions. Standard (Sample Illustration) Audio Setup screen - Done 6 To save the new settings, highlight Done, and then press the ENTER button. 32 Connecting Your TV Connecting a digital audio system 5 Press the ( / arrow) buttons to the factory defaults, highlight...
... audio systems that may not output some digital audio sources because of copy restrictions. Standard (Sample Illustration) Audio Setup screen - Done 6 To save the new settings, highlight Done, and then press the ENTER button. 32 Connecting Your TV Connecting a digital audio system 5 Press the ( / arrow) buttons to the factory defaults, highlight...
User Guide
Page 34
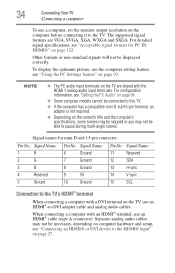
... the HDMI 1 analog audio input terminals. The supported signal formats are shared with a DVI terminal on page 122. For detailed signal specifications, see "Setting the PC Audio" on page 94. ❖ Some computer models cannot be connected to this TV. ❖ If the computer has a compatible mini...on page 27. Other formats or non-standard signals will not be necessary, depending on computer hardware and setup, see "Using the PC Settings feature" on the computer before connecting it to -DVI adapter cable and analog audio cables. 34 Connecting Your TV Connecting a computer To ...
... the HDMI 1 analog audio input terminals. The supported signal formats are shared with a DVI terminal on page 122. For detailed signal specifications, see "Setting the PC Audio" on page 94. ❖ Some computer models cannot be connected to this TV. ❖ If the computer has a compatible mini...on page 27. Other formats or non-standard signals will not be necessary, depending on computer hardware and setup, see "Using the PC Settings feature" on the computer before connecting it to -DVI adapter cable and analog audio cables. 34 Connecting Your TV Connecting a computer To ...
User Guide
Page 39
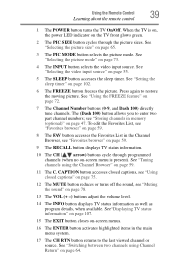
Using the Remote Control 39 Learning about the remote control 1 The POWER button turns the TV On/Off. When the TV is present). See "Setting the sleep timer" on the TV front glows green. 2 The PIC SIZE button cycles through programmed channels (when no on page 59. 8 The FAV button ...
Using the Remote Control 39 Learning about the remote control 1 The POWER button turns the TV On/Off. When the TV is present). See "Setting the sleep timer" on the TV front glows green. 2 The PIC SIZE button cycles through programmed channels (when no on page 59. 8 The FAV button ...
User Guide
Page 41
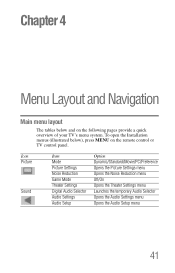
Icon Picture Sound Item Mode Picture Settings Noise Reduction Game Mode Theater Settings Digital Audio Selector Audio Settings Audio Setup Option Dynamic/Standard/Movie/PC/Preference Opens the Picture Settings menu Opens the Noise Reduction menu Off/On Opens the Theater Settings menu Launches the temporary Audio Selector Opens the Audio Settings menu Opens the Audio Setup...
Icon Picture Sound Item Mode Picture Settings Noise Reduction Game Mode Theater Settings Digital Audio Selector Audio Settings Audio Setup Option Dynamic/Standard/Movie/PC/Preference Opens the Picture Settings menu Opens the Noise Reduction menu Off/On Opens the Theater Settings menu Launches the temporary Audio Selector Opens the Audio Settings menu Opens the Audio Setup...

User Guide
Page 42
... Rating Blocking Edit Rating Limits Input Lock Panel Lock GameTimer® New PIN Code Installation HDMI® CEC Setup Sleep Timer PC Settings Media Player Option Launches the temporary CC Selector Off/CC1/CC2/CC3/CC4/T1/T2/T3/T4 Opens the Digital CC Setup menu Opens the ... English/Français/Español Opens the Channel Browser Setup menu Opens the HDMI® CEC Player Control menu Opens the Energy Saving Settings menu Off/On (for USA region) Opens the Edit Rating Limits menu (for USA region) Off/Video/Video+ Off/On Off/30 min/60 min...
... Rating Blocking Edit Rating Limits Input Lock Panel Lock GameTimer® New PIN Code Installation HDMI® CEC Setup Sleep Timer PC Settings Media Player Option Launches the temporary CC Selector Off/CC1/CC2/CC3/CC4/T1/T2/T3/T4 Opens the Digital CC Setup menu Opens the ... English/Français/Español Opens the Channel Browser Setup menu Opens the HDMI® CEC Player Control menu Opens the Energy Saving Settings menu Off/On (for USA region) Opens the Edit Rating Limits menu (for USA region) Off/Video/Video+ Off/On Off/30 min/60 min...
User Guide
Page 43
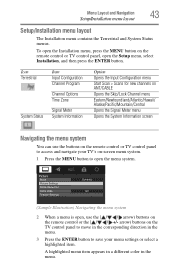
..., and then press the ENTER button. To open , use the buttons on the remote control or TV control panel to access and navigate your menu settings or select a highlighted item. Menu Layout and Navigation 43 Setup/Installation menu layout Setup/Installation menu layout The Installation menu contains the Terrestrial and System...
..., and then press the ENTER button. To open , use the buttons on the remote control or TV control panel to access and navigate your menu settings or select a highlighted item. Menu Layout and Navigation 43 Setup/Installation menu layout Setup/Installation menu layout The Installation menu contains the Terrestrial and System...


