Owner's Manual - English
Page 3
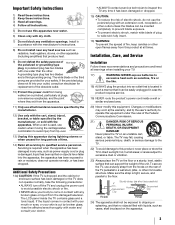
...body to wide slot; Servicing is required when the apparatus has been damaged in any time it can be easily unplugged in direct sunlight; The LCD panel inside a wall or similar enclosed area. 20) Never modify this apparatus during lightning storms or when unused for replacement of the unit. ...mouth or eyes, or your skin is dropped and the cabinet or enclosure surface has been damaged or the TV does not operate normally, take the following precautions: • ALWAYS turn off the TV and unplug the power cord to avoid possible electric shock or fire. • NEVER allow your safety. ...
...body to wide slot; Servicing is required when the apparatus has been damaged in any time it can be easily unplugged in direct sunlight; The LCD panel inside a wall or similar enclosed area. 20) Never modify this apparatus during lightning storms or when unused for replacement of the unit. ...mouth or eyes, or your skin is dropped and the cabinet or enclosure surface has been damaged or the TV does not operate normally, take the following precautions: • ALWAYS turn off the TV and unplug the power cord to avoid possible electric shock or fire. • NEVER allow your safety. ...
Owner's Manual - English
Page 4
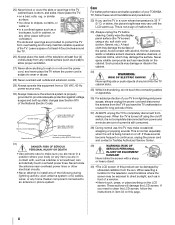
... not completely disconnected from the TV if you need to clean the LCD screen, follow these sounds become frequent or continuous, unplug the power cord and contact a Toshiba Authorized Service Center. 39) WARNING: RISK OF SERIOUS PERSONAL INJURY OR EQUIPMENT DAMAGE! Avoid contact with poor ventilation. When the TV is turned off using a dry, soft...
... not completely disconnected from the TV if you need to clean the LCD screen, follow these sounds become frequent or continuous, unplug the power cord and contact a Toshiba Authorized Service Center. 39) WARNING: RISK OF SERIOUS PERSONAL INJURY OR EQUIPMENT DAMAGE! Avoid contact with poor ventilation. When the TV is turned off using a dry, soft...
Owner's Manual - English
Page 9
...not plug in a proper location (- page 49). •Two sets of the TV's connections and controls (- page 54). •ClearFrame™ 120Hz anti-blur feature (- page 39). •Media Player allows you turn on the remote control, install the batteries and prepare to operate your other device... with 1080p input support (- page 6). •Place the TV in any power cords until AFTER you to automatically adjust picture settings based on using its many exciting features of your new Toshiba widescreen, integrated HD, LCD TV: •Integrated digital tuning (8VSB ATSC and QAM) eliminates...
...not plug in a proper location (- page 49). •Two sets of the TV's connections and controls (- page 54). •ClearFrame™ 120Hz anti-blur feature (- page 39). •Media Player allows you turn on the remote control, install the batteries and prepare to operate your other device... with 1080p input support (- page 6). •Place the TV in any power cords until AFTER you to automatically adjust picture settings based on using its many exciting features of your new Toshiba widescreen, integrated HD, LCD TV: •Integrated digital tuning (8VSB ATSC and QAM) eliminates...
Owner's Manual - English
Page 10
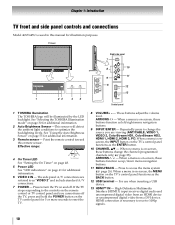
... to access the menu system (- See "Using the Auto Brightness Sensor" on -screen, these buttons change the source you cannot turn the TV on -screen, these buttons function as left/right menu navigation buttons. 9 INPUT/ENTER - Press to optimize the backlighting levels. When...61 for illustration purposes. TV front 1 23 45 Right side panel 7 8 10 11 9 6 12 13 Control panel 1 TOSHIBA Illumination The TOSHIBA logo will detect the ambient light conditions to turn off . Chapter 1: Introduction TV front and side panel controls and connections Model 46XV645U is used in this ...
... to access the menu system (- See "Using the Auto Brightness Sensor" on -screen, these buttons change the source you cannot turn the TV on -screen, these buttons function as left/right menu navigation buttons. 9 INPUT/ENTER - Press to optimize the backlighting levels. When...61 for illustration purposes. TV front 1 23 45 Right side panel 7 8 10 11 9 6 12 13 Control panel 1 TOSHIBA Illumination The TOSHIBA logo will detect the ambient light conditions to turn off . Chapter 1: Introduction TV front and side panel controls and connections Model 46XV645U is used in this ...

Owner's Manual - English
Page 13
... view the camcorder video: Select the VIDEO 2 video input source on the TV.* * To select the video input source, press INPUT on the TV.* To view basic and premium Cable channels: Turn OFF the VCR. For better picture performance, if your VCR has Svideo, use an S-video cable (plus the audio cables)... to VIDEO 1 on the TV back instead of the VIDEO 2 on the TV.* Tune the TV to channel 3 or 4 (...
... view the camcorder video: Select the VIDEO 2 video input source on the TV.* * To select the video input source, press INPUT on the TV.* To view basic and premium Cable channels: Turn OFF the VCR. For better picture performance, if your VCR has Svideo, use an S-video cable (plus the audio cables)... to VIDEO 1 on the TV back instead of the VIDEO 2 on the TV.* Tune the TV to channel 3 or 4 (...
Owner's Manual - English
Page 14
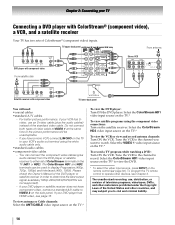
... - If your DVD player or satellite receiver does not have a mono VCR, connect L/MONO on the TV to your VCR's audio out terminal using the component video connections: Turn on the side panel. Tune the VCR to the channel you to civil and criminal liability. 14 page 32...- To view antenna or Cable channels: Select the ANT/CABLE video input source on the TV.* To record a TV program while watching a DVD: Turn ON the VCR. Chapter 2: Connecting your TV Connecting a DVD player with component video TV lower back panel You will be used to display Progressive (480p, 720p, 1080p) and ...
... - If your DVD player or satellite receiver does not have a mono VCR, connect L/MONO on the TV to your VCR's audio out terminal using the component video connections: Turn on the side panel. Tune the VCR to the channel you to civil and criminal liability. 14 page 32...- To view antenna or Cable channels: Select the ANT/CABLE video input source on the TV.* To record a TV program while watching a DVD: Turn ON the VCR. Chapter 2: Connecting your TV Connecting a DVD player with component video TV lower back panel You will be used to display Progressive (480p, 720p, 1080p) and ...
Owner's Manual - English
Page 15
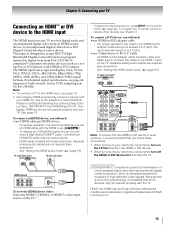
...For proper operation, it is recommended that you follow these procedures: • When turning on your electronic components, turn on the TV first and then the HDMI or DVI device. • When turning off your TV receives digital audio and uncompressed digital video from an HDMI source device, or uncompressed ...is being standardized for reception of uncompressed digital video with HDMI or DVI output). Chapter 2: Connecting your TV Connecting an HDMI™ or DVI device to the HDMI input The HDMI input on your electronic components, turn off the HDMI or DVI device first and then the...
...For proper operation, it is recommended that you follow these procedures: • When turning on your electronic components, turn on the TV first and then the HDMI or DVI device. • When turning off your TV receives digital audio and uncompressed digital video from an HDMI source device, or uncompressed ...is being standardized for reception of uncompressed digital video with HDMI or DVI output). Chapter 2: Connecting your TV Connecting an HDMI™ or DVI device to the HDMI input The HDMI input on your electronic components, turn off the HDMI or DVI device first and then the...
Owner's Manual - English
Page 17
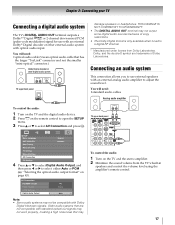
... PC Digital Auto Note: • Some audio systems may To control the audio: 1 Turn on page 43). LINE IN LR TV upper back panel SETUP Menu Language English ANT/CABLE In Antenna Auto Tuning Manual Tuning TV Settings Manual Setting AV Connection PC Settings 4 Press B or b to select Digital Audio...may not be compatible with optical audio input. You will need : •standard audio cables Analog audio amplifier To control the audio: 1 Turn on the TV and the digital audio device. 2 Press Y on the remote control to open the SETUP menu. 3 Press B or b to use with an ...
... PC Digital Auto Note: • Some audio systems may To control the audio: 1 Turn on page 43). LINE IN LR TV upper back panel SETUP Menu Language English ANT/CABLE In Antenna Auto Tuning Manual Tuning TV Settings Manual Setting AV Connection PC Settings 4 Press B or b to select Digital Audio...may not be compatible with optical audio input. You will need : •standard audio cables Analog audio amplifier To control the audio: 1 Turn on the TV and the digital audio device. 2 Press Y on the remote control to open the SETUP menu. 3 Press B or b to use with an ...
Owner's Manual - English
Page 20
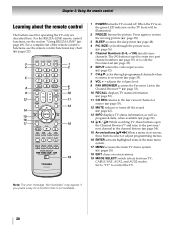
... used to enter two part channel numbers (- For the REGZA-LINK remote control functions, see the remote control functional key chart (- pages 22). 1 POWER turns the TV on -screen (- The = button is on and off the sound (- page 32). 7 CH Bb cycles through the picture sizes (- adjusts the volume ...modes. page 33). 6 INPUT selects the video input source (- page 35). 12 MUTE reduces or turns off . Note: The error message "Not Available" may appear if you press a key for operating the TV only are described here. For a complete list of the remote control's functions, see the section "...
... used to enter two part channel numbers (- For the REGZA-LINK remote control functions, see the remote control functional key chart (- pages 22). 1 POWER turns the TV on -screen (- The = button is on and off the sound (- page 32). 7 CH Bb cycles through the picture sizes (- adjusts the volume ...modes. page 33). 6 INPUT selects the video input source (- page 35). 12 MUTE reduces or turns off . Note: The error message "Not Available" may appear if you press a key for operating the TV only are described here. For a complete list of the remote control's functions, see the section "...
Owner's Manual - English
Page 21
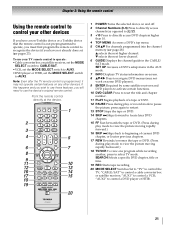
...If this happens and you wish to use those features, you have a non-Toshiba device or a Toshiba device that the remote control is programmed, it may not work on and .... b selects the next lower channel. 6 GUIDE Displays the channel guide in the AUX mode. 7 INFO Displays TV status information on-screen. 8 BbC c Press to navigate DVD menus (may not operate certain features on any other...your other devices. Point the remote control directly at the device. 16 17 18 19 1 POWER Turns the selected device on some DVD players). 9 ENTER Required by some satellite receivers and DVD players to...
...If this happens and you wish to use those features, you have a non-Toshiba device or a Toshiba device that the remote control is programmed, it may not work on and .... b selects the next lower channel. 6 GUIDE Displays the channel guide in the AUX mode. 7 INFO Displays TV status information on-screen. 8 BbC c Press to navigate DVD menus (may not operate certain features on any other...your other devices. Point the remote control directly at the device. 16 17 18 19 1 POWER Turns the selected device on some DVD players). 9 ENTER Required by some satellite receivers and DVD players to...
Owner's Manual - English
Page 23
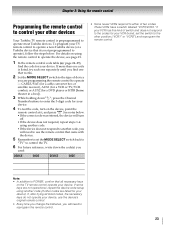
... If the correct code was entered, the device will need to another code (if other codes are listed for your device. 4 To test the code, turn off. •If the device does not respond, repeat steps 1-4 using another code. • If the device does not respond to reprogram the remote ...control. 23 To program your TV remote control to operate a non-Toshiba device (or a Toshiba device that works. 2 Set the MODE SELECT switch to the type of switch and does not respond to the codes for your...
... If the correct code was entered, the device will need to another code (if other codes are listed for your device. 4 To test the code, turn off. •If the device does not respond, repeat steps 1-4 using another code. • If the device does not respond to reprogram the remote ...control. 23 To program your TV remote control to operate a non-Toshiba device (or a Toshiba device that works. 2 Set the MODE SELECT switch to the type of switch and does not respond to the codes for your...

Owner's Manual - English
Page 27
... as Initial Setup (- However if you do not finish the entire Initial Setup process, the Initial Setup window will appear every time you turn on the TV. 5 If you first turn on the screen, press C or c to select your preferred menu language. 27 Selecting the menu language You can stop the Initial Setup...
... as Initial Setup (- However if you do not finish the entire Initial Setup process, the Initial Setup window will appear every time you turn on the TV. 5 If you first turn on the screen, press C or c to select your preferred menu language. 27 Selecting the menu language You can stop the Initial Setup...
Owner's Manual - English
Page 29
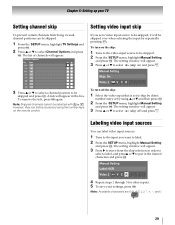
...remote control. If you want to be skipped. 2 From the SETUP menu, highlight Manual Setting and press T. Manual Setting Skip: On Video 2 V C R To turn on ) and press O. To remove the tick, press T again. The setting window will appear. Manual Setting Label: VCR Video 2 V C R 4 Repeat ...input source to put in the box. The setting window will be selected with < or ,; To turn off ) and press O. however, they can still be skipped. 1 From the SETUP menu, highlight TV Settings and press T. 2 Press B or b to move from being viewed, channel positions can be...
...remote control. If you want to be skipped. 2 From the SETUP menu, highlight Manual Setting and press T. Manual Setting Skip: On Video 2 V C R To turn on ) and press O. To remove the tick, press T again. The setting window will appear. Manual Setting Label: VCR Video 2 V C R 4 Repeat ...input source to put in the box. The setting window will be selected with < or ,; To turn off ) and press O. however, they can still be skipped. 1 From the SETUP menu, highlight TV Settings and press T. 2 Press B or b to move from being viewed, channel positions can be...
Owner's Manual - English
Page 30
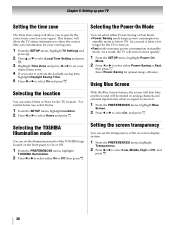
... and press C or c to set your desired time zone. 4 If you to specify the correct time zone for the TV to turn on the front panel to On or Off. 1 From the PREFERENCES menu, highlight TOSHIBA Illumination. 2 Press C or c to select On, and press O. As a result, it takes a bit longer for ...your TV Setting the time zone The Time Zone setup will allow you want to activate the daylight saving time, highlight ...
... and press C or c to set your desired time zone. 4 If you to specify the correct time zone for the TV to turn on the front panel to On or Off. 1 From the PREFERENCES menu, highlight TOSHIBA Illumination. 2 Press C or c to select On, and press O. As a result, it takes a bit longer for ...your TV Setting the time zone The Time Zone setup will allow you want to activate the daylight saving time, highlight ...

Owner's Manual - English
Page 31
The TV will turn off automatically. Chapter 5: Setting up your PIN code (if PIN code has been set). 3 Press C or c to select Yes and press T. To cancel the reset: Press C or c to display the system information. System Information Software Version XV645U 6.1.23.0 Mar 26 2009 - 01:16:45 FW: 21 Reset Factory Defaults You can reset all settings and channels to their factory default values. 1 From the SETUP menu, highlight Reset TV and press T. 2 Enter your TV Viewing the system status 1 From the SETUP menu, highlight System Information. 2 Press T to select No and press T. 31
The TV will turn off automatically. Chapter 5: Setting up your PIN code (if PIN code has been set). 3 Press C or c to select Yes and press T. To cancel the reset: Press C or c to display the system information. System Information Software Version XV645U 6.1.23.0 Mar 26 2009 - 01:16:45 FW: 21 Reset Factory Defaults You can reset all settings and channels to their factory default values. 1 From the SETUP menu, highlight Reset TV and press T. 2 Enter your TV Viewing the system status 1 From the SETUP menu, highlight System Information. 2 Press T to select No and press T. 31
Owner's Manual - English
Page 34
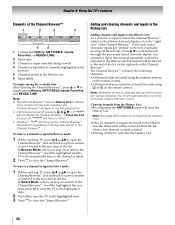
... selected list. • If all lists are tuned for at least 5 seconds using the numeric buttons on the remote control. •All channels that are turned off, pressing 3 C, # c, or n will clear the History List. Adding and clearing channels and inputs in the History List Adding channels and inputs to the... 5 1 Current list (History, ANT/CABLE, Inputs, Favorites, or REGZA-LINK) 2 Input type 3 Channel or input currently being viewed 4 Channel or input that is tuned. •Turning off the TV will clear the History List. 34 To tune to a channel or input in History List by default.
... selected list. • If all lists are tuned for at least 5 seconds using the numeric buttons on the remote control. •All channels that are turned off, pressing 3 C, # c, or n will clear the History List. Adding and clearing channels and inputs in the History List Adding channels and inputs to the... 5 1 Current list (History, ANT/CABLE, Inputs, Favorites, or REGZA-LINK) 2 Input type 3 Channel or input currently being viewed 4 Channel or input that is tuned. •Turning off the TV will clear the History List. 34 To tune to a channel or input in History List by default.

Owner's Manual - English
Page 39
...a different picture mode for each input and source for photo viewing. Press C or c to select Yes, and then press T. 39 Chapter 6: Using the TV's features Adjusting the picture Selecting the picture mode You can select your desired picture settings from the controller PC Designed for viewing of PC tables...it is selected. • PC mode is available for HDMI and PC inputs only (not displayed for other input sources). • Game mode cannot be turned on when the ANT/ CABLE input is selected. 1 From the PICTURE menu, highlight Picture Mode. 2 Press C or c to select the picture mode you...
...a different picture mode for each input and source for photo viewing. Press C or c to select Yes, and then press T. 39 Chapter 6: Using the TV's features Adjusting the picture Selecting the picture mode You can select your desired picture settings from the controller PC Designed for viewing of PC tables...it is selected. • PC mode is available for HDMI and PC inputs only (not displayed for other input sources). • Game mode cannot be turned on when the ANT/ CABLE input is selected. 1 From the PICTURE menu, highlight Picture Mode. 2 Press C or c to select the picture mode you...
Owner's Manual - English
Page 40
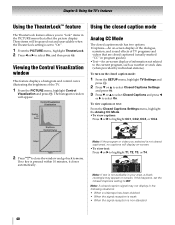
... to close the window and go back to highlight T1, T2, T3, or T4. Chapter 6: Using the TV's features Using the TheaterLock™ feature The TheaterLock feature allows you selected is non-standard 40 Viewing the Control ... Analog CC Mode The closed caption mode has two options: •Captions-An on -screen display of the TV. 1 From the PICTURE menu, highlight Control Visualization and press T. If no captions will appear. If this ...program, such as weather or stock data (when provided by individual stations). To turn on -screen. •To view text: Press C or c to menu.
... to close the window and go back to highlight T1, T2, T3, or T4. Chapter 6: Using the TV's features Using the TheaterLock™ feature The TheaterLock feature allows you selected is non-standard 40 Viewing the Control ... Analog CC Mode The closed caption mode has two options: •Captions-An on -screen display of the TV. 1 From the PICTURE menu, highlight Control Visualization and press T. If no captions will appear. If this ...program, such as weather or stock data (when provided by individual stations). To turn on -screen. •To view text: Press C or c to menu.
Owner's Manual - English
Page 42
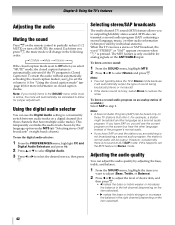
...program, the station's normal audio will change in the following order: 1/2 Mute Mute Volume If the closed caption feature is automatically activated if the TV program is no sound at all in step 2. For example, a station might broadcast another language as a second audio program. This temporarily overrides... SOUND menu, highlight the item you modify items in the SOUND menu while mute is set the volume to partially reduce (1/2 MUTE) or turn off (MUTE) the sound. If you will automatically be heard only on those channels that offer it will automatically output the type of sound...
...program, the station's normal audio will change in the following order: 1/2 Mute Mute Volume If the closed caption feature is automatically activated if the TV program is no sound at all in step 2. For example, a station might broadcast another language as a second audio program. This temporarily overrides... SOUND menu, highlight the item you modify items in the SOUND menu while mute is set the volume to partially reduce (1/2 MUTE) or turn off (MUTE) the sound. If you will automatically be heard only on those channels that offer it will automatically output the type of sound...
Owner's Manual - English
Page 48
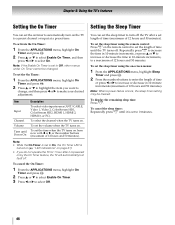
... indications" on -screen menus: 1 From the APPLICATIONS menu, highlight Sleep Timer and press T. 2 Press the number buttons to enter the length of time until the TV turns off. To set the sleep timer using the on page 61). • If you want to change, and then press C or c to increase or decrease..., other menus under On Timer cannot be cleared. Note: If the Enable On Timer is set to 0 minutes. 48 To set the volume when the TV turns on . To display the remaining sleep time: Press [. To set the On Timer: 1 From the APPLICATIONS menu, highlight On Timer and press T. 2 Press B or b to...
... indications" on -screen menus: 1 From the APPLICATIONS menu, highlight Sleep Timer and press T. 2 Press the number buttons to enter the length of time until the TV turns off. To set the sleep timer using the on page 61). • If you want to change, and then press C or c to increase or decrease..., other menus under On Timer cannot be cleared. Note: If the Enable On Timer is set to 0 minutes. 48 To set the volume when the TV turns on . To display the remaining sleep time: Press [. To set the On Timer: 1 From the APPLICATIONS menu, highlight On Timer and press T. 2 Press B or b to...


