
Owner's Manual - English
Page 7
...LCD TV 5 Chapter 1: Introduction 9 Features of your new TV 9 Overview of steps for installing, setting up, and using your new TV 9 TV front and side panel controls and connections . . . . 10 TV back panel connections 11 Chapter 2: Connecting your TV...Navigating the menu system 26 Chapter 5: Setting up your TV 27 Initial Setup 27 Quick Setup from the SETUP menu 27 Selecting the menu language 27 Configuring the ...TV programs and movies 44 Unlocking programs 45 Locking channels 46 Using the input lock feature 46 Using the GameTimer® feature 46 Using the panel lock feature 46...
...LCD TV 5 Chapter 1: Introduction 9 Features of your new TV 9 Overview of steps for installing, setting up, and using your new TV 9 TV front and side panel controls and connections . . . . 10 TV back panel connections 11 Chapter 2: Connecting your TV...Navigating the menu system 26 Chapter 5: Setting up your TV 27 Initial Setup 27 Quick Setup from the SETUP menu 27 Selecting the menu language 27 Configuring the ...TV programs and movies 44 Unlocking programs 45 Locking channels 46 Using the input lock feature 46 Using the GameTimer® feature 46 Using the panel lock feature 46...
Owner's Manual - English
Page 9
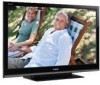
...(- pages 13-18). 5 See "Chapter 3: Using the remote control" (page 19) for an overview of the buttons on the TV, the Initial Setup menu appears automatically by the RGB or YCbCr color space. HDMI INSTAPORT™ technology reduces the lag of switching time when switching HDMI sources... settings based on using its many exciting features of your new Toshiba widescreen, integrated HD, LCD TV: •Integrated digital tuning (8VSB ATSC and QAM) eliminates the need for a separate digital converter set up your TV and begin using the TV's features, see Chapters 6 and 7. 10 For help, refer...
...(- pages 13-18). 5 See "Chapter 3: Using the remote control" (page 19) for an overview of the buttons on the TV, the Initial Setup menu appears automatically by the RGB or YCbCr color space. HDMI INSTAPORT™ technology reduces the lag of switching time when switching HDMI sources... settings based on using its many exciting features of your new Toshiba widescreen, integrated HD, LCD TV: •Integrated digital tuning (8VSB ATSC and QAM) eliminates the need for a separate digital converter set up your TV and begin using the TV's features, see Chapters 6 and 7. 10 For help, refer...
Owner's Manual - English
Page 16
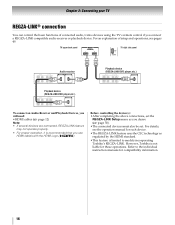
...for those operations. For an explanation of connected audio/video devices using the TV's remote control if you will need: •HDMI cables (- However, Toshiba is recommended that you desire (- Refer to models incorporating Toshiba's REGZA-LINK. Before controlling the device(s): •After completing the above... a REGZA-LINK compatible audio receiver or playback device. For details, see pages 49. Chapter 2: Connecting your TV REGZA-LINK® connection You can control the basic functions of setup and operations, see the operation manual for compatibility information. 16
...for those operations. For an explanation of connected audio/video devices using the TV's remote control if you will need: •HDMI cables (- However, Toshiba is recommended that you desire (- Refer to models incorporating Toshiba's REGZA-LINK. Before controlling the device(s): •After completing the above... a REGZA-LINK compatible audio receiver or playback device. For details, see pages 49. Chapter 2: Connecting your TV REGZA-LINK® connection You can control the basic functions of setup and operations, see the operation manual for compatibility information. 16
Owner's Manual - English
Page 17
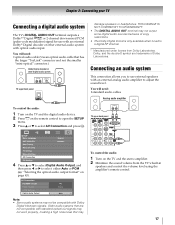
LINE IN LR TV upper back panel SETUP Menu Language English ANT/CABLE In Antenna Auto Tuning Manual Tuning TV Settings Manual Setting AV Connection PC Settings 4 Press B or b to select Digital Audio Output, and then press C or c to select AV Connection and press T. ... systems may not output some digital audio sources because of Dolby Laboratories. "Selecting the optical audio output format" on the remote control to open the SETUP menu. 3 Press B or b to select either Auto or PCM (- Older audio systems that has the larger "TosLink" connector and not the smaller "mini-...
LINE IN LR TV upper back panel SETUP Menu Language English ANT/CABLE In Antenna Auto Tuning Manual Tuning TV Settings Manual Setting AV Connection PC Settings 4 Press B or b to select Digital Audio Output, and then press C or c to select AV Connection and press T. ... systems may not output some digital audio sources because of Dolby Laboratories. "Selecting the optical audio output format" on the remote control to open the SETUP menu. 3 Press B or b to select either Auto or PCM (- Older audio systems that has the larger "TosLink" connector and not the smaller "mini-...
Owner's Manual - English
Page 21
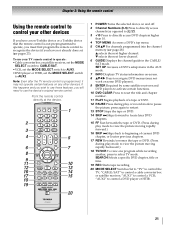
...to view the picture moving rapidly backward.) 18 TV/VCR To view one program while recording another, press to select TV mode. "AUX2" to control a VCR; "CABLE/SAT" to control the TV; To use the device's original remote control. SET UP Accesses a DVD's setup menu in the CABLE/ SAT mode. SEARCH ...control directly at the device. 16 17 18 19 1 POWER Turns the selected device on any other devices If you have a non-Toshiba device or a Toshiba device that the remote control is programmed, it may not work on some DVD players). 9 ENTER Required by some satellite receivers and ...
...to view the picture moving rapidly backward.) 18 TV/VCR To view one program while recording another, press to select TV mode. "AUX2" to control a VCR; "CABLE/SAT" to control the TV; To use the device's original remote control. SET UP Accesses a DVD's setup menu in the CABLE/ SAT mode. SEARCH ...control directly at the device. 16 17 18 19 1 POWER Turns the selected device on any other devices If you have a non-Toshiba device or a Toshiba device that the remote control is programmed, it may not work on some DVD players). 9 ENTER Required by some satellite receivers and ...
Owner's Manual - English
Page 22
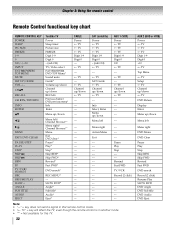
... HTIB) Power s TV s TV s TV Digit 1-9 Digit 0 +10 s TV Top Menu s TV Setup s TV Channel up/down s TV DVD Return Display Enter Menu up /down Menu left Menu right Action Menu Exit --- s TV --s TV Channel up /down s TV --- ----- --- --- --- --- --- --- s TV SAT Guide s TV Channel up /down s TV --- SAT (satellite) Power s TV s TV s TV Digit 1-9 Digit 0 - (sub CH) s TV --- s TV --s TV Channel up /down s TV --- ----- --- --- --- --- --- AUX 1 (VCR) Power s TV s TV s TV Digit 1-9 Digit 0 100 s TV --- CHBb RECALL...
... HTIB) Power s TV s TV s TV Digit 1-9 Digit 0 +10 s TV Top Menu s TV Setup s TV Channel up/down s TV DVD Return Display Enter Menu up /down Menu left Menu right Action Menu Exit --- s TV --s TV Channel up /down s TV --- ----- --- --- --- --- --- --- s TV SAT Guide s TV Channel up /down s TV --- SAT (satellite) Power s TV s TV s TV Digit 1-9 Digit 0 - (sub CH) s TV --- s TV --s TV Channel up /down s TV --- ----- --- --- --- --- --- AUX 1 (VCR) Power s TV s TV s TV Digit 1-9 Digit 0 100 s TV --- CHBb RECALL...
Owner's Manual - English
Page 23
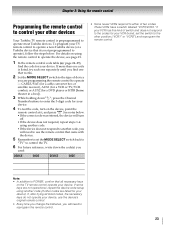
...TV remote control to operate a non-Toshiba device (or a Toshiba device that it , and press p. Note: • In addition to operate most Toshiba...does not respond to another code (if other devices Your Toshiba TV remote control is not preprogrammed to operate), follow the steps... VCR brand, set the MODE SELECT switch back to "TV" to control the TV. 6 For future reference, write down E, press the...cable converter box or satellite receiver), AUX1 (for a VCR or TV/VCR combo), or AUX2 (for a DVD player or HTIB [... keys on the TV remote control operate your device. page 24-25), find...
...TV remote control to operate a non-Toshiba device (or a Toshiba device that it , and press p. Note: • In addition to operate most Toshiba...does not respond to another code (if other devices Your Toshiba TV remote control is not preprogrammed to operate), follow the steps... VCR brand, set the MODE SELECT switch back to "TV" to control the TV. 6 For future reference, write down E, press the...cable converter box or satellite receiver), AUX1 (for a VCR or TV/VCR combo), or AUX2 (for a DVD player or HTIB [... keys on the TV remote control operate your device. page 24-25), find...
Owner's Manual - English
Page 26
... Auto Aspect 38 4:3 Stretch 38 Blue Screen 30 Transparency 30 TOSHIBA Illumination 30 Icon SETUP Item Menu Language ANT/CABLE In Auto Tuning Manual Tuning TV Settings Manual Setting AV Connection PC Settings Picture Position Quick Setup Power-On Mode Location System Information Reset TV Page 27 28 28 28 29 29 43 47 38...
... Auto Aspect 38 4:3 Stretch 38 Blue Screen 30 Transparency 30 TOSHIBA Illumination 30 Icon SETUP Item Menu Language ANT/CABLE In Auto Tuning Manual Tuning TV Settings Manual Setting AV Connection PC Settings Picture Position Quick Setup Power-On Mode Location System Information Reset TV Page 27 28 28 28 29 29 43 47 38...

Owner's Manual - English
Page 27
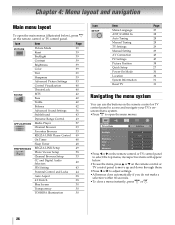
...to Auto Tuning. 6 Press T to select the input source (Cable or Antenna) for the on the TV. left-hand column). Quick Setup from the SETUP menu You can conveniently change various basic TV settings from three different languages (English, Français and Español) for the ANT/CABLE ... C or c to select Yes and press T. 4 Other procedures are the same as Initial Setup (- Chapter 5: Setting up your TV Initial Setup When you first turn on -screen display of menus and messages. 1 From the SETUP menu, highlight Menu Language. 2 Press C or c to select Time Zone and set your preferred...
...to Auto Tuning. 6 Press T to select the input source (Cable or Antenna) for the on the TV. left-hand column). Quick Setup from the SETUP menu You can conveniently change various basic TV settings from three different languages (English, Français and Español) for the ANT/CABLE ... C or c to select Yes and press T. 4 Other procedures are the same as Initial Setup (- Chapter 5: Setting up your TV Initial Setup When you first turn on -screen display of menus and messages. 1 From the SETUP menu, highlight Menu Language. 2 Press C or c to select Time Zone and set your preferred...
Owner's Manual - English
Page 28
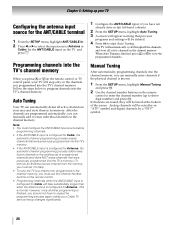
... channel is finished, you should not have not already done so (- The TV will stop only on the remote control to enter the channel number (up your TV Configuring the antenna input source for the ANT/CABLE terminal 1 From the SETUP menu, highlight ANT/CABLE In. 2 Press C or c to select the ... the channel memory. After the channels are found channels to the existing set it to Skip. • To tune the TV to view the programmed channels. left-hand column). 2 From the SETUP menu, highlight Auto Tuning. 3 A screen will be noted by an "ATV" symbol and digital channels by a "DTV" symbol. ...
... channel is finished, you should not have not already done so (- The TV will stop only on the remote control to enter the channel number (up your TV Configuring the antenna input source for the ANT/CABLE terminal 1 From the SETUP menu, highlight ANT/CABLE In. 2 Press C or c to select the ... the channel memory. After the channels are found channels to the existing set it to Skip. • To tune the TV to view the programmed channels. left-hand column). 2 From the SETUP menu, highlight Auto Tuning. 3 A screen will be noted by an "ATV" symbol and digital channels by a "DTV" symbol. ...
Owner's Manual - English
Page 29
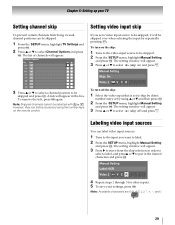
...and press T. however, they can be selected with < or ,; Note: Skipped channels cannot be skipped. 1 From the SETUP menu, highlight TV Settings and press T. 2 Press B or b to label. 2 From the SETUP menu, highlight Manual Setting and press T. Manual Setting Label: VCR Video 2 V C R 4 Repeat steps 1 through... 3 for other inputs. 5 To save your TV Setting channel skip Setting video input skip To prevent certain channels from the...
...and press T. however, they can be selected with < or ,; Note: Skipped channels cannot be skipped. 1 From the SETUP menu, highlight TV Settings and press T. 2 Press B or b to label. 2 From the SETUP menu, highlight Manual Setting and press T. Manual Setting Label: VCR Video 2 V C R 4 Repeat steps 1 through... 3 for other inputs. 5 To save your TV Setting channel skip Setting video input skip To prevent certain channels from the...
Owner's Manual - English
Page 30
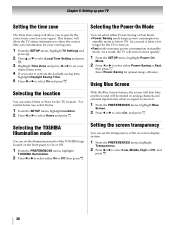
...to activate the daylight saving time, highlight Daylight Saving Time. 5 Press C or c to specify the correct time zone for the TV location. Selecting the TOSHIBA Illumination mode You can select either Power-Saving or Fast mode. •Power-Saving mode keeps power consumption in standby mode. Selecting the... If you to select On and press O. For normal home use, select Home. 1 From the SETUP menu, highlight Location. 2 Press C or c to select On, and press O. Select Power-Saving for the TV to turn blue and the sound will turn on the front panel to On or Off. 1 From...
...to activate the daylight saving time, highlight Daylight Saving Time. 5 Press C or c to specify the correct time zone for the TV location. Selecting the TOSHIBA Illumination mode You can select either Power-Saving or Fast mode. •Power-Saving mode keeps power consumption in standby mode. Selecting the... If you to select On and press O. For normal home use, select Home. 1 From the SETUP menu, highlight Location. 2 Press C or c to select On, and press O. Select Power-Saving for the TV to turn blue and the sound will turn on the front panel to On or Off. 1 From...

Owner's Manual - English
Page 31
To cancel the reset: Press C or c to select No and press T. 31 System Information Software Version XV645U 6.1.23.0 Mar 26 2009 - 01:16:45 FW: 21 Reset Factory Defaults You can reset all settings and channels to their factory default values. 1 From the SETUP menu, highlight Reset TV and press T. 2 Enter your TV Viewing the system status 1 From the SETUP menu, highlight System Information. 2 Press T to display the system information. Chapter 5: Setting up your PIN code (if PIN code has been set). 3 Press C or c to select Yes and press T. The TV will turn off automatically.
To cancel the reset: Press C or c to select No and press T. 31 System Information Software Version XV645U 6.1.23.0 Mar 26 2009 - 01:16:45 FW: 21 Reset Factory Defaults You can reset all settings and channels to their factory default values. 1 From the SETUP menu, highlight Reset TV and press T. 2 Enter your TV Viewing the system status 1 From the SETUP menu, highlight System Information. 2 Press T to display the system information. Chapter 5: Setting up your PIN code (if PIN code has been set). 3 Press C or c to select Yes and press T. The TV will turn off automatically.
Owner's Manual - English
Page 33
...Favorites list. 33 This feature allows you select one to select On or Off. Note: REGZA-LINK List will be cleared every time the TV is switched to the beginning of the Channel Browser™. Note: Additions are added to Off. (- To set up the Channel Browser™:... 1 From the PREFERENCES menu, highlight Channel Browser Setup and press T. 2 Press b or B to highlight Navigation, and then press C or c to select either On or Off. To open the Favorites browser ...
...Favorites list. 33 This feature allows you select one to select On or Off. Note: REGZA-LINK List will be cleared every time the TV is switched to the beginning of the Channel Browser™. Note: Additions are added to Off. (- To set up the Channel Browser™:... 1 From the PREFERENCES menu, highlight Channel Browser Setup and press T. 2 Press b or B to highlight Navigation, and then press C or c to select either On or Off. To open the Favorites browser ...
Owner's Manual - English
Page 35
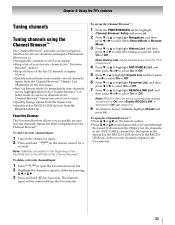
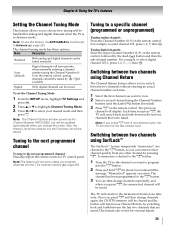
...updated automatically when you change channels repeatedly, and when you press R, the memorized channel will be set the Channel Tuning Mode: 1 From the SETUP menu, highlight TV Settings and press T. 2 Press B or b to highlight Channel Tuning Mode. 3 Press C or c to select your desired mode and ...the remote control, followed by < / , if available Only digital channels can return to that channel quickly from a non-antenna input, the TV will return to the last-viewed input. Note: The Channel Options window as well as Channel Return, by pressing R. Mode Description Standard Both ...
...updated automatically when you change channels repeatedly, and when you press R, the memorized channel will be set the Channel Tuning Mode: 1 From the SETUP menu, highlight TV Settings and press T. 2 Press B or b to highlight Channel Tuning Mode. 3 Press C or c to select your desired mode and ...the remote control, followed by < / , if available Only digital channels can return to that channel quickly from a non-antenna input, the TV will return to the last-viewed input. Note: The Channel Options window as well as Channel Return, by pressing R. Mode Description Standard Both ...
Owner's Manual - English
Page 38
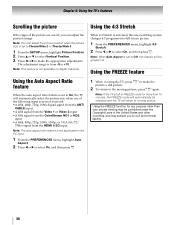
... more than your private viewing may subject you can adjust the picture position when the picture size is set to TheaterWide 2 or TheaterWide 3. 1 From the SETUP menu, highlight Picture Position. 2 Press B or b to select Vertical Position. 3 Press C or c to Off, this feature will automatically select the ... press B again. Using the FREEZE feature Using the Auto Aspect Ratio feature When the auto aspect ratio feature is set to On, the TV will be prohibited under the Copyright Laws of the following input sources is received: •A 480i, 480p, 720p, 1080i digital signal from the...
... more than your private viewing may subject you can adjust the picture position when the picture size is set to TheaterWide 2 or TheaterWide 3. 1 From the SETUP menu, highlight Picture Position. 2 Press B or b to select Vertical Position. 3 Press C or c to Off, this feature will automatically select the ... press B again. Using the FREEZE feature Using the Auto Aspect Ratio feature When the auto aspect ratio feature is set to On, the TV will be prohibited under the Copyright Laws of the following input sources is received: •A 480i, 480p, 720p, 1080i digital signal from the...
Owner's Manual - English
Page 40
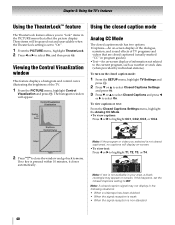
...videos that are closed caption signal may not display in the PICTURE menu that affect the picture display. To turn on -screen display of the TV. 1 From the PICTURE menu, highlight Control Visualization and press T. If no captions will display on-screen. •To view text: Press... C or c to menu. Note: A closed captioned (usually marked "CC" in program guides). •Text-An on the closed caption mode: 1 From the SETUP menu, highlight TV Settings and press T. 2 Press b or B to select Closed Captions Settings and press T. 3 Press b or B to select Closed Captions and press C or ...
...videos that are closed caption signal may not display in the PICTURE menu that affect the picture display. To turn on -screen display of the TV. 1 From the PICTURE menu, highlight Control Visualization and press T. If no captions will display on-screen. •To view text: Press... C or c to menu. Note: A closed captioned (usually marked "CC" in program guides). •Text-An on the closed caption mode: 1 From the SETUP menu, highlight TV Settings and press T. 2 Press b or B to select Closed Captions Settings and press T. 3 Press b or B to select Closed Captions and press C or ...
Owner's Manual - English
Page 41
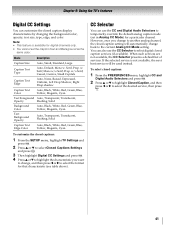
Chapter 6: Using the TV's features Digital CC Settings You can also use the CC and Digital Audio Selectors to select the format for a particular channel. Mode Description Caption Size ... channels only. • You cannot set in Analog CC Mode) for that characteristic (see table above). You can customize the closed captions: 1 From the SETUP menu, highlight TV Settings and press T. 2 Press B or b to select Closed Captions Settings and press T. 3 Then highlight Digital CC Settings and press T. 4 Press B or b to highlight the...
Chapter 6: Using the TV's features Digital CC Settings You can also use the CC and Digital Audio Selectors to select the format for a particular channel. Mode Description Caption Size ... channels only. • You cannot set in Analog CC Mode) for that characteristic (see table above). You can customize the closed captions: 1 From the SETUP menu, highlight TV Settings and press T. 2 Press B or b to select Closed Captions Settings and press T. 3 Then highlight Digital CC Settings and press T. 4 Press B or b to highlight the...

Owner's Manual - English
Page 43
... is displayed, press E four times within five seconds. Setting the PIN code A PIN code is only available on the ANT/CABLE input. 2 From the SETUP menu, highlight AV Connection and press T. 3 Press B or b to select Digital Audio Output. 4 Press C or c to the digital audio output socket...or c to enter a four-digit number. A new screen will display. 2 Press number buttons to select On, then press O. Chapter 6: Using the TV's features Using the StableSound® feature The StableSound feature limits the highest volume level to prevent extreme changes in volume when the signal source changes...
... is displayed, press E four times within five seconds. Setting the PIN code A PIN code is only available on the ANT/CABLE input. 2 From the SETUP menu, highlight AV Connection and press T. 3 Press B or b to select Digital Audio Output. 4 Press C or c to the digital audio output socket...or c to enter a four-digit number. A new screen will display. 2 Press number buttons to select On, then press O. Chapter 6: Using the TV's features Using the StableSound® feature The StableSound feature limits the highest volume level to prevent extreme changes in volume when the signal source changes...
Owner's Manual - English
Page 46
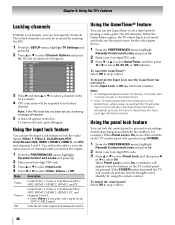
... DTV 6 ATV 6-1 DTV 8 ATV 9 ATV 10 ATV 11 ATV 12 ATV 3 Press c and then B or b to select a channel in step 3 above . 46 Using the GameTimer® feature You can use the GameTimer to set a time limit for playing a video game (30-120 minutes). left -hand column). Mode... the PREFERENCES menu, highlight Parental Control and Locks and press T. 2 Enter your settings from being changed accidentally (by entering the PIN. 1 From the SETUP menu, highlight TV Settings and press T. 2 Press B or b to set yet, a warning message will appear. 5 A tick will switch off and can only be...
... DTV 6 ATV 6-1 DTV 8 ATV 9 ATV 10 ATV 11 ATV 12 ATV 3 Press c and then B or b to select a channel in step 3 above . 46 Using the GameTimer® feature You can use the GameTimer to set a time limit for playing a video game (30-120 minutes). left -hand column). Mode... the PREFERENCES menu, highlight Parental Control and Locks and press T. 2 Enter your settings from being changed accidentally (by entering the PIN. 1 From the SETUP menu, highlight TV Settings and press T. 2 Press B or b to set yet, a warning message will appear. 5 A tick will switch off and can only be...


