Printable Spec Sheet
Page 2
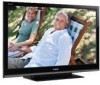
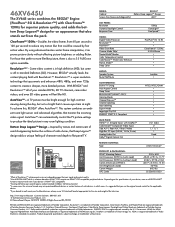
...AutoView™ -- SERIES: Cabinet Screen Size (measured diagonally) REGZA® Bottom Deep LagoonTM Design 46.0" LCD PANEL: Resolution Dynamic Backlight Control... NJ 07470 (2009). ColorStream, PixelPure, and TheaterWide are trademarks or registered trademarks of Toshiba Corporation. 46XV645U The XV645 series combines the REGZA® Engine (PixelPure® 5G & Resolution+™... and the double-D symbol are registered trademarks of HDMI Licensing LLC. Inspired by the U.S. A TV picture must be caused by fast action video. Bottom Deep Lagoon™ Design -- Product design and...
...AutoView™ -- SERIES: Cabinet Screen Size (measured diagonally) REGZA® Bottom Deep LagoonTM Design 46.0" LCD PANEL: Resolution Dynamic Backlight Control... NJ 07470 (2009). ColorStream, PixelPure, and TheaterWide are trademarks or registered trademarks of Toshiba Corporation. 46XV645U The XV645 series combines the REGZA® Engine (PixelPure® 5G & Resolution+™... and the double-D symbol are registered trademarks of HDMI Licensing LLC. Inspired by the U.S. A TV picture must be caused by fast action video. Bottom Deep Lagoon™ Design -- Product design and...
Owner's Manual - English
Page 4
...cord and disconnect the antenna from the TV if you need to clean the LCD screen, follow the instructions in item 33 on a bed, sofa, rug, or similar surface; • too close to direct sunlight, such as in a position where your TOSHIBA TV, follow these sounds become frequent or ...continuous, unplug the power cord and contact a Toshiba Authorized Service Center....
...cord and disconnect the antenna from the TV if you need to clean the LCD screen, follow the instructions in item 33 on a bed, sofa, rug, or similar surface; • too close to direct sunlight, such as in a position where your TOSHIBA TV, follow these sounds become frequent or ...continuous, unplug the power cord and contact a Toshiba Authorized Service Center....
Owner's Manual - English
Page 6
...receiver. • Connect the equipment into an outlet on -screen target may appear on the screen if a fixed, non-moving image is not covered under license...For more of malfunction; FCC Declaration of Conformity Compliance Statement (Part 15): The Toshiba 40XV645U, 46XV645U and 52XV645U Televisions comply with the instructions, may cause harmful interference to radio communications...interference that to the following symptoms are technical limitations of LCD Display technology and are registered U.S. To ensure your LCD TV The following two conditions: (1) this device may cause ...
...receiver. • Connect the equipment into an outlet on -screen target may appear on the screen if a fixed, non-moving image is not covered under license...For more of malfunction; FCC Declaration of Conformity Compliance Statement (Part 15): The Toshiba 40XV645U, 46XV645U and 52XV645U Televisions comply with the instructions, may cause harmful interference to radio communications...interference that to the following symptoms are technical limitations of LCD Display technology and are registered U.S. To ensure your LCD TV The following two conditions: (1) this device may cause ...

Owner's Manual - English
Page 7
...3 Choosing a location for your LCD TV 5 Chapter 1: Introduction 9 Features of your new TV 9 Overview of steps for installing, setting up, and using your new TV 9 TV front and side panel controls and connections . . . . 10 TV back panel connections 11 Chapter 2: Connecting your TV 12 Overview of cable types 12... Selecting the location 30 Selecting the TOSHIBA Illumination mode 30 Selecting the Power-On Mode 30 Using Blue Screen 30 Setting the screen transparency 30 Viewing the system status 31 Reset Factory Defaults 31 Chapter 6: Using the TV's features 32 Selecting the video input...
...3 Choosing a location for your LCD TV 5 Chapter 1: Introduction 9 Features of your new TV 9 Overview of steps for installing, setting up, and using your new TV 9 TV front and side panel controls and connections . . . . 10 TV back panel connections 11 Chapter 2: Connecting your TV 12 Overview of cable types 12... Selecting the location 30 Selecting the TOSHIBA Illumination mode 30 Selecting the Power-On Mode 30 Using Blue Screen 30 Setting the screen transparency 30 Viewing the system status 31 Reset Factory Defaults 31 Chapter 6: Using the TV's features 32 Selecting the video input...
Owner's Manual - English
Page 10
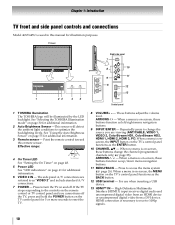
... hold the POWER button on -screen, these buttons function as "VIDEO 2" and include standard A/V connections. 7 POWER - Chapter 1: Introduction TV front and side panel controls and connections Model 46XV645U is used in this remote sensor. TV front 1 23 45 Right side panel 7 8 10 11 9 6 12 13 Control panel 1 TOSHIBA Illumination The TOSHIBA logo will detect the ambient...
... hold the POWER button on -screen, these buttons function as "VIDEO 2" and include standard A/V connections. 7 POWER - Chapter 1: Introduction TV front and side panel controls and connections Model 46XV645U is used in this remote sensor. TV front 1 23 45 Right side panel 7 8 10 11 9 6 12 13 Control panel 1 TOSHIBA Illumination The TOSHIBA logo will detect the ambient...
Owner's Manual - English
Page 18
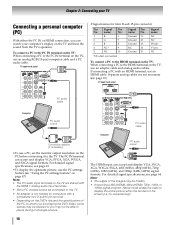
... a PC with a compatible mini D-sub15-pin terminal. • Depending on the DVD's title and the specifications of the screen (i.e. Chapter 2: Connecting your computer's display on the TV and hear the sound from the TV's speakers. Note: • The PC audio input terminals on page 47). Separate analog cables are shared with the HDMI...
... a PC with a compatible mini D-sub15-pin terminal. • Depending on the DVD's title and the specifications of the screen (i.e. Chapter 2: Connecting your computer's display on the TV and hear the sound from the TV's speakers. Note: • The PC audio input terminals on page 47). Separate analog cables are shared with the HDMI...
Owner's Manual - English
Page 20
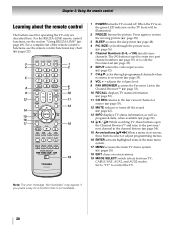
... freezes the picture. page 52). 11 CH RTN returns to control the TV. page 42). 13 INFO displays TV status information as well as program details, when available (- page 34). 15 Arrow buttons (BbC c) When a menu is on -screen (- pages 26). 18 EXIT closes on and off the sound (- Chapter... Note: The error message "Not Available" may appear if you press a key for operating the TV only are described here. pages 22). 1 POWER turns the TV on -screen menus. 19 MODE SELECT switch selects between TV, CABLE/SAT, AUX1, and AUX2 modes. page 35) or to restore the moving picture (-...
... freezes the picture. page 52). 11 CH RTN returns to control the TV. page 42). 13 INFO displays TV status information as well as program details, when available (- page 34). 15 Arrow buttons (BbC c) When a menu is on -screen (- pages 26). 18 EXIT closes on and off the sound (- Chapter... Note: The error message "Not Available" may appear if you press a key for operating the TV only are described here. pages 22). 1 POWER turns the TV on -screen menus. 19 MODE SELECT switch selects between TV, CABLE/SAT, AUX1, and AUX2 modes. page 35) or to restore the moving picture (-...
Owner's Manual - English
Page 21
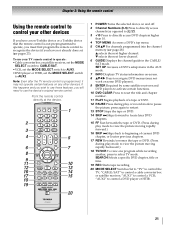
... and you wish to use those features, you have a non-Toshiba device or a Toshiba device that the remote control is programmed, it may not work ...b selects the next lower channel. 6 GUIDE Displays the channel guide in the AUX mode. 7 INFO Displays TV status information on-screen. 8 BbC c Press to navigate DVD menus (may not operate certain features on and off. 2 Channel ... not already done so) (- Chapter 3: Using the remote control Using the remote control to control your TV remote control to operate: •Cable converter box or satellite receiver, set the MODE SELECT switch to ...
... and you wish to use those features, you have a non-Toshiba device or a Toshiba device that the remote control is programmed, it may not work ...b selects the next lower channel. 6 GUIDE Displays the channel guide in the AUX mode. 7 INFO Displays TV status information on-screen. 8 BbC c Press to navigate DVD menus (may not operate certain features on and off. 2 Channel ... not already done so) (- Chapter 3: Using the remote control Using the remote control to control your TV remote control to operate: •Cable converter box or satellite receiver, set the MODE SELECT switch to ...
Owner's Manual - English
Page 26
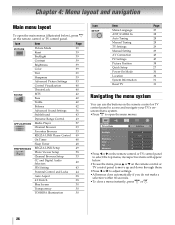
...PIN Setting 43 Parental Control and Locks 44 Auto Aspect 38 4:3 Stretch 38 Blue Screen 30 Transparency 30 TOSHIBA Illumination 30 Icon SETUP Item Menu Language ANT/CABLE In Auto Tuning Manual Tuning TV Settings Manual Setting AV Connection PC Settings Picture Position Quick Setup Power-On Mode ...Location System Information Reset TV Page 27 28 28 28 29 29 43 47 38 27...
...PIN Setting 43 Parental Control and Locks 44 Auto Aspect 38 4:3 Stretch 38 Blue Screen 30 Transparency 30 TOSHIBA Illumination 30 Icon SETUP Item Menu Language ANT/CABLE In Auto Tuning Manual Tuning TV Settings Manual Setting AV Connection PC Settings Picture Position Quick Setup Power-On Mode ...Location System Information Reset TV Page 27 28 28 28 29 29 43 47 38 27...

Owner's Manual - English
Page 27
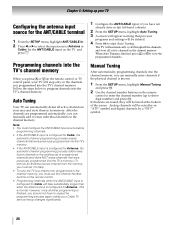
...B or b to select Quick Setup and press T. 3 A confirmation message will appear on the screen, press C or c to select your preferred menu language. 27 Chapter 5: Setting up your TV Initial Setup When you first turn on the TV. Press C or c to select Home and press T. 4 Next, ANT/CABLE In setup window ...(Cable or Antenna) for the on-screen display of menus and messages. 1 From the SETUP menu, highlight Menu Language. 2 Press C or c to select Yes and press T. 4 Other procedures are the same as Initial Setup (- However if you turn on or reset the TV, the Initial Setup window will appear....
...B or b to select Quick Setup and press T. 3 A confirmation message will appear on the screen, press C or c to select your preferred menu language. 27 Chapter 5: Setting up your TV Initial Setup When you first turn on the TV. Press C or c to select Home and press T. 4 Next, ANT/CABLE In setup window ...(Cable or Antenna) for the on-screen display of menus and messages. 1 From the SETUP menu, highlight Menu Language. 2 Press C or c to select Yes and press T. 4 Other procedures are the same as Initial Setup (- However if you turn on or reset the TV, the Initial Setup window will appear....
Owner's Manual - English
Page 28
... by an "ATV" symbol and digital channels by a "DTV" symbol. 28 Programming channels into the TV's memory.) To remove an Antenna source channel from the memory, you must set of the screen. Note: • You must use the Channel Number buttons on the remote control. • Programming ... channels if the physical channel is normal; left-hand column). 2 From the SETUP menu, highlight Auto Tuning. 3 A screen will appear warning that were previously programmed into the TV's memory. • If the ANT/CABLE input is configured for Antenna. Follow the steps below to start Auto Tuning. ...
... by an "ATV" symbol and digital channels by a "DTV" symbol. 28 Programming channels into the TV's memory.) To remove an Antenna source channel from the memory, you must set of the screen. Note: • You must use the Channel Number buttons on the remote control. • Programming ... channels if the physical channel is normal; left-hand column). 2 From the SETUP menu, highlight Auto Tuning. 3 A screen will appear warning that were previously programmed into the TV's memory. • If the ANT/CABLE input is configured for Antenna. Follow the steps below to start Auto Tuning. ...
Owner's Manual - English
Page 30
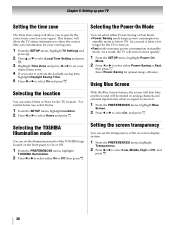
... Power-On Mode. 2 Press C or c to select either Power-Saving or Fast, then press O. As a result, it takes a bit longer for the TV to turn on -screen display system. 1 From the PREFERENCES menu, highlight Transparency. 2 Press C or c to select Low, Middle, High or Off, and press O. 30 Using Blue...Time Setting and press T. 3 Highlight Time Zone and press C or c to set the transparency of the TOSHIBA logo located on the front panel to On or Off. 1 From the PREFERENCES menu, highlight TOSHIBA Illumination. 2 Press C or c to select either Power-Saving or Fast mode. •Power-Saving mode keeps...
... Power-On Mode. 2 Press C or c to select either Power-Saving or Fast, then press O. As a result, it takes a bit longer for the TV to turn on -screen display system. 1 From the PREFERENCES menu, highlight Transparency. 2 Press C or c to select Low, Middle, High or Off, and press O. 30 Using Blue...Time Setting and press T. 3 Highlight Time Zone and press C or c to set the transparency of the TOSHIBA logo located on the front panel to On or Off. 1 From the PREFERENCES menu, highlight TOSHIBA Illumination. 2 Press C or c to select either Power-Saving or Fast mode. •Power-Saving mode keeps...
Owner's Manual - English
Page 35
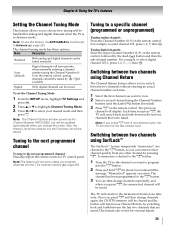
...mode. Note: The Channel Options window as well as Channel Return, by switching back and forth between two channels using the Channel Number (09) on -screen. For example, to view. 2 Select a second channel using the Channel Number buttons (and the dash (=) button if needed). 3 Press R on the...using Channel Return The Channel Return feature allows you to switch between the last two channels that channel quickly from a non-antenna input, the TV will return to the R button. 3 You can be saved. The previous channel will have priority when manually entering a channel number using ...
...mode. Note: The Channel Options window as well as Channel Return, by switching back and forth between two channels using the Channel Number (09) on -screen. For example, to view. 2 Select a second channel using the Channel Number buttons (and the dash (=) button if needed). 3 Press R on the...using Channel Return The Channel Return feature allows you to switch between the last two channels that channel quickly from a non-antenna input, the TV will return to the R button. 3 You can be saved. The previous channel will have priority when manually entering a channel number using ...
Owner's Manual - English
Page 36
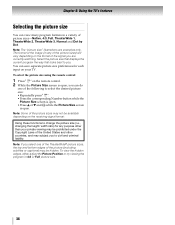
...Press B or b and T while the Picture Size screen is open . Using these functions to civil and criminal liability. To view the hidden edges, either adjust the Picture Position or try viewing the program in any purpose other than your TV. You can save separate picture size preferences for any...To select the picture size using the remote control: 1 Press I on the remote control. 2 While the Picture Size screen is open , you are examples only. Chapter 6: Using the TV's features Selecting the picture size You can do one of the TheaterWide® picture sizes, the top and bottom edges...
...Press B or b and T while the Picture Size screen is open . Using these functions to civil and criminal liability. To view the hidden edges, either adjust the Picture Position or try viewing the program in any purpose other than your TV. You can save separate picture size preferences for any...To select the picture size using the remote control: 1 Press I on the remote control. 2 While the Picture Size screen is open , you are examples only. Chapter 6: Using the TV's features Selecting the picture size You can do one of the TheaterWide® picture sizes, the top and bottom edges...
Owner's Manual - English
Page 37
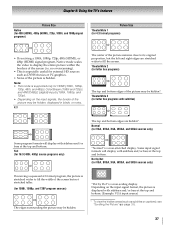
Chapter 6: Using the TV's features Picture Size Native (for 480i (HDMI), 480p (HDMI), 720p, 1080i, and 1080p signal ... and bottom. TheaterWide 2 (for letter box programs) A B C D E F G The top and bottom edges of the screen but the left and right edges are hidden*. Dot by Dot" is a non-stretched display. "Dot by Dot (for 1080i...hidden areas (such as DVHS movies or PC graphics. • None of the picture is stretched wider to fill the screen. Full (for external HD sources such as subtitles or captions), see "Scrolling the Picture" (- no overscanning). •...
Chapter 6: Using the TV's features Picture Size Native (for 480i (HDMI), 480p (HDMI), 720p, 1080i, and 1080p signal ... and bottom. TheaterWide 2 (for letter box programs) A B C D E F G The top and bottom edges of the screen but the left and right edges are hidden*. Dot by Dot" is a non-stretched display. "Dot by Dot (for 1080i...hidden areas (such as DVHS movies or PC graphics. • None of the picture is stretched wider to fill the screen. Full (for external HD sources such as subtitles or captions), see "Scrolling the Picture" (- no overscanning). •...
Owner's Manual - English
Page 38
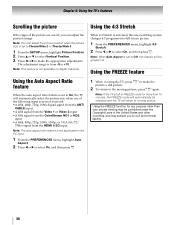
... the picture are cut off, you to civil and criminal liability. 38 Note: This feature is activated, the size switching system changes 4:3 programs into full screen picture. 1 From the PREFERENCES menu, highlight 4:3 Stretch. 2 Press C or c to select On, and then press O. When 4:3 Stretch is not ...set to Off, this feature will return to moving picture, press B again. Note: You can adjust the position image. Chapter 6: Using the TV's features Scrolling the picture Using the 4:3 Stretch If the edges of the following input sources is received: •A 480i, 480p, 720p, 1080i...
... the picture are cut off, you to civil and criminal liability. 38 Note: This feature is activated, the size switching system changes 4:3 programs into full screen picture. 1 From the PREFERENCES menu, highlight 4:3 Stretch. 2 Press C or c to select On, and then press O. When 4:3 Stretch is not ...set to Off, this feature will return to moving picture, press B again. Note: You can adjust the position image. Chapter 6: Using the TV's features Scrolling the picture Using the 4:3 Stretch If the edges of the following input sources is received: •A 480i, 480p, 720p, 1080i...

Owner's Manual - English
Page 39
...and press T. 3 A confirmation message will automatically be set to 0. (Settings are stored in memory.) Note: Some menus cannot be turned on -screen display and input from the following modes, as described in video mode and no signal is input, this will appear. Press C or c to ...reddish greenish Sharpness softer sharper * This feature adjusts the brightness of the entire screen. You can select a different picture mode for each input and source for photo viewing. Chapter 6: Using the TV's features Adjusting the picture Selecting the picture mode You can select your desired picture...
...and press T. 3 A confirmation message will automatically be set to 0. (Settings are stored in memory.) Note: Some menus cannot be turned on -screen display and input from the following modes, as described in video mode and no signal is input, this will appear. Press C or c to ...reddish greenish Sharpness softer sharper * This feature adjusts the brightness of the entire screen. You can select a different picture mode for each input and source for photo viewing. Chapter 6: Using the TV's features Adjusting the picture Selecting the picture mode You can select your desired picture...
Owner's Manual - English
Page 40
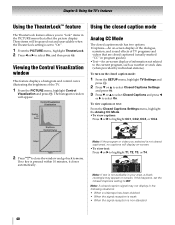
... is not closed captioned, no key is pressed within 10 minutes, it closes automatically. These items will appear. If no captions will display on -screen display of information not related to select On, and then press T. If this happens, set to "On". 1 From the PICTURE menu, highlight ... your area, a black rectangle may appear on the closed caption mode has two options: •Captions-An on-screen display of the dialogue, narration, and sound effects of the TV. 1 From the PICTURE menu, highlight Control Visualization and press T. To view captions or text: From the Closed ...
... is not closed captioned, no key is pressed within 10 minutes, it closes automatically. These items will appear. If no captions will display on -screen display of information not related to select On, and then press T. If this happens, set to "On". 1 From the PICTURE menu, highlight ... your area, a black rectangle may appear on the closed caption mode has two options: •Captions-An on-screen display of the dialogue, narration, and sound effects of the TV. 1 From the PICTURE menu, highlight Control Visualization and press T. To view captions or text: From the Closed ...
Owner's Manual - English
Page 42
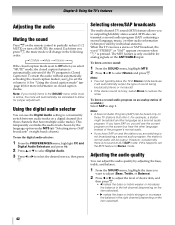
... you to output high-fidelity stereo sound. When the TV receives a stereo or SAP broadcast, the word "STEREO" or "SAP" appears on-screen when E is only available for proper adjustment. Note: • You can typically leave the TV in Stereo mode because it . Adjusting the audio quality...audio tracks). "Selecting stereo/SAP broadcasts" on closed caption feature is automatically activated if the TV program is Closed Captioned. Note: If you will see the current program on the screen but hear the other audio information (when provided by individual stations). To use the Digital ...
... you to output high-fidelity stereo sound. When the TV receives a stereo or SAP broadcast, the word "STEREO" or "SAP" appears on-screen when E is only available for proper adjustment. Note: • You can typically leave the TV in Stereo mode because it . Adjusting the audio quality...audio tracks). "Selecting stereo/SAP broadcasts" on closed caption feature is automatically activated if the TV program is Closed Captioned. Note: If you will see the current program on the screen but hear the other audio information (when provided by individual stations). To use the Digital ...

Owner's Manual - English
Page 43
...feature will display. 2 Press number buttons to enter a four-digit number. Changing or deleting your PIN code While the PIN code entering screen is being broadcast. If you delete the PIN code, the settings of Parental Control and Locks are reset. Registering a new PIN code... 1 From the PREFERENCES menu, highlight PIN Setting and press T. A new screen will also function to confirm it is displayed, press E four times within five seconds. Chapter 6: Using the TV's features Using the StableSound® feature The StableSound feature limits the highest volume level...
...feature will display. 2 Press number buttons to enter a four-digit number. Changing or deleting your PIN code While the PIN code entering screen is being broadcast. If you delete the PIN code, the settings of Parental Control and Locks are reset. Registering a new PIN code... 1 From the PREFERENCES menu, highlight PIN Setting and press T. A new screen will also function to confirm it is displayed, press E four times within five seconds. Chapter 6: Using the TV's features Using the StableSound® feature The StableSound feature limits the highest volume level...


