Owner's Manual - English
Page 3
... or eyes, or your skin is dropped and the cabinet or enclosure surface has been damaged or the TV does not operate normally, take the following precautions: • ALWAYS turn off the TV and unplug the power cord to avoid possible electric shock or fire. • NEVER allow your body ...to rain or moisture, does not operate normally, or has been dropped. The LCD panel inside a wall or similar enclosed area. 20)...
... or eyes, or your skin is dropped and the cabinet or enclosure surface has been damaged or the TV does not operate normally, take the following precautions: • ALWAYS turn off the TV and unplug the power cord to avoid possible electric shock or fire. • NEVER allow your body ...to rain or moisture, does not operate normally, or has been dropped. The LCD panel inside a wall or similar enclosed area. 20)...
Owner's Manual - English
Page 4
...abrasive cleaners, or chemical cloths, which may vary until the LCD warms up static charges (see Section 810 of the TV. Gently wipe the display panel surface (the TV screen) using the on or off switch, it is being turned on /off . Never spray volatile compounds such as insecticide...38) During normal use the TV in cabinet, or any other electrical circuits. • Never attempt to install any home theater component connected to clean the LCD screen, follow these sounds become frequent or continuous, unplug the power cord and contact a Toshiba Authorized Service Center. 39) ...
...abrasive cleaners, or chemical cloths, which may vary until the LCD warms up static charges (see Section 810 of the TV. Gently wipe the display panel surface (the TV screen) using the on or off switch, it is being turned on /off . Never spray volatile compounds such as insecticide...38) During normal use the TV in cabinet, or any other electrical circuits. • Never attempt to install any home theater component connected to clean the LCD screen, follow these sounds become frequent or continuous, unplug the power cord and contact a Toshiba Authorized Service Center. 39) ...
Owner's Manual - English
Page 9
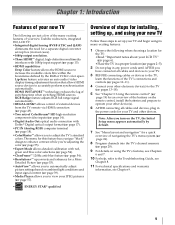
...feature has a unique "black" design to enhance contrast while you turn on using its many exciting features. 1 Observe the following are just a few of the many exciting features of your new Toshiba widescreen, integrated HD, LCD TV: •Integrated digital tuning (8VSB ATSC and QAM) eliminates the...allows you to set -top box (in the power cords for the TV: •Read "Important notes about your LCD TV" (- Chapter 1: Introduction Features of your new TV The following when choosing a location for your TV and other devices. page 15). •HDMI capabilities Deep Color feature ...
...feature has a unique "black" design to enhance contrast while you turn on using its many exciting features. 1 Observe the following are just a few of the many exciting features of your new Toshiba widescreen, integrated HD, LCD TV: •Integrated digital tuning (8VSB ATSC and QAM) eliminates the...allows you to set -top box (in the power cords for the TV: •Read "Important notes about your LCD TV" (- Chapter 1: Introduction Features of your new TV The following when choosing a location for your TV and other devices. page 15). •HDMI capabilities Deep Color feature ...
Owner's Manual - English
Page 10
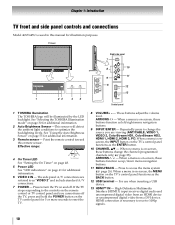
...functions as the BACK button. 12 USB terminal - Chapter 1: Introduction TV front and side panel controls and connections Model 46XV645U is on-screen, these buttons change the source you cannot turn the TV on and off the TV, press and hold the POWER button on page 55 for additional information... 9 INPUT/ENTER - Press to access the menu system (- TV front 1 23 45 Right side panel 7 8 10 11 9 6 12 13 Control panel 1 TOSHIBA Illumination The TOSHIBA logo will detect the ambient light conditions to reset the TV. 8 VOLUME+ - - High-Definition Multimedia Interface (HDMI 3)...
...functions as the BACK button. 12 USB terminal - Chapter 1: Introduction TV front and side panel controls and connections Model 46XV645U is on-screen, these buttons change the source you cannot turn the TV on and off the TV, press and hold the POWER button on page 55 for additional information... 9 INPUT/ENTER - Press to access the menu system (- TV front 1 23 45 Right side panel 7 8 10 11 9 6 12 13 Control panel 1 TOSHIBA Illumination The TOSHIBA logo will detect the ambient light conditions to reset the TV. 8 VOLUME+ - - High-Definition Multimedia Interface (HDMI 3)...

Owner's Manual - English
Page 13
...the VIDEO 2 on the TV right side panel. - Select the VIDEO 1 video input source on the TV.* To view the camcorder video: Select the VIDEO 2 video input source on the TV.* * To select the video input source, press INPUT on the TV.* To view basic and premium Cable channels: Turn OFF the VCR. To ...program the TV remote control to your VCR's audio out terminal using the white audio cable only. &#...
...the VIDEO 2 on the TV right side panel. - Select the VIDEO 1 video input source on the TV.* To view the camcorder video: Select the VIDEO 2 video input source on the TV.* * To select the video input source, press INPUT on the TV.* To view basic and premium Cable channels: Turn OFF the VCR. To ...program the TV remote control to your VCR's audio out terminal using the white audio cable only. &#...
Owner's Manual - English
Page 14
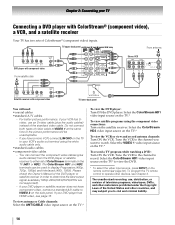
... the Copyright Laws of the DVD player or satellite receiver in order to your VCR's audio out terminal using the component video connections: Turn on the TV (HD1 or HD2). Do not connect both types of ColorStream terminals on the satellite receiver. If your DVD player has HDMI video,... OUT to display Progressive (480p, 720p, 1080p) and Interlaced (480i, 1080i). Select the VIDEO 1 video input source on the TV.* To view the DVD player: Turn ON the DVD player. The ColorStream HD1 and HD2 terminals can connect the component video cables (plus the audio cables) instead of ColorStream...
... the Copyright Laws of the DVD player or satellite receiver in order to your VCR's audio out terminal using the component video connections: Turn on the TV (HD1 or HD2). Do not connect both types of ColorStream terminals on the satellite receiver. If your DVD player has HDMI video,... OUT to display Progressive (480p, 720p, 1080p) and Interlaced (480i, 1080i). Select the VIDEO 1 video input source on the TV.* To view the DVD player: Turn ON the DVD player. The ColorStream HD1 and HD2 terminals can connect the component video cables (plus the audio cables) instead of ColorStream...
Owner's Manual - English
Page 15
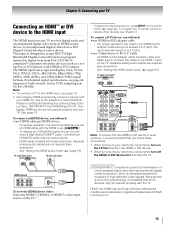
... signal formats. For proper operation, it is designed to the HDMI 1 input on the TV first and then the HDMI or DVI device. • When turning off your electronic components, turn on the TV. page 51). Separate analog audio cables are not required (see illustration). - Because this cable...Licensing LLC. 15 compliant[1] consumer electronic devices (such as a settop box or DVD player with your electronic components, turn off the HDMI or DVI device first and then the TV. See "Setting the HDMI audio mode" (- Supported Audio format: Linear PCM, sampling rate 32/44.1/48 kHz...
... signal formats. For proper operation, it is designed to the HDMI 1 input on the TV first and then the HDMI or DVI device. • When turning off your electronic components, turn on the TV. page 51). Separate analog audio cables are not required (see illustration). - Because this cable...Licensing LLC. 15 compliant[1] consumer electronic devices (such as a settop box or DVD player with your electronic components, turn off the HDMI or DVI device first and then the TV. See "Setting the HDMI audio mode" (- Supported Audio format: Linear PCM, sampling rate 32/44.1/48 kHz...
Owner's Manual - English
Page 17
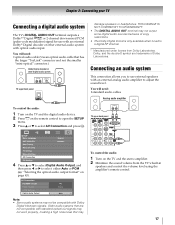
...external audio system with optical audio input. You will need : •standard audio cables Analog audio amplifier To control the audio: 1 Turn on the TV and the digital audio device. 2 Press Y on the remote control to open the SETUP menu. 3 Press B or b to select AV Connection...C or c to select either Auto or PCM (- Older audio systems that may To control the audio: 1 Turn on page 43). Chapter 2: Connecting your TV Connecting a digital audio system The TV's DIGITAL AUDIO OUT terminal outputs a Dolby®* Digital or 2-channel down-mixed PCM (pulse-code modulation) signal ...
...external audio system with optical audio input. You will need : •standard audio cables Analog audio amplifier To control the audio: 1 Turn on the TV and the digital audio device. 2 Press Y on the remote control to open the SETUP menu. 3 Press B or b to select AV Connection...C or c to select either Auto or PCM (- Older audio systems that may To control the audio: 1 Turn on page 43). Chapter 2: Connecting your TV Connecting a digital audio system The TV's DIGITAL AUDIO OUT terminal outputs a Dolby®* Digital or 2-channel down-mixed PCM (pulse-code modulation) signal ...
Owner's Manual - English
Page 20
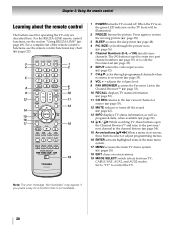
... to the last viewed channel or source (- page 33). 10 RECALL displays TV status information (- pages 22). 1 POWER turns the TV on the TV front will be illuminated. 2 FREEZE freezes the picture. When the TV is on -screen (- page 35). 12 MUTE reduces or turns off . page 38). 3 SLEEP accesses the sleep timer (- pages 26). 18...
... to the last viewed channel or source (- page 33). 10 RECALL displays TV status information (- pages 22). 1 POWER turns the TV on the TV front will be illuminated. 2 FREEZE freezes the picture. When the TV is on -screen (- page 35). 12 MUTE reduces or turns off . page 38). 3 SLEEP accesses the sleep timer (- pages 26). 18...
Owner's Manual - English
Page 21
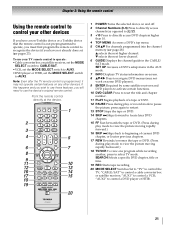
Note: Even after the TV remote control is not preprogrammed to operate, you must first program the remote control to recognize the device (if you have a non-Toshiba device or a Toshiba device that the remote control is programmed, it may not work on some DVD players). 9 ENTER Required by some...21 Point the remote control directly at the device. 16 17 18 19 1 POWER Turns the selected device on any other devices. Chapter 3: Using the remote control Using the remote control to control your TV remote control to operate: •Cable converter box or satellite receiver, set the MODE...
Note: Even after the TV remote control is not preprogrammed to operate, you must first program the remote control to recognize the device (if you have a non-Toshiba device or a Toshiba device that the remote control is programmed, it may not work on some DVD players). 9 ENTER Required by some...21 Point the remote control directly at the device. 16 17 18 19 1 POWER Turns the selected device on any other devices. Chapter 3: Using the remote control Using the remote control to control your TV remote control to operate: •Cable converter box or satellite receiver, set the MODE...
Owner's Manual - English
Page 23
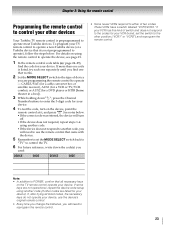
... Using the remote control Programming the remote control to control your other codes are listed for your device). To program your TV remote control to operate a non-Toshiba device (or a Toshiba device that works. 2 Set the MODE SELECT switch to the type of switch and does not respond to the codes... the 3-digit code for your device. 4 To test the code, turn off. •If the device does not respond, repeat steps 1-4 using another code. • If the device does not respond to another code (if other devices Your Toshiba TV remote control is listed, try each one that it , and press...
... Using the remote control Programming the remote control to control your other codes are listed for your device). To program your TV remote control to operate a non-Toshiba device (or a Toshiba device that works. 2 Set the MODE SELECT switch to the type of switch and does not respond to the codes... the 3-digit code for your device. 4 To test the code, turn off. •If the device does not respond, repeat steps 1-4 using another code. • If the device does not respond to another code (if other devices Your Toshiba TV remote control is listed, try each one that it , and press...

Owner's Manual - English
Page 27
...Digital. However if you do not finish the entire Initial Setup process, the Initial Setup window will appear every time you turn on or reset the TV, the Initial Setup window will appear. To tune digital channels preferentially over analog when entering channel number directly, select Auto...the SETUP menu. 2 Press B or b to select Quick Setup and press T. 3 A confirmation message will appear. Chapter 5: Setting up your TV Initial Setup When you first turn on the screen, press C or c to select your preferred menu language. 27 Press C or c to select Time Zone and set your desired ...
...Digital. However if you do not finish the entire Initial Setup process, the Initial Setup window will appear every time you turn on or reset the TV, the Initial Setup window will appear. To tune digital channels preferentially over analog when entering channel number directly, select Auto...the SETUP menu. 2 Press B or b to select Quick Setup and press T. 3 A confirmation message will appear. Chapter 5: Setting up your TV Initial Setup When you first turn on the screen, press C or c to select your preferred menu language. 27 Press C or c to select Time Zone and set your desired ...
Owner's Manual - English
Page 29
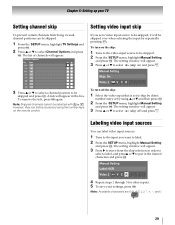
.... If you want to be skipped, it will appear in the desired characters and press T. To turn off ) and press O. Manual Setting Label: VCR Video 2 V C R 4 Repeat steps 1 through 3 for other inputs. 5 To save your TV Setting channel skip Setting video input skip To prevent certain channels from the skip selection in order...
.... If you want to be skipped, it will appear in the desired characters and press T. To turn off ) and press O. Manual Setting Label: VCR Video 2 V C R 4 Repeat steps 1 through 3 for other inputs. 5 To save your TV Setting channel skip Setting video input skip To prevent certain channels from the skip selection in order...
Owner's Manual - English
Page 30
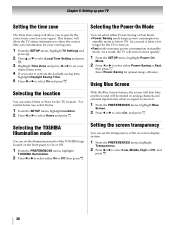
...daylight saving time, highlight Daylight Saving Time. 5 Press C or c to select On and press O. As a result, it takes a bit longer for the TV to turn blue and the sound will be muted on -screen display system. 1 From the PREFERENCES menu, highlight Transparency. 2 Press C or c to select Low, Middle... the screen will turn on more quickly. 1 From the SETUP menu, highlight Power-On Mode. 2 Press C or c to select either Power-Saving or Fast, then press O. Selecting the TOSHIBA Illumination mode You can select Home or Store for the TV location. Chapter 5: Setting up your TV Setting the time ...
...daylight saving time, highlight Daylight Saving Time. 5 Press C or c to select On and press O. As a result, it takes a bit longer for the TV to turn blue and the sound will be muted on -screen display system. 1 From the PREFERENCES menu, highlight Transparency. 2 Press C or c to select Low, Middle... the screen will turn on more quickly. 1 From the SETUP menu, highlight Power-On Mode. 2 Press C or c to select either Power-Saving or Fast, then press O. Selecting the TOSHIBA Illumination mode You can select Home or Store for the TV location. Chapter 5: Setting up your TV Setting the time ...

Owner's Manual - English
Page 31
System Information Software Version XV645U 6.1.23.0 Mar 26 2009 - 01:16:45 FW: 21 Reset Factory Defaults You can reset all settings and channels to their factory default values. 1 From the SETUP menu, highlight Reset TV and press T. 2 Enter your TV Viewing the system status 1 From the SETUP menu, highlight System Information. 2 Press T to display the system information. To cancel the reset: Press C or c to select No and press T. 31 The TV will turn off automatically. Chapter 5: Setting up your PIN code (if PIN code has been set). 3 Press C or c to select Yes and press T.
System Information Software Version XV645U 6.1.23.0 Mar 26 2009 - 01:16:45 FW: 21 Reset Factory Defaults You can reset all settings and channels to their factory default values. 1 From the SETUP menu, highlight Reset TV and press T. 2 Enter your TV Viewing the system status 1 From the SETUP menu, highlight System Information. 2 Press T to display the system information. To cancel the reset: Press C or c to select No and press T. 31 The TV will turn off automatically. Chapter 5: Setting up your PIN code (if PIN code has been set). 3 Press C or c to select Yes and press T.
Owner's Manual - English
Page 34
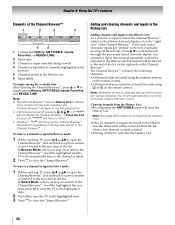
...selected list in the Channel Browser™. Clearing channels from the list when a new channel or input is tuned. •Turning off the left , eventually moving off the TV will clear the History List. 34 Once another list has been selected, the Channel Browser™ will open the Channel ...™ adds it to the History List and displays it will be highlighted and the TV will automatically tune to the channel or input. 2 Press O to close the Channel Browser™. Previously tuned channels/inputs are turned off , n will have no effect. • Pressing n will bring up the Channel ...
...selected list in the Channel Browser™. Clearing channels from the list when a new channel or input is tuned. •Turning off the left , eventually moving off the TV will clear the History List. 34 Once another list has been selected, the Channel Browser™ will open the Channel ...™ adds it to the History List and displays it will be highlighted and the TV will automatically tune to the channel or input. 2 Press O to close the Channel Browser™. Previously tuned channels/inputs are turned off , n will have no effect. • Pressing n will bring up the Channel ...

Owner's Manual - English
Page 39
...then press O. You can select a different picture mode for each input and source for other input sources). • Game mode cannot be turned on when the ANT/ CABLE input is set to On. Mode Picture Quality AutoView™ Automatically adjusts picture settings based on ambient light ...Yes, and then press T. 39 To revert to the factory defaults: 1 Select the picture mode you prefer and press T. Chapter 6: Using the TV's features Adjusting the picture Selecting the picture mode You can select your desired picture settings from the controller PC Designed for viewing of PC tables...
...then press O. You can select a different picture mode for each input and source for other input sources). • Game mode cannot be turned on when the ANT/ CABLE input is set to On. Mode Picture Quality AutoView™ Automatically adjusts picture settings based on ambient light ...Yes, and then press T. 39 To revert to the factory defaults: 1 Select the picture mode you prefer and press T. Chapter 6: Using the TV's features Adjusting the picture Selecting the picture mode You can select your desired picture settings from the controller PC Designed for viewing of PC tables...
Owner's Manual - English
Page 40
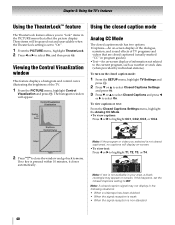
... this happens, set to "On". 1 From the PICTURE menu, highlight TheaterLock. 2 Press C or c to highlight T1, T2, T3, or T4. To turn on -screen. •To view text: Press C or c to select On, and then press T. Control Visualization Distribution Number Of Pixels Using the closed caption mode... no captions will display on the closed captioned (usually marked "CC" in the PICTURE menu that are closed caption mode: 1 From the SETUP menu, highlight TV Settings and press T. 2 Press b or B to select Closed Captions Settings and press T. 3 Press b or B to select Closed Captions and press C or ...
... this happens, set to "On". 1 From the PICTURE menu, highlight TheaterLock. 2 Press C or c to highlight T1, T2, T3, or T4. To turn on -screen. •To view text: Press C or c to select On, and then press T. Control Visualization Distribution Number Of Pixels Using the closed caption mode... no captions will display on the closed captioned (usually marked "CC" in the PICTURE menu that are closed caption mode: 1 From the SETUP menu, highlight TV Settings and press T. 2 Press b or B to select Closed Captions Settings and press T. 3 Press b or B to select Closed Captions and press C or ...
Owner's Manual - English
Page 42
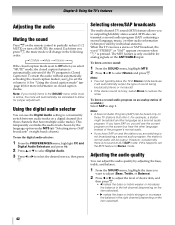
... information on and the station you want to adjust (Bass, Treble, or Balance). 2 Press C or c to partially reduce (1/2 MUTE) or turn off (MUTE) the sound. "Selecting stereo/SAP broadcasts" on those channels that offer it will see the current program on the screen but hear...might broadcast another language as a second audio program. To mute the audio without automatically activating the closed caption feature is automatically activated if the TV program is not broadcasting a second audio program, the station's normal audio will change in the following order: 1/2 Mute Mute Volume If the...
... information on and the station you want to adjust (Bass, Treble, or Balance). 2 Press C or c to partially reduce (1/2 MUTE) or turn off (MUTE) the sound. "Selecting stereo/SAP broadcasts" on those channels that offer it will see the current program on the screen but hear...might broadcast another language as a second audio program. To mute the audio without automatically activating the closed caption feature is automatically activated if the TV program is not broadcasting a second audio program, the station's normal audio will change in the following order: 1/2 Mute Mute Volume If the...
Owner's Manual - English
Page 48
.../CABLE, Video 1, Video 2, ColorStream HD1, ColorStream HD2, HDMI 1, HDMI 2, HDMI 3, or PC). To display the remaining sleep time: Press [. To set the time when the TV turns on . Note: • While the On Timer is set to On, the On Timer LED is powered on by the On Timer feature, the.... To set the sleep timer using the on . To set the sleep timer using the remote control: Press [ on (- To select the channel when the TV turns on -screen menus: 1 From the APPLICATIONS menu, highlight Sleep Timer and press T. 2 Press the number buttons to enter the length of time or press C or...
.../CABLE, Video 1, Video 2, ColorStream HD1, ColorStream HD2, HDMI 1, HDMI 2, HDMI 3, or PC). To display the remaining sleep time: Press [. To set the time when the TV turns on . Note: • While the On Timer is set to On, the On Timer LED is powered on by the On Timer feature, the.... To set the sleep timer using the on . To set the sleep timer using the remote control: Press [ on (- To select the channel when the TV turns on -screen menus: 1 From the APPLICATIONS menu, highlight Sleep Timer and press T. 2 Press the number buttons to enter the length of time or press C or...


