Software Installation Guidebook
Page 15
... install would work better for each machine. The Welcome Screen opens. 2. The default is Numeric. • If installing TI-Nspire™ Navigator™ software, both numeric and CAS versions are planning a basic install, it is displayed. • Note the blue border (darker border... necessary, but they cannot run concurrently. Also, it may present Teacher, Student, Handheld, or other options. • In the following example, the selection TI-Nspire™ Teacher Software or TI-Nspire™ CAS Teacher Software is recommended you first review the setup.ini as covered in the setup....
... install would work better for each machine. The Welcome Screen opens. 2. The default is Numeric. • If installing TI-Nspire™ Navigator™ software, both numeric and CAS versions are planning a basic install, it is displayed. • Note the blue border (darker border... necessary, but they cannot run concurrently. Also, it may present Teacher, Student, Handheld, or other options. • In the following example, the selection TI-Nspire™ Teacher Software or TI-Nspire™ CAS Teacher Software is recommended you first review the setup.ini as covered in the setup....

Software Installation Guidebook
Page 38
...same in the posted setup.ini before continuing. 4. For example, if you first install the Student Software and set the TINSPIRE_SS value to CAS and then later are using the same setup.ini for ...clear values that do not correspond to acquire the correct setup.ini for your version as the TI-Nspire™ installer executable. On the Mac® the setup.ini must be in this document was written... before it is not clear how to clear the TINSPIRE_SS value. 34 Installing and Activating TI Software For Windows® the setup.ini must be in the fields and values used. Do not...
...same in the posted setup.ini before continuing. 4. For example, if you first install the Student Software and set the TINSPIRE_SS value to CAS and then later are using the same setup.ini for ...clear values that do not correspond to acquire the correct setup.ini for your version as the TI-Nspire™ installer executable. On the Mac® the setup.ini must be in this document was written... before it is not clear how to clear the TINSPIRE_SS value. 34 Installing and Activating TI Software For Windows® the setup.ini must be in the fields and values used. Do not...
Software Installation Guidebook
Page 42
... that do not belong to the flavor been installed will see or have to install the TI-Nspire™ CAS Student or TI-Nspire™ Student version of the software. If set to 'yes' no User Interface will be ignored. #Accepted values: CAS/NCAS TINSPIRE_TS=NCAS License types:... item that specifies the installation Edition on product flavor. Items that do not belong to install the TI-Nspire™ CAS Teacher or TI-Nspire™ Teacher version of the software. SILENT #Configuration item that enables silent activation of the three fields (TINspire_SS, TINspire_TS, or ...
... that do not belong to the flavor been installed will see or have to install the TI-Nspire™ CAS Student or TI-Nspire™ Student version of the software. If set to 'yes' no User Interface will be ignored. #Accepted values: CAS/NCAS TINSPIRE_TS=NCAS License types:... item that specifies the installation Edition on product flavor. Items that do not belong to install the TI-Nspire™ CAS Teacher or TI-Nspire™ Teacher version of the software. SILENT #Configuration item that enables silent activation of the three fields (TINspire_SS, TINspire_TS, or ...

Data Collection Guidebook
Page 8
... to handhelds, and copy/paste. Options available from the Content Workspace to collect and analyze data, set up sensors, view data in the student software. Á Toolbar. Handheld: Move the cursor to the tools most commonly used to create folders, save files, create lesson bundles, send... depending on . Ã Context menu. Provides access to the desired object, and then press / b. 4 Getting Started In the TI-Nspire™ Teacher Software, click these commands to the Documents Workspace. À Á Â Ã Ä À Workspace Selector. These tabs are performing.
... to handhelds, and copy/paste. Options available from the Content Workspace to collect and analyze data, set up sensors, view data in the student software. Á Toolbar. Handheld: Move the cursor to the tools most commonly used to create folders, save files, create lesson bundles, send... depending on . Ã Context menu. Provides access to the desired object, and then press / b. 4 Getting Started In the TI-Nspire™ Teacher Software, click these commands to the Documents Workspace. À Á Â Ã Ä À Workspace Selector. These tabs are performing.

Data Collection Guidebook
Page 96
... collection device such as a Stand-Alone Data Collection Tool You can use any computer or handheld running a compatible OS and TI-Nspire™ software to manually start and stop data collection when in stand-alone mode. Using the Lab Cradle with a Handheld You can connect the...to the student's chest. Students can attach a lanyard to collect data either manually or automatically. Using the Lab Cradle with a Computer The Lab Cradle works with all Windows® and Mac® operating systems currently supported by the TI-Nspire™ Teacher and Student computer software. Using the...
... collection device such as a Stand-Alone Data Collection Tool You can use any computer or handheld running a compatible OS and TI-Nspire™ software to manually start and stop data collection when in stand-alone mode. Using the Lab Cradle with a Handheld You can connect the...to the student's chest. Students can attach a lanyard to collect data either manually or automatically. Using the Lab Cradle with a Computer The Lab Cradle works with all Windows® and Mac® operating systems currently supported by the TI-Nspire™ Teacher and Student computer software. Using the...

Getting Started
Page 3
... account 20 Logging in to the TI-Nspire™ Navigator™ system from the handheld 24 Getting started with the TI-Nspire™ Navigator™ Teacher Software 27 Exploring the TI-Nspire™ Navigator™ Teacher software .......... 29 Exploring workspaces 31 Changing language ...classes 66 Removing classes 69 Adding students to classes 69 Removing students from classes 71 Beginning and ending a class session 72 Changing the student view 73 Arranging the seating chart 74 Checking student login status 74 Sorting student information 75 Changing the classes assigned...
... account 20 Logging in to the TI-Nspire™ Navigator™ system from the handheld 24 Getting started with the TI-Nspire™ Navigator™ Teacher Software 27 Exploring the TI-Nspire™ Navigator™ Teacher software .......... 29 Exploring workspaces 31 Changing language ...classes 66 Removing classes 69 Adding students to classes 69 Removing students from classes 71 Beginning and ending a class session 72 Changing the student view 73 Arranging the seating chart 74 Checking student login status 74 Sorting student information 75 Changing the classes assigned...
Getting Started
Page 7
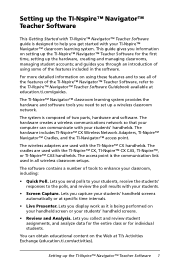
... handhelds. For more detailed information on setting up the TI-Nspire™ Navigator™ Teacher Software for individual students. Lets you send polls to your students, receive the students' responses to enhance your TI-Nspire™ Navigator™ classroom learning system. and guides you capture your students' handheld screens. • Review and Analysis. The system is the...
... handhelds. For more detailed information on setting up the TI-Nspire™ Navigator™ Teacher Software for individual students. Lets you send polls to your students, receive the students' responses to enhance your TI-Nspire™ Navigator™ classroom learning system. and guides you capture your students' handheld screens. • Review and Analysis. The system is the...

Getting Started
Page 8
... up classrooms. • The TI-Nspire™ Navigator™ Teacher Software Guidebook, provided in both printed and PDF formats. The Getting Started Guide introduces you to set up and use the Getting Started Guide or the Software Guidebook as 40 students. The process of your specific order.... After you can use the TI-Nspire™ Navigator™ Teacher Software: • The Start Here Guide-a short version of the setup process ...
... up classrooms. • The TI-Nspire™ Navigator™ Teacher Software Guidebook, provided in both printed and PDF formats. The Getting Started Guide introduces you to set up and use the Getting Started Guide or the Software Guidebook as 40 students. The process of your specific order.... After you can use the TI-Nspire™ Navigator™ Teacher Software: • The Start Here Guide-a short version of the setup process ...
Getting Started
Page 18
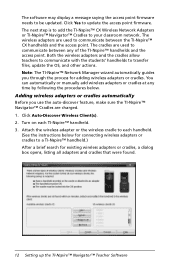
The software may display a message saying the access point firmware needs to update the access point firmware. Click Yes to be updated. The wireless adapters are used to each TI-Nspire™ handheld. 3. Adding wireless adapters or cradles automatically Before you through the process ...allow teachers to communicate with the students' handhelds to your classroom network. Note: The TI-Nspire™ Network Manager wizard automatically guides you use the auto-discover feature, make sure the TI-Nspire™ Navigator™ Cradles are used to a TI-Nspire™ handheld.) After a ...
The software may display a message saying the access point firmware needs to update the access point firmware. Click Yes to be updated. The wireless adapters are used to each TI-Nspire™ handheld. 3. Adding wireless adapters or cradles automatically Before you through the process ...allow teachers to communicate with the students' handhelds to your classroom network. Note: The TI-Nspire™ Network Manager wizard automatically guides you use the auto-discover feature, make sure the TI-Nspire™ Navigator™ Cradles are used to a TI-Nspire™ handheld.) After a ...

Getting Started
Page 85
... the class to another. The TI-Nspire™ Navigator™ software copies the student to the TI-Nspire™ Navigator™ network. Using the Class Workspace 79 TI-Nspire™ Navigator™ software moves the student to copy the student. 5. Note: You can access many.... 4. Click Edit > Paste or click Paste . The TI-Nspire™ Navigator™ Teacher Software copies the student onto the clipboard. 4. The TI-Nspire™ Navigator™ software removes the student from the menu. Click the student you must end it convenient to select the class. 2. Click...
... the class to another. The TI-Nspire™ Navigator™ software copies the student to the TI-Nspire™ Navigator™ network. Using the Class Workspace 79 TI-Nspire™ Navigator™ software moves the student to copy the student. 5. Note: You can access many.... 4. Click Edit > Paste or click Paste . The TI-Nspire™ Navigator™ Teacher Software copies the student onto the clipboard. 4. The TI-Nspire™ Navigator™ software removes the student from the menu. Click the student you must end it convenient to select the class. 2. Click...

Getting Started
Page 96
... Class Record list. • A yellow background indicates that a student received the collect or delete action, but they do not have the file on the students' handhelds. 1. Click Delete. The TI-Nspire™ Navigator™ software stops the file transfer and removes the file from Class Record....asks if you are deleting an item that transfer before you want to Porfolio, the TI-Nspire™ Navigator™ software deletes those students' files. 1. The TI-Nspire™ Navigator™ software asks if you're sure you want to remove the action. 3. Note: If you have...
... Class Record list. • A yellow background indicates that a student received the collect or delete action, but they do not have the file on the students' handhelds. 1. Click Delete. The TI-Nspire™ Navigator™ software stops the file transfer and removes the file from Class Record....asks if you are deleting an item that transfer before you want to Porfolio, the TI-Nspire™ Navigator™ software deletes those students' files. 1. The TI-Nspire™ Navigator™ software asks if you're sure you want to remove the action. 3. Note: If you have...
Teacher Software Guidebook
Page 131
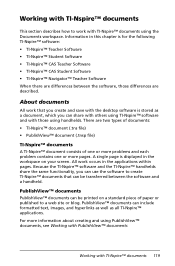
... using the Documents workspace. A single page is for the following TI-Nspire™ software: • TI-Nspire™ Teacher Software • TI-Nspire™ Student Software • TI-Nspire™ CAS Teacher Software • TI-Nspire™ CAS Student Software • TI-Nspire™ Navigator™ Teacher Software When there are differences between the software and a handheld. PublishView™ documents PublishView™ documents can share...
... using the Documents workspace. A single page is for the following TI-Nspire™ software: • TI-Nspire™ Teacher Software • TI-Nspire™ Student Software • TI-Nspire™ CAS Teacher Software • TI-Nspire™ CAS Student Software • TI-Nspire™ Navigator™ Teacher Software When there are differences between the software and a handheld. PublishView™ documents PublishView™ documents can share...

Teacher Software Guidebook
Page 189
...; features provide layout and editing features for use one tool to create a document that is available in the following TI-Nspire™ software: • TI-Nspire™ Teacher Software and TI-Nspire™ Student Software Working with TI-Nspire™ applications directly from existing handheld documents or convert lesson plans to a web site or blog, or for presenting...
...; features provide layout and editing features for use one tool to create a document that is available in the following TI-Nspire™ software: • TI-Nspire™ Teacher Software and TI-Nspire™ Student Software Working with TI-Nspire™ applications directly from existing handheld documents or convert lesson plans to a web site or blog, or for presenting...
Teacher Software Guidebook
Page 190
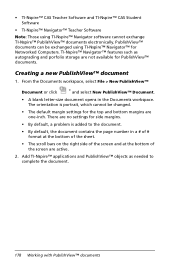
...; documents. The orientation is added to complete the document. 178 Working with PublishView™ documents Add TI-Nspire™ applications and PublishView™ objects as autograding and porfolio storage are active. 2. There are one-inch... be exchanged using TI-Nspire™ Navigator software cannot exchange TI-Nspire™ PublishView™ documents electronically. • TI-Nspire™ CAS Teacher Software and TI-Nspire™ CAS Student Software • TI-Nspire™ Navigator™ Teacher Software Note: Those using TI-Nspire™ Navigator™ ...
...; documents. The orientation is added to complete the document. 178 Working with PublishView™ documents Add TI-Nspire™ applications and PublishView™ objects as autograding and porfolio storage are active. 2. There are one-inch... be exchanged using TI-Nspire™ Navigator software cannot exchange TI-Nspire™ PublishView™ documents electronically. • TI-Nspire™ CAS Teacher Software and TI-Nspire™ CAS Student Software • TI-Nspire™ Navigator™ Teacher Software Note: Those using TI-Nspire™ Navigator™ ...

Teacher Software Guidebook
Page 271
... their information again. Note: If you have students in to the selected class. Copying a student to the selected class. The TI-Nspire™ Navigator™ software removes the student from the menu. TI-Nspire™ Navigator™ software moves the student to another class 1. The TI-Nspire™ Navigator™ Teacher Software copies the student onto the clipboard. 4. Using the Class...
... their information again. Note: If you have students in to the selected class. Copying a student to the selected class. The TI-Nspire™ Navigator™ software removes the student from the menu. TI-Nspire™ Navigator™ software moves the student to another class 1. The TI-Nspire™ Navigator™ Teacher Software copies the student onto the clipboard. 4. Using the Class...

Teacher Software Guidebook
Page 282
...file transfers stops the TI-Nspire™ Navigator™ Teacher Software from Class. Click Tools > Delete from transferring more files. The TI-Nspire™ Navigator™ software stops the file transfer and removes the file from Class Record. Any files that students have not yet sent/received... have performed in the file's Properties dialog box. Note: If you are sure you want to Porfolio, the TI-Nspire™ Navigator™ software deletes those students' files. 1. You can cancel the transfer in the Class Record. Click Remove from the Class Record list. Click Delete...
...file transfers stops the TI-Nspire™ Navigator™ Teacher Software from Class. Click Tools > Delete from transferring more files. The TI-Nspire™ Navigator™ software stops the file transfer and removes the file from Class Record. Any files that students have not yet sent/received... have performed in the file's Properties dialog box. Note: If you are sure you want to Porfolio, the TI-Nspire™ Navigator™ software deletes those students' files. 1. You can cancel the transfer in the Class Record. Click Remove from the Class Record list. Click Delete...

Teacher Software Guidebook
Page 715
...; application in the TI-Nspire™ software including: • TI-Nspire™ Teacher Software • TI-Nspire™ Student Software • TI-Nspire™ CAS Teacher Software • TI-Nspire™ CAS Student Software • TI-Nspire™ Navigator™ Teacher Software • TI-Nspire™ Navigator™ Teacher Software for completing often used in...Graph View These are in now. To use the Vernier DataQuest™ application, your TI-Nspire™ software must be 3.0 or higher. This chapter introduces you to collect, view, and analyze real-world data.
...; application in the TI-Nspire™ software including: • TI-Nspire™ Teacher Software • TI-Nspire™ Student Software • TI-Nspire™ CAS Teacher Software • TI-Nspire™ CAS Student Software • TI-Nspire™ Navigator™ Teacher Software • TI-Nspire™ Navigator™ Teacher Software for completing often used in...Graph View These are in now. To use the Vernier DataQuest™ application, your TI-Nspire™ software must be 3.0 or higher. This chapter introduces you to collect, view, and analyze real-world data.
Teacher Software Guidebook
Page 829
... you to emulate the TI-Nspire™ CX, TI-Nspire™ with Touchpad, and the TI-Nspire™ with Clickpad handhelds in the following TI-Nspire™ software: • TI-Nspire™ Teacher Software • TI-Nspire™ CAS Teacher Software • TI-Nspire™ Student Software • TI-Nspire™ CAS Student Software • TI-Nspire™ Navigator™ Teacher Software With three layout options to...
... you to emulate the TI-Nspire™ CX, TI-Nspire™ with Touchpad, and the TI-Nspire™ with Clickpad handhelds in the following TI-Nspire™ software: • TI-Nspire™ Teacher Software • TI-Nspire™ CAS Teacher Software • TI-Nspire™ Student Software • TI-Nspire™ CAS Student Software • TI-Nspire™ Navigator™ Teacher Software With three layout options to...

Teacher Software Guidebook
Page 830
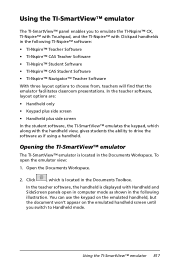
In the student software, the TI-Nspire™ CX keypad is displayed with the side screen open in the status bar to switch to Handheld mode. 3. in computer mode. You can use the keypad on the emulated handheld, but the document won't appear on the emulated handheld screen until you switch to 818 Using the TI-SmartView™ emulator Select View > Handheld or click handheld mode.
In the student software, the TI-Nspire™ CX keypad is displayed with the side screen open in the status bar to switch to Handheld mode. 3. in computer mode. You can use the keypad on the emulated handheld, but the document won't appear on the emulated handheld screen until you switch to 818 Using the TI-SmartView™ emulator Select View > Handheld or click handheld mode.
Teacher Software Guidebook
Page 835
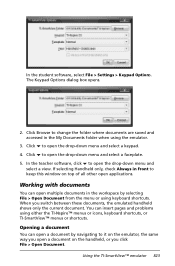
...by selecting File > Open Document from the menu or using keyboard shortcuts. You can open applications. In the teacher software, click ¤ to keep this window on the handheld, or you click File > Open Document. If selecting ...in the workspace by navigating to open multiple documents in the My Documents folder when using either the TI-Nspire™ menus or icons, keyboard shortcuts, or TI-SmartView™ menus or shortcuts. Working with documents ... current document. Using the TI-SmartView™ emulator 823 In the student software, select File > Settings > Keypad Options.
...by selecting File > Open Document from the menu or using keyboard shortcuts. You can open applications. In the teacher software, click ¤ to keep this window on the handheld, or you click File > Open Document. If selecting ...in the workspace by navigating to open multiple documents in the My Documents folder when using either the TI-Nspire™ menus or icons, keyboard shortcuts, or TI-SmartView™ menus or shortcuts. Working with documents ... current document. Using the TI-SmartView™ emulator 823 In the student software, select File > Settings > Keypad Options.


