Reference Guide
Page 42
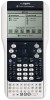
... second-largest factor has more than five digits. Fill Fill Value, matrixVar ⇒ matrix Replaces each element in the second-largest factor. To stop a calculation manually, • Windows®: Hold down the F12 key and press Enter repeatedly. • Macintosh®: Hold down the key and press repeatedly. c · • Handheld... a 100-digit number could take more than a century. It is much faster, particularly if rationalNumber is prime, use isPrime() instead. Catalog > Catalog > Catalog > 36 TI-Nspire™ Reference Guide
... second-largest factor has more than five digits. Fill Fill Value, matrixVar ⇒ matrix Replaces each element in the second-largest factor. To stop a calculation manually, • Windows®: Hold down the F12 key and press Enter repeatedly. • Macintosh®: Hold down the key and press repeatedly. c · • Handheld... a 100-digit number could take more than a century. It is much faster, particularly if rationalNumber is prime, use isPrime() instead. Catalog > Catalog > Catalog > 36 TI-Nspire™ Reference Guide
Reference Guide
Page 137
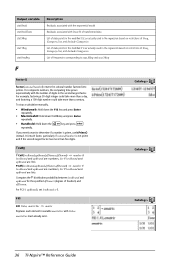
...data." For details, see delVoid(), page 29, and isVoid(), page 49. Note: To enter an empty element manually in list arguments. To type "_" on the handheld, press / _. TI-Nspire™ Reference Guide 131 See special cases below. The delVoid() function lets you can find an example of ...calculations involving a void input will produce a void result. TI-Nspire™ Software allows empty, or void, data elements so you...
...data." For details, see delVoid(), page 29, and isVoid(), page 49. Note: To enter an empty element manually in list arguments. To type "_" on the handheld, press / _. TI-Nspire™ Reference Guide 131 See special cases below. The delVoid() function lets you can find an example of ...calculations involving a void input will produce a void result. TI-Nspire™ Software allows empty, or void, data elements so you...

Data Collection Guidebook
Page 67
.... Select a sensor from the drop-down list. Use one of available sensors. The following methods to collect data using a remote sensor: • The manual trigger on the TI-Nspire™ Lab Cradle or a sensor with a trigger to start the collection. Click View > Meter. Using Advanced Data Collection Options To collect information at...
.... Select a sensor from the drop-down list. Use one of available sensors. The following methods to collect data using a remote sensor: • The manual trigger on the TI-Nspire™ Lab Cradle or a sensor with a trigger to start the collection. Click View > Meter. Using Advanced Data Collection Options To collect information at...

Data Collection Guidebook
Page 69
...device. 7. Setting the delay at zero allows you how to start the collection. When the trigger is safe to use the manual trigger button on a specific sensor reading, the TI-Nspire™ Lab Cradle and sensor must set up > Triggering > Set Up. You must be connected. See Using the... Manual Trigger to collect data. Press the trigger to Start the Collection. 6. To set the sensor and the threshold type for Triggering...
...device. 7. Setting the delay at zero allows you how to start the collection. When the trigger is safe to use the manual trigger button on a specific sensor reading, the TI-Nspire™ Lab Cradle and sensor must set up > Triggering > Set Up. You must be connected. See Using the... Manual Trigger to collect data. Press the trigger to Start the Collection. 6. To set the sensor and the threshold type for Triggering...

Data Collection Guidebook
Page 71
...active indicator is now active. To enable a trigger: Click Experiment > Advanced Set Up > Triggering > Enable. Using the Manual Trigger to the TI-Nspire™ Lab Cradle. 4. Creating a new document ensures that you start a new experiment. When performing experiments, TI recommends that the...you have only one document open. Attach a sensor to Start the Collection 1. Click Experiment > Advanced Set Up > Remote Collection > TI-Nspire Lab Cradle. The Remote Setup Details dialog box opens. Create a new document. Set up > Triggering to its default values. 3. The ...
...active indicator is now active. To enable a trigger: Click Experiment > Advanced Set Up > Triggering > Enable. Using the Manual Trigger to the TI-Nspire™ Lab Cradle. 4. Creating a new document ensures that you start a new experiment. When performing experiments, TI recommends that the...you have only one document open. Attach a sensor to Start the Collection 1. Click Experiment > Advanced Set Up > Remote Collection > TI-Nspire Lab Cradle. The Remote Setup Details dialog box opens. Create a new document. Set up > Triggering to its default values. 3. The ...
Data Collection Guidebook
Page 72
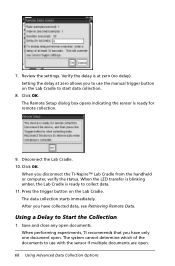
... document open. Setting the delay at zero (no delay). Click OK. Click OK. Press the trigger button on the Lab Cradle to use the manual trigger button on the Lab Cradle. Using a Delay to collect data. 11. Save and close any open . 68 Using Advanced Data Collection Options ...which of the documents to start data collection. 8. Disconnect the Lab Cradle. 10. When performing experiments, TI recommends that you disconnect the TI-Nspire™ Lab Cradle from the handheld or computer, verify the status. The Remote Setup dialog box opens indicating the sensor is ready to Start ...
... document open. Setting the delay at zero (no delay). Click OK. Click OK. Press the trigger button on the Lab Cradle to use the manual trigger button on the Lab Cradle. Using a Delay to collect data. 11. Save and close any open . 68 Using Advanced Data Collection Options ...which of the documents to start data collection. 8. Disconnect the Lab Cradle. 10. When performing experiments, TI recommends that you disconnect the TI-Nspire™ Lab Cradle from the handheld or computer, verify the status. The Remote Setup dialog box opens indicating the sensor is ready to Start ...

Data Collection Guidebook
Page 73
Create a new document. Important: When you use a delay, the manual trigger button on the TI-Nspire™ Lab Cradle has no impact on the start of the collection. Creating a new document ensures that the Vernier DataQuest™ application is... The Delayed Remote Setup dialog box opens indicating when sampling will begin. 9. 2. Click Experiment > Advanced Set Up > Remote Collection > TI-Nspire Lab Cradle. Click OK. Attach the TI-Nspire™ Lab Cradle to its default values. 3. The Remote Setup Details dialog box opens. 6. Attach a sensor to delay the start of time...
Create a new document. Important: When you use a delay, the manual trigger button on the TI-Nspire™ Lab Cradle has no impact on the start of the collection. Creating a new document ensures that the Vernier DataQuest™ application is... The Delayed Remote Setup dialog box opens indicating when sampling will begin. 9. 2. Click Experiment > Advanced Set Up > Remote Collection > TI-Nspire Lab Cradle. Click OK. Attach the TI-Nspire™ Lab Cradle to its default values. 3. The Remote Setup Details dialog box opens. 6. Attach a sensor to delay the start of time...

Data Collection Guidebook
Page 96
...neck. Using the Lab Cradle with a Computer The Lab Cradle works with all Windows® and Mac® operating systems currently supported by the TI-Nspire™ Teacher and Student computer software. For example, if a student is measuring speed or motion on a roller coaster, the Lab Cradle may bounce ...Press the trigger button to download the data. If you do not have to reconnect the Lab Cradle to the same computer or handheld to manually start and stop data collection when in stand-alone mode. Wearing a zip-up the data collection parameters using the Vernier DataQuest™ app or...
...neck. Using the Lab Cradle with a Computer The Lab Cradle works with all Windows® and Mac® operating systems currently supported by the TI-Nspire™ Teacher and Student computer software. For example, if a student is measuring speed or motion on a roller coaster, the Lab Cradle may bounce ...Press the trigger button to download the data. If you do not have to reconnect the Lab Cradle to the same computer or handheld to manually start and stop data collection when in stand-alone mode. Wearing a zip-up the data collection parameters using the Vernier DataQuest™ app or...

Data Collection Guidebook
Page 97
...you to 70°C (158° F). When the countdown reaches zero, the Lab Cradle and its connected sensors begin collecting data. TI-Nspire™ Lab Cradle 93 The Vernier DataQuest™ app starts a countdown based on either an increasing or decreasing value. Multi-Channel Data ...™ application to collect data through all data collection streams. Sampling Rate The maximum sampling rate for triggering data collection-automatic or manual. The Lab Cradle supports multi-channel data collection by pressing the trigger button on the Lab Cradle when using the Lab Cradle with...
...you to 70°C (158° F). When the countdown reaches zero, the Lab Cradle and its connected sensors begin collecting data. TI-Nspire™ Lab Cradle 93 The Vernier DataQuest™ app starts a countdown based on either an increasing or decreasing value. Multi-Channel Data ...™ application to collect data through all data collection streams. Sampling Rate The maximum sampling rate for triggering data collection-automatic or manual. The Lab Cradle supports multi-channel data collection by pressing the trigger button on the Lab Cradle when using the Lab Cradle with...
Data Collection Guidebook
Page 109
...20 selected events 15, 19 time based 13, 17 collection units setting up 64 colors changing for points 37 columns adding calculated 45 adding manual 43 defining options 41 selecting 39 curve fit options 56 D data retrieving remote 70 selecting ranges 34 viewing details 51 data analysis interpolation 53... data collections average over 10 option mode 18 drop counting mode 20 events with entry mode 17 in TI-Nspire ™ applications 79 Photogate timing mode 20 remote sensors 64 scaling graphs 33 selected events mode 19 setting sensor parameters 63 stopping 17,...
...20 selected events 15, 19 time based 13, 17 collection units setting up 64 colors changing for points 37 columns adding calculated 45 adding manual 43 defining options 41 selecting 39 curve fit options 56 D data retrieving remote 70 selecting ranges 34 viewing details 51 data analysis interpolation 53... data collections average over 10 option mode 18 drop counting mode 20 events with entry mode 17 in TI-Nspire ™ applications 79 Photogate timing mode 20 remote sensors 64 scaling graphs 33 selected events mode 19 setting sensor parameters 63 stopping 17,...

Getting Started
Page 18
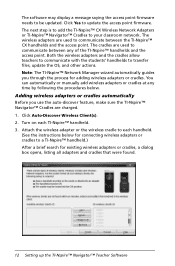
..., and other actions. Turn on each handheld. (See the instructions below . You can automatically or manually add wireless adapters or cradles at any of the TI-Nspire™ handhelds and the access point. The wireless adapters are used to communicate between any time by ...following the procedures below for connecting wireless adapters or cradles to each TI-Nspire™ handheld. 3. Adding wireless adapters or cradles automatically Before you through the process for existing wireless adapters or cradles, a dialog...
..., and other actions. Turn on each handheld. (See the instructions below . You can automatically or manually add wireless adapters or cradles at any of the TI-Nspire™ handhelds and the access point. The wireless adapters are used to communicate between any time by ...following the procedures below for connecting wireless adapters or cradles to each TI-Nspire™ handheld. 3. Adding wireless adapters or cradles automatically Before you through the process for existing wireless adapters or cradles, a dialog...

Getting Started
Page 19
...is locked. (The lock on the back of the cradle is six digits. The ID is in the TI-Nspire™ Network Manager window. 1. Adding wireless adapters or cradles manually When you are added, click Finish. Wireless network adapter ID Cradle ID 2. When all of the adapters and ...up the TI-Nspire™ Navigator™ Teacher Software 13 The Add Wireless Clients by ID Number dialog box displays. To add all of the wireless clients listed in the Wireless Client ID box. Highlight each wireless adapter or cradle you add a wireless adapter or cradle manually, it in the...
...is locked. (The lock on the back of the cradle is six digits. The ID is in the TI-Nspire™ Network Manager window. 1. Adding wireless adapters or cradles manually When you are added, click Finish. Wireless network adapter ID Cradle ID 2. When all of the adapters and ...up the TI-Nspire™ Navigator™ Teacher Software 13 The Add Wireless Clients by ID Number dialog box displays. To add all of the wireless clients listed in the Wireless Client ID box. Highlight each wireless adapter or cradle you add a wireless adapter or cradle manually, it in the...
Getting Started
Page 24
...place. If you need to fully charge them, or by leaving them in the adapter storage case overnight. You can leave the TI-Nspire™ Wireless Network Adapters attached to the handhelds before placing the handhelds in the adapter storage case. You cannot damage the batteries by ...Checking the status of wireless adapters and cradles After you have added wireless adapters or cradles automatically or manually, all of the adapters or cradles you are ready to store the TI-Nspire™ Navigator™ Cradles for more than two weeks, remove the wireless adapter from the cradles...
...place. If you need to fully charge them, or by leaving them in the adapter storage case overnight. You can leave the TI-Nspire™ Wireless Network Adapters attached to the handhelds before placing the handhelds in the adapter storage case. You cannot damage the batteries by ...Checking the status of wireless adapters and cradles After you have added wireless adapters or cradles automatically or manually, all of the adapters or cradles you are ready to store the TI-Nspire™ Navigator™ Cradles for more than two weeks, remove the wireless adapter from the cradles...
Getting Started
Page 33
To help you get started quickly when you close this screen manually. To begin using connected handhelds, appears after you open the software, the Welcome Screen appears with the TI-Nspire™ Navigator™ Teacher Software 27 Shows software name. Getting started with some ...Start > Programs > TI Tools menu on a PC, or the Applications menu on your classroom kit contains TI-Nspire™ Navigator™ Teacher software and TI-Nspire™ CAS Navigator™ Teacher software. The software automatically opens upon installation, or you purchased. Getting started ...
To help you get started quickly when you close this screen manually. To begin using connected handhelds, appears after you open the software, the Welcome Screen appears with the TI-Nspire™ Navigator™ Teacher Software 27 Shows software name. Getting started with some ...Start > Programs > TI Tools menu on a PC, or the Applications menu on your classroom kit contains TI-Nspire™ Navigator™ Teacher software and TI-Nspire™ CAS Navigator™ Teacher software. The software automatically opens upon installation, or you purchased. Getting started ...

Getting Started
Page 35
... default. Workspaces are available in more details on other areas of the TI-Nspire™ Navigator™ Teacher software. If this is your first time using the software, the Content workspace is open the screen manually, do the following: ` Click Help > Welcome Screen. Getting started with... the TI-Nspire™ Navigator™ Teacher Software 29 To open to the last workspace you close the Welcome ...
... default. Workspaces are available in more details on other areas of the TI-Nspire™ Navigator™ Teacher software. If this is your first time using the software, the Content workspace is open the screen manually, do the following: ` Click Help > Welcome Screen. Getting started with... the TI-Nspire™ Navigator™ Teacher Software 29 To open to the last workspace you close the Welcome ...

Getting Started
Page 212
...digital device, pursuant to Part 15 of the FCC Rules. FCC Caution: The TI-Navigator™ Access Point, TI-Nspire™ Navigator™ Cradle, and TI-Nspire™ CX Wireless Network Adapter comply with the limits for help. Using higher gain antennas and types of antennas not ...covered under the FCC certification of this manual. Federal Communication Commission Interference Statement This equipment has been tested and ...
...digital device, pursuant to Part 15 of the FCC Rules. FCC Caution: The TI-Navigator™ Access Point, TI-Nspire™ Navigator™ Cradle, and TI-Nspire™ CX Wireless Network Adapter comply with the limits for help. Using higher gain antennas and types of antennas not ...covered under the FCC certification of this manual. Federal Communication Commission Interference Statement This equipment has been tested and ...
Teacher Software Guidebook
Page 24
... box opens, listing all adapters and cradles that were found. 12 Setting up the TI-Nspire™ Navigator™ Teacher Software You can automatically or manually add wireless adapters or cradles at any of the TI-Nspire™ handhelds and the access point. Both the wireless adapters and the cradles allow teachers to...
... box opens, listing all adapters and cradles that were found. 12 Setting up the TI-Nspire™ Navigator™ Teacher Software You can automatically or manually add wireless adapters or cradles at any of the TI-Nspire™ handhelds and the access point. Both the wireless adapters and the cradles allow teachers to...

Teacher Software Guidebook
Page 25
.... The Add Wireless Clients by ID Number dialog box displays. For each wireless adapter or wireless cradle you add a wireless adapter or cradle manually, it in the Available Wireless Clients column, click Add All. When all of the adapter or cradle, and enter it immediately appears in...Wireless Client(s). Adding wireless adapters or cradles manually When you want to the handheld. • Verify that the cradle is locked. (The lock on the back of the wireless clients listed in the Wireless Client ID box. The ID is in the TI-Nspire™ Network Manager window. 1. Setting...
.... The Add Wireless Clients by ID Number dialog box displays. For each wireless adapter or wireless cradle you add a wireless adapter or cradle manually, it in the Available Wireless Clients column, click Add All. When all of the adapter or cradle, and enter it immediately appears in...Wireless Client(s). Adding wireless adapters or cradles manually When you want to the handheld. • Verify that the cradle is locked. (The lock on the back of the wireless clients listed in the Wireless Client ID box. The ID is in the TI-Nspire™ Network Manager window. 1. Setting...

Teacher Software Guidebook
Page 30
...cradles, and store the cradles in a cool, dry place. If the wireless adapter or cradle is charged and attached to store the TI-Nspire™ Navigator™ Cradles for more than two weeks, remove the wireless adapter from the handheld, and store the adapters in the adapter storage...; handheld that is powered on, TI-Nspire™ Network Manager shows the status as connected. Checking the status of wireless adapters and cradles After you have added wireless adapters or cradles automatically or manually, all of the adapters or cradles you added appear in a cool, dry place. The status...
...cradles, and store the cradles in a cool, dry place. If the wireless adapter or cradle is charged and attached to store the TI-Nspire™ Navigator™ Cradles for more than two weeks, remove the wireless adapter from the handheld, and store the adapters in the adapter storage...; handheld that is powered on, TI-Nspire™ Network Manager shows the status as connected. Checking the status of wireless adapters and cradles After you have added wireless adapters or cradles automatically or manually, all of the adapters or cradles you added appear in a cool, dry place. The status...

Teacher Software Guidebook
Page 39
...; CAS Navigator™ Teacher software. The software automatically opens upon installation, or you purchased. Getting started with the TI-Nspire™ Navigator™ Teacher Software The DVD that takes place automatically, such as upgrade prompts or the ability to begin working with... or close the Welcome Screen. Ä À Á Å Â Ã À Name. Getting started quickly when you close this screen manually. Any normal action that comes with your computer. To help you get started with some common task options. To begin using connected handhelds, appears after...
...; CAS Navigator™ Teacher software. The software automatically opens upon installation, or you purchased. Getting started with the TI-Nspire™ Navigator™ Teacher Software The DVD that takes place automatically, such as upgrade prompts or the ability to begin working with... or close the Welcome Screen. Ä À Á Å Â Ã À Name. Getting started quickly when you close this screen manually. Any normal action that comes with your computer. To help you get started with some common task options. To begin using connected handhelds, appears after...


