Operating Instructions
Page 3
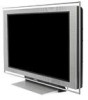
... use this polarized AC plug with the instructions, may be installed near an easily accessible power outlet. To Customers Sufficient expertise is recommended to Part 15 of TV closed captioning in this manual could void your cable service provider. (Continued) 3 Be sure to subcontract the installation to Sony dealers or licensed contractors and pay adequate attention to constitute a risk of Conformity Trade Name: SONY Model: KDL-40XBR2/KDL-46XBR2/ KDL-40XBR3/KDL...
... use this polarized AC plug with the instructions, may be installed near an easily accessible power outlet. To Customers Sufficient expertise is recommended to Part 15 of TV closed captioning in this manual could void your cable service provider. (Continued) 3 Be sure to subcontract the installation to Sony dealers or licensed contractors and pay adequate attention to constitute a risk of Conformity Trade Name: SONY Model: KDL-40XBR2/KDL-46XBR2/ KDL-40XBR3/KDL...
Operating Instructions
Page 5
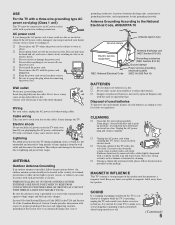
... convert or damage the power cord. Wall outlet Do not use strong solvents such as to provide some TVs to proper grounding of the mast and supporting structure, grounding of overhead power lines or other electric light or power circuits, or where it may cause arcing and result in a fire. An outdoor antenna system should not be located in the vicinity of...
... convert or damage the power cord. Wall outlet Do not use strong solvents such as to provide some TVs to proper grounding of the mast and supporting structure, grounding of overhead power lines or other electric light or power circuits, or where it may cause arcing and result in a fire. An outdoor antenna system should not be located in the vicinity of...
Operating Instructions
Page 9
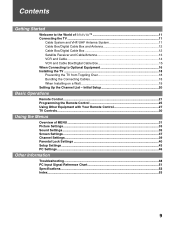
... MENU ...31 Picture Settings...33 Sound Settings...35 Screen Settings ...37 Channel Settings...39 Parental Lock Settings 40 Setup Settings ...43 PC Settings ...46 Other Information Troubleshooting...48 PC Input Signal Reference Chart 51 Specifications ...52 Index ...53 9 Initial Setup 20 Basic Operations Remote Control ...21 Programming the Remote Control 25 Using Other Equipment with Your Remote Control 27 TV Controls...30 Using the Menus Overview of TM 11 Connecting the TV ...11 Cable System and VHF/UHF Antenna System 11 Cable Box/Digital Cable Box and Antenna 12 Cable...
... MENU ...31 Picture Settings...33 Sound Settings...35 Screen Settings ...37 Channel Settings...39 Parental Lock Settings 40 Setup Settings ...43 PC Settings ...46 Other Information Troubleshooting...48 PC Input Signal Reference Chart 51 Specifications ...52 Index ...53 9 Initial Setup 20 Basic Operations Remote Control ...21 Programming the Remote Control 25 Using Other Equipment with Your Remote Control 27 TV Controls...30 Using the Menus Overview of TM 11 Connecting the TV ...11 Cable System and VHF/UHF Antenna System 11 Cable Box/Digital Cable Box and Antenna 12 Cable...
Operating Instructions
Page 15
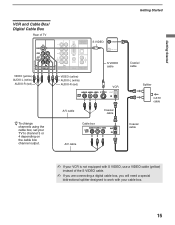
...HD/DVD IN (1080i/720p/480p/480i) RGB DIGITAL OUT (OPTICAL) AUDIO L AUDIO R PC IN AUDIO OUT (VAR/FIX) S VIDEO CABLE VHF/UHF S VIDEO cable VIDEO (yellow) AUDIO-L (white) AUDIO-R (red) VIDEO (yellow) AUDIO-L (white) AUDIO-R (red) VCR z To change channels using the cable box, set your TV to work with your cable box. 15 Getting Started Getting Started VCR and Cable Box/ Digital Cable Box Rear of the S VIDEO cable. ✍ If you are connecting a digital cable box, you will need a special bidirectional splitter designed to channel 3 or 4 depending on the cable box channel output...
...HD/DVD IN (1080i/720p/480p/480i) RGB DIGITAL OUT (OPTICAL) AUDIO L AUDIO R PC IN AUDIO OUT (VAR/FIX) S VIDEO CABLE VHF/UHF S VIDEO cable VIDEO (yellow) AUDIO-L (white) AUDIO-R (red) VIDEO (yellow) AUDIO-L (white) AUDIO-R (red) VCR z To change channels using the cable box, set your TV to work with your cable box. 15 Getting Started Getting Started VCR and Cable Box/ Digital Cable Box Rear of the S VIDEO cable. ✍ If you are connecting a digital cable box, you will need a special bidirectional splitter designed to channel 3 or 4 depending on the cable box channel output...
Operating Instructions
Page 17
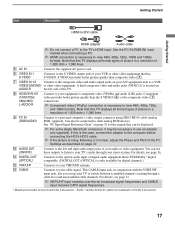
... this TV displays all format types of picture in a resolution of 1,920 dots × 1,080 lines. 5 AC IN Connects the supplied AC power cord. 6 VIDEO IN 1 S VIDEO Connects to your VHF/UHF antenna. See "PC Input Signal Reference Chart" on page 51 for the signals that is PCM/Dolby* digital compatible. (DIGITAL OUT (OPTICAL) is only available for digital channels.) qs VHF/UHF Connects to the S VIDEO output jack of your VCR or other analog RGB devices...
... this TV displays all format types of picture in a resolution of 1,920 dots × 1,080 lines. 5 AC IN Connects the supplied AC power cord. 6 VIDEO IN 1 S VIDEO Connects to your VHF/UHF antenna. See "PC Input Signal Reference Chart" on page 51 for the signals that is PCM/Dolby* digital compatible. (DIGITAL OUT (OPTICAL) is only available for digital channels.) qs VHF/UHF Connects to the S VIDEO output jack of your VCR or other analog RGB devices...
Operating Instructions
Page 19
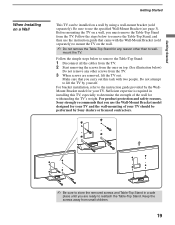
... not remove any reason other screws from the TV. 3 When screws are ready to use the specified Wall-Mount Bracket (see page 3). Follow the simple steps below to remove the Table-Top Stand, and then use the Wall-Mount Bracket model designed for withstanding the TV's weight. Make sure that you must remove the Table-Top Stand from small children. 19 For bracket installation, refer to the instruction guide provided by the WallMount Bracket model for any...
... not remove any reason other screws from the TV. 3 When screws are ready to use the specified Wall-Mount Bracket (see page 3). Follow the simple steps below to remove the Table-Top Stand, and then use the Wall-Mount Bracket model designed for withstanding the TV's weight. Make sure that you must remove the Table-Top Stand from small children. 19 For bracket installation, refer to the instruction guide provided by the WallMount Bracket model for any...
Operating Instructions
Page 21
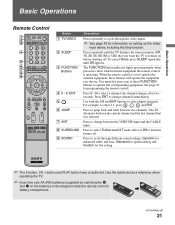
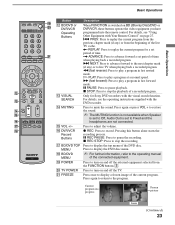
... operate the corresponding equipment. The FUNCTION button indicator lights up the video input labels, including the Skip function. Press to show which external equipment the remote control is set to select digital channels. To cancel Sleep, press SLEEP repeatedly until the TV displays the time in minutes (Off, 15, 30, 45, 60, 90 or 120) that was selected. See page 25 for flat setting. ✍ The 5 button, CH + button and PLAY button...
... operate the corresponding equipment. The FUNCTION button indicator lights up the video input labels, including the Skip function. Press to show which external equipment the remote control is set to select digital channels. To cancel Sleep, press SLEEP repeatedly until the TV displays the time in minutes (Off, 15, 30, 45, 60, 90 or 120) that was selected. See page 25 for flat setting. ✍ The 5 button, CH + button and PLAY button...
Operating Instructions
Page 23
... operating instructions supplied with Your Remote Control" on and off the external equipment selected from the beginning of time. Press to live TV cache. REPLAY: Press to Fixed and the headphones are not connected. m (fast reverse): Press to the program. Press to display the top menu of the connected equipment. Press to mute the sound. ADVANCE: Press to advance forward a set to replay the current program for Sony DVD...
... operating instructions supplied with Your Remote Control" on and off the external equipment selected from the beginning of time. Press to live TV cache. REPLAY: Press to Fixed and the headphones are not connected. m (fast reverse): Press to the program. Press to display the top menu of the connected equipment. Press to mute the sound. ADVANCE: Press to advance forward a set to replay the current program for Sony DVD...
Operating Instructions
Page 24
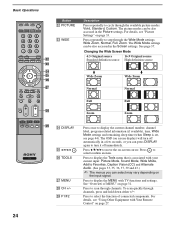
... of connected components. To scan quickly through the available picture modes: Vivid, Standard, Custom. wl F1/F2 Press once to select/confirm an item. Press to display the MENU with Your Remote Control" on -screen cursor. For details, see page 44). Press to display the current channel number, channel label, program-related information (if available), time, Wide Mode settings and remaining sleep time (when Sleep is associated with your current input: Picture Mode, Sound Mode, Wide Mode, Add...
... of connected components. To scan quickly through the available picture modes: Vivid, Standard, Custom. wl F1/F2 Press once to select/confirm an item. Press to display the MENU with Your Remote Control" on -screen cursor. For details, see page 44). Press to display the current channel number, channel label, program-related information (if available), time, Wide Mode settings and remaining sleep time (when Sleep is associated with your current input: Picture Mode, Sound Mode, Wide Mode, Add...
Operating Instructions
Page 29
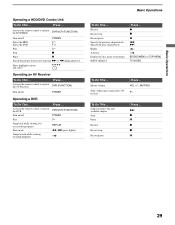
... the DVD F 2 Play H Stop x Pause X Search the picture forward or backward M or m during playback Move highlight (cursor) and select V v B b Operating an AV Receiver To Do This ... z x X . > BD/DVD MENU or TOP MENU TV/VIDEO To Do This ... Activate the remote control to operate the AV Receiver DVR (FUNCTION) Turn on/off POWER Play H Jump back while viewing live or recorded programs REPLAY Slow mode m/m (press lightly) Jump forward while viewing recorded programs Basic Operations...
... the DVD F 2 Play H Stop x Pause X Search the picture forward or backward M or m during playback Move highlight (cursor) and select V v B b Operating an AV Receiver To Do This ... z x X . > BD/DVD MENU or TOP MENU TV/VIDEO To Do This ... Activate the remote control to operate the AV Receiver DVR (FUNCTION) Turn on/off POWER Play H Jump back while viewing live or recorded programs REPLAY Slow mode m/m (press lightly) Jump forward while viewing recorded programs Basic Operations...

Operating Instructions
Page 30
... Receiver/Light Sensor Receives IR signals from the remote control. In the MENU screen, this LED will not appear. Speaker Outputs the audio signal. ✍ The CHANNEL + button has a tactile dot. If you set , this button serves as its function may indicate the TV needs servicing (see "Overview of MENU" on page 2). 8 POWER LED Lights up in green when Picture Off is set. Use it as up in red when your TV is set a certain input to cycle through the video inputs. In the MENU screen, these buttons...
... Receiver/Light Sensor Receives IR signals from the remote control. In the MENU screen, this LED will not appear. Speaker Outputs the audio signal. ✍ The CHANNEL + button has a tactile dot. If you set , this button serves as its function may indicate the TV needs servicing (see "Overview of MENU" on page 2). 8 POWER LED Lights up in green when Picture Off is set. Use it as up in red when your TV is set a certain input to cycle through the video inputs. In the MENU screen, these buttons...
Operating Instructions
Page 31
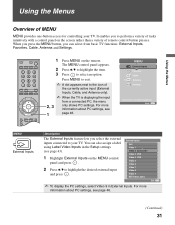
... Inputs Exit Video 1 Video 2 Camcorder Video 3 DVD Video 4 DVR Video 5 Video 6 Video 7 Video 8 Video 9 Edit Video Labels ✍ To display the PC settings, select Video 9 in the Setup settings (see page 43). 1 Highlight External Inputs on the remote. Exit: MENU (Continued) 31 Using the Menus RETURN Using the Menus Overview of remote control button presses. TV/VIDEO POWER TV POWER BD/DVD DVR/VCR SAT/CABLE TV FUNCTION ENT JUMP ANT FREEZE MODE SURROUND SOUND PICTURE WIDE DISPLAY GUIDE TOOLS MENU PREV REPLAY ADVANCE NEXT PLAY 1 Press MENU on the MENU control panel...
... Inputs Exit Video 1 Video 2 Camcorder Video 3 DVD Video 4 DVR Video 5 Video 6 Video 7 Video 8 Video 9 Edit Video Labels ✍ To display the PC settings, select Video 9 in the Setup settings (see page 43). 1 Highlight External Inputs on the remote. Exit: MENU (Continued) 31 Using the Menus RETURN Using the Menus Overview of remote control button presses. TV/VIDEO POWER TV POWER BD/DVD DVR/VCR SAT/CABLE TV FUNCTION ENT JUMP ANT FREEZE MODE SURROUND SOUND PICTURE WIDE DISPLAY GUIDE TOOLS MENU PREV REPLAY ADVANCE NEXT PLAY 1 Press MENU on the MENU control panel...
Operating Instructions
Page 33
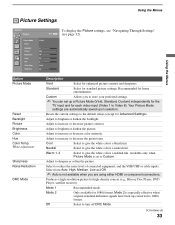
... backlight. Using the Menus Picture Settings Antenna Picture Picture Mode Reset Backlight Picture Brightness Color Hue Color Temp. Your Picture Mode settings are using either HDMI or component connections. Adjust to increase or decrease the green tones. Select from Auto, High, Medium, Low and Off. ✍ Auto is especially effective when original standard-definition signals have been up a Picture Mode (Vivid, Standard, Custom) independently for the TV input and for each video input (Video 1 to give the white colors a neutral tint. White adjustment Sharpness...
... backlight. Using the Menus Picture Settings Antenna Picture Picture Mode Reset Backlight Picture Brightness Color Hue Color Temp. Your Picture Mode settings are using either HDMI or component connections. Adjust to increase or decrease the green tones. Select from Auto, High, Medium, Low and Off. ✍ Auto is especially effective when original standard-definition signals have been up a Picture Mode (Vivid, Standard, Custom) independently for the TV input and for each video input (Video 1 to give the white colors a neutral tint. White adjustment Sharpness...
Operating Instructions
Page 37
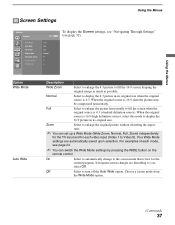
Using the Menus Screen Settings Using the Menus Antenna Screen Wide Mode Auto Wide 4:3 Default Display Area Horizontal Center Vertical Center Vertical Size To display the Screen settings, see "Navigating Through Settings" Exit: MENU (see page 24. ✍ You can set up a Wide Mode (Wide Zoom, Normal, Full, Zoom) independently for the TV input and for the current program. Normal Select to display the 4:3 picture in its original size when the original source is 16:9, then...
Using the Menus Screen Settings Using the Menus Antenna Screen Wide Mode Auto Wide 4:3 Default Display Area Horizontal Center Vertical Center Vertical Size To display the Screen settings, see "Navigating Through Settings" Exit: MENU (see page 24. ✍ You can set up a Wide Mode (Wide Zoom, Normal, Full, Zoom) independently for the TV input and for the current program. Normal Select to display the 4:3 picture in its original size when the original source is 16:9, then...
Operating Instructions
Page 39
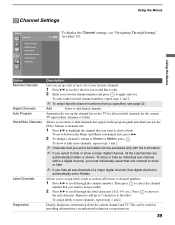
... receivable channels for all the subchannels are automatically hidden or shown. Display diagnostics information about the current channel and TV. Add Select to the label. Then press to select the channel number that digital channel is automatically set up a list of up the channel list on the TV for the current TV input (either Antenna or Cable). To assign labels to apply and save. Using the Menus Option Favorite Channels Digital Channels Auto Program...
... receivable channels for all the subchannels are automatically hidden or shown. Display diagnostics information about the current channel and TV. Add Select to the label. Then press to select the channel number that digital channel is automatically set up a list of up the channel list on the TV for the current TV input (either Antenna or Cable). To assign labels to apply and save. Using the Menus Option Favorite Channels Digital Channels Auto Program...
Operating Instructions
Page 44
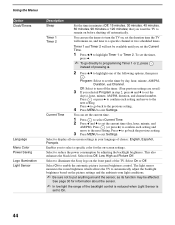
... brightness based on -screen settings in your language of the TV. Using the Menus Option Clock/Timers Language Menu Color Power Saving Logo Illumination Light Sensor Description Sleep Set the time in minutes (Off, 15 minutes, 30 minutes, 45 minutes, 60 minutes, 90 minutes or 120 minutes) that you to select a specific color for information about the sensor. ✍ In low light the range of the backlight control is...
... brightness based on -screen settings in your language of the TV. Using the Menus Option Clock/Timers Language Menu Color Power Saving Logo Illumination Light Sensor Description Sleep Set the time in minutes (Off, 15 minutes, 30 minutes, 45 minutes, 60 minutes, 90 minutes or 120 minutes) that you to select a specific color for information about the sensor. ✍ In low light the range of the backlight control is...
Operating Instructions
Page 48
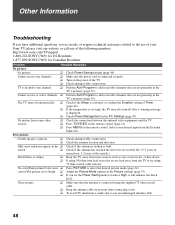
... input from some video sources. ❑ Check the connection between the optional video equipment and the TV. ❑ Press TV/VIDEO on the remote control (page 21). ❑ Press MENU on the ❑ Check if the antenna is connected using 75 ohm coaxial cable instead. No color/Dark picture/Color is not ❑ correct/The picture is locked to select the desired picture mode (page 24). Cannot receive any channels. ❑ Make sure the power cord...
... input from some video sources. ❑ Check the connection between the optional video equipment and the TV. ❑ Press TV/VIDEO on the remote control (page 21). ❑ Press MENU on the ❑ Check if the antenna is connected using 75 ohm coaxial cable instead. No color/Dark picture/Color is not ❑ correct/The picture is locked to select the desired picture mode (page 24). Cannot receive any channels. ❑ Make sure the power cord...
Operating Instructions
Page 49
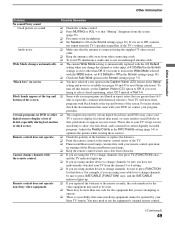
... using another device to change the channel or video input, if 4:3 Default in aspect ratios that device. video equipment may need to Off, sound is automatically replaced with theatrical releases). Wide Mode changes automatically. ❑ The current Wide Mode setting is not output from obstacles. To turn off the Fluorescent/fluorescent lamps. ❑ Keep the remote control sensor area clear from the TV's speakers regardless of the screen. and the TV indicator lights up . Remote control...
... using another device to change the channel or video input, if 4:3 Default in aspect ratios that device. video equipment may need to Off, sound is automatically replaced with theatrical releases). Wide Mode changes automatically. ❑ The current Wide Mode setting is not output from obstacles. To turn off the Fluorescent/fluorescent lamps. ❑ Keep the remote control sensor area clear from the TV's speakers regardless of the screen. and the TV indicator lights up . Remote control...
Operating Instructions
Page 52
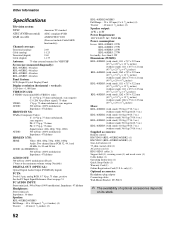
...: Remote control RM-YD010 (KDL-40XBR2/46XBR2) (1) RM-YD013 (KDL-40XBR3/46XBR3) (1) Size AA batteries (2) 75-ohm coaxial cable (1) AC power cord (1) HD15-HD15 cable (1) Support belt (1), securing screw (1) and wood screw (1) Cable holder (1) Operating Instructions (1) Quick Setup Guide (1) Warranty Card (1) Online Registration Card (U.S.A. Other Information Specifications Television system: NTSC American TV standard ATSC (8VSB terrestrial) ATSC compliant 8VSB QAM on cable ANSI/SCTE 07 2000 (Does not include CableCARD functionality) Channel coverage: Terrestrial (analog) Cable (analog...
...: Remote control RM-YD010 (KDL-40XBR2/46XBR2) (1) RM-YD013 (KDL-40XBR3/46XBR3) (1) Size AA batteries (2) 75-ohm coaxial cable (1) AC power cord (1) HD15-HD15 cable (1) Support belt (1), securing screw (1) and wood screw (1) Cable holder (1) Operating Instructions (1) Quick Setup Guide (1) Warranty Card (1) Online Registration Card (U.S.A. Other Information Specifications Television system: NTSC American TV standard ATSC (8VSB terrestrial) ATSC compliant 8VSB QAM on cable ANSI/SCTE 07 2000 (Does not include CableCARD functionality) Channel coverage: Terrestrial (analog) Cable (analog...
Operating Instructions
Page 53
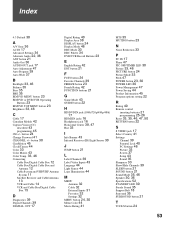
... Light Sensor 44 Logo Illumination 44 M MENU Antenna 32 Cable 32 External Inputs 31 Favorites 32 Settings 32 MENU button 24, 30 Menu Color 44 Movie Rating 41 MTS 35 MUTING button 23 N Noise Reduction 33 P PC IN 17 Phase 47 PIC OFF/TIMER LED 30 Picture 33, 46 PICTURE button 24 Picture Mode 33 Pitch 47 POWER button 23, 30 POWER LED 30 Power Management 47 Power Saving 44 Product Information 45 Program options setting 22 R Rating 40 Remote control...
... Light Sensor 44 Logo Illumination 44 M MENU Antenna 32 Cable 32 External Inputs 31 Favorites 32 Settings 32 MENU button 24, 30 Menu Color 44 Movie Rating 41 MTS 35 MUTING button 23 N Noise Reduction 33 P PC IN 17 Phase 47 PIC OFF/TIMER LED 30 Picture 33, 46 PICTURE button 24 Picture Mode 33 Pitch 47 POWER button 23, 30 POWER LED 30 Power Management 47 Power Saving 44 Product Information 45 Program options setting 22 R Rating 40 Remote control...


