
Operating Instructions
Page 8
...light conditions such as in a car parked in the sun or under direct sunlight [b]. •Be careful when placing the camera near a window or outdoors. Copyright precautions Television programs, films, video tapes, and other materials may be some tiny black points and/or bright points (white, red, blue or green in ...any way. •Do not directly shoot the sun. Unauthorized recording of such materials may be contrary to the provision of the camcorder, video tape, etc. 8 However, there may be copyrighted. Keep your recordings on the LCD screen and the finder. To view your...
...light conditions such as in a car parked in the sun or under direct sunlight [b]. •Be careful when placing the camera near a window or outdoors. Copyright precautions Television programs, films, video tapes, and other materials may be some tiny black points and/or bright points (white, red, blue or green in ...any way. •Do not directly shoot the sun. Unauthorized recording of such materials may be contrary to the provision of the camcorder, video tape, etc. 8 However, there may be copyrighted. Keep your recordings on the LCD screen and the finder. To view your...

Operating Instructions
Page 28
...LCD screen. buttons . 4 REW 5 PLAY VOLUME 6 To stop playback Press x. 2 POWER 31 MEMORY OFF CAMERA (CHG) VCR 28 Playing back a tape You can monitor the playback picture in the direction of the VOLUME ...+/- You can also control playback using the Remote Commander supplied with your camcorder. (1) Install the power source and insert the recorded tape. (2) Set the POWER switch to start playback.... (5) Press N to VCR while pressing the small green button. - The video control buttons light up. (3) Slide OPEN in the viewfinder. Playback -
...LCD screen. buttons . 4 REW 5 PLAY VOLUME 6 To stop playback Press x. 2 POWER 31 MEMORY OFF CAMERA (CHG) VCR 28 Playing back a tape You can monitor the playback picture in the direction of the VOLUME ...+/- You can also control playback using the Remote Commander supplied with your camcorder. (1) Install the power source and insert the recorded tape. (2) Set the POWER switch to start playback.... (5) Press N to VCR while pressing the small green button. - The video control buttons light up. (3) Slide OPEN in the viewfinder. Playback -
Operating Instructions
Page 34
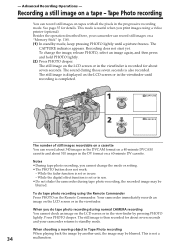
... for about 510 images in the viewfinder. This is also recorded. Besides the operation described here, your camcorder returns to standby mode. The sound during normal CAMERA recording You cannot check an image on a 40-minute DVCAM cassette and about seven seconds. The still ...34 malfunction. To change the mode or setting. •The PHOTO button does not work: - When you do tape photo recording using a video printer (optional). Press PHOTO deeper. Recording does not start yet. Tape Photo recording You can record still images on the Remote Commander. - ...
... for about 510 images in the viewfinder. This is also recorded. Besides the operation described here, your camcorder returns to standby mode. The sound during normal CAMERA recording You cannot check an image on a 40-minute DVCAM cassette and about seven seconds. The still ...34 malfunction. To change the mode or setting. •The PHOTO button does not work: - When you do tape photo recording using a video printer (optional). Press PHOTO deeper. Recording does not start yet. Tape Photo recording You can record still images on the Remote Commander. - ...

Operating Instructions
Page 47
... on the LCD screen or in the viewfinder The ND filter is now deactivated. If you use the video flash light (optional) Set the ND FILTER selector to 1/32 of the quantity of a video camera recorder. This phenomenon is necessary. When the ND1 or ND2 indicator flashes on the LCD screen or in...
... on the LCD screen or in the viewfinder The ND filter is now deactivated. If you use the video flash light (optional) Set the ND FILTER selector to 1/32 of the quantity of a video camera recorder. This phenomenon is necessary. When the ND1 or ND2 indicator flashes on the LCD screen or in...
Operating Instructions
Page 52
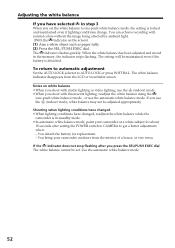
...ambient light. (With the indicator on white balance •When you shoot with studio lighting or video lighting, use the n (indoor) mode. •When you shoot with fluorescent lighting, readjust... adjusted and stored in standby mode. •In automatic white balance mode, point your camcorder outdoors from the LCD or viewfinder screen. If you use the automatic white balance mode...battery is detached. If the indicator does not stop flashing after setting the POWER switch to CAMERA to get a better adjustment when: - Shooting when lighting conditions have changed •When lighting...
...ambient light. (With the indicator on white balance •When you shoot with studio lighting or video lighting, use the n (indoor) mode. •When you shoot with fluorescent lighting, readjust... adjusted and stored in standby mode. •In automatic white balance mode, point your camcorder outdoors from the LCD or viewfinder screen. If you use the automatic white balance mode...battery is detached. If the indicator does not stop flashing after setting the POWER switch to CAMERA to get a better adjustment when: - Shooting when lighting conditions have changed •When lighting...
Operating Instructions
Page 80
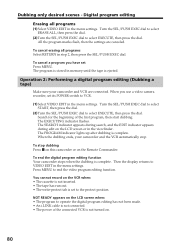
To cancel a program you use a video camera recorder, set its POWER switch to VCR. (1) Select VIDEO EDIT in the menu settings. Operation 2: Performing a digital program editing (Dubbing a tape) Make sure your camcorder and the VCR automatically stop dubbing Press x on this camcorder or on the LCD screen or in... complete. To end the digital program editing function Your camcorder stops when the dubbing is set Press MENU. To cancel erasing all programs (1) Select VIDEO EDIT in the menu settings. When the dubbing ends, your camcorder and VCR are canceled. You cannot record on . ...
To cancel a program you use a video camera recorder, set its POWER switch to VCR. (1) Select VIDEO EDIT in the menu settings. Operation 2: Performing a digital program editing (Dubbing a tape) Make sure your camcorder and the VCR automatically stop dubbing Press x on this camcorder or on the LCD screen or in... complete. To end the digital program editing function Your camcorder stops when the dubbing is set Press MENU. To cancel erasing all programs (1) Select VIDEO EDIT in the menu settings. When the dubbing ends, your camcorder and VCR are canceled. You cannot record on . ...

Operating Instructions
Page 112
... screen and viewfinder screen. To activate the Remote Commander supplied with your camcorder and a VCR for dubbing in 10-operation increments. CAMERA To superimpose the date and time on the picture. To make programs and perform video editing (p. 78). Changing the menu settings Icon/item BEEP Mode MELODY ...z LCD V-OUT/LCD DATE REC z OFF ON REC LAMP z ON COLOR BAR VIDEO EDIT OFF z OFF ON - CAMERA Displays the color bar. VCR CAMERA MEMORY To show the display on the LCD screen even when your camcorder. EDIT SET - Does not display the color bar. To light up the...
... screen and viewfinder screen. To activate the Remote Commander supplied with your camcorder and a VCR for dubbing in 10-operation increments. CAMERA To superimpose the date and time on the picture. To make programs and perform video editing (p. 78). Changing the menu settings Icon/item BEEP Mode MELODY ...z LCD V-OUT/LCD DATE REC z OFF ON REC LAMP z ON COLOR BAR VIDEO EDIT OFF z OFF ON - CAMERA Displays the color bar. VCR CAMERA MEMORY To show the display on the LCD screen even when your camcorder. EDIT SET - Does not display the color bar. To light up the...

Operating Instructions
Page 132
... button on its right simultaneously on a "Memory Stick" and record them to a tape. Set the tape to copy, repeat steps 4 and 5. 1 VCR POWER MEMORY OFF CAMERA (CHG) 3 REC 4 PLAY 2 5 PAUSE 132 To stop . (6) If you want to record the desired still image. Copying an image recorded on a "Memory Stick" to tapes...
... button on its right simultaneously on a "Memory Stick" and record them to a tape. Set the tape to copy, repeat steps 4 and 5. 1 VCR POWER MEMORY OFF CAMERA (CHG) 3 REC 4 PLAY 2 5 PAUSE 132 To stop . (6) If you want to record the desired still image. Copying an image recorded on a "Memory Stick" to tapes...

Operating Instructions
Page 142
... with is marked with . "COPY INHIBIT" appears on the LCD screen, in VCR mode. Sony recommends that you record, using a digital video camera recorder without cassette memory. Using this camcorder. When you use a tape with mark to enjoy your camcorder can read, write, and search data such as a guide. Copyright signal When you play back...
... with is marked with . "COPY INHIBIT" appears on the LCD screen, in VCR mode. Sony recommends that you record, using a digital video camera recorder without cassette memory. Using this camcorder. When you use a tape with mark to enjoy your camcorder can read, write, and search data such as a guide. Copyright signal When you play back...

Operating Instructions
Page 159
... •Remove the tape, and periodically turn on the power, operate the CAMERA and VCR sections and play back a tape for about three minutes when your camcorder is not a malfunction. •Do not place the unit in locations that are: - To disconnect the power cord, pull it completely once a...store the battery pack after you charge it fully and use your camcorder to water. When you are fingerprints on it from AM receivers and video equipment. If this happens, a short may occur and the unit may cause your camcorder on a sandy beach or in use, particularly during use any...
... •Remove the tape, and periodically turn on the power, operate the CAMERA and VCR sections and play back a tape for about three minutes when your camcorder is not a malfunction. •Do not place the unit in locations that are: - To disconnect the power cord, pull it completely once a...store the battery pack after you charge it fully and use your camcorder to water. When you are fingerprints on it from AM receivers and video equipment. If this happens, a short may occur and the unit may cause your camcorder on a sandy beach or in use, particularly during use any...

Operating Instructions
Page 161
... time (using cassette PDVM-40ME) Approx. 2 min and 30 s Viewfinder Electric viewfinder (B&W) Image device 1/3 type CCD (3 Charge Coupled Device) Approx. 380 000 pixels (Effective: Approx. 340 000 pixels) Lens Combined power zoom lens Filter diameter 58 mm (2 3/8 in) 12× (Optical), 48×...in) (w/h/d) Mass (approx.) 100 g (3.5 oz) Type Lithium ion Wide conversion lens VCL-HG0758 Lens power 0.7 Lens structure 3 groups, 3 elements Screw thread for video camera recorder M58 × 0.75 Dimensions Maximum diameter : ø 93 mm (3 3/4 in) Length : Approx. 48 mm (1 15/16 in) Mass (excluding ...
... time (using cassette PDVM-40ME) Approx. 2 min and 30 s Viewfinder Electric viewfinder (B&W) Image device 1/3 type CCD (3 Charge Coupled Device) Approx. 380 000 pixels (Effective: Approx. 340 000 pixels) Lens Combined power zoom lens Filter diameter 58 mm (2 3/8 in) 12× (Optical), 48×...in) (w/h/d) Mass (approx.) 100 g (3.5 oz) Type Lithium ion Wide conversion lens VCL-HG0758 Lens power 0.7 Lens structure 3 groups, 3 elements Screw thread for video camera recorder M58 × 0.75 Dimensions Maximum diameter : ø 93 mm (3 3/4 in) Length : Approx. 48 mm (1 15/16 in) Mass (excluding ...

Operating Instructions
Page 167
...is id if ig ih ij i; ij i (headphones) jack When you cannot attach the tripod securely and the screw may damage your camcorder is a trademark of video equipment and peripherals connected to it. ih LANC jack LANC stands for Local Application Control Bus System. ia is i.LINK compatible. This ... transport of Sony Corporation and indicates that the length of the tripod screw is in agreement with IEEE 13941995 specifications and their revisions. Quick Reference Identifying the parts and controls ua us ud uf ug uh uj uk ul ua Carrying handle us Remote sensor ud Camera recording lamp ...
...is id if ig ih ij i; ij i (headphones) jack When you cannot attach the tripod securely and the screw may damage your camcorder is a trademark of video equipment and peripherals connected to it. ih LANC jack LANC stands for Local Application Control Bus System. ia is i.LINK compatible. This ... transport of Sony Corporation and indicates that the length of the tripod screw is in agreement with IEEE 13941995 specifications and their revisions. Quick Reference Identifying the parts and controls ua us ud uf ug uh uj uk ul ua Carrying handle us Remote sensor ud Camera recording lamp ...

Operating Instructions
Page 174
...Audio dubbing 86 AUDIO LEVEL 54 AUDIO MIX 108 AUDIO MODE 110 AUTO SHTR 107 BACK LIGHT 25 Battery pack 11 BEEP 112 C, D Camera chromakey 121 Cassette memory 7, 142 Charging battery 12 Charging the built-in rechargeable battery ........ 158 Clock set 16 COLOR BAR 112 Connection (... battery time indicator 24 Remaining tape indicator .... 24 Remote Commander .......... 170 Remote control jack (LANC) 167 Remote sensor 165 RESET 151 S S VIDEO jack 33, 73, 82 SEL/PUSH EXEC dial ....... 105 Self-diagnosis display ........ 152 Skip scan 31 Slide show 134 Slow playback 31 Spotlight...
...Audio dubbing 86 AUDIO LEVEL 54 AUDIO MIX 108 AUDIO MODE 110 AUTO SHTR 107 BACK LIGHT 25 Battery pack 11 BEEP 112 C, D Camera chromakey 121 Cassette memory 7, 142 Charging battery 12 Charging the built-in rechargeable battery ........ 158 Clock set 16 COLOR BAR 112 Connection (... battery time indicator 24 Remaining tape indicator .... 24 Remote Commander .......... 170 Remote control jack (LANC) 167 Remote sensor 165 RESET 151 S S VIDEO jack 33, 73, 82 SEL/PUSH EXEC dial ....... 105 Self-diagnosis display ........ 152 Skip scan 31 Slide show 134 Slow playback 31 Spotlight...


