Operating Instructions
Page 4
...25 Spot light 26 Checking the recording - END SEARCH / EDITSEARCH / Rec Review 27 Playback - PROG. SCAN 35 Using the guide frame 36 Using the wide mode 37 Using the fader function 38 Using special effects - Sound recording level 53 Connecting an optional external microphone 55 Presetting the adjustment for picture quality - Photo search/Photo scan 70 Playing back a tape with manual adjustment 43 Adjusting the white balance 51 Adjusting the recording level manually - introduction ...... 113 Recording still images on a tape - MEMORY MIX 121 Recording an image from a tape as...
...25 Spot light 26 Checking the recording - END SEARCH / EDITSEARCH / Rec Review 27 Playback - PROG. SCAN 35 Using the guide frame 36 Using the wide mode 37 Using the fader function 38 Using special effects - Sound recording level 53 Connecting an optional external microphone 55 Presetting the adjustment for picture quality - Photo search/Photo scan 70 Playing back a tape with manual adjustment 43 Adjusting the white balance 51 Adjusting the recording level manually - introduction ...... 113 Recording still images on a tape - MEMORY MIX 121 Recording an image from a tape as...

Operating Instructions
Page 12
... be displayed. 12 The remaining battery time is completed. Your camcorder operates only with the "InfoLITHIUM" battery pack (L series). (1) Open the DC IN jack cover and connect the AC Adaptor supplied with your camcorder to the DC IN jack with the plug's v mark facing toward the LCD panel side. (2) Connect the power cord to the AC Adaptor. (3) Connect the power cord to a wall outlet. (4) Set the POWER switch to u, normal charge...
... be displayed. 12 The remaining battery time is completed. Your camcorder operates only with the "InfoLITHIUM" battery pack (L series). (1) Open the DC IN jack cover and connect the AC Adaptor supplied with your camcorder to the DC IN jack with the plug's v mark facing toward the LCD panel side. (2) Connect the power cord to the AC Adaptor. (3) Connect the power cord to a wall outlet. (4) Set the POWER switch to u, normal charge...
Operating Instructions
Page 33
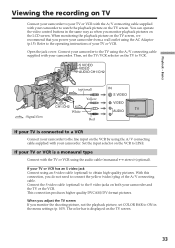
... outlet using an S video cable (optional) to connect the yellow (video) plug of your camcorder and the TV or the VCR. Playback - Refer to LINE. Connect the S video cable (optional) to ON in the same way as when you do not need to obtain high-quality pictures. If your TV or VCR is displayed on the VCR to the operating instructions of the A/V connecting cable. You can operate the video control buttons in the menu settings (p. 105...
... outlet using an S video cable (optional) to connect the yellow (video) plug of your camcorder and the TV or the VCR. Playback - Refer to LINE. Connect the S video cable (optional) to ON in the same way as when you do not need to obtain high-quality pictures. If your TV or VCR is displayed on the VCR to the operating instructions of the A/V connecting cable. You can operate the video control buttons in the menu settings (p. 105...
Operating Instructions
Page 34
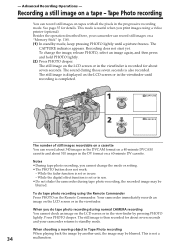
... tape photo recording, the recorded image may be blurred. When shooting a moving object in use . •Do not shake the camcorder during normal CAMERA recording You cannot check an image on the Remote Commander. Advanced Recording Operations - This mode is set or in Tape Photo recording When playing back the image by pressing PHOTO lightly. Notes •During tape photo recording, you print images using the Remote Commander Press PHOTO on the LCD screen or in the viewfinder until a picture freezes. While the digital effect function...
... tape photo recording, the recorded image may be blurred. When shooting a moving object in use . •Do not shake the camcorder during normal CAMERA recording You cannot check an image on the Remote Commander. Advanced Recording Operations - This mode is set or in Tape Photo recording When playing back the image by pressing PHOTO lightly. Notes •During tape photo recording, you print images using the Remote Commander Press PHOTO on the LCD screen or in the viewfinder until a picture freezes. While the digital effect function...

Operating Instructions
Page 43
... shutter speed) that you can adjust in menu settings Deactivating the SteadyShot Functions you set the AUTO LOCK selector to AUTO LOCK. Functions you can adjust by setting the AUTO LOCK selector to the center (auto lock release) position Iris, gain, shutter speed, and white balance Functions you can adjust by using other selectors/rings ND filter, zebra pattern, focus, AE shift, and zoom The following functions manually to suit your preference. Advanced Recording Operations Shooting with manual adjustment Under...
... shutter speed) that you can adjust in menu settings Deactivating the SteadyShot Functions you set the AUTO LOCK selector to AUTO LOCK. Functions you can adjust by setting the AUTO LOCK selector to the center (auto lock release) position Iris, gain, shutter speed, and white balance Functions you can adjust by using other selectors/rings ND filter, zebra pattern, focus, AE shift, and zoom The following functions manually to suit your preference. Advanced Recording Operations Shooting with manual adjustment Under...
Operating Instructions
Page 53
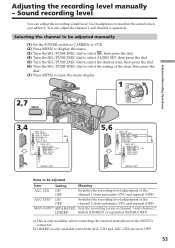
... the dial. (7) Press MENU to erase the menu display. 1 VCR POWER MEMORY OFF CAMERA (CHG) 2,7 MENU Advanced Recording Operations 3,4 TAPE SET REC MODE AUD I O MODE REMA I N M I C NR AUD I O SET TAPE SET AUD I O SET AGC CH1 ON AGC CH2 [MENU] : MENARDNETGURANI N [MENU] : END 5,6 TAPE SET AUD I O SET AGC CH1 AGC CH2 MAN GA I N RETURN ON OFF TAPE SET AUD I O SET AGC CH1 AGC CH2 [MENU] : MENARDNETGURANI N OFF [MENU] : END Items to monitor the sound when you adjust it. Sound recording level You can adjust the channel 1 and...
... the dial. (7) Press MENU to erase the menu display. 1 VCR POWER MEMORY OFF CAMERA (CHG) 2,7 MENU Advanced Recording Operations 3,4 TAPE SET REC MODE AUD I O MODE REMA I N M I C NR AUD I O SET TAPE SET AUD I O SET AGC CH1 ON AGC CH2 [MENU] : MENARDNETGURANI N [MENU] : END 5,6 TAPE SET AUD I O SET AGC CH1 AGC CH2 MAN GA I N RETURN ON OFF TAPE SET AUD I O SET AGC CH1 AGC CH2 [MENU] : MENARDNETGURANI N OFF [MENU] : END Items to monitor the sound when you adjust it. Sound recording level You can adjust the channel 1 and...
Operating Instructions
Page 59
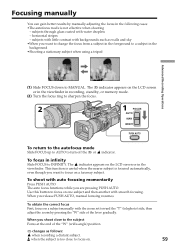
... - When you shoot close to focus on the LCD screen or in the viewfinder in recording, standby, or memory mode. (2) Turn the focus ring to sharpen the focus. 2 1 FOCUS AUTO MAN INFINITY PUSH AUTO To return to the autofocus mode Slide FOCUS up to AUTO to turn off the 9 or indicator. Focusing manually You can gain better results by pressing the "W" side of the "W" (wide-angle) position. 9 changes as walls...
... - When you shoot close to focus on the LCD screen or in the viewfinder in recording, standby, or memory mode. (2) Turn the focus ring to sharpen the focus. 2 1 FOCUS AUTO MAN INFINITY PUSH AUTO To return to the autofocus mode Slide FOCUS up to AUTO to turn off the 9 or indicator. Focusing manually You can gain better results by pressing the "W" side of the "W" (wide-angle) position. 9 changes as walls...

Operating Instructions
Page 83
... not need to connect the yellow (video) plug of the A/V connecting cable. Connect an S video cable (optional) to avoid remote control misoperation. This connection produces higher quality DVCAM/DV format pictures. If you start recording. Editing Recording video or TV programs If your VCR is a monaural type Connect with black paper. On index signal The index is recorded on a tape when you mark the index using the audio cable (monaural y stereo) (optional). On the commander mode Your camcorder works...
... not need to connect the yellow (video) plug of the A/V connecting cable. Connect an S video cable (optional) to avoid remote control misoperation. This connection produces higher quality DVCAM/DV format pictures. If you start recording. Editing Recording video or TV programs If your VCR is a monaural type Connect with black paper. On index signal The index is recorded on a tape when you mark the index using the audio cable (monaural y stereo) (optional). On the commander mode Your camcorder works...

Operating Instructions
Page 106
... FORMAT z AUTO DF NDF TC RUN z REC RUN FREE RUN TC MAKE z REGEN UB TIME PRESET z OFF ON Meaning POWER switch Presets/resets the time code (p. 90). The LCD screen or viewfinder screen shows only the items you can operate at back space editing. Makes the time code continuous at the moment. Menu items are displayed as the following icons: TC/UB SET MANUAL SET CAMERA SET VCR SET LCD/VF SET MEMORY SET CM SET TAPE SET SETUP MENU OTHERS Selecting the mode setting of...
... FORMAT z AUTO DF NDF TC RUN z REC RUN FREE RUN TC MAKE z REGEN UB TIME PRESET z OFF ON Meaning POWER switch Presets/resets the time code (p. 90). The LCD screen or viewfinder screen shows only the items you can operate at back space editing. Makes the time code continuous at the moment. Menu items are displayed as the following icons: TC/UB SET MANUAL SET CAMERA SET VCR SET LCD/VF SET MEMORY SET CM SET TAPE SET SETUP MENU OTHERS Selecting the mode setting of...

Operating Instructions
Page 107
... Meaning POWER switch To automatically adjust the electronic shutter* speed. CAMERA Records still/moving pictures in progressive recording mode. Up to 24× (p. 24). Natural MEMORY pictures are produced when shooting a stationary object with the SETUP 7.5 % system. Does not make an interval recording. Sets the interval time and recording time. Notes on the following page) 107 Customizing Your Camcorder Changing the menu settings Icon/item Mode AUTO SHTR z ON OFF PROG. CAMERA To activate the digital zoom. To...
... Meaning POWER switch To automatically adjust the electronic shutter* speed. CAMERA Records still/moving pictures in progressive recording mode. Up to 24× (p. 24). Natural MEMORY pictures are produced when shooting a stationary object with the SETUP 7.5 % system. Does not make an interval recording. Sets the interval time and recording time. Notes on the following page) 107 Customizing Your Camcorder Changing the menu settings Icon/item Mode AUTO SHTR z ON OFF PROG. CAMERA To activate the digital zoom. To...
Operating Instructions
Page 108
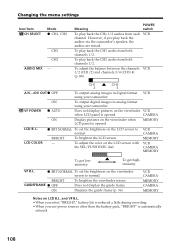
... display pictures on the viewfinder screen to normal. and VF B.L. •When you select "BRIGHT," battery life is opened MEMORY LCD B. VCR CAMERA MEMORY VCR CAMERA MEMORY To get lowintensity To get highintensity VF B.L. Meaning To play back the audios via the camcorder's speaker, the audios are mixed. L. POWER switch VCR VCR CH1 2 CH3 4 A/VtDV OUT z OFF ON VF POWER z AUTO ON To output analog images in analog format using your camcorder. To output digital images in digital format VCR using your camcorder. To adjust the color on LCD...
... display pictures on the viewfinder screen to normal. and VF B.L. •When you select "BRIGHT," battery life is opened MEMORY LCD B. VCR CAMERA MEMORY VCR CAMERA MEMORY To get lowintensity To get highintensity VF B.L. Meaning To play back the audios via the camcorder's speaker, the audios are mixed. L. POWER switch VCR VCR CH1 2 CH3 4 A/VtDV OUT z OFF ON VF POWER z AUTO ON To output analog images in analog format using your camcorder. To output digital images in digital format VCR using your camcorder. To adjust the color on LCD...

Operating Instructions
Page 111
... operating instructions (for the period of tape • for about eight seconds after N is pressed in VCR mode • for about eight seconds after a cassette is pressed to the originally set the date or time (p. 16). To display date, time and various settings VCR during playback. CAMERA Adjusts the audio recording level manually VCR (p. 53). CAMERA To display selected menu items at twice the MEMORY normal size. CLOCK SET - Customizing Your Camcorder Changing the menu settings Icon/item Mode qREMAIN z AUTO ON DATA CODE z DATE/CAM MIC NR AUDIO SET DATE...
... operating instructions (for the period of tape • for about eight seconds after N is pressed in VCR mode • for about eight seconds after a cassette is pressed to the originally set the date or time (p. 16). To display date, time and various settings VCR during playback. CAMERA Adjusts the audio recording level manually VCR (p. 53). CAMERA To display selected menu items at twice the MEMORY normal size. CLOCK SET - Customizing Your Camcorder Changing the menu settings Icon/item Mode qREMAIN z AUTO ON DATA CODE z DATE/CAM MIC NR AUDIO SET DATE...
Operating Instructions
Page 122
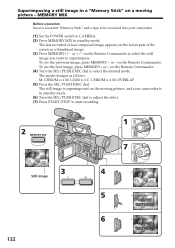
... M. Superimposing a still image in a "Memory Stick" on the lower part of the screen as follows: M. CHROM 100-0019 Still image 3 - 4 + 5 6 122 1 VCR POWER MEMORY OFF CAMERA (CHG) 7 VCR POWER MEMORY OFF CAMERA (CHG) M. LUMI y C. or - LUMI I I I 100-0019 or +/- The last recorded or last composed image appears on a moving picture, and your camcorder. (1) Set the POWER switch to CAMERA. (2) Press MEMORY MIX in standby mode. (6) Turn the SEL/PUSH EXEC dial to adjust the effect. (7) Press...
... M. Superimposing a still image in a "Memory Stick" on the lower part of the screen as follows: M. CHROM 100-0019 Still image 3 - 4 + 5 6 122 1 VCR POWER MEMORY OFF CAMERA (CHG) 7 VCR POWER MEMORY OFF CAMERA (CHG) M. LUMI y C. or - LUMI I I I 100-0019 or +/- The last recorded or last composed image appears on a moving picture, and your camcorder. (1) Set the POWER switch to CAMERA. (2) Press MEMORY MIX in standby mode. (6) Turn the SEL/PUSH EXEC dial to adjust the effect. (7) Press...

Operating Instructions
Page 124
... PHOTO lightly until the picture from the tape freezes. The image displayed on the screen will be recorded on the LCD screen or in the viewfinder. Recording is complete when the bar scroll indicator disappears. 2 REW PLAY FF 1 VCR POWER MEMORY OFF CAMERA (CHG) 3 PHOTO CAPTURE 4 PHOTO 124 When the access lamp is lit or is activated You cannot use this function. Check the format of your camcorder. (1) Set the POWER switch to that of the "Memory Stick." "CAPTURE" appears on a "Memory Stick...
... PHOTO lightly until the picture from the tape freezes. The image displayed on the screen will be recorded on the LCD screen or in the viewfinder. Recording is complete when the bar scroll indicator disappears. 2 REW PLAY FF 1 VCR POWER MEMORY OFF CAMERA (CHG) 3 PHOTO CAPTURE 4 PHOTO 124 When the access lamp is lit or is activated You cannot use this function. Check the format of your camcorder. (1) Set the POWER switch to that of the "Memory Stick." "CAPTURE" appears on a "Memory Stick...

Operating Instructions
Page 127
... camcorder. (1) Set the POWER switch to VCR. (2) Press MENU to display the menu. (3) Turn the SEL/PUSH EXEC dial to select , then press the dial. (4) Turn the SEL/PUSH EXEC dial to select PHOTO SAVE, then press the dial. "END" is displayed when copying is displayed. "PHOTO BUTTON" appears on the "Memory Stick." Photo save Using the search function, you can automatically take in only still images from a tape - The number of still images copied is completed. 1 VCR POWER MEMORY OFF CAMERA...
... camcorder. (1) Set the POWER switch to VCR. (2) Press MENU to display the menu. (3) Turn the SEL/PUSH EXEC dial to select , then press the dial. (4) Turn the SEL/PUSH EXEC dial to select PHOTO SAVE, then press the dial. "END" is displayed when copying is displayed. "PHOTO BUTTON" appears on the "Memory Stick." Photo save Using the search function, you can automatically take in only still images from a tape - The number of still images copied is completed. 1 VCR POWER MEMORY OFF CAMERA...

Operating Instructions
Page 129
... images at a time by pressing DATA CODE. on the Remote Commander. 2 PLAY 1 POWER "Memory Stick" Operations MEMORY VCR OFF CAMERA (CHG) 3 - + To stop memory photo playback Press MEMORY PLAY again. Note on the date/time indicator Recording date/time is not displayed, however, it is as good as ever. •Turn the audio volume of the TV down before operation. •When operating memory photo playback on a TV or on the "Memory Stick" The message " NO FILE" appears. To see the next image, press MEMORY + or + on the Remote Commander. Image data...
... images at a time by pressing DATA CODE. on the Remote Commander. 2 PLAY 1 POWER "Memory Stick" Operations MEMORY VCR OFF CAMERA (CHG) 3 - + To stop memory photo playback Press MEMORY PLAY again. Note on the date/time indicator Recording date/time is not displayed, however, it is as good as ever. •Turn the audio volume of the TV down before operation. •When operating memory photo playback on a TV or on the "Memory Stick" The message " NO FILE" appears. To see the next image, press MEMORY + or + on the Remote Commander. Image data...

Operating Instructions
Page 142
... record such software. Sony recommends that played back on your camcorder. 142 When you try to the end of the data) 1 The numbers above . Using this camcorder. If the tape has a blank portion in the cassette with . If there is marked with cassette memory. The maximum number of data recordable on a tape recorded by one with the cassette memory function, the same result may not work correctly. "COPY INHIBIT" appears on the LCD screen, in VCR mode...
... record such software. Sony recommends that played back on your camcorder. 142 When you try to the end of the data) 1 The numbers above . Using this camcorder. If the tape has a blank portion in the cassette with . If there is marked with cassette memory. The maximum number of data recordable on a tape recorded by one with the cassette memory function, the same result may not work correctly. "COPY INHIBIT" appears on the LCD screen, in VCR mode...

Operating Instructions
Page 151
... is connected to OFF in your camcorder is set to outputs on the TV or VCR. c Remove the cassette and leave your camcorder. •The AC Adaptor is on . Troubleshooting Symptom The Remote Commander supplied with the + - c Set it after about one hour to acclimatize. (p. 156) •Some troubles have occurred in the menu settings. The input picture does not appear on the LCD screen or in the display window...
... is connected to OFF in your camcorder is set to outputs on the TV or VCR. c Remove the cassette and leave your camcorder. •The AC Adaptor is on . Troubleshooting Symptom The Remote Commander supplied with the + - c Set it after about one hour to acclimatize. (p. 156) •Some troubles have occurred in the menu settings. The input picture does not appear on the LCD screen or in the display window...

Operating Instructions
Page 161
... bits, channels 1/2) Video signal NTSC color, EIA standards Usable cassette Mini DVCAM cassette with the mark printed Mini DV cassette with the mark printed Tape speed DVCAM format: Approx. 28.218 mm/s DV format SP mode: Approx. 18.812 mm/s Recording/playback time (using cassette PDVM-40ME) DVCAM format: 40 min DV format SP mode: 1 h Fast-forward/rewind time (using cassette PDVM-40ME) Approx. 2 min and 30 s Viewfinder Electric viewfinder (B&W) Image device 1/3 type CCD (3 Charge Coupled Device) Approx. 380 000 pixels...
... bits, channels 1/2) Video signal NTSC color, EIA standards Usable cassette Mini DVCAM cassette with the mark printed Mini DV cassette with the mark printed Tape speed DVCAM format: Approx. 28.218 mm/s DV format SP mode: Approx. 18.812 mm/s Recording/playback time (using cassette PDVM-40ME) DVCAM format: 40 min DV format SP mode: 1 h Fast-forward/rewind time (using cassette PDVM-40ME) Approx. 2 min and 30 s Viewfinder Electric viewfinder (B&W) Image device 1/3 type CCD (3 Charge Coupled Device) Approx. 380 000 pixels...

Operating Instructions
Page 174
... "Memory Stick 113 Menu settings 105 Mirror mode 20 Moisture condensation ...... 156 MONOTONE 38 ND filter 47 Normal charge 12 NTSC system 155 O, P OLD MOVIE 40 Operation indicators .......... 172 OVERLAP 38 Photo scan 71 Photo search 70 Picture search 31 Playback pause 31 Power sources (battery pack 11 (car battery 15 (house current 15 Power zoom 23 Print mark 139 Progressive recording .......... 35 R Rec Review 27 Recording level 53 Recording time 13 Remaining battery time indicator 24 Remaining tape...
... "Memory Stick 113 Menu settings 105 Mirror mode 20 Moisture condensation ...... 156 MONOTONE 38 ND filter 47 Normal charge 12 NTSC system 155 O, P OLD MOVIE 40 Operation indicators .......... 172 OVERLAP 38 Photo scan 71 Photo search 70 Picture search 31 Playback pause 31 Power sources (battery pack 11 (car battery 15 (house current 15 Power zoom 23 Print mark 139 Progressive recording .......... 35 R Rec Review 27 Recording level 53 Recording time 13 Remaining battery time indicator 24 Remaining tape...


