
Operating Instructions
Page 55
... using Windows XP. Enjoying images using a Macintosh computer, refer to your computer (page 57) Preparation Viewing images on your computer Installing the USB driver. • Installation of the USB driver is not needed when using "ImageMixer" (page 64) Creating a video CD "ImageMixer VCD2" is installed automatically when "PicturePackage" is installed. 55 Using...
... using Windows XP. Enjoying images using a Macintosh computer, refer to your computer (page 57) Preparation Viewing images on your computer Installing the USB driver. • Installation of the USB driver is not needed when using "ImageMixer" (page 64) Creating a video CD "ImageMixer VCD2" is installed automatically when "PicturePackage" is installed. 55 Using...
Operating Instructions
Page 56
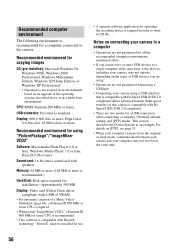
...time, some devices, including your camera, may not operate, depending on an upgrade of USB devices you connect two or more is recommended.) Hard Disk: Disk space required for installation-approximately 500 MB Display: Video card (Direct Draw driver compliant) with 4 MB of ... software is compatible with HiSpeed USB (USB 2.0 compliant). • There are not guaranteed when using a USB hub. • Connecting your camera to a computer • Operations are not guaranteed for all the recommended computer environments mentioned above. • If you are using "PicturePackage"/"ImageMixer...
...time, some devices, including your camera, may not operate, depending on an upgrade of USB devices you connect two or more is recommended.) Hard Disk: Disk space required for installation-approximately 500 MB Display: Video card (Direct Draw driver compliant) with 4 MB of ... software is compatible with HiSpeed USB (USB 2.0 compliant). • There are not guaranteed when using a USB hub. • Connecting your camera to a computer • Operations are not guaranteed for all the recommended computer environments mentioned above. • If you are using "PicturePackage"/"ImageMixer...

Operating Instructions
Page 57
... to 61 to copy images. • Screens when copying images on as follows. The USB driver installation starts. Stage 2: Preparing the camera and the computer 1 Insert a "Memory Stick" with a "Memory Stick" slot Remove the "Memory Stick" from the camera and insert the "Memory Stick" into the "Memory Stick" slot of completion. 4 Click the...
... to 61 to copy images. • Screens when copying images on as follows. The USB driver installation starts. Stage 2: Preparing the camera and the computer 1 Insert a "Memory Stick" with a "Memory Stick" slot Remove the "Memory Stick" from the camera and insert the "Memory Stick" into the "Memory Stick" slot of completion. 4 Click the...
Operating Instructions
Page 64
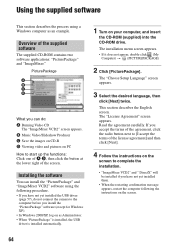
Installing the software You can do not connect the camera to start up the functions: Click one of ... software This section describes the process using the following procedure. • If you have not yet installed the USB driver (page 57), do : A Burning Video CD The "ImageMixer VCD2" screen appears. PicturePackage A B C D What...PicturePackage" and "ImageMixer VCD2" software using a Windows computer as Administrator. • When "PicturePackage" is installed, the USB driver is installed automatically. 1 Turn on your computer, and insert the CD-ROM (supplied) into the CD-ROM drive. ...
Installing the software You can do not connect the camera to start up the functions: Click one of ... software This section describes the process using the following procedure. • If you have not yet installed the USB driver (page 57), do : A Burning Video CD The "ImageMixer VCD2" screen appears. PicturePackage A B C D What...PicturePackage" and "ImageMixer VCD2" software using a Windows computer as Administrator. • When "PicturePackage" is installed, the USB driver is installed automatically. 1 Turn on your computer, and insert the CD-ROM (supplied) into the CD-ROM drive. ...
Operating Instructions
Page 81
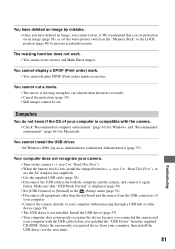
... computer does not properly recognize the device because you connected the camera and your computer, then install the USB driver (see the next item). 81 Troubleshooting You cannot install the USB driver. • In Windows 2000, log on the camera (t step 2 in "Read This First"). • When the...supplied CD-ROM. Your computer does not recognize your computer is compatible with the USB cable before you installed the "USB Driver" from the USB connectors of your camera. • Turn on as Administrator (authorized Administrators) (page 57). We recommend that "USB Mode Normal" is not ...
... computer does not properly recognize the device because you connected the camera and your computer, then install the USB driver (see the next item). 81 Troubleshooting You cannot install the USB driver. • In Windows 2000, log on the camera (t step 2 in "Read This First"). • When the...supplied CD-ROM. Your computer does not recognize your computer is compatible with the USB cable before you installed the "USB Driver" from the USB connectors of your camera. • Turn on as Administrator (authorized Administrators) (page 57). We recommend that "USB Mode Normal" is not ...
Operating Instructions
Page 82
The "Device Manager" appears. 3 Right-click [ Sony DSC], then click [Uninstall] t [OK]. You cannot copy images. • Connect the camera and your computer correctly using a "Memory Stick" formatted by a computer. Copy the movie to the hard disk of each screen. • ...a movie on a computer. • You are playing back the movie directly from the hard disk (page 57). The following procedure is deleted. 4 Install the USB driver (page 57). You cannot print an image. • Check the printer settings. The "System Properties" screen appears. 2 Click [Hardware] t [Device Manager]. •...
The "Device Manager" appears. 3 Right-click [ Sony DSC], then click [Uninstall] t [OK]. You cannot copy images. • Connect the camera and your computer correctly using a "Memory Stick" formatted by a computer. Copy the movie to the hard disk of each screen. • ...a movie on a computer. • You are playing back the movie directly from the hard disk (page 57). The following procedure is deleted. 4 Install the USB driver (page 57). You cannot print an image. • Check the printer settings. The "System Properties" screen appears. 2 Click [Hardware] t [Device Manager]. •...

Operating Instructions
Page 98
... display...........86 Self-timer t step 5 in "Read This First" Sepia 36 Setting the clock t step 2 in "Read This First" Setup 36, 43, 44 Camera 1 45 Camera 2 48 Internal Memory Tool ...49 Memory Stick Tool .......50 Setup 1 52 Setup 2 53 Setup 1 52 Setup 2 53 Sharpness 36 Shooting Movie t step 5 ...TV 74 Twilight mode t step 5 in "Read This First" Twilight portrait mode t step 5 in "Read This First" U Underexposure 11 USB Connect 53 USB Driver 57 Using your camera abroad t step 1 in "Read This First" V VGA t step 4 in "Read This First" Video CD 64, 67 Video Out 53 Viewing Movie t ...
... display...........86 Self-timer t step 5 in "Read This First" Sepia 36 Setting the clock t step 2 in "Read This First" Setup 36, 43, 44 Camera 1 45 Camera 2 48 Internal Memory Tool ...49 Memory Stick Tool .......50 Setup 1 52 Setup 2 53 Setup 1 52 Setup 2 53 Sharpness 36 Shooting Movie t step 5 ...TV 74 Twilight mode t step 5 in "Read This First" Twilight portrait mode t step 5 in "Read This First" U Underexposure 11 USB Connect 53 USB Driver 57 Using your camera abroad t step 1 in "Read This First" V VGA t step 4 in "Read This First" Video CD 64, 67 Video Out 53 Viewing Movie t ...


