Operating Instructions
Page 7
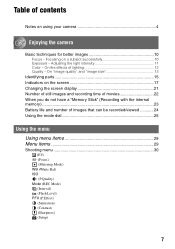
On "image quality" and "image size 13 Identifying parts 15 Indicators on a subject successfully 10 Exposure - Focusing on the screen 17 Changing the screen display 21 Number of still images and recording time of movies 22 When you do not ... Mode) M (Interval) (Flash Level) PFX (P.Effect) (Saturation) (Contrast) (Sharpness) (Setup) 7 Adjusting the light intensity 11 Color - On the effects of contents Notes on using your camera 4 Enjoying the camera Basic techniques for better images 10 Focus - Table of lighting 12 Quality -
On "image quality" and "image size 13 Identifying parts 15 Indicators on a subject successfully 10 Exposure - Focusing on the screen 17 Changing the screen display 21 Number of still images and recording time of movies 22 When you do not ... Mode) M (Interval) (Flash Level) PFX (P.Effect) (Saturation) (Contrast) (Sharpness) (Setup) 7 Adjusting the light intensity 11 Color - On the effects of contents Notes on using your camera 4 Enjoying the camera Basic techniques for better images 10 Focus - Table of lighting 12 Quality -

Operating Instructions
Page 10
Hints for preventing blur" (below). Using a tripod, and using the flash in dark places are also recommended. 10 Focus Focusing on a subject successfully When you press the shutter button halfway down . Press fully down straight away Press halfway down, then Flashing,lit/beeps ...VGA FINE 101 96 Press fully down S AF 30 F3.5 To shoot a still image difficult to press the shutter button only halfway down , the camera adjusts the focus automatically (Auto Focus). Also, you can enjoy your side. Remember to focus on . t See "Hints for preventing blur Hold the...
Hints for preventing blur" (below). Using a tripod, and using the flash in dark places are also recommended. 10 Focus Focusing on a subject successfully When you press the shutter button halfway down . Press fully down straight away Press halfway down, then Flashing,lit/beeps ...VGA FINE 101 96 Press fully down S AF 30 F3.5 To shoot a still image difficult to press the shutter button only halfway down , the camera adjusts the focus automatically (Auto Focus). Also, you can enjoy your side. Remember to focus on . t See "Hints for preventing blur Hold the...

Operating Instructions
Page 18
However, we recommend holding the camera steadily and turning off the indicator to avoid the effects of recordable...101 Recording folder (50) • This does not appear when using the internal memory. C Display Indication 7M (DSC-W7/ Image size (t step 4 in "Read This First") C:32:00 Self-diagnosis display (86) Date/Time (46) ISO ...number (33) D Display E + Indication Vibration warning (10) • Indicates vibration will prevent you can still shoot images. Low battery warning (24) Spot metering cross hair ...
However, we recommend holding the camera steadily and turning off the indicator to avoid the effects of recordable...101 Recording folder (50) • This does not appear when using the internal memory. C Display Indication 7M (DSC-W7/ Image size (t step 4 in "Read This First") C:32:00 Self-diagnosis display (86) Date/Time (46) ISO ...number (33) D Display E + Indication Vibration warning (10) • Indicates vibration will prevent you can still shoot images. Low battery warning (24) Spot metering cross hair ...
Operating Instructions
Page 22
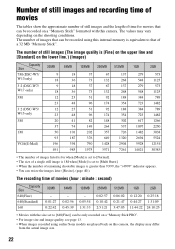
...- 0:02:56 0:45:39 128MB - 0:05:54 1:31:33 256MB 0:02:57 0:10:42 2:51:21 512MB 1GB 2GB 0:06:02 0:21:47 5:47:05 0:12:20 ...be recorded using earlier Sony models are played back on this camera, the display may vary depending on a "Memory Stick" formatted with this camera. The number of ...images that can resize the images later ([Resize], (page 40)). The recording time of a 32 MB "Memory Stick". The number of still images (The image quality is [Fine] on the upper line and [Standard] on the lower line.) (Images) Capacity Size 7M (DSC-W7/ W17only) 3:2 (DSC-W7...
...- 0:02:56 0:45:39 128MB - 0:05:54 1:31:33 256MB 0:02:57 0:10:42 2:51:21 512MB 1GB 2GB 0:06:02 0:21:47 5:47:05 0:12:20 ...be recorded using earlier Sony models are played back on this camera, the display may vary depending on a "Memory Stick" formatted with this camera. The number of ...images that can resize the images later ([Resize], (page 40)). The recording time of a 32 MB "Memory Stick". The number of still images (The image quality is [Fine] on the upper line and [Standard] on the lower line.) (Images) Capacity Size 7M (DSC-W7/ W17only) 3:2 (DSC-W7...
Operating Instructions
Page 39
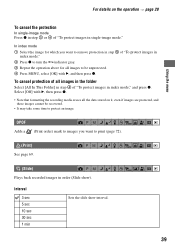
..., and these images cannot be recovered. • It may take some time to protect an image. Select [Off] with B, and then press z. Interval 3 sec 5 sec 10 sec 30 sec 1 min Sets the slide show ). indicator gray. 3 Repeat the operation above for which you want to print (page 72). (Print) See page...
..., and these images cannot be recovered. • It may take some time to protect an image. Select [Off] with B, and then press z. Interval 3 sec 5 sec 10 sec 30 sec 1 min Sets the slide show ). indicator gray. 3 Repeat the operation above for which you want to print (page 72). (Print) See page...

Operating Instructions
Page 74
...button Images shot with the A/V cable. 3 Set the mode dial to on the camera. Press b/B on the control button to select the desired image. • When using your camera abroad, it may be necessary to switch the video signal output to match that of a TV. 101-0002 2005 1 1 10:30PM BACK.../NEXT VOLUME To audio/video input jacks A/V cable To A/VOUT (MONO) jack • If your camera and the TV before connecting the camera and the TV with the camera appear on a TV screen by connecting the camera to a TV. Connecting your camera to your TV system (page...
...button Images shot with the A/V cable. 3 Set the mode dial to on the camera. Press b/B on the control button to select the desired image. • When using your camera abroad, it may be necessary to switch the video signal output to match that of a TV. 101-0002 2005 1 1 10:30PM BACK.../NEXT VOLUME To audio/video input jacks A/V cable To A/VOUT (MONO) jack • If your camera and the TV before connecting the camera and the TV with the camera appear on a TV screen by connecting the camera to a TV. Connecting your camera to your TV system (page...
Operating Instructions
Page 86
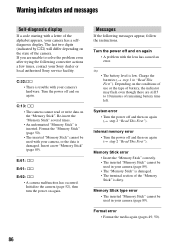
...camera, or the data is trouble with your camera has a selfdiagnosis display. Memory Stick error • Insert the "Memory Stick" correctly. • The inserted "Memory Stick" cannot be used in your Sony dealer or local authorized Sony... the type of battery, the indicator may flash even though there are unable to 10 minutes of remaining battery time left. E • The battery level is inserted... (page 50). • The inserted "Memory Stick" cannot be used with your camera (page 89). The last two digits (indicated by ss) will differ depending on again (t step 2 "Read This First...
...camera, or the data is trouble with your camera has a selfdiagnosis display. Memory Stick error • Insert the "Memory Stick" correctly. • The inserted "Memory Stick" cannot be used in your Sony dealer or local authorized Sony... the type of battery, the indicator may flash even though there are unable to 10 minutes of remaining battery time left. E • The battery level is inserted... (page 50). • The inserted "Memory Stick" cannot be used with your camera (page 89). The last two digits (indicated by ss) will differ depending on again (t step 2 "Read This First...
Operating Instructions
Page 96
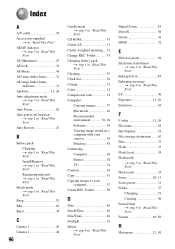
Folder 50 D Date 46 Date&Time 46 Date/Time 46 Daylight 33 Delete t step 6 in "Read This First" Digital Zoom 45 DirectX 56 Divide 41 DPOF 72 E Effective pixels 94 Electronic transformer t step 1 in "Read This First" Enlarged Icon 48 Enlarging an image t step 6 .../Remove t step 1 in "Read This First" Remaining indicator t step 1 in "Read This First" Beach mode t step 5 in "Read This First" Beep 52 Blur 10 Burst 34 C Camera 1 45 Camera 2 48 96 Candle mode t step 5 in "Read This First" Format 49, 50 H Histogram 21, 30 Folder 51 Charging battery pack t step 1 in "Read This...
Folder 50 D Date 46 Date&Time 46 Date/Time 46 Daylight 33 Delete t step 6 in "Read This First" Digital Zoom 45 DirectX 56 Divide 41 DPOF 72 E Effective pixels 94 Electronic transformer t step 1 in "Read This First" Enlarged Icon 48 Enlarging an image t step 6 .../Remove t step 1 in "Read This First" Remaining indicator t step 1 in "Read This First" Beach mode t step 5 in "Read This First" Beep 52 Blur 10 Burst 34 C Camera 1 45 Camera 2 48 96 Candle mode t step 5 in "Read This First" Format 49, 50 H Histogram 21, 30 Folder 51 Charging battery pack t step 1 in "Read This...
Operating Instructions
Page 97
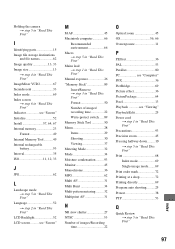
...12, 33 J JPG 62 L Landscape mode t step 5 in "Read This First" Language 52 t step 2 in "Read This First" Index 97 Holding the camera t step 5 in "Read This First" I Identifying parts 15 Image file storage destinations and file names 62 Image quality 13, 33 Image size 13 t step 4 ...This First" Indicator see "Viewing" Playback/Edit 25 Power cord t step 1 in "Read This First" Precautions 93 Precision zoom 45 Pressing halfway down .........10 t step 5 in "Read This First" Print 68 Index mode 69 Single-image mode........69 Print order mark 72 Printing at a shop 72 Printing directly...
...12, 33 J JPG 62 L Landscape mode t step 5 in "Read This First" Language 52 t step 2 in "Read This First" Index 97 Holding the camera t step 5 in "Read This First" I Identifying parts 15 Image file storage destinations and file names 62 Image quality 13, 33 Image size 13 t step 4 ...This First" Indicator see "Viewing" Playback/Edit 25 Power cord t step 1 in "Read This First" Precautions 93 Precision zoom 45 Pressing halfway down .........10 t step 5 in "Read This First" Print 68 Index mode 69 Single-image mode........69 Print order mark 72 Printing at a shop 72 Printing directly...


