Operating Instructions
Page 1
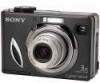
Enjoying the camera Using the menu Using the Setup screen Using your computer Printing still images Connecting your camera to these numbers whenever you call upon your Sony dealer regarding this product. Refer to your camera. Model No. Owner's Record The model and serial numbers are located on 100% recycled paper using VOC (Volatile Organic Compound)-free vegetable oil based ink. Record the serial number in China 2-586-568-12(1) Digital Still Camera User's Guide/ Troubleshooting Operating Instructions Before operating the unit...
Enjoying the camera Using the menu Using the Setup screen Using your computer Printing still images Connecting your camera to these numbers whenever you call upon your Sony dealer regarding this product. Refer to your camera. Model No. Owner's Record The model and serial numbers are located on 100% recycled paper using VOC (Volatile Organic Compound)-free vegetable oil based ink. Record the serial number in China 2-586-568-12(1) Digital Still Camera User's Guide/ Troubleshooting Operating Instructions Before operating the unit...
Operating Instructions
Page 3
... Sony service station. If you change the fuse. Notice for customers in the EMC Directive for a Class B digital device, pursuant to Part 15 of this camera. If the plug supplied with the limits for using connection cables shorter than 3 meters (9.8 feet). Never use the plug without the fuse cover. This equipment generates, uses, and can radiate radio frequency energy and, if not installed...
... Sony service station. If you change the fuse. Notice for customers in the EMC Directive for a Class B digital device, pursuant to Part 15 of this camera. If the plug supplied with the limits for using connection cables shorter than 3 meters (9.8 feet). Never use the plug without the fuse cover. This equipment generates, uses, and can radiate radio frequency energy and, if not installed...

Operating Instructions
Page 4
... the internal memory may be corrupted. The heat of flash emission may cause dirt on the flash surface to become discolored or to stick to record images, this camera is a "Memory Stick". Notes on "Memory Stick", see page 91. during the access lamp is . • If you record one-time events, make a trial recording to other bright light. The lens for a long time, use up the data. Water...
... the internal memory may be corrupted. The heat of flash emission may cause dirt on the flash surface to become discolored or to stick to record images, this camera is a "Memory Stick". Notes on "Memory Stick", see page 91. during the access lamp is . • If you record one-time events, make a trial recording to other bright light. The lens for a long time, use up the data. Water...

Operating Instructions
Page 6
..." (separate volume) 1 Prepare the battery 2 Turn the camera on/set the clock 3 Insert a "Memory Stick" (not supplied) 4 Select the image size for use 5 Shoot images easily (Auto adjustment mode) Shoot still images (Scene Selection) 6 View images/Delete images Get more friendly with your camera This manual • Shoot with your favorite settings (Program auto shooting/ Manual shooting) t page 25 • Enjoy various shooting/playback using the menu t page 28 • Change the default settings t page 44 Connect your camera to a PC or a printer This manual • Copy your images to...
..." (separate volume) 1 Prepare the battery 2 Turn the camera on/set the clock 3 Insert a "Memory Stick" (not supplied) 4 Select the image size for use 5 Shoot images easily (Auto adjustment mode) Shoot still images (Scene Selection) 6 View images/Delete images Get more friendly with your camera This manual • Shoot with your favorite settings (Program auto shooting/ Manual shooting) t page 25 • Enjoy various shooting/playback using the menu t page 28 • Change the default settings t page 44 Connect your camera to a PC or a printer This manual • Copy your images to...
Operating Instructions
Page 8
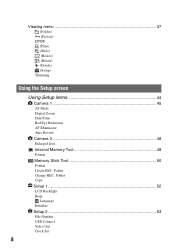
Viewing menu 37 (Folder) - (Protect) DPOF (Print) (Slide) (Resize) (Rotate) (Divide) (Setup) Trimming Using the Setup screen Using Setup items 44 Camera 1 45 1 AF Mode Digital Zoom Date/Time Red Eye Reduction AF Illuminator Auto Review Camera 2 48 2 Enlarged Icon Internal Memory Tool 49 Format Memory Stick Tool 50 Format Create REC. Folder Change REC. Folder Copy Setup 1 52 1 LCD Backlight Beep Language Initialize Setup 2 53 2 File Number USB Connect Video Out Clock Set 8
Viewing menu 37 (Folder) - (Protect) DPOF (Print) (Slide) (Resize) (Rotate) (Divide) (Setup) Trimming Using the Setup screen Using Setup items 44 Camera 1 45 1 AF Mode Digital Zoom Date/Time Red Eye Reduction AF Illuminator Auto Review Camera 2 48 2 Enlarged Icon Internal Memory Tool 49 Format Memory Stick Tool 50 Format Create REC. Folder Change REC. Folder Copy Setup 1 52 1 LCD Backlight Beep Language Initialize Setup 2 53 2 File Number USB Connect Video Out Clock Set 8
Operating Instructions
Page 26
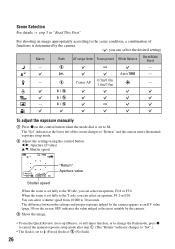
... image. • To use the Quick Review, close-up (Macro), or self-timer function, or to change the flash mode, press z to cancel the manual exposure setup mode after step 1. (The "Return" indicator changes to "Set".) • The flash is set fully to the W side, you can select the desired setting) Macro Flash AF range finder Focus preset White Balance Burst/Multi Burst - - b/B: Aperture (F value) v/V: Shutter speed VGA FINE M 98 Return SAF 250 F2.8 0EV Shutter speed "Return" Aperture value When the zoom...
... image. • To use the Quick Review, close-up (Macro), or self-timer function, or to change the flash mode, press z to cancel the manual exposure setup mode after step 1. (The "Return" indicator changes to "Set".) • The flash is set fully to the W side, you can select the desired setting) Macro Flash AF range finder Focus preset White Balance Burst/Multi Burst - - b/B: Aperture (F value) v/V: Shutter speed VGA FINE M 98 Return SAF 250 F2.8 0EV Shutter speed "Return" Aperture value When the zoom...

Operating Instructions
Page 37
... press z. OK See the following indicators appear. : Moves to the previous folder. : Moves to the next folder. : Moves to play back (when using a "Memory Stick" only). z On the [Folder] The camera stores images in the folder is displayed, the following procedure. Select Folder 102 2/2 Folder Name:102MSDCF No. Using the menu Viewing menu For details on the control button. Folder] (page 50) • To change the folder or create a new one. •...
... press z. OK See the following indicators appear. : Moves to the previous folder. : Moves to the next folder. : Moves to play back (when using a "Memory Stick" only). z On the [Folder] The camera stores images in the folder is displayed, the following procedure. Select Folder 102 2/2 Folder Name:102MSDCF No. Using the menu Viewing menu For details on the control button. Folder] (page 50) • To change the folder or create a new one. •...
Operating Instructions
Page 53
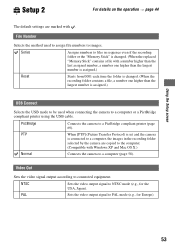
...] (Picture Transfer Protocol) is set and the camera is assigned.) USB Connect Selects the USB mode to be used to assign file numbers to images. Series Assigns numbers to files in sequence even if the recording folder or the "Memory Stick" is changed. (When the replaced "Memory Stick" contains a file with a number higher than the last assigned number, a number one higher than the largest number is assigned.) Reset Starts from 0001 each time the folder is changed. (When the recording folder contains a file, a number...
...] (Picture Transfer Protocol) is set and the camera is assigned.) USB Connect Selects the USB mode to be used to assign file numbers to images. Series Assigns numbers to files in sequence even if the recording folder or the "Memory Stick" is changed. (When the replaced "Memory Stick" contains a file with a number higher than the last assigned number, a number one higher than the largest number is assigned.) Reset Starts from 0001 each time the folder is changed. (When the recording folder contains a file, a number...
Operating Instructions
Page 61
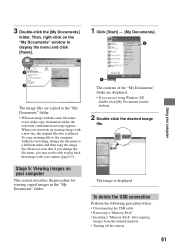
To delete the USB connection Perform the following procedure when: • Disconnecting the USB cable • Removing a "Memory Stick" • Inserting a "Memory Stick" after copying images from the internal memory • Turning off the camera 61 Stage 5: Viewing images on your camera (page 63). To copy an image file to the computer without overwriting, change the file name, you may not be able to play back that if you change the file name to the "My...
To delete the USB connection Perform the following procedure when: • Disconnecting the USB cable • Removing a "Memory Stick" • Inserting a "Memory Stick" after copying images from the internal memory • Turning off the camera 61 Stage 5: Viewing images on your camera (page 63). To copy an image file to the computer without overwriting, change the file name, you may not be able to play back that if you change the file name to the "My...
Operating Instructions
Page 62
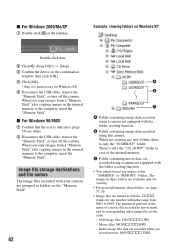
... the "101_SONY" folder in the internal memory to 9999. C Folder containing movie data, etc., recorded using this camera When not creating any new folders, there is only the "101MSDCF" folder. When you copy images from a "Memory Stick" after copying images in the internal memory to the "100MSDCF" or "MSSONY" folders. ssss stands for Windows XP. 5 Disconnect the USB cable, remove the "Memory Stick", or turn off the camera. The images in movie mode and its corresponding index image file are named...
... the "101_SONY" folder in the internal memory to 9999. C Folder containing movie data, etc., recorded using this camera When not creating any new folders, there is only the "101MSDCF" folder. When you copy images from a "Memory Stick" after copying images in the internal memory to the "100MSDCF" or "MSSONY" folders. ssss stands for Windows XP. 5 Disconnect the USB cable, remove the "Memory Stick", or turn off the camera. The images in movie mode and its corresponding index image file are named...

Operating Instructions
Page 63
... there is MPG. Change the file name to "DSC0ssss." When an image file copied to a computer no folder, first create a folder with your camera has not been changed. • You may be unable to play back some images depending on the image size. • When an image file has been processed by a computer or when the image file was recorded using a Windows computer as an example. Enter a number from 0001 to...
... there is MPG. Change the file name to "DSC0ssss." When an image file copied to a computer no folder, first create a folder with your camera has not been changed. • You may be unable to play back some images depending on the image size. • When an image file has been processed by a computer or when the image file was recorded using a Windows computer as an example. Enter a number from 0001 to...
Operating Instructions
Page 64
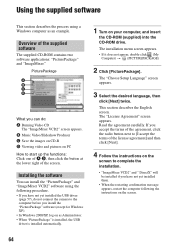
... yet installed the USB driver (page 57), do : A Burning Video CD The "ImageMixer VCD2" screen appears. PicturePackage A B C D What you can install the "PicturePackage" and "ImageMixer VCD2" software using a Windows computer as Administrator. • When "PicturePackage" is installed, the USB driver is installed automatically. 1 Turn on your computer, and insert the CD-ROM (supplied) into the CD-ROM drive. Installing the software You can do not connect the camera...
... yet installed the USB driver (page 57), do : A Burning Video CD The "ImageMixer VCD2" screen appears. PicturePackage A B C D What you can install the "PicturePackage" and "ImageMixer VCD2" software using a Windows computer as Administrator. • When "PicturePackage" is installed, the USB driver is installed automatically. 1 Turn on your computer, and insert the CD-ROM (supplied) into the CD-ROM drive. Installing the software You can do not connect the camera...
Operating Instructions
Page 66
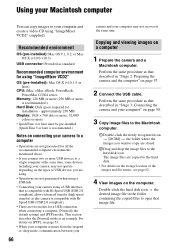
... for using . • Operations are stored. 2Drag and drop the image files to the hard disk icon. The image files are two modes for a USB connection when connecting a computer, [Normal] (the default setting) and [PTP] modes. Double-click the hard disk icon t the desired image file in the folder containing the copied files to open that described in "Stage 2: Preparing the camera and the computer" on the computer. Recommended environment OS (pre-installed): Mac OS 9.1, 9.2, or Mac...
... for using . • Operations are stored. 2Drag and drop the image files to the hard disk icon. The image files are two modes for a USB connection when connecting a computer, [Normal] (the default setting) and [PTP] modes. Double-click the hard disk icon t the desired image file in the folder containing the copied files to open that described in "Stage 2: Preparing the camera and the computer" on the computer. Recommended environment OS (pre-installed): Mac OS 9.1, 9.2, or Mac...
Operating Instructions
Page 67
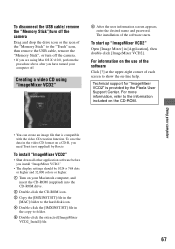
... the use of the software Click [?] at the upper-right corner of each screen to show the on the CD-ROM. Technical support for "ImageMixer VCD2" is compatible with the video CD creation function. To disconnect the USB cable/ remove the "Memory Stick"/turn off the camera Drag and drop the drive icon or the icon of the "Memory Stick" to the "Trash" icon, then remove the USB cable, remove the "Memory...
... the use of the software Click [?] at the upper-right corner of each screen to show the on the CD-ROM. Technical support for "ImageMixer VCD2" is compatible with the video CD creation function. To disconnect the USB cable/ remove the "Memory Stick"/turn off the camera Drag and drop the drive icon or the icon of the "Memory Stick" to the "Trash" icon, then remove the USB cable, remove the "Memory...
Operating Instructions
Page 69
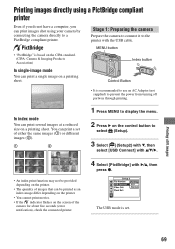
... screen of images that can be printed as an index image differ depending on the printer. • You cannot print movies. • If the indicator flashes on a printing sheet. In index mode You can print several images at a reduced size on a printing sheet. Printing images directly using a PictBridge compliant printer Even if you do not have a computer, you can print images shot using your camera by connecting the camera directly to prevent the power from turning off partway through printing. Printing still images...
... screen of images that can be printed as an index image differ depending on the printer. • You cannot print movies. • If the indicator flashes on a printing sheet. In index mode You can print several images at a reduced size on a printing sheet. Printing images directly using a PictBridge compliant printer Even if you do not have a computer, you can print images shot using your camera by connecting the camera directly to prevent the power from turning off partway through printing. Printing still images...

Operating Instructions
Page 78
... is set to [7M] (DSC-W7/W17), [5M] (DSC-W5/W15), or [3:2]. - The flash does not work . • You cannot change the zoom scale when shooting movies. Recording takes a long time. • The NR slow shutter function is selected as the Scene mode when you shoot still images. • The Focus preset function is not a malfunction. Select the auto focus mode (page 31). • Refer to "If the subject is too close -up (Macro) recording mode. Shooting...
... is set to [7M] (DSC-W7/W17), [5M] (DSC-W5/W15), or [3:2]. - The flash does not work . • You cannot change the zoom scale when shooting movies. Recording takes a long time. • The NR slow shutter function is selected as the Scene mode when you shoot still images. • The Focus preset function is not a malfunction. Select the auto focus mode (page 31). • Refer to "If the subject is too close -up (Macro) recording mode. Shooting...
Operating Instructions
Page 81
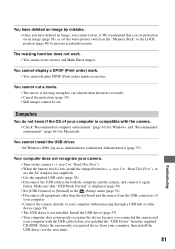
..., install the charged batteries (t step 1 in the (Setup) menu (page 53). • Disconnect all equipment other device (page 58). • The USB driver is displayed (page 58). • Set [USB Connect] to prevent accidental erasure. Delete the erroneously recognized device from both the computer and the camera, and connect it . We recommend that "USB Mode Normal" is not installed. You cannot install the USB driver. • In Windows 2000, log on movies...
..., install the charged batteries (t step 1 in the (Setup) menu (page 53). • Disconnect all equipment other device (page 58). • The USB driver is displayed (page 58). • Set [USB Connect] to prevent accidental erasure. Delete the erroneously recognized device from both the computer and the camera, and connect it . We recommend that "USB Mode Normal" is not installed. You cannot install the USB driver. • In Windows 2000, log on movies...
Operating Instructions
Page 82
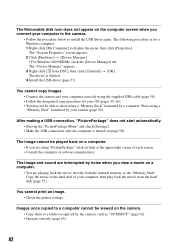
... image and sound are using the supplied USB cable (page 58). • Follow the designated copy procedure for a Windows computer. 1 Right-click [My Computer] to display the menu, then click [Properties]. After making a USB connection, "PicturePackage" does not start automatically. • Start up the "PicturePackage Menu" and check [Settings]. • Make the USB connection after the computer is turned on the camera. • Copy them to shoot using a "Memory Stick" formatted by noise when you view a movie on help...
... image and sound are using the supplied USB cable (page 58). • Follow the designated copy procedure for a Windows computer. 1 Right-click [My Computer] to display the menu, then click [Properties]. After making a USB connection, "PicturePackage" does not start automatically. • Start up the "PicturePackage Menu" and check [Settings]. • Make the USB connection after the computer is turned on the camera. • Copy them to shoot using a "Memory Stick" formatted by noise when you view a movie on help...

Operating Instructions
Page 84
... to the operating instructions supplied with the printer. Set [Date] to [PictBridge] in the index mode depending on the date-inserted part of the image. • Images that the camera and the printer are properly connected using the USB cable. • Turn on , then connect the USB cable again. • Movies cannot be printed. • Images shot using cameras other than this camera or images modified with the date inserted. Cannot print the image at the size selected. • Disconnect the USB cable and...
... to the operating instructions supplied with the printer. Set [Date] to [PictBridge] in the index mode depending on the date-inserted part of the image. • Images that the camera and the printer are properly connected using the USB cable. • Turn on , then connect the USB cable again. • Movies cannot be printed. • Images shot using cameras other than this camera or images modified with the date inserted. Cannot print the image at the size selected. • Disconnect the USB cable and...

Operating Instructions
Page 98
... display...........86 Self-timer t step 5 in "Read This First" Sepia 36 Setting the clock t step 2 in "Read This First" Setup 36, 43, 44 Camera 1 45 Camera 2 48 Internal Memory Tool ...49 Memory Stick Tool .......50 Setup 1 52 Setup 2 53 Setup 1 52 Setup 2 53 Sharpness 36 Shooting Movie t step 5 in "Read This First" Still image 98 t step 5 in "Read This First" Shooting menu 30 Shooting movies 25 Shutter speed 11, 26 Single 45 Single-image mode...
... display...........86 Self-timer t step 5 in "Read This First" Sepia 36 Setting the clock t step 2 in "Read This First" Setup 36, 43, 44 Camera 1 45 Camera 2 48 Internal Memory Tool ...49 Memory Stick Tool .......50 Setup 1 52 Setup 2 53 Setup 1 52 Setup 2 53 Sharpness 36 Shooting Movie t step 5 in "Read This First" Still image 98 t step 5 in "Read This First" Shooting menu 30 Shooting movies 25 Shutter speed 11, 26 Single 45 Single-image mode...


