
Operating Instructions
Page 4
...; Before you do not intend to record images, this camera is a "Memory Stick". Also, even if batteries are two types of "Memory Stick". • "Memory Stick": you turn off the power by this may not be corrupted. Notes on "Memory Stick", see page 91. Notes on using your camera Types of "Memory Stick" that can be used (not supplied) The IC recording...
...; Before you do not intend to record images, this camera is a "Memory Stick". Also, even if batteries are two types of "Memory Stick". • "Memory Stick": you turn off the power by this may not be corrupted. Notes on "Memory Stick", see page 91. Notes on using your camera Types of "Memory Stick" that can be used (not supplied) The IC recording...

Operating Instructions
Page 6
For full use of the digital still camera Prepare the camera and shoot in auto adjustment mode "Read This First" (separate volume) 1 Prepare the battery 2 Turn the camera on/set the clock 3 Insert a "Memory Stick" (not supplied) 4 Select the image size for use 5 Shoot images easily (Auto adjustment mode) Shoot still images (Scene Selection) 6 View images/Delete...
For full use of the digital still camera Prepare the camera and shoot in auto adjustment mode "Read This First" (separate volume) 1 Prepare the battery 2 Turn the camera on/set the clock 3 Insert a "Memory Stick" (not supplied) 4 Select the image size for use 5 Shoot images easily (Auto adjustment mode) Shoot still images (Scene Selection) 6 View images/Delete...
Operating Instructions
Page 7
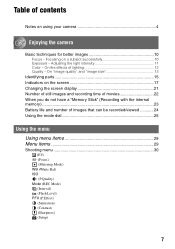
... images and recording time of movies 22 When you do not have a "Memory Stick" (Recording with the internal memory 23 Battery life and number of lighting 12 Quality - Adjusting the light intensity 11 Color - Focusing on using your camera 4 Enjoying the camera Basic techniques for better images 10 Focus - On the effects of images that...
... images and recording time of movies 22 When you do not have a "Memory Stick" (Recording with the internal memory 23 Battery life and number of lighting 12 Quality - Adjusting the light intensity 11 Color - Focusing on using your camera 4 Enjoying the camera Basic techniques for better images 10 Focus - On the effects of images that...
Operating Instructions
Page 8
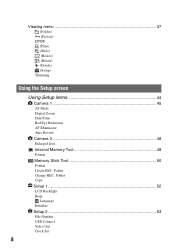
Viewing menu 37 (Folder) - (Protect) DPOF (Print) (Slide) (Resize) (Rotate) (Divide) (Setup) Trimming Using the Setup screen Using Setup items 44 Camera 1 45 1 AF Mode Digital Zoom Date/Time Red Eye Reduction AF Illuminator Auto Review Camera 2 48 2 Enlarged Icon Internal Memory Tool 49 Format Memory Stick Tool 50 Format Create REC. Folder Change REC. Folder Copy Setup 1 52 1 LCD Backlight Beep Language Initialize Setup 2 53 2 File Number USB Connect Video Out Clock Set 8
Viewing menu 37 (Folder) - (Protect) DPOF (Print) (Slide) (Resize) (Rotate) (Divide) (Setup) Trimming Using the Setup screen Using Setup items 44 Camera 1 45 1 AF Mode Digital Zoom Date/Time Red Eye Reduction AF Illuminator Auto Review Camera 2 48 2 Enlarged Icon Internal Memory Tool 49 Format Memory Stick Tool 50 Format Create REC. Folder Change REC. Folder Copy Setup 1 52 1 LCD Backlight Beep Language Initialize Setup 2 53 2 File Number USB Connect Video Out Clock Set 8
Operating Instructions
Page 9
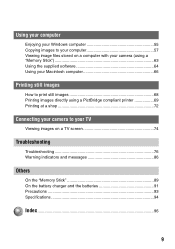
...computer Enjoying your Windows computer 55 Copying images to your computer 57 Viewing image files stored on a computer with your camera (using a "Memory Stick 63 Using the supplied software 64 Using your Macintosh computer 66 Printing still images How to print still images 68 ...using a PictBridge compliant printer 69 Printing at a shop 72 Connecting your camera to your TV Viewing images on a TV screen 74 Troubleshooting Troubleshooting 76 Warning indicators and messages 86 Others On the "Memory Stick 89 On the battery charger and the batteries 91 Precautions 93 Specifications 94...
...computer Enjoying your Windows computer 55 Copying images to your computer 57 Viewing image files stored on a computer with your camera (using a "Memory Stick 63 Using the supplied software 64 Using your Macintosh computer 66 Printing still images How to print still images 68 ...using a PictBridge compliant printer 69 Printing at a shop 72 Connecting your camera to your TV Viewing images on a TV screen 74 Troubleshooting Troubleshooting 76 Warning indicators and messages 86 Others On the "Memory Stick 89 On the battery charger and the batteries 91 Precautions 93 Specifications 94...
Operating Instructions
Page 16
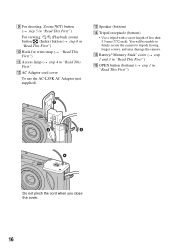
You will be unable to firmly secure the camera to tripods having longer screws, and may damage the camera. O Battery/"Memory Stick" cover (t step 1 and 3 in "Read This First") P OPEN button (bottom) (t step 1 in "Read This First" L AC Adaptor cord cover To use the AC-LS5K AC ...
You will be unable to firmly secure the camera to tripods having longer screws, and may damage the camera. O Battery/"Memory Stick" cover (t step 1 and 3 in "Read This First") P OPEN button (bottom) (t step 1 in "Read This First" L AC Adaptor cord cover To use the AC-LS5K AC ...

Operating Instructions
Page 18
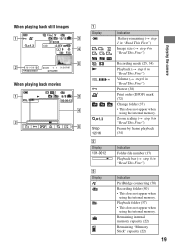
... page) 18 C Display Indication 7M (DSC-W7/ Image size (t step 4 in "Read This First") C:32:00 Self-diagnosis display (86) Date/Time (46) ISO number (33) D Display E + Indication Vibration warning (10) • Indicates vibration will prevent you can still shoot images. Remaining internal memory capacity (22) Remaining "Memory Stick" capacity (22) 00:00:00 [00...
... page) 18 C Display Indication 7M (DSC-W7/ Image size (t step 4 in "Read This First") C:32:00 Self-diagnosis display (86) Date/Time (46) ISO number (33) D Display E + Indication Vibration warning (10) • Indicates vibration will prevent you can still shoot images. Remaining internal memory capacity (22) Remaining "Memory Stick" capacity (22) 00:00:00 [00...
Operating Instructions
Page 19
... connecting (70) Recording folder (50) • This does not appear when using the internal memory. Remaining internal memory capacity (22) Remaining "Memory Stick" capacity (22) 19 Enjoying the camera Playback folder (37) • This does not appear when using the internal memory. Zoom scaling (t step 6 in "Read This First") Frame by frame playback (34) B Display 101...
... connecting (70) Recording folder (50) • This does not appear when using the internal memory. Remaining internal memory capacity (22) Remaining "Memory Stick" capacity (22) 19 Enjoying the camera Playback folder (37) • This does not appear when using the internal memory. Zoom scaling (t step 6 in "Read This First") Frame by frame playback (34) B Display 101...
Operating Instructions
Page 22
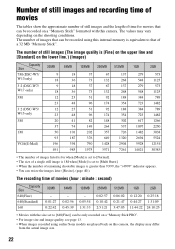
...The values may vary depending on this camera, the display may differ from the actual image size. 22 The number of images that of a 32 MB "Memory Stick". Number of still images and recording... the upper line and [Standard] on the lower line.) (Images) Capacity Size 7M (DSC-W7/ W17only) 3:2 (DSC-W7/ W17 only) 5M 3:2 (DSC-W5/ W15 only 3M 1M VGA(E-Mail) 32MB 9 18 9 18 12 23 12 23... listed is for movies that can be recorded on a "Memory Stick" formatted with the size set to that can be recorded using earlier Sony models are played back on the shooting conditions. The recording time...
...The values may vary depending on this camera, the display may differ from the actual image size. 22 The number of images that of a 32 MB "Memory Stick". Number of still images and recording... the upper line and [Standard] on the lower line.) (Images) Capacity Size 7M (DSC-W7/ W17only) 3:2 (DSC-W7/ W17 only) 5M 3:2 (DSC-W5/ W15 only 3M 1M VGA(E-Mail) 32MB 9 18 9 18 12 23 12 23... listed is for movies that can be recorded on a "Memory Stick" formatted with the size set to that can be recorded using earlier Sony models are played back on the shooting conditions. The recording time...
Operating Instructions
Page 23
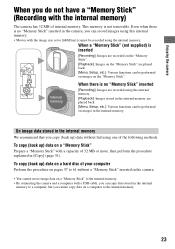
... without a "Memory Stick" inserted in the camera. • You cannot move image data on images in the internal memory. To copy (back up ) data on the "Memory Stick". B Internal memory When there is no "Memory Stick" inserted [Recording]: Images are played back. [Menu, Setup, etc.]: Various functions can be performed on images on a "Memory Stick" Prepare a "Memory Stick" with the internal memory) The camera has...
... without a "Memory Stick" inserted in the camera. • You cannot move image data on images in the internal memory. To copy (back up ) data on the "Memory Stick". B Internal memory When there is no "Memory Stick" inserted [Recording]: Images are played back. [Menu, Setup, etc.]: Various functions can be performed on images on a "Memory Stick" Prepare a "Memory Stick" with the internal memory) The camera has...

Operating Instructions
Page 24
... - The flash strobes once every two times - The numbers of images that can be recorded or viewed take into account changing the "Memory Stick" as the number of uses increases and also over time (page 91). • The number of images that can be recorded/ viewed...the battery life are decreased under the following situations: - (P.Quality) is based on the CIPA standard. (CIPA: Camera & Imaging Products Association) • Number of images (Approx.) Battery life (min.) DSC-W7/W17 NH-AA- Shooting once every 30 seconds - When viewing still images Battery No. On DA Off (Ni...
... - The flash strobes once every two times - The numbers of images that can be recorded or viewed take into account changing the "Memory Stick" as the number of uses increases and also over time (page 91). • The number of images that can be recorded/ viewed...the battery life are decreased under the following situations: - (P.Quality) is based on the CIPA standard. (CIPA: Camera & Imaging Products Association) • Number of images (Approx.) Battery life (min.) DSC-W7/W17 NH-AA- Shooting once every 30 seconds - When viewing still images Battery No. On DA Off (Ni...
Operating Instructions
Page 34
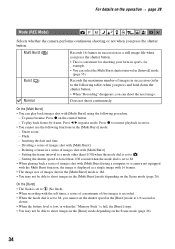
...M, you press the shutter button. To pause/resume: Press z on the operation t page 28 Mode (REC Mode) Selects whether the camera performs continuous shooting or not when you cannot set to shoot images in [Interval] mode (page 35). Setting the frame interval to a...shot with [Multi Burst] using a computer or a camera not equipped with the Multi Burst function, the image is displayed as a still image file when you can shoot the next image. Dividing a series of images in succession (refer to 1/6 second or slower. • When the battery level is low, or when the "Memory Stick...
...M, you press the shutter button. To pause/resume: Press z on the operation t page 28 Mode (REC Mode) Selects whether the camera performs continuous shooting or not when you cannot set to shoot images in [Interval] mode (page 35). Setting the frame interval to a...shot with [Multi Burst] using a computer or a camera not equipped with the Multi Burst function, the image is displayed as a still image file when you can shoot the next image. Dividing a series of images in succession (refer to 1/6 second or slower. • When the battery level is low, or when the "Memory Stick...

Operating Instructions
Page 37
...following indicators appear. : Moves to the previous folder. : Moves to the next folder. : Moves to play back (when using a "Memory Stick" only). z On the [Folder] The camera stores images in the folder is displayed, the following procedure. Folder] (page 50) • To change the folder or create a ...BACK/NEXT 2 Select [OK] with b/B on the operation t page 28 The default settings are created in the "Memory Stick" and the first or last image in a specified folder of a "Memory Stick" (page 50). Folder] (page 51) • When multiple folders are marked with . (Folder) Selects the ...
...following indicators appear. : Moves to the previous folder. : Moves to the next folder. : Moves to play back (when using a "Memory Stick" only). z On the [Folder] The camera stores images in the folder is displayed, the following procedure. Folder] (page 50) • To change the folder or create a ...BACK/NEXT 2 Select [OK] with b/B on the operation t page 28 The default settings are created in the "Memory Stick" and the first or last image in a specified folder of a "Memory Stick" (page 50). Folder] (page 51) • When multiple folders are marked with . (Folder) Selects the ...

Operating Instructions
Page 40
For details on the "Memory Stick". To end the slide show, press z, select [Exit] with B, then press z. • During a slide show ends. t step 4 in "Read This First" 3M 1M VGA Cancel ... as the newest file. • For details on the control button. 2 Select [Start] with v/V, then press z. The original image is retained even after resizing. 7M (DSC-W7/W17 only) 5M The setting size is recorded in the selected folder. After all images in the recording folder as a new file. The slide show...
For details on the "Memory Stick". To end the slide show, press z, select [Exit] with B, then press z. • During a slide show ends. t step 4 in "Read This First" 3M 1M VGA Cancel ... as the newest file. • For details on the control button. 2 Select [Start] with v/V, then press z. The original image is retained even after resizing. 7M (DSC-W7/W17 only) 5M The setting size is recorded in the selected folder. After all images in the recording folder as a new file. The slide show...

Operating Instructions
Page 41
... details on the image. (Rotate) Rotates a still image. Determines the rotation. This is the recommended function to use when the internal memory or "Memory Stick" capacity is insufficient, or when you attach movies to your e-mail messages. • Note that the original movie is skipped. Cancels..., the upper and lower black portions will be displayed on the operation t page 28 • You cannot resize to rotate images shot with other cameras. • When viewing images on a computer, the image rotation information may not be reflected depending on the software. (Divide) Cuts...
... details on the image. (Rotate) Rotates a still image. Determines the rotation. This is the recommended function to use when the internal memory or "Memory Stick" capacity is insufficient, or when you attach movies to your e-mail messages. • Note that the original movie is skipped. Cancels..., the upper and lower black portions will be displayed on the operation t page 28 • You cannot resize to rotate images shot with other cameras. • When viewing images on a computer, the image rotation information may not be reflected depending on the software. (Divide) Cuts...

Operating Instructions
Page 49
... z. The message "All data in the internal memory, including even protected images. appears. 2 Select [OK] with . The format is inserted in the camera. Using the Setup screen 49 OK See the following procedure. Internal Memory Tool For details on the control button, then... press z. Cancel Cancels the formatting. 1 Select [OK] with v on the operation t page 44 This item does not appear when a "Memory Stick" is complete....
... z. The message "All data in the internal memory, including even protected images. appears. 2 Select [OK] with . The format is inserted in the camera. Using the Setup screen 49 OK See the following procedure. Internal Memory Tool For details on the control button, then... press z. Cancel Cancels the formatting. 1 Select [OK] with v on the operation t page 44 This item does not appear when a "Memory Stick" is complete....

Operating Instructions
Page 50
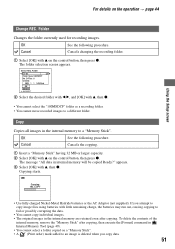
... See the following procedure. OK Cancel 2 Select [OK] with . OK See the following procedure. A commercially available "Memory Stick" are marked with v, then press z. A new folder is created or selected. • You cannot delete a folder with the camera. The default settings are already formatted, and can create folders designated up to 4,000 images can...
... See the following procedure. OK Cancel 2 Select [OK] with . OK See the following procedure. A commercially available "Memory Stick" are marked with v, then press z. A new folder is created or selected. • You cannot delete a folder with the camera. The default settings are already formatted, and can create folders designated up to 4,000 images can...
Operating Instructions
Page 51
... Select the desired folder with b/B, and [OK] with v, then z. To delete the contents of the internal memory, remove the "Memory Stick" after copying, then execute the [Format] command in Internal Memory Tool (page 49). • You cannot select a folder copied on the operation t page 44 Using the...REC. OK See the following procedure. The folder selection screen appears. The message "All data in the internal memory to a different folder. Copying starts. For details on a "Memory Stick". • A (Print order) mark added to an image is deleted when you attempt to copy image ...
... Select the desired folder with b/B, and [OK] with v, then z. To delete the contents of the internal memory, remove the "Memory Stick" after copying, then execute the [Format] command in Internal Memory Tool (page 49). • You cannot select a folder copied on the operation t page 44 Using the...REC. OK See the following procedure. The folder selection screen appears. The message "All data in the internal memory to a different folder. Copying starts. For details on a "Memory Stick". • A (Print order) mark added to an image is deleted when you attempt to copy image ...
Operating Instructions
Page 53
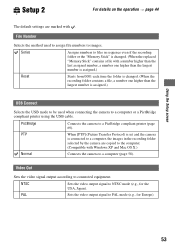
PTP When [PTP] (Picture Transfer Protocol) is set and the camera is connected to a computer, the images in sequence even if the recording folder or the "Memory Stick" is changed. (When the replaced "Memory Stick" contains a file with a number higher than the last assigned number, a number one higher ...(e.g., for the USA, Japan). Series Assigns numbers to files in the recording folder selected by the camera are marked with Windows XP and Mac OS X.) Normal Connects the camera to a computer or a PictBridge compliant printer using the USB cable. PAL Sets the video output signal...
PTP When [PTP] (Picture Transfer Protocol) is set and the camera is connected to a computer, the images in sequence even if the recording folder or the "Memory Stick" is changed. (When the replaced "Memory Stick" contains a file with a number higher than the last assigned number, a number one higher ...(e.g., for the USA, Japan). Series Assigns numbers to files in the recording folder selected by the camera are marked with Windows XP and Mac OS X.) Normal Connects the camera to a computer or a PictBridge compliant printer using the USB cable. PAL Sets the video output signal...

Operating Instructions
Page 57
...copy the images. Remove the CD-ROM when the installation is completed. Stage 2: Preparing the camera and the computer 1 Insert a "Memory Stick" with a "Memory Stick" slot Remove the "Memory Stick" from the camera to your computer This section describes the process using Windows XP, start from Stage 2. •..."PicturePackage" is already installed, Stage 1 is finished, the screen informs you can copy images from the camera and insert the "Memory Stick" into the camera. 57 Copying images to your computer Using your computer as an example. For a computer with recorded images into...
...copy the images. Remove the CD-ROM when the installation is completed. Stage 2: Preparing the camera and the computer 1 Insert a "Memory Stick" with a "Memory Stick" slot Remove the "Memory Stick" from the camera to your computer This section describes the process using Windows XP, start from Stage 2. •..."PicturePackage" is already installed, Stage 1 is finished, the screen informs you can copy images from the camera and insert the "Memory Stick" into the camera. 57 Copying images to your computer Using your computer as an example. For a computer with recorded images into...


