Operating Instructions
Page 8
Folder Change REC. Viewing menu 37 (Folder) - (Protect) DPOF (Print) (Slide) (Resize) (Rotate) (Divide) (Setup) Trimming Using the Setup screen Using Setup items 44 Camera 1 45 1 AF Mode Digital Zoom Date/Time Red Eye Reduction AF Illuminator Auto Review Camera 2 48 2 Enlarged Icon Internal Memory Tool 49 Format Memory Stick Tool 50 Format Create REC. Folder Copy Setup 1 52 1 LCD Backlight Beep Language Initialize Setup 2 53 2 File Number USB Connect Video Out Clock Set 8
Folder Change REC. Viewing menu 37 (Folder) - (Protect) DPOF (Print) (Slide) (Resize) (Rotate) (Divide) (Setup) Trimming Using the Setup screen Using Setup items 44 Camera 1 45 1 AF Mode Digital Zoom Date/Time Red Eye Reduction AF Illuminator Auto Review Camera 2 48 2 Enlarged Icon Internal Memory Tool 49 Format Memory Stick Tool 50 Format Create REC. Folder Copy Setup 1 52 1 LCD Backlight Beep Language Initialize Setup 2 53 2 File Number USB Connect Video Out Clock Set 8
Operating Instructions
Page 26
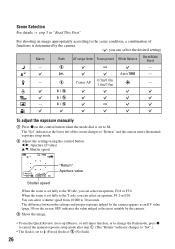
The "Set" indicator at the lower left of functions is determined by the camera. 3 Shoot the image. • To use the Quick Review, close-up (Macro), or self-timer function, or to change the flash mode, press z to cancel the manual exposure setup mode after step 1. (The "Return" ...indicator changes to "Set".) • The flash is set to M. The difference between the settings and proper exposure judged by the camera appears as...
The "Set" indicator at the lower left of functions is determined by the camera. 3 Shoot the image. • To use the Quick Review, close-up (Macro), or self-timer function, or to change the flash mode, press z to cancel the manual exposure setup mode after step 1. (The "Return" ...indicator changes to "Set".) • The flash is set to M. The difference between the settings and proper exposure judged by the camera appears as...
Operating Instructions
Page 30
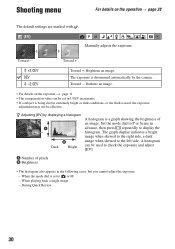
... 101 4 A 0EV B Dark Bright A histogram is set in 1/3EV increments. • If a subject is being shot in extremely bright or dark conditions, or the flash is determined automatically by the camera. Set the mode dial to P or Scene in the following cases, but you cannot adjust the exposure. - A Number...the left side. Shooting menu For details on the exposure t page 11 • The compensation value can be set to or M - During Quick Review 30 Toward -: Darkens an image. • For details on the operation t page 28 The default settings are marked with . (EV) Manually adjusts ...
... 101 4 A 0EV B Dark Bright A histogram is set in 1/3EV increments. • If a subject is being shot in extremely bright or dark conditions, or the flash is determined automatically by the camera. Set the mode dial to P or Scene in the following cases, but you cannot adjust the exposure. - A Number...the left side. Shooting menu For details on the exposure t page 11 • The compensation value can be set to or M - During Quick Review 30 Toward -: Darkens an image. • For details on the operation t page 28 The default settings are marked with . (EV) Manually adjusts ...
Operating Instructions
Page 43
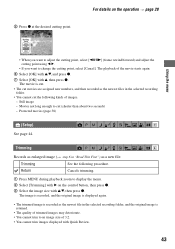
... z. 7 Select [OK] with v, then press z. Protected movies (page 38) (Setup) See page 44. Movies not long enough to display the menu. 2 Select [Trimming] with Quick Review. 43 The playback of images. - The image is recorded, and the original image is displayed again. • The trimmed image is recorded as the newest...
... z. 7 Select [OK] with v, then press z. Protected movies (page 38) (Setup) See page 44. Movies not long enough to display the menu. 2 Select [Trimming] with Quick Review. 43 The playback of images. - The image is recorded, and the original image is displayed again. • The trimmed image is recorded as the newest...
Operating Instructions
Page 47
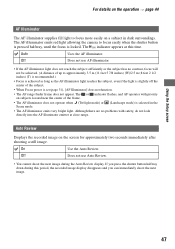
... subjects located near the center of the subject. • When Focus preset is selected in dark surroundings. Off Does not use Auto Review. • You cannot shoot the next image during this time. Although there are no contrast, focus will not be achieved. (A ... pressed halfway, until the focus is locked. If you press the shutter button halfway down during the Auto Review display. Auto Uses the AF illuminator. The AF illuminator emits red light allowing the camera to approximately 3.5 m (11 feet 5 7/8 inches) (W)/2.5 m (8 feet 2 1/2 inches) (T) is recommended.) • ...
... subjects located near the center of the subject. • When Focus preset is selected in dark surroundings. Off Does not use Auto Review. • You cannot shoot the next image during this time. Although there are no contrast, focus will not be achieved. (A ... pressed halfway, until the focus is locked. If you press the shutter button halfway down during the Auto Review display. Auto Uses the AF illuminator. The AF illuminator emits red light allowing the camera to approximately 3.5 m (11 feet 5 7/8 inches) (W)/2.5 m (8 feet 2 1/2 inches) (T) is recommended.) • ...
Operating Instructions
Page 96
...Date&Time 46 Date/Time 46 Daylight 33 Delete t step 6 in "Read This First" Digital Zoom 45 DirectX 56 Divide 41 DPOF 72 E Effective pixels 94 Electronic transformer t step ...Macintosh 66 Recommended environment 56, 66 Software 64 Viewing image stored on a computer with your camera 63 Windows 55 Connecting Computer 58 Printer 70 TV 74 Contrast 36 Copy 51 Copying images... step 5 in "Read This First" Auto Focus 10 Auto power-off function t step 2 in "Read This First" Auto Review 47 B Battery pack Charging t step 1 in "Read This First" Install/Remove t step 1 in "Read This First" ...
...Date&Time 46 Date/Time 46 Daylight 33 Delete t step 6 in "Read This First" Digital Zoom 45 DirectX 56 Divide 41 DPOF 72 E Effective pixels 94 Electronic transformer t step ...Macintosh 66 Recommended environment 56, 66 Software 64 Viewing image stored on a computer with your camera 63 Windows 55 Connecting Computer 58 Printer 70 TV 74 Contrast 36 Copy 51 Copying images... step 5 in "Read This First" Auto Focus 10 Auto power-off function t step 2 in "Read This First" Auto Review 47 B Battery pack Charging t step 1 in "Read This First" Install/Remove t step 1 in "Read This First" ...
Operating Instructions
Page 97
... 35 ISO 11, 12, 33 J JPG 62 L Landscape mode t step 5 in "Read This First" Language 52 t step 2 in "Read This First" Index 97 Holding the camera t step 5 in "Read This First" I Identifying parts 15 Image file storage destinations and file names 62 Image quality 13, 33 Image size 13 t step 4 in... 69 Single-image mode........69 Print order mark 72 Printing at a shop 72 Printing directly 69 Program auto shooting..........25 Protect 38 PTP 53 Q Quick Review t step 5 in "Read This First" LCD Backlight 52 LCD screen ..........
... 35 ISO 11, 12, 33 J JPG 62 L Landscape mode t step 5 in "Read This First" Language 52 t step 2 in "Read This First" Index 97 Holding the camera t step 5 in "Read This First" I Identifying parts 15 Image file storage destinations and file names 62 Image quality 13, 33 Image size 13 t step 4 in... 69 Single-image mode........69 Print order mark 72 Printing at a shop 72 Printing directly 69 Program auto shooting..........25 Protect 38 PTP 53 Q Quick Review t step 5 in "Read This First" LCD Backlight 52 LCD screen ..........
