Instruction Manual
Page 7
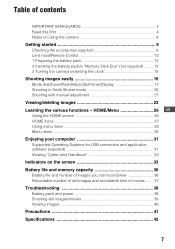
... Read this first 4 Notes on using the camera 8 Getting started 9 Checking the accessories supplied 9 Lens hood/Remote Control 10 1 Preparing the battery pack 12 2 Inserting the battery pack/a "Memory Stick Duo" (not supplied) ........ 13 3 Turning the camera on the screen 33 Battery life and memory capacity...items 28 Menu items 29 Enjoying your computer 31 Supported Operating Systems for USB connection and application software (supplied 31 Viewing "Cyber-shot Handbook 32 Indicators on /setting the clock 15 Shooting images easily 16 Mode dial/Zoom/Flash/Macro/Self-timer/Display 17...
... Read this first 4 Notes on using the camera 8 Getting started 9 Checking the accessories supplied 9 Lens hood/Remote Control 10 1 Preparing the battery pack 12 2 Inserting the battery pack/a "Memory Stick Duo" (not supplied) ........ 13 3 Turning the camera on the screen 33 Battery life and memory capacity...items 28 Menu items 29 Enjoying your computer 31 Supported Operating Systems for USB connection and application software (supplied 31 Viewing "Cyber-shot Handbook 32 Indicators on /setting the clock 15 Shooting images easily 16 Mode dial/Zoom/Flash/Macro/Self-timer/Display 17...
Instruction Manual
Page 8
...become unusable or image data may be contrary to the provisions of the copyright laws. [ No compensation for damaged content or recording failure Sony cannot compensate for failure to record or loss or damage of recorded content due to the flash surface, resulting in sandy or dusty locations... of the manufacturing process, and do not affect the recording. • When the battery level becomes low, the lens might stop moving. Insert a charged battery pack and turn off the camera, remove the battery pack, or remove the "Memory Stick Duo" while the access lamp is neither dust-proof, ...
...become unusable or image data may be contrary to the provisions of the copyright laws. [ No compensation for damaged content or recording failure Sony cannot compensate for failure to record or loss or damage of recorded content due to the flash surface, resulting in sandy or dusty locations... of the manufacturing process, and do not affect the recording. • When the battery level becomes low, the lens might stop moving. Insert a charged battery pack and turn off the camera, remove the battery pack, or remove the "Memory Stick Duo" while the access lamp is neither dust-proof, ...
Instruction Manual
Page 9
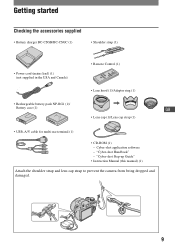
... (1)/Adaptor ring (1) • Rechargeable battery pack NP-BG1 (1)/ Battery case (1) GB • Lens cap (1)/Lens cap strap (1) • USB, A/V cable for multi-use terminal (1) • CD-ROM (1) - Cyber-shot application software - "Cyber-shot Step-up Guide" • Instruction Manual (this manual) (1) Attach the shoulder strap and lens cap strap to prevent the camera from being dropped and damaged. 9
... (1)/Adaptor ring (1) • Rechargeable battery pack NP-BG1 (1)/ Battery case (1) GB • Lens cap (1)/Lens cap strap (1) • USB, A/V cable for multi-use terminal (1) • CD-ROM (1) - Cyber-shot application software - "Cyber-shot Step-up Guide" • Instruction Manual (this manual) (1) Attach the shoulder strap and lens cap strap to prevent the camera from being dropped and damaged. 9
Instruction Manual
Page 10
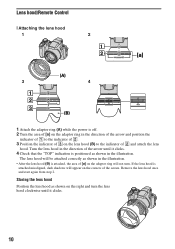
... is off. 2 Turn the area of [a] on the adaptor ring in the illustration. Remove the lens hood once and start again from step 2. Storing the lens hood Position the lens hood as shown in the direction of the arrow and position the indicator of 1 to the indicator of 2. 3 ...Position the indicator of 3 on the lens hood (B) to the indicator of 2 and attach the lens hood. Lens hood/Remote Control [ Attaching the lens hood 1 2 3 4 1 Attach the adaptor ring (A) while the power is attached misaligned, dark shadows will ...
... is off. 2 Turn the area of [a] on the adaptor ring in the illustration. Remove the lens hood once and start again from step 2. Storing the lens hood Position the lens hood as shown in the direction of the arrow and position the indicator of 1 to the indicator of 2. 3 ...Position the indicator of 3 on the lens hood (B) to the indicator of 2 and attach the lens hood. Lens hood/Remote Control [ Attaching the lens hood 1 2 3 4 1 Attach the adaptor ring (A) while the power is attached misaligned, dark shadows will ...
Instruction Manual
Page 13
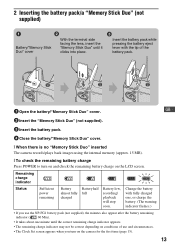
2 Inserting the battery pack/a "Memory Stick Duo" (not supplied) ɟ Battery/"Memory Stick Duo" cover With the terminal side facing the lens, insert the "Memory Stick Duo" until it clicks into place. ɠ Insert the battery pack while pressing the battery eject lever with fully ... Stick Duo" (not supplied). 3 Insert the battery pack. 4 Close the battery/"Memory Stick Duo" cover. [ When there is no "Memory Stick Duo" inserted The camera records/plays back images using the internal memory (approx. 15 MB). [ To check the remaining battery charge Press POWER to turn on the LCD screen...
2 Inserting the battery pack/a "Memory Stick Duo" (not supplied) ɟ Battery/"Memory Stick Duo" cover With the terminal side facing the lens, insert the "Memory Stick Duo" until it clicks into place. ɠ Insert the battery pack while pressing the battery eject lever with fully ... Stick Duo" (not supplied). 3 Insert the battery pack. 4 Close the battery/"Memory Stick Duo" cover. [ When there is no "Memory Stick Duo" inserted The camera records/plays back images using the internal memory (approx. 15 MB). [ To check the remaining battery charge Press POWER to turn on the LCD screen...
Instruction Manual
Page 16
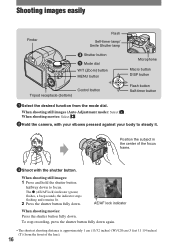
... . 2Hold the camera, with the shutter button. AE/AF lock indicator When shooting movies: Press the shutter button fully down again. • The shortest shooting distance is approximately 1 cm (13/32 inches) (W)/120 cm (3 feet 11 1/4 inches) (T) (from the mode dial. Position the subject in the center of the lens). 16 To...
... . 2Hold the camera, with the shutter button. AE/AF lock indicator When shooting movies: Press the shutter button fully down again. • The shortest shooting distance is approximately 1 cm (13/32 inches) (W)/120 cm (3 feet 11 1/4 inches) (T) (from the mode dial. Position the subject in the center of the lens). 16 To...
Instruction Manual
Page 27
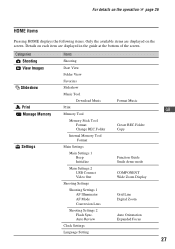
... the screen. Auto Review Clock Settings Language Setting Format Music Create REC.Folder Copy Function Guide Smile demo mode COMPONENT Wide Zoom Display Grid Line Digital Zoom Auto Orientation Expanded Focus GB 27 Categories Shooting View Images Slideshow Print Manage Memory Settings Items Shooting Date View Folder View Favorites Slideshow Music... Internal Memory Tool Format Main Settings Main Settings 1 Beep Initialize Main Settings 2 USB Connect Video Out Shooting Settings Shooting Settings 1 AF Illuminator AF Mode Conversion Lens Shooting Settings 2 Flash Sync.
... the screen. Auto Review Clock Settings Language Setting Format Music Create REC.Folder Copy Function Guide Smile demo mode COMPONENT Wide Zoom Display Grid Line Digital Zoom Auto Orientation Expanded Focus GB 27 Categories Shooting View Images Slideshow Print Manage Memory Settings Items Shooting Date View Folder View Favorites Slideshow Music... Internal Memory Tool Format Main Settings Main Settings 1 Beep Initialize Main Settings 2 USB Connect Video Out Shooting Settings Shooting Settings 1 AF Illuminator AF Mode Conversion Lens Shooting Settings 2 Flash Sync.
Instruction Manual
Page 34
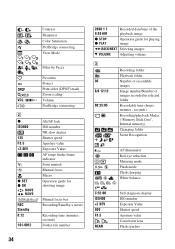
... Flash mode Flash charging White balance C:32:00 ISO400 +2.0EV 500 F3.5 REAR Self-diagnosis display ISO number Exposure Value Shutter speed Aperture value Conversion lens Flash synchro Contrast Sharpness Color Saturation PictBridge connecting View Mode VOL.
... Flash mode Flash charging White balance C:32:00 ISO400 +2.0EV 500 F3.5 REAR Self-diagnosis display ISO number Exposure Value Shutter speed Aperture value Conversion lens Flash synchro Contrast Sharpness Color Saturation PictBridge connecting View Mode VOL.
Instruction Manual
Page 39
Shooting still images/movies Cannot record images. • Check the free capacity of the following : - Vertical streaks appear when you use the camera in an extremely hot or cold location. • A discrepancy arose between the remaining charge indicator and the actual remaining battery charge. Replace it ... the battery. Do one of the internal memory or "Memory Stick Duo" (page 37). GB - Insert a "Memory Stick PRO Duo". • The lens cap is incorrect. • This phenomenon occurs when you are shooting a very bright subject. • The smear phenomenon is discharged.
Shooting still images/movies Cannot record images. • Check the free capacity of the following : - Vertical streaks appear when you use the camera in an extremely hot or cold location. • A discrepancy arose between the remaining charge indicator and the actual remaining battery charge. Replace it ... the battery. Do one of the internal memory or "Memory Stick Duo" (page 37). GB - Insert a "Memory Stick PRO Duo". • The lens cap is incorrect. • This phenomenon occurs when you are shooting a very bright subject. • The smear phenomenon is discharged.
Instruction Manual
Page 41
...or other settings regardless of whether the power is on your trousers or skirt, as this rechargeable battery before using the camera. This moisture condensation may condense inside the lens, images will not be indicated. If moisture condensation occurs Turn off . 41 Note that exceed this range is not ...for a long time. [ On operating temperatures The camera is designed for use the GB camera at all for about an hour for 24 hours or more with an LCD cleaning kit (not supplied) to evaporate. Cleaning the lens Wipe the lens with a dry cloth. To prevent damage to ...
...or other settings regardless of whether the power is on your trousers or skirt, as this rechargeable battery before using the camera. This moisture condensation may condense inside the lens, images will not be indicated. If moisture condensation occurs Turn off . 41 Note that exceed this range is not ...for a long time. [ On operating temperatures The camera is designed for use the GB camera at all for about an hour for 24 hours or more with an LCD cleaning kit (not supplied) to evaporate. Cleaning the lens Wipe the lens with a dry cloth. To prevent damage to ...
Instruction Manual
Page 42
.... 10.3 Megapixels Effective pixel number of camera: Approx. 9.1 Megapixels Lens: Carl Zeiss Vario-Tessar 15× zoom lens f = 5.2 - 78 mm (31 - 465 mm (35 mm film equivalent)) F2.7(W) - 4.5(T) Exposure control: Automatic exposure, Shutter speed priority, Aperture priority, Manual exposure, ... voltage: DC 4.2 V Nominal voltage: DC 3.6 V Capacity: 3.4 Wh (960 mAh) Design and specifications are subject to change without notice. 42 Specifications Camera [System] Image device: 7.70 mm (1/2.3 type) color CCD, Primary color filter • Only 7.30 mm (1/2.5 type equivalent) area is used in the...
.... 10.3 Megapixels Effective pixel number of camera: Approx. 9.1 Megapixels Lens: Carl Zeiss Vario-Tessar 15× zoom lens f = 5.2 - 78 mm (31 - 465 mm (35 mm film equivalent)) F2.7(W) - 4.5(T) Exposure control: Automatic exposure, Shutter speed priority, Aperture priority, Manual exposure, ... voltage: DC 4.2 V Nominal voltage: DC 3.6 V Capacity: 3.4 Wh (960 mAh) Design and specifications are subject to change without notice. 42 Specifications Camera [System] Image device: 7.70 mm (1/2.3 type) color CCD, Primary color filter • Only 7.30 mm (1/2.5 type equivalent) area is used in the...


