Instruction Manual
Page 2
.... For those sets designed to operate from the type of electrical power supplied to your home, consult your protection, please read these numbers whenever you are unable to insert the plug fully into the power outlet only one way. For Customers in the space provided below. This symbol is a safety feature. English Owner's Record The model and serial numbers are located...
.... For those sets designed to operate from the type of electrical power supplied to your home, consult your protection, please read these numbers whenever you are unable to insert the plug fully into the power outlet only one way. For Customers in the space provided below. This symbol is a safety feature. English Owner's Record The model and serial numbers are located...
Instruction Manual
Page 3
... removing covers may result in fire, electric shock, or other similar surface. - Refer all servicing to normal operation. - Do not use power-line operated sets near a swimming pool, etc. [ Power-Cord Protection Route the power cord so that the set is provided. - The set may result in safe operating condition. 3 Never block the slots and openings by a qualified technician to restore the set to qualified service personnel. [ Replacement parts When replacement parts...
... removing covers may result in fire, electric shock, or other similar surface. - Refer all servicing to normal operation. - Do not use power-line operated sets near a swimming pool, etc. [ Power-Cord Protection Route the power cord so that the set is provided. - The set may result in safe operating condition. 3 Never block the slots and openings by a qualified technician to restore the set to qualified service personnel. [ Replacement parts When replacement parts...
Instruction Manual
Page 5
... cable (USB, etc.) again. [ Disposal of this product, please contact your local Civic Office, your household waste disposal service or the shop where you will help prevent potential negative consequences for using connection cables shorter than 3 meters (9.8 feet). [ Attention The electromagnetic fields at the specific frequencies may apply, See www.dtsc.ca.gov/hazardouswaste/perchlorate Perchlorate Material: Lithium battery...
... cable (USB, etc.) again. [ Disposal of this product, please contact your local Civic Office, your household waste disposal service or the shop where you will help prevent potential negative consequences for using connection cables shorter than 3 meters (9.8 feet). [ Attention The electromagnetic fields at the specific frequencies may apply, See www.dtsc.ca.gov/hazardouswaste/perchlorate Perchlorate Material: Lithium battery...
Instruction Manual
Page 7
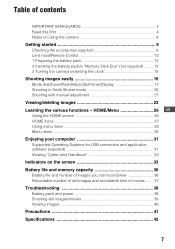
.../view 36 Recordable number of still images and recordable time of contents IMPORTANT SAFEGUARDS 2 Read this first 4 Notes on using the camera 8 Getting started 9 Checking the accessories supplied 9 Lens hood/Remote Control 10 1 Preparing the battery pack 12 2 Inserting the battery pack/a "Memory Stick Duo" (not supplied) ........ 13 3 Turning the camera on/setting the clock 15 Shooting images easily 16 Mode dial/Zoom/Flash/Macro/Self-timer/Display 17 Shooting in Smile Shutter mode 20 Shooting with manual adjustment 21 Viewing/deleting images 23 Learning the various functions...
.../view 36 Recordable number of still images and recordable time of contents IMPORTANT SAFEGUARDS 2 Read this first 4 Notes on using the camera 8 Getting started 9 Checking the accessories supplied 9 Lens hood/Remote Control 10 1 Preparing the battery pack 12 2 Inserting the battery pack/a "Memory Stick Duo" (not supplied) ........ 13 3 Turning the camera on/setting the clock 15 Shooting images easily 16 Mode dial/Zoom/Flash/Macro/Self-timer/Display 17 Shooting in Smile Shutter mode 20 Shooting with manual adjustment 21 Viewing/deleting images 23 Learning the various functions...
Instruction Manual
Page 8
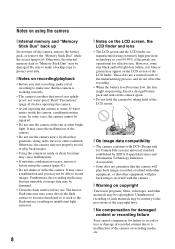
... LCD screen. [ On image data compatibility • The camera conforms with DCF (Design rule for Camera File system) universal standard established by JEITA (Japan Electronics and Information Technology Industries Association). • Sony does not guarantee that the camera will play back images recorded or edited with the camera. [ Warning on copyright Television programs, films, videotapes, and other bright light. Insert a charged battery pack and turn off the camera, remove the battery...
... LCD screen. [ On image data compatibility • The camera conforms with DCF (Design rule for Camera File system) universal standard established by JEITA (Japan Electronics and Information Technology Industries Association). • Sony does not guarantee that the camera will play back images recorded or edited with the camera. [ Warning on copyright Television programs, films, videotapes, and other bright light. Insert a charged battery pack and turn off the camera, remove the battery...
Instruction Manual
Page 13
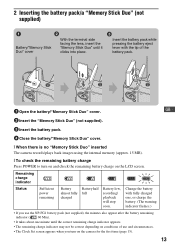
... warning indicator flashes.) • If you use and circumstances. • The Clock Set screen appears when you turn on and check the remaining battery charge on the camera for the first time (page 15). 13 GB 2 Insert the "Memory Stick Duo" (not supplied). 3 Insert the battery pack. 4 Close the battery/"Memory Stick Duo" cover. [ When there is no "Memory Stick Duo" inserted The camera records/plays back images using the internal memory...
... warning indicator flashes.) • If you use and circumstances. • The Clock Set screen appears when you turn on and check the remaining battery charge on the camera for the first time (page 15). 13 GB 2 Insert the "Memory Stick Duo" (not supplied). 3 Insert the battery pack. 4 Close the battery/"Memory Stick Duo" cover. [ When there is no "Memory Stick Duo" inserted The camera records/plays back images using the internal memory...
Instruction Manual
Page 15
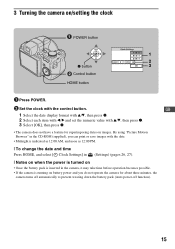
... print or save images with the date. • Midnight is indicated as 12:00 AM, and noon as 12:00 PM. [ To change the date and time Press HOME, and select [ Clock Settings] in (Settings) (pages 26, 27). [ Notes on when the power is turned on • Once the battery pack is inserted in the camera, it may take time before operation becomes possible. • If the camera...
... print or save images with the date. • Midnight is indicated as 12:00 AM, and noon as 12:00 PM. [ To change the date and time Press HOME, and select [ Clock Settings] in (Settings) (pages 26, 27). [ Notes on when the power is turned on • Once the battery pack is inserted in the camera, it may take time before operation becomes possible. • If the camera...
Instruction Manual
Page 17
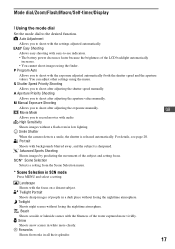
... shutter speed and the aperture value). Twilight Shoots night scenes without losing the nighttime atmosphere. High Sensitivity Shoots images without a flash even in all their splendor. P Program Auto Allows you to record movies with easy-to shoot with the focus on a distant subject. SCN* Scene Selection Selects a setting from the Scene Selection menu. * Scene Selection in white more vividly. Auto Adjustment Allows you to the desired function. Mode dial/Zoom/Flash/Macro/Self-timer/Display [ Using the mode...
... shutter speed and the aperture value). Twilight Shoots night scenes without losing the nighttime atmosphere. High Sensitivity Shoots images without a flash even in all their splendor. P Program Auto Allows you to record movies with easy-to shoot with the focus on a distant subject. SCN* Scene Selection Selects a setting from the Scene Selection menu. * Scene Selection in white more vividly. Auto Adjustment Allows you to the desired function. Mode dial/Zoom/Flash/Macro/Self-timer/Display [ Using the mode...
Instruction Manual
Page 18
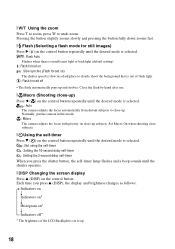
... down zooms fast. [ Flash (Selecting a flash mode for still images) Press B ( ) on the control button repeatedly until the desired mode is selected. : Flash Auto Flashes when there is insufficient light or backlight (default setting). : Flash forced on : Slow synchro (Flash forced on) The shutter speed is slow in this mode. : Macro The camera adjusts the focus with priority on close subjects. [ Using the self-timer Press V ( ) on the control button repeatedly until the shutter operates. [ DISP Changing the screen display Press v (DISP) on * r Indicators...
... down zooms fast. [ Flash (Selecting a flash mode for still images) Press B ( ) on the control button repeatedly until the desired mode is selected. : Flash Auto Flashes when there is insufficient light or backlight (default setting). : Flash forced on : Slow synchro (Flash forced on) The shutter speed is slow in this mode. : Macro The camera adjusts the focus with priority on close subjects. [ Using the self-timer Press V ( ) on the control button repeatedly until the shutter operates. [ DISP Changing the screen display Press v (DISP) on * r Indicators...
Instruction Manual
Page 20
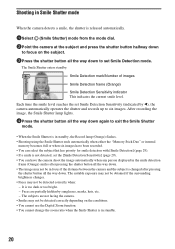
... Smile Shutter enters standby. Shooting in Smile Shutter mode When the camera detects a smile, the shutter is released automatically. 1Select (Smile Shutter) mode from the mode dial. 2Point the camera at the subject and press the shutter button halfway down to focus on the conditions. • You cannot use the Digital Zoom function. • You cannot change the zoom ratio when the Smile Shutter is in standby. 20 Each time the...
... Smile Shutter enters standby. Shooting in Smile Shutter mode When the camera detects a smile, the shutter is released automatically. 1Select (Smile Shutter) mode from the mode dial. 2Point the camera at the subject and press the shutter button halfway down to focus on the conditions. • You cannot use the Digital Zoom function. • You cannot change the zoom ratio when the Smile Shutter is in standby. 20 Each time the...
Instruction Manual
Page 22
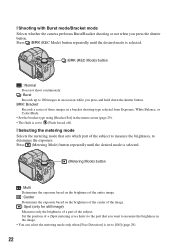
...) to the part that sets which part of three images in a bracket shooting type selected from Exposure, White Balance, or Color Mode. • Set the bracket type using [Bracket Set] in the menu screen (page 29). • The flash is selected. /BRK (REC Mode) button : Normal Does not shoot continuously. : Burst Records up to measure the brightness in succession while you press the shutter button. [ Shooting with Burst mode/Bracket mode Selects whether the camera performs Burst...
...) to the part that sets which part of three images in a bracket shooting type selected from Exposure, White Balance, or Color Mode. • Set the bracket type using [Bracket Set] in the menu screen (page 29). • The flash is selected. /BRK (REC Mode) button : Normal Does not shoot continuously. : Burst Records up to measure the brightness in succession while you press the shutter button. [ Shooting with Burst mode/Bracket mode Selects whether the camera performs Burst...
Instruction Manual
Page 23
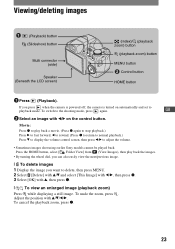
...3 Select [OK] with v/V/b/B. Adjust the position with v, then press z. [ To view an enlarged image (playback zoom) Press while displaying a still image. To undo the zoom, press . To switch to playback mode. To cancel the playback zoom, press z. 23 Viewing/deleting images (Playback) button (Slideshow) button Multi connector (side) Speaker (Beneath the LCD screen) (Index)/ (playback zoom) button (playback zoom) button MENU button ɟ Control button HOME button 1 Press (Playback). GB 2 Select an image with b/B on automatically and set to the shooting mode, press again.
...3 Select [OK] with v/V/b/B. Adjust the position with v, then press z. [ To view an enlarged image (playback zoom) Press while displaying a still image. To undo the zoom, press . To switch to playback mode. To cancel the playback zoom, press z. 23 Viewing/deleting images (Playback) button (Slideshow) button Multi connector (side) Speaker (Beneath the LCD screen) (Index)/ (playback zoom) button (playback zoom) button MENU button ɟ Control button HOME button 1 Press (Playback). GB 2 Select an image with b/B on automatically and set to the shooting mode, press again.
Instruction Manual
Page 24
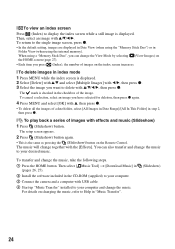
... transfer and change the View Mode by selecting (View Images) on the HOME screen (page 27). • Each time you have selected for deletion, then press z again. 4 Press MENU and select [OK] with v, then press z. • To delete all the images of images with USB cable. 4 Start up "Music Transfer" installed to your computer. 3 Connect the camera and a computer with effects and music (Slideshow) 1 Press (Slideshow) button. When using the internal memory). [ To view an...
... transfer and change the View Mode by selecting (View Images) on the HOME screen (page 27). • Each time you have selected for deletion, then press z again. 4 Press MENU and select [OK] with v, then press z. • To delete all the images of images with USB cable. 4 Start up "Music Transfer" installed to your computer. 3 Connect the camera and a computer with effects and music (Slideshow) 1 Press (Slideshow) button. When using the internal memory). [ To view an...
Instruction Manual
Page 27
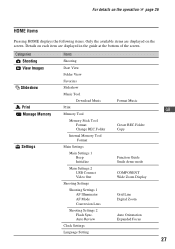
... Shooting View Images Slideshow Print Manage Memory Settings Items Shooting Date View Folder View Favorites Slideshow Music Tool Download Music Print Memory Tool Memory Stick Tool Format Change REC.Folder Internal Memory Tool Format Main Settings Main Settings 1 Beep Initialize Main Settings 2 USB Connect Video Out Shooting Settings Shooting Settings 1 AF Illuminator AF Mode Conversion Lens Shooting Settings 2 Flash Sync. Details on the screen. Auto Review Clock Settings Language Setting Format Music Create REC.Folder Copy Function Guide Smile demo mode COMPONENT Wide Zoom Display...
... Shooting View Images Slideshow Print Manage Memory Settings Items Shooting Date View Folder View Favorites Slideshow Music Tool Download Music Print Memory Tool Memory Stick Tool Format Change REC.Folder Internal Memory Tool Format Main Settings Main Settings 1 Beep Initialize Main Settings 2 USB Connect Video Out Shooting Settings Shooting Settings 1 AF Illuminator AF Mode Conversion Lens Shooting Settings 2 Flash Sync. Details on the screen. Auto Review Clock Settings Language Setting Format Music Create REC.Folder Copy Function Guide Smile demo mode COMPONENT Wide Zoom Display...
Instruction Manual
Page 31
... a computer. Supported Operating Systems for USB connection and application software (supplied) For Windows users For Macintosh users USB connection Windows 2000 Professional SP4, Windows XP* SP2, Windows Vista* Mac OS 9.1/9.2/ Mac OS X(v10.1 to "Cyber-shot Handbook". 31 OS upgrades are not supported. • If your OS does not support USB connections, copy images by inserting the "Memory Stick Duo" into the Memory Stick slot on your computer You can enjoy still images and movies from the camera more than...
... a computer. Supported Operating Systems for USB connection and application software (supplied) For Windows users For Macintosh users USB connection Windows 2000 Professional SP4, Windows XP* SP2, Windows Vista* Mac OS 9.1/9.2/ Mac OS X(v10.1 to "Cyber-shot Handbook". 31 OS upgrades are not supported. • If your OS does not support USB connections, copy images by inserting the "Memory Stick Duo" into the Memory Stick slot on your computer You can enjoy still images and movies from the camera more than...
Instruction Manual
Page 34
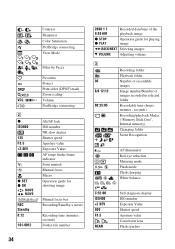
...Protect Print order (DPOF) mark Zoom scaling Volume PictBridge connecting AE/AF lock ISO number NR slow shutter Shutter speed Aperture value Exposure Value AF range finder frame indicator Semi manual Manual focus Macro Operation guide for shooting image Manual focus bar Recording/Standby a movie Recording time (minutes : seconds) Folder-file number 34 2008 1 1 9:30 AM Recorded date/time of the playback image z STOP z PLAY Operation guide for playing image BACK/NEXT Selecting images V VOLUME Adjusting volume C 96 8/8 12/12 00:25:05 Recording folder Playback folder Number of recordable...
...Protect Print order (DPOF) mark Zoom scaling Volume PictBridge connecting AE/AF lock ISO number NR slow shutter Shutter speed Aperture value Exposure Value AF range finder frame indicator Semi manual Manual focus Macro Operation guide for shooting image Manual focus bar Recording/Standby a movie Recording time (minutes : seconds) Folder-file number 34 2008 1 1 9:30 AM Recorded date/time of the playback image z STOP z PLAY Operation guide for playing image BACK/NEXT Selecting images V VOLUME Adjusting volume C 96 8/8 12/12 00:25:05 Recording folder Playback folder Number of recordable...
Instruction Manual
Page 36
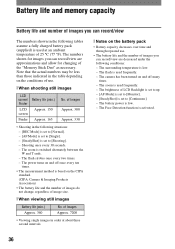
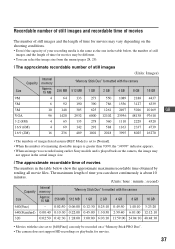
...; Battery capacity decreases over time and through repeated use . [ When shooting still images LCD screen/ Battery life (min.) Finder LCD Approx. 150 screen Finder Approx. 165 No. The flash is used frequently. - The zoom is used frequently. - The Face Detection function is low. - The numbers shown for images you can record/view are decreased under the following conditions: - Shooting once every 30 seconds. - The zoom is low. - The surrounding temperature is switched...
...; Battery capacity decreases over time and through repeated use . [ When shooting still images LCD screen/ Battery life (min.) Finder LCD Approx. 150 screen Finder Approx. 165 No. The flash is used frequently. - The zoom is used frequently. - The Face Detection function is low. - The numbers shown for images you can record/view are decreased under the following conditions: - Shooting once every 30 seconds. - The zoom is low. - The surrounding temperature is switched...
Instruction Manual
Page 37
... of your recording media is played back on the camera, the image may not appear in the actual image size. [ The approximate recordable time of movies The numbers in the table below show the approximate maximum recordable time obtained by totaling all movie files. The maximum length of time you can shoot continuously is about 10 minutes. (Units: hour : minute : second) Internal Capacity memory "Memory Stick Duo" formatted with the camera Size Approx...
... of your recording media is played back on the camera, the image may not appear in the actual image size. [ The approximate recordable time of movies The numbers in the table below show the approximate maximum recordable time obtained by totaling all movie files. The maximum length of time you can shoot continuously is about 10 minutes. (Units: hour : minute : second) Internal Capacity memory "Memory Stick Duo" formatted with the camera Size Approx...
Instruction Manual
Page 38
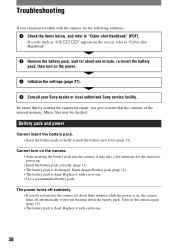
... "Cyber-shot Handbook" (PDF). Cannot turn on the camera again (page 15). • The battery pack is dead. Battery pack and power Cannot insert the battery pack. • Insert the battery pack correctly to prevent wearing down the battery pack. Turn on the power. 3 Initialize the settings (page 27). 4 Consult your Sony dealer or local authorized Sony service facility. Be aware that the contents of the internal memory, Music files may take...
... "Cyber-shot Handbook" (PDF). Cannot turn on the camera again (page 15). • The battery pack is dead. Battery pack and power Cannot insert the battery pack. • Insert the battery pack correctly to prevent wearing down the battery pack. Turn on the power. 3 Initialize the settings (page 27). 4 Consult your Sony dealer or local authorized Sony service facility. Be aware that the contents of the internal memory, Music files may take...
Instruction Manual
Page 42
... 15× zoom lens f = 5.2 - 78 mm (31 - 465 mm (35 mm film equivalent)) F2.7(W) - 4.5(T) Exposure control: Automatic exposure, Shutter speed priority, Aperture priority, Manual exposure, Scene Selection (10 modes) White balance: Automatic, Daylight, Cloudy, Fluorescent 1,2,3, Incandescent, Flash, One push File format (DCF compliant): Still images: Exif Ver. 2.21 JPEG compliant, DPOF compatible Movies: MPEG1 compliant (Monaural) Recording media: Internal Memory (approx. 15 MB), "Memory Stick Duo" Flash: Flash range (ISO sensitivity (Recommended exposure Index) set to Auto): Approx. 0.2 to...
... 15× zoom lens f = 5.2 - 78 mm (31 - 465 mm (35 mm film equivalent)) F2.7(W) - 4.5(T) Exposure control: Automatic exposure, Shutter speed priority, Aperture priority, Manual exposure, Scene Selection (10 modes) White balance: Automatic, Daylight, Cloudy, Fluorescent 1,2,3, Incandescent, Flash, One push File format (DCF compliant): Still images: Exif Ver. 2.21 JPEG compliant, DPOF compatible Movies: MPEG1 compliant (Monaural) Recording media: Internal Memory (approx. 15 MB), "Memory Stick Duo" Flash: Flash range (ISO sensitivity (Recommended exposure Index) set to Auto): Approx. 0.2 to...


