
Instruction Manual
Page 5
.... [ Disposal of Old Electrical & Electronic Equipment (Applicable GB in the European Union and other European countries with the limits for a Class B digital device, pursuant to Part 15 of the FCC Rules. Reorient or relocate the receiving antenna. - This equipment generates, uses, and can be used... reasonable protection against harmful interference in accordance with the limits for a digital device pursuant to Subpart B of Part 15 of FCC Rules. These limits are designed to correct the interference by turning the equipment off and on a circuit different from that interference will ...
.... [ Disposal of Old Electrical & Electronic Equipment (Applicable GB in the European Union and other European countries with the limits for a Class B digital device, pursuant to Part 15 of the FCC Rules. Reorient or relocate the receiving antenna. - This equipment generates, uses, and can be used... reasonable protection against harmful interference in accordance with the limits for a digital device pursuant to Subpart B of Part 15 of FCC Rules. These limits are designed to correct the interference by turning the equipment off and on a circuit different from that interference will ...
Instruction Manual
Page 7
...menu items 28 Menu items 29 Enjoying your computer 31 Supported Operating Systems for USB connection and application software (supplied 31 Viewing "Cyber-shot Handbook 32 Indicators on the screen 33 Battery life and memory capacity 36 Battery life and number of images you can record/... Lens hood/Remote Control 10 1 Preparing the battery pack 12 2 Inserting the battery pack/a "Memory Stick Duo" (not supplied) ........ 13 3 Turning the camera on/setting the clock 15 Shooting images easily 16 Mode dial/Zoom/Flash/Macro/Self-timer/Display 17 Shooting in Smile Shutter mode 20 Shooting...
...menu items 28 Menu items 29 Enjoying your computer 31 Supported Operating Systems for USB connection and application software (supplied 31 Viewing "Cyber-shot Handbook 32 Indicators on the screen 33 Battery life and memory capacity 36 Battery life and number of images you can record/... Lens hood/Remote Control 10 1 Preparing the battery pack 12 2 Inserting the battery pack/a "Memory Stick Duo" (not supplied) ........ 13 3 Turning the camera on/setting the clock 15 Shooting images easily 16 Mode dial/Zoom/Flash/Macro/Self-timer/Display 17 Shooting in Smile Shutter mode 20 Shooting...
Instruction Manual
Page 8
... recording/playback • Before you may be contrary to water. However, some cases, the camera cannot be copyrighted. Insert a charged battery pack and turn off the camera, remove the battery pack, or remove the "Memory Stick Duo" while the access lamp is... or recording failure Sony cannot compensate for Camera File system) universal standard established by taking hold the camera by JEITA (Japan Electronics and Information Technology Industries Association). • Sony does not guarantee that the camera will play back images. • Using the camera in insufficient light ...
... recording/playback • Before you may be contrary to water. However, some cases, the camera cannot be copyrighted. Insert a charged battery pack and turn off the camera, remove the battery pack, or remove the "Memory Stick Duo" while the access lamp is... or recording failure Sony cannot compensate for Camera File system) universal standard established by taking hold the camera by JEITA (Japan Electronics and Information Technology Industries Association). • Sony does not guarantee that the camera will play back images. • Using the camera in insufficient light ...
Instruction Manual
Page 10
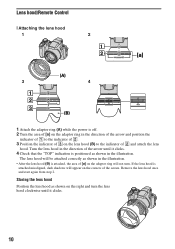
... position the indicator of 1 to the indicator of 2. 3 Position the indicator of 3 on the lens hood (B) to the indicator of 2 and attach the lens hood. Turn the lens hood in the direction of the screen. The lens hood will be attached correctly as shown in the illustration. • After the lens... hood (B) is attached, the area of [a] on the adaptor ring will appear on the right and turn . Storing the lens hood Position the lens hood as shown on the corners of the arrow until it clicks. 4 Check that the "TOP" indication is...
... position the indicator of 1 to the indicator of 2. 3 Position the indicator of 3 on the lens hood (B) to the indicator of 2 and attach the lens hood. Turn the lens hood in the direction of the screen. The lens hood will be attached correctly as shown in the illustration. • After the lens... hood (B) is attached, the area of [a] on the adaptor ring will appear on the right and turn . Storing the lens hood Position the lens hood as shown on the corners of the arrow until it clicks. 4 Check that the "TOP" indication is...
Instruction Manual
Page 12
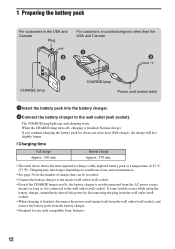
When the CHARGE lamp turns off the power by disconnecting the plug from the wall outlet (wall socket). • When charging is finished, disconnect the power cord (mains lead) from ... can be recorded. • Connect the battery charger to the wall outlet (wall socket). Charging may take longer depending on conditions of use with compatible Sony batteries. 12 Normal charge Approx. 270 min. • The table above shows the time required to the wall outlet (wall socket). If some trouble occurs...
When the CHARGE lamp turns off the power by disconnecting the plug from the wall outlet (wall socket). • When charging is finished, disconnect the power cord (mains lead) from ... can be recorded. • Connect the battery charger to the wall outlet (wall socket). Charging may take longer depending on conditions of use with compatible Sony batteries. 12 Normal charge Approx. 270 min. • The table above shows the time required to the wall outlet (wall socket). If some trouble occurs...
Instruction Manual
Page 13
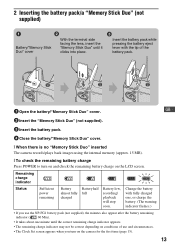
...pressing the battery eject lever with fully charged one, or charge the battery. (The warning indicator flashes.) • If you turn on and check the remaining battery charge on the camera for the first time (page 15). 13 Change the battery with the tip of use and circumstances. • The Clock ... Stick Duo" (not supplied). 3 Insert the battery pack. 4 Close the battery/"Memory Stick Duo" cover. [ When there is no "Memory Stick Duo" inserted The camera records/plays back images using the internal memory (approx. 15 MB). [ To check the remaining battery charge Press POWER to...
...pressing the battery eject lever with fully charged one, or charge the battery. (The warning indicator flashes.) • If you turn on and check the remaining battery charge on the camera for the first time (page 15). 13 Change the battery with the tip of use and circumstances. • The Clock ... Stick Duo" (not supplied). 3 Insert the battery pack. 4 Close the battery/"Memory Stick Duo" cover. [ When there is no "Memory Stick Duo" inserted The camera records/plays back images using the internal memory (approx. 15 MB). [ To check the remaining battery charge Press POWER to...
Instruction Manual
Page 15
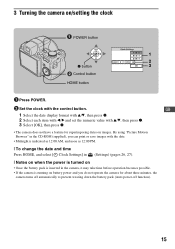
... Notes on when the power is turned on • Once the battery pack is inserted in the camera, it may take time before operation becomes possible. • If the camera is running on battery power and you do not operate the camera for superimposing dates on /setting the ...button HOME button 1 Press POWER. 2 Set the clock with v/V, then press z. 3 Select [OK], then press z. • The camera does not have a feature for about three minutes, the camera turns off automatically to prevent wearing down the battery pack (Auto power-off function). 15 GB 1 Select the date display format with...
... Notes on when the power is turned on • Once the battery pack is inserted in the camera, it may take time before operation becomes possible. • If the camera is running on battery power and you do not operate the camera for superimposing dates on /setting the ...button HOME button 1 Press POWER. 2 Set the clock with v/V, then press z. 3 Select [OK], then press z. • The camera does not have a feature for about three minutes, the camera turns off automatically to prevent wearing down the battery pack (Auto power-off function). 15 GB 1 Select the date display format with...

Instruction Manual
Page 21
...Aperture value Shutter speed ISO value Select Set GB Wheel dial Control button To select the item 1 Turn the wheel dial to select the item you want to set is set . The value turns yellow. Shooting with manual adjustment [ Using the wheel dial You can change the following operations. ...When manual focus is selected, the distance which the focus is adjusted. Turn the wheel dial to select the item. 2 Press z on ...
...Aperture value Shutter speed ISO value Select Set GB Wheel dial Control button To select the item 1 Turn the wheel dial to select the item you want to set is set . The value turns yellow. Shooting with manual adjustment [ Using the wheel dial You can change the following operations. ...When manual focus is selected, the distance which the focus is adjusted. Turn the wheel dial to select the item. 2 Press z on ...
Instruction Manual
Page 23
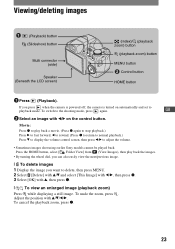
... the playback zoom, press z. 23 If you want to adjust the volume. • Sometimes images shot using earlier Sony models cannot be played back. To switch to play back the images. • By turning the wheel dial, you can also easily view the next/previous image. [ To delete images 1 ...Display the image you press when the camera is powered off, the camera is turned on the control button....
... the playback zoom, press z. 23 If you want to adjust the volume. • Sometimes images shot using earlier Sony models cannot be played back. To switch to play back the images. • By turning the wheel dial, you can also easily view the next/previous image. [ To delete images 1 ...Display the image you press when the camera is powered off, the camera is turned on the control button....
Instruction Manual
Page 28
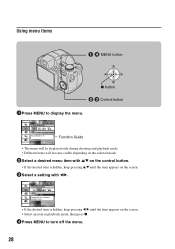
... item in playback mode, then press z. 4Press MENU to display the menu. Using menu items MENU button z button ɟ ɠ Control button 1Press MENU to turn off the menu. 28
... item in playback mode, then press z. 4Press MENU to display the menu. Using menu items MENU button z button ɟ ɠ Control button 1Press MENU to turn off the menu. 28
Instruction Manual
Page 32
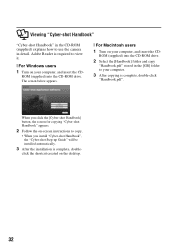
... to copy. • When you install "Cyber-shot Handbook", the "Cyber-shot Step-up Guide" will be installed automatically. 3 After the installation is required to view it. [ For Windows users 1 Turn on your computer, and insert the CD- ROM...camera in the CD-ROM (supplied) explains how to your computer, and insert the CD- The screen below appears. [ For Macintosh users 1 Turn on the desktop. 32 click the shortcut created on your computer. 3 After copying is complete, double-click "Handbook.pdf". Adobe Reader is complete, double- Viewing "Cyber-shot Handbook" "Cyber-shot...
... to copy. • When you install "Cyber-shot Handbook", the "Cyber-shot Step-up Guide" will be installed automatically. 3 After the installation is required to view it. [ For Windows users 1 Turn on your computer, and insert the CD- ROM...camera in the CD-ROM (supplied) explains how to your computer, and insert the CD- The screen below appears. [ For Macintosh users 1 Turn on the desktop. 32 click the shortcut created on your computer. 3 After copying is complete, double-click "Handbook.pdf". Adobe Reader is complete, double- Viewing "Cyber-shot Handbook" "Cyber-shot...
Instruction Manual
Page 36
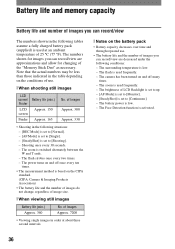
...Approx. 150 screen Finder Approx. 165 No. The battery power is used at about three second intervals [ Notes on the CIPA standard. (CIPA: Camera & Imaging Products Association) • The battery life and the number of images do not change, regardless of image size. [ When viewing still ...frequently. - The brightness of 25 °C (77 °F). The Face Detection function is switched alternately between the W and T ends. - The camera has been turned on the conditions of use . • The battery life and the number of Images Approx. 300 Approx. 330 • Shooting in order at ...
...Approx. 150 screen Finder Approx. 165 No. The battery power is used at about three second intervals [ Notes on the CIPA standard. (CIPA: Camera & Imaging Products Association) • The battery life and the number of images do not change, regardless of image size. [ When viewing still ...frequently. - The brightness of 25 °C (77 °F). The Face Detection function is switched alternately between the W and T ends. - The camera has been turned on the conditions of use . • The battery life and the number of Images Approx. 300 Approx. 330 • Shooting in order at ...
Instruction Manual
Page 38
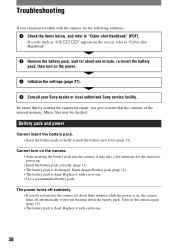
...Sony service facility. If a code such as "C/E:ss:ss" appears on the screen, refer to power up. • Insert the battery pack correctly (page 13). • The battery pack is discharged. Be aware that the contents of the internal memory, Music files may take a few moments for the camera to "Cyber-shot... Handbook". 2 Remove the battery pack, wait for about three minutes while the power is on, the camera turns off suddenly. • If you do not operate the camera for repair, you experience trouble with a new one ...
...Sony service facility. If a code such as "C/E:ss:ss" appears on the screen, refer to power up. • Insert the battery pack correctly (page 13). • The battery pack is discharged. Be aware that the contents of the internal memory, Music files may take a few moments for the camera to "Cyber-shot... Handbook". 2 Remove the battery pack, wait for about three minutes while the power is on, the camera turns off suddenly. • If you do not operate the camera for repair, you experience trouble with a new one ...
Instruction Manual
Page 41
...camera has an internal rechargeable battery for maintaining the date and time and other place with the camera...camera. Precautions [ Do not use/store the camera...camera body may become deformed and this may cause a malfunction. • Under direct sunlight or near a heater The camera...camera to malfunction, and in some cases this... camera in the camera, and then leave the camera for... condensation If the camera is designed for 24...off the camera and wait...camera. However, if you use the camera...camera. Do not touch the camera with rubber or vinyl for a long time. [ On operating temperatures The camera...
...camera has an internal rechargeable battery for maintaining the date and time and other place with the camera...camera. Precautions [ Do not use/store the camera...camera body may become deformed and this may cause a malfunction. • Under direct sunlight or near a heater The camera...camera to malfunction, and in some cases this... camera in the camera, and then leave the camera for... condensation If the camera is designed for 24...off the camera and wait...camera. However, if you use the camera...camera. Do not touch the camera with rubber or vinyl for a long time. [ On operating temperatures The camera...


