Instruction Manual
Page 7
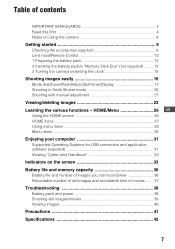
...2 Read this first 4 Notes on using the camera 8 Getting started 9 Checking the accessories supplied 9 Lens hood/Remote Control 10 1 Preparing the battery pack 12 2 Inserting the battery pack/a "Memory Stick Duo" (not supplied) ........ 13 3 Turning the camera on the screen 33 Battery life and memory capacity ... 28 Menu items 29 Enjoying your computer 31 Supported Operating Systems for USB connection and application software (supplied 31 Viewing "Cyber-shot Handbook 32 Indicators on /setting the clock 15 Shooting images easily 16 Mode dial/Zoom/Flash/Macro/Self-timer/Display 17...
...2 Read this first 4 Notes on using the camera 8 Getting started 9 Checking the accessories supplied 9 Lens hood/Remote Control 10 1 Preparing the battery pack 12 2 Inserting the battery pack/a "Memory Stick Duo" (not supplied) ........ 13 3 Turning the camera on the screen 33 Battery life and memory capacity ... 28 Menu items 29 Enjoying your computer 31 Supported Operating Systems for USB connection and application software (supplied 31 Viewing "Cyber-shot Handbook 32 Indicators on /setting the clock 15 Shooting images easily 16 Mode dial/Zoom/Flash/Macro/Self-timer/Display 17...
Instruction Manual
Page 9
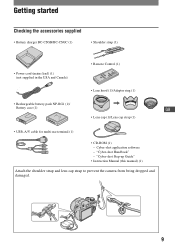
... shoulder strap and lens cap strap to prevent the camera from being dropped and damaged. 9 "Cyber-shot Handbook" - Cyber-shot application software - Getting started Checking the accessories supplied • Battery charger BC-CSGB/BC-CSGC (1) • Shoulder strap (1) • Power cord (mains lead) (1) (not supplied in the USA and Canada) • Remote Control (1) • Lens hood (1)/Adaptor ring...
... shoulder strap and lens cap strap to prevent the camera from being dropped and damaged. 9 "Cyber-shot Handbook" - Cyber-shot application software - Getting started Checking the accessories supplied • Battery charger BC-CSGB/BC-CSGC (1) • Shoulder strap (1) • Power cord (mains lead) (1) (not supplied in the USA and Canada) • Remote Control (1) • Lens hood (1)/Adaptor ring...
Instruction Manual
Page 10
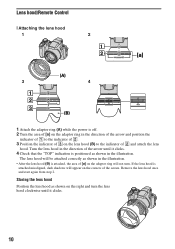
... the corners of 2 and attach the lens hood. The lens hood will be attached correctly as shown in the illustration. If the lens hood is attached misaligned, dark shadows will not turn the lens hood clockwise until it clicks. 10 Remove the lens hood once and start again from step 2. Lens hood/Remote Control [ Attaching the lens hood 1 2 3 4 1 Attach the adaptor ring (A) while the...
... the corners of 2 and attach the lens hood. The lens hood will be attached correctly as shown in the illustration. If the lens hood is attached misaligned, dark shadows will not turn the lens hood clockwise until it clicks. 10 Remove the lens hood once and start again from step 2. Lens hood/Remote Control [ Attaching the lens hood 1 2 3 4 1 Attach the adaptor ring (A) while the...


