Instruction Manual
Page 7
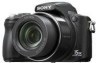
... hood/Remote Control 10 1 Preparing the battery pack 12 2 Inserting the battery pack/a "Memory Stick Duo" (not supplied) ........ 13 3 Turning the camera on the screen 33 Battery life and memory capacity 36 Battery life and number of images you can record/view 36 Recordable number of still... menu items 28 Menu items 29 Enjoying your computer 31 Supported Operating Systems for USB connection and application software (supplied 31 Viewing "Cyber-shot Handbook 32 Indicators on /setting the clock 15 Shooting images easily 16 Mode dial/Zoom/Flash/Macro/Self-timer/Display 17 Shooting in...
... hood/Remote Control 10 1 Preparing the battery pack 12 2 Inserting the battery pack/a "Memory Stick Duo" (not supplied) ........ 13 3 Turning the camera on the screen 33 Battery life and memory capacity 36 Battery life and number of images you can record/view 36 Recordable number of still... menu items 28 Menu items 29 Enjoying your computer 31 Supported Operating Systems for USB connection and application software (supplied 31 Viewing "Cyber-shot Handbook 32 Indicators on /setting the clock 15 Shooting images easily 16 Mode dial/Zoom/Flash/Macro/Self-timer/Display 17 Shooting in...
Instruction Manual
Page 8
... system) universal standard established by JEITA (Japan Electronics and Information Technology Industries Association). • Sony does not guarantee that the camera will play back images recorded or edited with the camera. [ Warning on copyright Television programs, films, videotapes, and other materials may not be copyrighted...copyright laws. [ No compensation for damaged content or recording failure Sony cannot compensate for failure to record or loss or damage of recorded content due to water. If water enters inside the camera, a malfunction may cause dirt on the flash surface to ...
... system) universal standard established by JEITA (Japan Electronics and Information Technology Industries Association). • Sony does not guarantee that the camera will play back images recorded or edited with the camera. [ Warning on copyright Television programs, films, videotapes, and other materials may not be copyrighted...copyright laws. [ No compensation for damaged content or recording failure Sony cannot compensate for failure to record or loss or damage of recorded content due to water. If water enters inside the camera, a malfunction may cause dirt on the flash surface to ...
Instruction Manual
Page 9
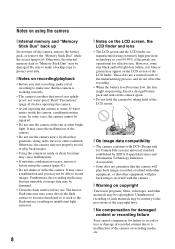
... Guide" • Instruction Manual (this manual) (1) Attach the shoulder strap and lens cap strap to prevent the camera from being dropped and damaged. 9 "Cyber-shot Handbook" - Getting started Checking the accessories supplied • Battery charger BC-CSGB/BC-CSGC (1) • Shoulder strap (1) • Power cord (mains lead) (1) (not supplied in ... (1) • Rechargeable battery pack NP-BG1 (1)/ Battery case (1) GB • Lens cap (1)/Lens cap strap (1) • USB, A/V cable for multi-use terminal (1) • CD-ROM (1) - Cyber-shot application software -
... Guide" • Instruction Manual (this manual) (1) Attach the shoulder strap and lens cap strap to prevent the camera from being dropped and damaged. 9 "Cyber-shot Handbook" - Getting started Checking the accessories supplied • Battery charger BC-CSGB/BC-CSGC (1) • Shoulder strap (1) • Power cord (mains lead) (1) (not supplied in ... (1) • Rechargeable battery pack NP-BG1 (1)/ Battery case (1) GB • Lens cap (1)/Lens cap strap (1) • USB, A/V cable for multi-use terminal (1) • CD-ROM (1) - Cyber-shot application software -
Instruction Manual
Page 11
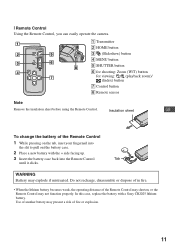
... the Remote Control 1 While pressing on the tab, inset your fingernail into the slit to pull out the battery case. 2 Place a new battery with a Sony CR2025 lithium battery. In this case, replace the battery with the + side facing up. 3 Insert the battery case back into the Remote Control Tab until... it clicks. [ Remote Control Using the Remote Control, you can easily operate the camera. Insulation sheet GB To change the battery of the Remote Control may shorten, or the Remote Control may not function properly.
... the Remote Control 1 While pressing on the tab, inset your fingernail into the slit to pull out the battery case. 2 Place a new battery with a Sony CR2025 lithium battery. In this case, replace the battery with the + side facing up. 3 Insert the battery case back into the Remote Control Tab until... it clicks. [ Remote Control Using the Remote Control, you can easily operate the camera. Insulation sheet GB To change the battery of the Remote Control may shorten, or the Remote Control may not function properly.
Instruction Manual
Page 13
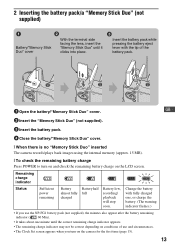
... with the tip of use and circumstances. • The Clock Set screen appears when you turn on and check the remaining battery charge on the camera for the first time (page 15). 13 GB 2 Insert the "Memory Stick Duo" (not supplied). 3 Insert the battery pack. 4 Close the battery/"...Memory Stick Duo" cover. [ When there is no "Memory Stick Duo" inserted The camera records/plays back images using the internal memory (approx. 15 MB). [ To check the remaining battery charge Press POWER to turn on the LCD screen.
... with the tip of use and circumstances. • The Clock Set screen appears when you turn on and check the remaining battery charge on the camera for the first time (page 15). 13 GB 2 Insert the "Memory Stick Duo" (not supplied). 3 Insert the battery pack. 4 Close the battery/"...Memory Stick Duo" cover. [ When there is no "Memory Stick Duo" inserted The camera records/plays back images using the internal memory (approx. 15 MB). [ To check the remaining battery charge Press POWER to turn on the LCD screen.
Instruction Manual
Page 15
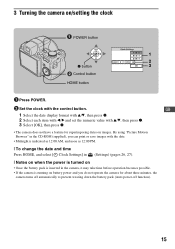
... off automatically to prevent wearing down the battery pack (Auto power-off function). 15 3 Turning the camera on/setting the clock POWER button 1 2 z button 3 ɟ Control button HOME button 1 Press POWER. 2 Set the clock with the date. • Midnight is indicated as ... the date display format with v/V, then press z. 2 Select each item with b/B and set the numeric value with v/V, then press z. 3 Select [OK], then press z. • The camera does not have a feature for superimposing dates on battery power and you can print or save images with the control button.
... off automatically to prevent wearing down the battery pack (Auto power-off function). 15 3 Turning the camera on/setting the clock POWER button 1 2 z button 3 ɟ Control button HOME button 1 Press POWER. 2 Set the clock with the date. • Midnight is indicated as ... the date display format with v/V, then press z. 2 Select each item with b/B and set the numeric value with v/V, then press z. 3 Select [OK], then press z. • The camera does not have a feature for superimposing dates on battery power and you can print or save images with the control button.
Instruction Manual
Page 16
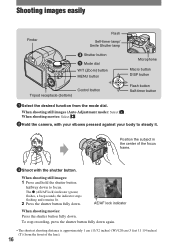
... the center of the lens). 16 AE/AF lock indicator When shooting movies: Press the shutter button fully down . When shooting movies: Select . 2Hold the camera, with the shutter button. When shooting still images: 1 Press and hold the shutter button halfway down again. • The shortest shooting distance is approximately 1 cm...
... the center of the lens). 16 AE/AF lock indicator When shooting movies: Press the shutter button fully down . When shooting movies: Select . 2Hold the camera, with the shutter button. When shooting still images: 1 Press and hold the shutter button halfway down again. • The shortest shooting distance is approximately 1 cm...
Instruction Manual
Page 17
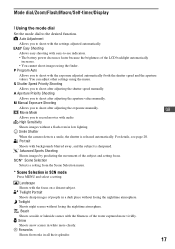
... with easy-to shoot after adjusting the aperture value manually. Easy Shooting Allows easy shooting with the focus on a distant subject. Smile Shutter When the camera detects a smile, the shutter is sharpened. You can adjust other settings using the finder. M Manual Exposure Shooting Allows you to shoot after adjusting the exposure...
... with easy-to shoot after adjusting the aperture value manually. Easy Shooting Allows easy shooting with the focus on a distant subject. Smile Shutter When the camera detects a smile, the shutter is sharpened. You can adjust other settings using the finder. M Manual Exposure Shooting Allows you to shoot after adjusting the exposure...
Instruction Manual
Page 18
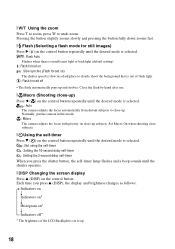
... is insufficient light or backlight (default setting). : Flash forced on : Slow synchro (Flash forced on) The shutter speed is slow in this mode. : Macro The camera adjusts the focus with priority on close -up. Close the flash by hand after use. [ Macro (Shooting close-up) Press b ( ) on the control button ... a beep sounds until the desired mode is out of the LCD Backlight is set to clearly shoot the background that is selected. : Auto The camera adjusts the focus automatically from distant subjects to undo zoom. [ W/T Using the zoom Press T to zoom, press W to close -up subjects.
... is insufficient light or backlight (default setting). : Flash forced on : Slow synchro (Flash forced on) The shutter speed is slow in this mode. : Macro The camera adjusts the focus with priority on close -up. Close the flash by hand after use. [ Macro (Shooting close-up) Press b ( ) on the control button ... a beep sounds until the desired mode is out of the LCD Backlight is set to clearly shoot the background that is selected. : Auto The camera adjusts the focus automatically from distant subjects to undo zoom. [ W/T Using the zoom Press T to zoom, press W to close -up subjects.
Instruction Manual
Page 20
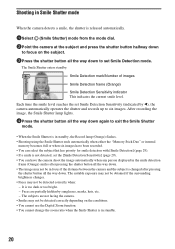
...Detection] (page 29). • If a smile is not detected, set the [Smile Detection Sensitivity] (page 29). • You can have the camera shoot the image automatically when any person displayed in the smile detection frame (Orange) smiles after pressing the shutter button all the way down . It...is released automatically. 1Select (Smile Shutter) mode from the mode dial. 2Point the camera at the subject and press the shutter button halfway down to focus on the conditions. • You cannot use the Digital Zoom function. • You cannot change the zoom ratio when the Smile Shutter is...
...Detection] (page 29). • If a smile is not detected, set the [Smile Detection Sensitivity] (page 29). • You can have the camera shoot the image automatically when any person displayed in the smile detection frame (Orange) smiles after pressing the shutter button all the way down . It...is released automatically. 1Select (Smile Shutter) mode from the mode dial. 2Point the camera at the subject and press the shutter button halfway down to focus on the conditions. • You cannot use the Digital Zoom function. • You cannot change the zoom ratio when the Smile Shutter is...
Instruction Manual
Page 22
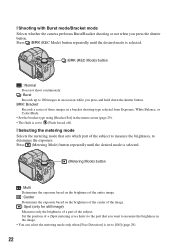
[ Shooting with Burst mode/Bracket mode Selects whether the camera performs Burst/Bracket shooting or not when you press and hold down the shutter button. Set the position of + (Spot metering cross hairs) to the ...
[ Shooting with Burst mode/Bracket mode Selects whether the camera performs Burst/Bracket shooting or not when you press and hold down the shutter button. Set the position of + (Spot metering cross hairs) to the ...
Instruction Manual
Page 23
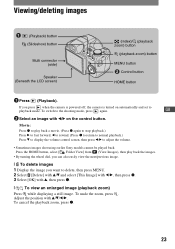
... wheel dial, you can also easily view the next/previous image. [ To delete images 1 Display the image you press when the camera is powered off, the camera is turned on the control button. Press the HOME button, select [ Folder View] from (View Images), then play back a movie... display the volume control screen, then press b/B to the shooting mode, press again. To switch to adjust the volume. • Sometimes images shot using earlier Sony models cannot be played back. GB 2 Select an image with v/V/b/B. Adjust the position with b/B on automatically and set to delete, then press ...
... wheel dial, you can also easily view the next/previous image. [ To delete images 1 Display the image you press when the camera is powered off, the camera is turned on the control button. Press the HOME button, select [ Folder View] from (View Images), then play back a movie... display the volume control screen, then press b/B to the shooting mode, press again. To switch to adjust the volume. • Sometimes images shot using earlier Sony models cannot be played back. GB 2 Select an image with v/V/b/B. Adjust the position with b/B on automatically and set to delete, then press ...
Instruction Manual
Page 24
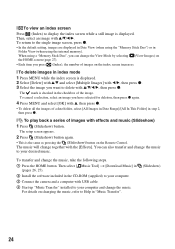
... also transfer and change the music, take the following steps. 1 Press the HOME button. To transfer and change the music to your computer. 3 Connect the camera and a computer with the [Effects]. Then select [ Music Tool] t [Download Music] in (pages 26, 27). 2 Install the software included in Folder View (when using the...
... also transfer and change the music, take the following steps. 1 Press the HOME button. To transfer and change the music to your computer. 3 Connect the camera and a computer with the [Effects]. Then select [ Music Tool] t [Download Music] in (pages 26, 27). 2 Install the software included in Folder View (when using the...

Instruction Manual
Page 25
[ To view images on HD (High Definition) TV, an HD Output Adaptor Cable (not supplied) is needed. • If you set the image size to [16:9], you can record images in [HD(1080i)] signal format. Set [COMPONENT] to the TV with the cable for multi-use terminal (supplied). To the multi connector To audio/video input jacks Cable for multi-use terminal (supplied) To view on TV Connect the camera to [SD] when shooting movies. 25 GB • You cannot view movies output in the size that fills the entire screen of the HD TV.
[ To view images on HD (High Definition) TV, an HD Output Adaptor Cable (not supplied) is needed. • If you set the image size to [16:9], you can record images in [HD(1080i)] signal format. Set [COMPONENT] to the TV with the cable for multi-use terminal (supplied). To the multi connector To audio/video input jacks Cable for multi-use terminal (supplied) To view on TV Connect the camera to [SD] when shooting movies. 25 GB • You cannot view movies output in the size that fills the entire screen of the HD TV.
Instruction Manual
Page 26
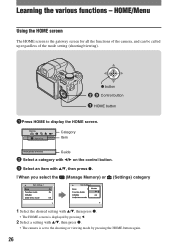
... button HOME button 1Press HOME to the shooting or viewing mode by pressing b. 2 Select a setting with v/V, then press z. • The camera is the gateway screen for all the functions of the camera, and can be called up regardless of the mode setting (shooting/viewing). HOME/Menu Using the HOME screen The HOME...
... button HOME button 1Press HOME to the shooting or viewing mode by pressing b. 2 Select a setting with v/V, then press z. • The camera is the gateway screen for all the functions of the camera, and can be called up regardless of the mode setting (shooting/viewing). HOME/Menu Using the HOME screen The HOME...
Instruction Manual
Page 31
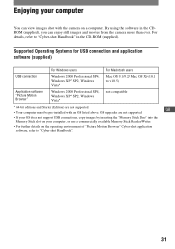
...installed with the camera on a computer. OS upgrades are not supported. Enjoying your computer, or use a commercially available Memory Stick Reader/Writer. • For further details on the operating environment of "Picture Motion Browser" Cyber-shot application software, refer to "Cyber-shot Handbook". 31 By...2000 Professional SP4, Windows XP* SP2, Windows Vista* Mac OS 9.1/9.2/ Mac OS X(v10.1 to "Cyber-shot Handbook" in the CDROM (supplied), you can view images shot with an OS listed above. For details, refer to v10.5) Application software "Picture Motion Browser" Windows ...
...installed with the camera on a computer. OS upgrades are not supported. Enjoying your computer, or use a commercially available Memory Stick Reader/Writer. • For further details on the operating environment of "Picture Motion Browser" Cyber-shot application software, refer to "Cyber-shot Handbook". 31 By...2000 Professional SP4, Windows XP* SP2, Windows Vista* Mac OS 9.1/9.2/ Mac OS X(v10.1 to "Cyber-shot Handbook" in the CDROM (supplied), you can view images shot with an OS listed above. For details, refer to v10.5) Application software "Picture Motion Browser" Windows ...
Instruction Manual
Page 32
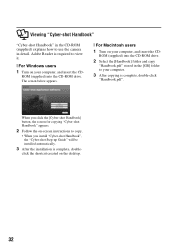
....pdf" stored in the [GB] folder to use the camera in the CD-ROM (supplied) explains how to your computer, and insert the CD- When you click the [Cyber-shot Handbook] button, the screen for copying "Cyber-shot Handbook" appears. 2 Follow the on-screen instructions to copy.... • When you install "Cyber-shot Handbook", the "Cyber-shot Step-up Guide" will be installed automatically. 3 After the installation...
....pdf" stored in the [GB] folder to use the camera in the CD-ROM (supplied) explains how to your computer, and insert the CD- When you click the [Cyber-shot Handbook] button, the screen for copying "Cyber-shot Handbook" appears. 2 Follow the on-screen instructions to copy.... • When you install "Cyber-shot Handbook", the "Cyber-shot Step-up Guide" will be installed automatically. 3 After the installation...
Instruction Manual
Page 36
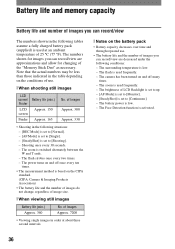
... and off once every ten times. • The measurement method is used frequently. - The flash strobes once every two times. - The camera has been turned on the CIPA standard. (CIPA: Camera & Imaging Products Association) • The battery life and the number of images do not change, regardless of image size. [ When viewing...
... and off once every ten times. • The measurement method is used frequently. - The flash strobes once every two times. - The camera has been turned on the CIPA standard. (CIPA: Camera & Imaging Products Association) • The battery life and the number of images do not change, regardless of image size. [ When viewing...
Instruction Manual
Page 37
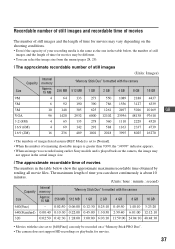
... size from the menu (pages 28, 29). [ The approximate recordable number of still images (Units: Images) Internal Capacity memory "Memory Stick Duo" formatted with the camera Size Approx. 15 MB 256 MB 512 MB 1 GB 2 GB 4 GB 8 GB 16 GB 9M 4 64 133 273 550 1089 2188 4437 5M 6 92... of remaining shootable images is greater than 9,999, the ">9999" indicator appears. • When an image was recorded using earlier Sony models and is played back on the camera, the image may be recorded on the shooting conditions. • Even if the capacity of your recording media is the same as...
... size from the menu (pages 28, 29). [ The approximate recordable number of still images (Units: Images) Internal Capacity memory "Memory Stick Duo" formatted with the camera Size Approx. 15 MB 256 MB 512 MB 1 GB 2 GB 4 GB 8 GB 16 GB 9M 4 64 133 273 550 1089 2188 4437 5M 6 92... of remaining shootable images is greater than 9,999, the ">9999" indicator appears. • When an image was recorded using earlier Sony models and is played back on the camera, the image may be recorded on the shooting conditions. • Even if the capacity of your recording media is the same as...
Instruction Manual
Page 38
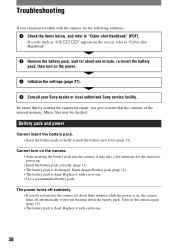
... Cannot insert the battery pack. • Insert the battery pack correctly to "Cyber-shot Handbook" (PDF). The power turns off automatically to "Cyber-shot Handbook". 2 Remove the battery pack, wait for about one minute, re-insert the battery pack, then turn on the camera again (page 15). • The battery pack is discharged. Be aware...; Use a recommended battery pack. Insert charged battery pack (page 12). • The battery pack is on the power. 3 Initialize the settings (page 27). 4 Consult your Sony dealer or local authorized...
... Cannot insert the battery pack. • Insert the battery pack correctly to "Cyber-shot Handbook" (PDF). The power turns off automatically to "Cyber-shot Handbook". 2 Remove the battery pack, wait for about one minute, re-insert the battery pack, then turn on the camera again (page 15). • The battery pack is discharged. Be aware...; Use a recommended battery pack. Insert charged battery pack (page 12). • The battery pack is on the power. 3 Initialize the settings (page 27). 4 Consult your Sony dealer or local authorized...


