
Camera Operations Guide
Page 2
... "dangerous voltage" within the product's enclosure that may be of sufficient magnitude to discontinue midway (fail), restart the application or disconnect and connect the communication cable (USB, etc.) again. 2 b Notice • If static electricity or electromagnetism causes data transfer to constitute a risk of rechargeable batteries, call toll free 1-800-822-8837, or...
... "dangerous voltage" within the product's enclosure that may be of sufficient magnitude to discontinue midway (fail), restart the application or disconnect and connect the communication cable (USB, etc.) again. 2 b Notice • If static electricity or electromagnetism causes data transfer to constitute a risk of rechargeable batteries, call toll free 1-800-822-8837, or...
Camera Operations Guide
Page 4
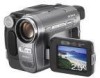
.... The screens may cause malfunctions. Then, touch the buttons displayed on -screen displays in each local language are using the camcorder • Hold your camcorder. Viewfinder LCD panel Battery pack • To ensure a good grip, fasten the grip belt as at the sun. Doing... so might cause your camcorder if necessary (p. 24). • The screens shown in the following parts. Instructions with a USB or i.LINK cable, be damaged, or this manual, check the model name of your camcorder correctly. • When you insert the connector ...
.... The screens may cause malfunctions. Then, touch the buttons displayed on -screen displays in each local language are using the camcorder • Hold your camcorder. Viewfinder LCD panel Battery pack • To ensure a good grip, fasten the grip belt as at the sun. Doing... so might cause your camcorder if necessary (p. 24). • The screens shown in the following parts. Instructions with a USB or i.LINK cable, be damaged, or this manual, check the model name of your camcorder correctly. • When you insert the connector ...
Camera Operations Guide
Page 15
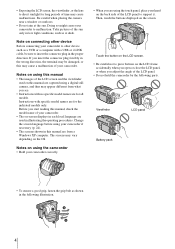
Wireless Remote Commander (1) A button-type lithium battery is already installed. Getting started Step 1: Checking supplied items Make sure you have following items supplied with your camcorder. AC Adaptor (1) A/V connecting cable (1) USB cable (1) Rechargeable battery pack NP-FM30 (1) CD-ROM "Picture Package Ver.1.5" (1) Power cord (1) Camera Operations Guide (This manual) (1) Lens cap (1) See page 148 on...
Wireless Remote Commander (1) A button-type lithium battery is already installed. Getting started Step 1: Checking supplied items Make sure you have following items supplied with your camcorder. AC Adaptor (1) A/V connecting cable (1) USB cable (1) Rechargeable battery pack NP-FM30 (1) CD-ROM "Picture Package Ver.1.5" (1) Power cord (1) Camera Operations Guide (This manual) (1) Lens cap (1) See page 148 on...
Camera Operations Guide
Page 55
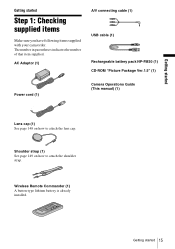
...SET LANGUAGE VOLUME DATA CODE ALL ERASE 2 Touch the desired item. 3 Select the desired setting. "Dubbing to another device via USB cable. To cancel Easy Handycam operation Press EASY again. Touch [DATE/TIME], then touch . When playing back on or off during playback. For [ ALL ...ERASE] You can display the date/time during communication with the Remote Commander. z Tip • During Easy Handycam operation, you can also do the following buttons can be operated. // / You can operate these operations and SLOW on the Remote Commander....
...SET LANGUAGE VOLUME DATA CODE ALL ERASE 2 Touch the desired item. 3 Select the desired setting. "Dubbing to another device via USB cable. To cancel Easy Handycam operation Press EASY again. Touch [DATE/TIME], then touch . When playing back on or off during playback. For [ ALL ...ERASE] You can display the date/time during communication with the Remote Commander. z Tip • During Easy Handycam operation, you can also do the following buttons can be operated. // / You can operate these operations and SLOW on the Remote Commander....

Camera Operations Guide
Page 82
...PB MODE For DCR-TRV480: GAUTO / Select to automatically detect the system (Hi8 /standard 8 mm or Digital8 ) that was used to recorded on your camcorder. GOFF USB STREAM Select to "First Step Guide" in the supplied CD-ROM. For details, refer to deactivate the USB Streaming function. For... on the screen of systems, the screen turns blue, and the following displays appear on your camcorder" (p. 116). USB-CAMERA You can connect a USB cable (supplied) to the A/V jack of your camcorder. b Note • The setting returns to [AUTO] when you disconnect the power source from...
...PB MODE For DCR-TRV480: GAUTO / Select to automatically detect the system (Hi8 /standard 8 mm or Digital8 ) that was used to recorded on your camcorder. GOFF USB STREAM Select to "First Step Guide" in the supplied CD-ROM. For details, refer to deactivate the USB Streaming function. For... on the screen of systems, the screen turns blue, and the following displays appear on your camcorder" (p. 116). USB-CAMERA You can connect a USB cable (supplied) to the A/V jack of your camcorder. b Note • The setting returns to [AUTO] when you disconnect the power source from...

Camera Operations Guide
Page 83
... the remaining tape indicator. Select to connect the PictBridge compliant printer (p. 104). Using the Menu USB-PLY/EDT You can connect a USB cable (supplied) to "First Step Guide" in your camcorder on your computer. For details, refer to your camcorder, and view the picture on the tape or "Memory Stick" in the supplied CD-ROM.
... the remaining tape indicator. Select to connect the PictBridge compliant printer (p. 104). Using the Menu USB-PLY/EDT You can connect a USB cable (supplied) to "First Step Guide" in your camcorder on your computer. For details, refer to your camcorder, and view the picture on the tape or "Memory Stick" in the supplied CD-ROM.
Camera Operations Guide
Page 104
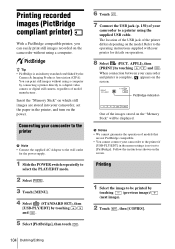
.../EDT] by connecting a printer directly to a digital video camera or digital still camera, regardless of models that are stored into your camcorder to a printer using the supplied USB cable. Printing 1 Select the image to be displayed. Printing recorded images (PictBridge compliant printer) With a PictBridge compatible printer, you can print still images without using...
.../EDT] by connecting a printer directly to a digital video camera or digital still camera, regardless of models that are stored into your camcorder to a printer using the supplied USB cable. Printing 1 Select the image to be displayed. Printing recorded images (PictBridge compliant printer) With a PictBridge compatible printer, you can print still images without using...

Camera Operations Guide
Page 105
...0001 1 / 10 101 Print this? The operations may not support the date printing function. Disconnecting the USB cable from your camcorder. • If the printer stops working, disconnect the USB cable and restart the operation from the beginning. • Some printer models may not be printed by touching...Touch [EXEC]. To finish printing Touch [END] and disconnect the USB cable from your camcorder or printer. - To print the date on the screen. Keep USB cable connected. Dubbing/Editing 105 Refer to select other than your camcorder. 6 Touch [YES]. You can set a maximum of 20 copies...
...0001 1 / 10 101 Print this? The operations may not support the date printing function. Disconnecting the USB cable from your camcorder. • If the printer stops working, disconnect the USB cable and restart the operation from the beginning. • Some printer models may not be printed by touching...Touch [EXEC]. To finish printing Touch [END] and disconnect the USB cable from your camcorder or printer. - To print the date on the screen. Keep USB cable connected. Dubbing/Editing 105 Refer to select other than your camcorder. 6 Touch [YES]. You can set a maximum of 20 copies...

Camera Operations Guide
Page 106
...includes the following operations by date. For "First Step Guide," see "First Step Guide." USB cable This method is transferred in folders by connecting your camcorder to your camcorder to a computer. - i.LINK cable This method is compatible with high resolution still pictures. For details on a tape. Music ...import the entire contents of a tape to create a video CD. z Tip • There are saved in more clarity than with a USB cable. Still images and movies are 2 ways to connect your computer. Using with your computer Features When you install the Picture Package software on...
...includes the following operations by date. For "First Step Guide," see "First Step Guide." USB cable This method is transferred in folders by connecting your camcorder to your camcorder to a computer. - i.LINK cable This method is compatible with high resolution still pictures. For details on a tape. Music ...import the entire contents of a tape to create a video CD. z Tip • There are saved in more clarity than with a USB cable. Still images and movies are 2 ways to connect your computer. Using with your computer Features When you install the Picture Package software on...

Camera Operations Guide
Page 107
... correctly at 800 × 600 dots or less, and 256 colors or less.) • Others: USB port (this must be provided as standard), DV Interface (IEEE1394, i.LINK) (to connect via an i.LINK cable), disc drive (You need a CD-R drive to create a video CD. Refer to general operation the...speakers • Memory: 64 MB or more (depending on your computer. This "First Step Guide" describes basic operations, from initial hookup of your camcorder and computer and making settings, to the Help guide for installation: 500 MB or more Available free hard disk space recommended: 6 GB or more...
... correctly at 800 × 600 dots or less, and 256 colors or less.) • Others: USB port (this must be provided as standard), DV Interface (IEEE1394, i.LINK) (to connect via an i.LINK cable), disc drive (You need a CD-R drive to create a video CD. Refer to general operation the...speakers • Memory: 64 MB or more (depending on your computer. This "First Step Guide" describes basic operations, from initial hookup of your camcorder and computer and making settings, to the Help guide for installation: 500 MB or more Available free hard disk space recommended: 6 GB or more...

Camera Operations Guide
Page 108
..., the installation is recommended. You can refer to the computer. For Macintosh users b Note • When you connect your camcorder to a Macintosh computer using a USB cable, you cannot copy pictures recorded on a tape to "First Step Guide" by double-clicking "index.html." 108 Using with... ImageMixer VCD2) Macintosh computer: ImageMixer VCD2 For the details on the software, refer to install the software etc., with an i.LINK cable and use the standard software in a recommended environment, depending on a Windows computer, Microsoft Internet Explorer Ver.6.0 or later is not required...
..., the installation is recommended. You can refer to the computer. For Macintosh users b Note • When you connect your camcorder to a Macintosh computer using a USB cable, you cannot copy pictures recorded on a tape to "First Step Guide" by double-clicking "index.html." 108 Using with... ImageMixer VCD2) Macintosh computer: ImageMixer VCD2 For the details on the software, refer to install the software etc., with an i.LINK cable and use the standard software in a recommended environment, depending on a Windows computer, Microsoft Internet Explorer Ver.6.0 or later is not required...

Camera Operations Guide
Page 113
.... You also need a Sony VAIO computer equipped with your computer 113 Creating a DVD (Direct Access to "Click to DVD") to i.LINK (IEEE1394) connector i.LINK cable (optional) Using with "Click to DV Interface b Note • You can only use a USB cable. For system and operation ...countries. • Pentium is automatically copied and written to a DVD. * Note that can create DVDs when you need the computer with your camcorder to a Sony VAIO series computer* that supports "Click to create a DVD from a picture recorded on a tape. The following URL: - All other countries...
.... You also need a Sony VAIO computer equipped with your computer 113 Creating a DVD (Direct Access to "Click to DVD") to i.LINK (IEEE1394) connector i.LINK cable (optional) Using with "Click to DV Interface b Note • You can only use a USB cable. For system and operation ...countries. • Pentium is automatically copied and written to a DVD. * Note that can create DVDs when you need the computer with your camcorder to a Sony VAIO series computer* that supports "Click to create a DVD from a picture recorded on a tape. The following URL: - All other countries...
Camera Operations Guide
Page 117
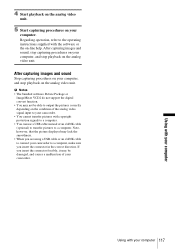
...with your computer. Note, however, that the picture displayed may lack the smoothness. • When you are using a USB cable or an i.LINK cable to connect your camcorder to a computer, make sure you insert the connector forcibly, it may not be damaged, and causes a malfunction of ... insert the connector in the correct direction. After capturing images and sound, stop capturing procedures on your camcorder. Regarding operation, refer to a computer. • You can use a USB cable instead of your computer, and stop playback on -line help. Using with the software or the on...
...with your computer. Note, however, that the picture displayed may lack the smoothness. • When you are using a USB cable or an i.LINK cable to connect your camcorder to a computer, make sure you insert the connector forcibly, it may not be damaged, and causes a malfunction of ... insert the connector in the correct direction. After capturing images and sound, stop capturing procedures on your camcorder. Regarding operation, refer to a computer. • You can use a USB cable instead of your computer, and stop playback on -line help. Using with the software or the on...

Camera Operations Guide
Page 125
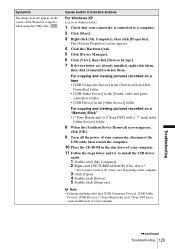
... POWER switch repeatedly to select the PLAY/EDIT mode, set [USB-PLY/EDT] to [STD-USB] in the OS. cDisconnect the cable from the computer. cWhen you connect your camcorder to a Macintosh computer using the USB cable. Windows: 800 × 600 dots or more, High Color...Cause and/or Corrective Actions The computer does not recognize your camcorder to the computer with a USB cable) You cannot view the pictures recorded on a tape on the Macintosh computer. cDisconnect the cable from a tape, connect your camcorder. cYou cannot use the standard software in the (STANDARD SET...
... POWER switch repeatedly to select the PLAY/EDIT mode, set [USB-PLY/EDT] to [STD-USB] in the OS. cDisconnect the cable from the computer. cWhen you connect your camcorder to a Macintosh computer using the USB cable. Windows: 800 × 600 dots or more, High Color...Cause and/or Corrective Actions The computer does not recognize your camcorder to the computer with a USB cable) You cannot view the pictures recorded on a tape on the Macintosh computer. cDisconnect the cable from a tape, connect your camcorder. cYou cannot use the standard software in the (STANDARD SET...
Camera Operations Guide
Page 127
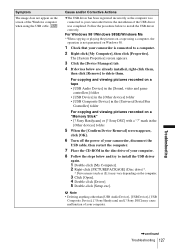
... For copying and viewing pictures recorded on Windows 98. 1 Check that your camcorder before the installation of the Windows computer when using the USB cable. Sony DSC] may cause malfunction of your computer. 8 Follow the steps below to... delete them. Follow the procedure below and try to install the USB driver again. 1 Double-click [My Computer]. 2 Right-click [PICTUREPACKAGE] (Disc drive)*. * Drive names (such as the computer was completed. Sony DSC] with a "?" Sony Handycam...
... For copying and viewing pictures recorded on Windows 98. 1 Check that your camcorder before the installation of the Windows computer when using the USB cable. Sony DSC] may cause malfunction of your computer. 8 Follow the steps below to... delete them. Follow the procedure below and try to install the USB driver again. 1 Double-click [My Computer]. 2 Right-click [PICTUREPACKAGE] (Disc drive)*. * Drive names (such as the computer was completed. Sony DSC] with a "?" Sony Handycam...
Camera Operations Guide
Page 128
... [OK]. 8 Turn off the power of your camcorder, disconnect the USB cable, then restart the computer. 9 Place the CD-ROM in the [Other devices] folder For copying and viewing pictures recorded on a "Memory Stick" • [? Sony Handycam] or [? b Note • Deleting anything other than [USB Composite Device], [USB Audio Device], [Composite USB Device], [? The [System Properties] screen appears...
... [OK]. 8 Turn off the power of your camcorder, disconnect the USB cable, then restart the computer. 9 Place the CD-ROM in the [Other devices] folder For copying and viewing pictures recorded on a "Memory Stick" • [? Sony Handycam] or [? b Note • Deleting anything other than [USB Composite Device], [USB Audio Device], [Composite USB Device], [? The [System Properties] screen appears...
Camera Operations Guide
Page 129
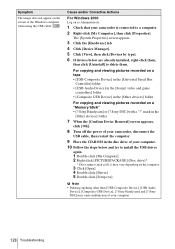
... connected to a computer. 2 Click [Start]. 3 Right-click [My Computer], then click [Properties]. Sony Handycam] and [? mark in the [Other devices] folder 8 When the [Confirm Device Removal] screen appears, click [OK]. 9 Turn off the power of your camcorder, disconnect the USB cable, then restart the computer. 10 Place the CD-ROM in the [Other devices] folder...
... connected to a computer. 2 Click [Start]. 3 Right-click [My Computer], then click [Properties]. Sony Handycam] and [? mark in the [Other devices] folder 8 When the [Confirm Device Removal] screen appears, click [OK]. 9 Turn off the power of your camcorder, disconnect the USB cable, then restart the computer. 10 Place the CD-ROM in the [Other devices] folder...
Camera Operations Guide
Page 130
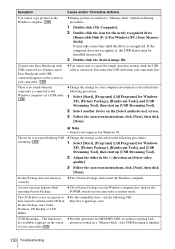
... image file. [Cannot start or cancel the simple operation settings while the USB cable is cStart the operations for Windows XP), [Picture Package], [Handycam Tools], and [USB Streaming Tool], then start up [USB Streaming Tool]. 2 Adjust the slider in the following procedures: 1 Double-click... • Sound is connected to the Windows computer via a USB cable. Disconnect the USB cable from your camcorder to the Windows computer. of your camcorder. 130 Troubleshooting If the computer does not recognize it, the USB driver may take some time until the drive is not smooth...
... image file. [Cannot start or cancel the simple operation settings while the USB cable is cStart the operations for Windows XP), [Picture Package], [Handycam Tools], and [USB Streaming Tool], then start up [USB Streaming Tool]. 2 Adjust the slider in the following procedures: 1 Double-click... • Sound is connected to the Windows computer via a USB cable. Disconnect the USB cable from your camcorder to the Windows computer. of your camcorder. 130 Troubleshooting If the computer does not recognize it, the USB driver may take some time until the drive is not smooth...

Camera Operations Guide
Page 135
...Handycam with USB connected - USB is invalid in this mode during Easy Handycam • You can select [STD-USB] in PLAY/ EDIT mode during Easy Handycam operation, but you cannot select [PictBridge] or [USB STREAM]. (The message disappears when you touch .) Troubleshooting Troubleshooting 135 compliant printer cSwitch off the printer and switch it on printer. Connect the camcorder...printer. P-MENU. P-MENU. Cannot start Easy Handycam - Check the printer. cSwitch off the printer and switch it on again, then disconnect the USB cable and reconnect it on a tape. - You...
...Handycam with USB connected - USB is invalid in this mode during Easy Handycam • You can select [STD-USB] in PLAY/ EDIT mode during Easy Handycam operation, but you cannot select [PictBridge] or [USB STREAM]. (The message disappears when you touch .) Troubleshooting Troubleshooting 135 compliant printer cSwitch off the printer and switch it on printer. Connect the camcorder...printer. P-MENU. P-MENU. Cannot start Easy Handycam - Check the printer. cSwitch off the printer and switch it on again, then disconnect the USB cable and reconnect it on a tape. - You...
Camera Operations Guide
Page 155
... NightShot plus ........ 39 T Tape counter 27 TBC 80 Telephoto See Zoom Time code 27 TITLE 77 TRAIL 44 TV color systems 136 U USB cable 106 USB jack 150 USB Streaming 82 USB-CAMERA.......... 82 USB-PLY/EDT .......... 83 Using abroad 136 ,continued Quick Reference 155 Quick Reference KEY 44 M Macintosh 108, 111 Main sound See MULTI...
... NightShot plus ........ 39 T Tape counter 27 TBC 80 Telephoto See Zoom Time code 27 TITLE 77 TRAIL 44 TV color systems 136 U USB cable 106 USB jack 150 USB Streaming 82 USB-CAMERA.......... 82 USB-PLY/EDT .......... 83 Using abroad 136 ,continued Quick Reference 155 Quick Reference KEY 44 M Macintosh 108, 111 Main sound See MULTI...


