Camera Operations Guide
Page 3
... NTSC system-based TV. • Television programs, films, video tapes, and other materials may cause undesired operation. Bernardo Dr, San...Conformity Trade Name: SONY Model No.: DCR-TRV480 Responsible Party: Sony Electronics Inc. DCR-TRV Serial No. ACSerial No. This equipment generates, uses, and can record on standard 8 mm and Hi8 , Digital8 video cassettes in ...cause harmful interference to radio communications. Reorient or relocate the receiving antenna. - To view your camcorder. Model No. Unauthorized recording of such materials may be used in any problems. • ...
... NTSC system-based TV. • Television programs, films, video tapes, and other materials may cause undesired operation. Bernardo Dr, San...Conformity Trade Name: SONY Model No.: DCR-TRV480 Responsible Party: Sony Electronics Inc. DCR-TRV Serial No. ACSerial No. This equipment generates, uses, and can record on standard 8 mm and Hi8 , Digital8 video cassettes in ...cause harmful interference to radio communications. Reorient or relocate the receiving antenna. - To view your camcorder. Model No. Unauthorized recording of such materials may be used in any problems. • ...
Camera Operations Guide
Page 5
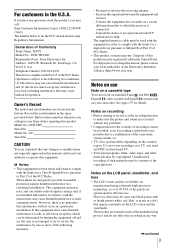
Table of Easy Handycam operation 37 ,continued 5 Easy Handycam 35 Recording a movie 35 Recording a still image 36 Making full use of Contents : Features available for tape only. : Features available for a longer time 28 Using zoom ...29 Using the built-in light 29 Recording in mirror...the LCD panel 20 Adjusting the viewfinder 20 Step 5: Setting the date and time 21 Step 6: Inserting the recording media 22 Inserting a cassette tape 22 Inserting a "Memory Stick 23 Step 7: Setting the screen language 24 Recording Recording movies 26 Recording for "Memory Stick" only. Read ...
Table of Easy Handycam operation 37 ,continued 5 Easy Handycam 35 Recording a movie 35 Recording a still image 36 Making full use of Contents : Features available for tape only. : Features available for a longer time 28 Using zoom ...29 Using the built-in light 29 Recording in mirror...the LCD panel 20 Adjusting the viewfinder 20 Step 5: Setting the date and time 21 Step 6: Inserting the recording media 22 Inserting a cassette tape 22 Inserting a "Memory Stick 23 Step 7: Setting the screen language 24 Recording Recording movies 26 Recording for "Memory Stick" only. Read ...
Camera Operations Guide
Page 6
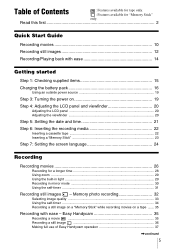
... 41 Recording a picture using various effects 42 Fading in dark places - Zero set memory 60 Searching for a desired scene - Tape playback zoom/Memory playback zoom 56 Displaying the screen indicators 57 Displaying the date/time and camera settings data - NightShot plus, etc...date of the most recently recorded scenes - Flexible spot meter 38 Adjusting the exposure manually 38 Recording in and out of Easy Handycam operation 55 Various playback functions 56 Magnifying pictures - EDIT SEARCH 47 Reviewing the most recent recording - MEMORY MIX 45 Searching for...
... 41 Recording a picture using various effects 42 Fading in dark places - Zero set memory 60 Searching for a desired scene - Tape playback zoom/Memory playback zoom 56 Displaying the screen indicators 57 Displaying the date/time and camera settings data - NightShot plus, etc...date of the most recently recorded scenes - Flexible spot meter 38 Adjusting the exposure manually 38 Recording in and out of Easy Handycam operation 55 Various playback functions 56 Magnifying pictures - EDIT SEARCH 47 Reviewing the most recent recording - MEMORY MIX 45 Searching for...
Camera Operations Guide
Page 7
...Using "First Step Guide 112 Creating a DVD (Direct Access to "Click to DVD 113 Connecting an analog VCR to a tape 93 Dubbing selected scenes from a tape - Image protection/ Print mark 102 Printing recorded images (PictBridge compliant printer 104 Using with specific information - QUALITY/IMAGE SIZE/ALL...Editing Connecting to a VCR or TV 89 Dubbing to another tape 90 Recording pictures from a VCR or TV ... 91 Dubbing pictures from a tape to a "Memory Stick 92 Dubbing still images from a "Memory Stick" to the computer via your camcorder - PROGRAM AE/16:9 WIDE, etc 64 Using the ...
...Using "First Step Guide 112 Creating a DVD (Direct Access to "Click to DVD 113 Connecting an analog VCR to a tape 93 Dubbing selected scenes from a tape - Image protection/ Print mark 102 Printing recorded images (PictBridge compliant printer 104 Using with specific information - QUALITY/IMAGE SIZE/ALL...Editing Connecting to a VCR or TV 89 Dubbing to another tape 90 Recording pictures from a VCR or TV ... 91 Dubbing pictures from a tape to a "Memory Stick 92 Dubbing still images from a "Memory Stick" to the computer via your camcorder - PROGRAM AE/16:9 WIDE, etc 64 Using the ...

Camera Operations Guide
Page 8
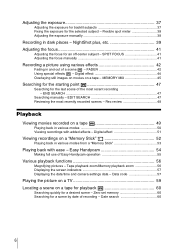
Troubleshooting Troubleshooting 118 Warning indicators and messages .......132 Additional Information Using your camcorder abroad 136 Usable cassette tapes 137 About the "Memory Stick 138 About the "InfoLITHIUM" battery pack 140 About i.LINK 141 Maintenance and precautions 142 Specification 145 Quick Reference Identifying parts and controls 148 Index 154 Two operating instructions are supplied with your camcorder: • Camera Operations Guide (This manual) • "First Step Guide" for using the supplied applications (included in the supplied CD-ROM) 8
Troubleshooting Troubleshooting 118 Warning indicators and messages .......132 Additional Information Using your camcorder abroad 136 Usable cassette tapes 137 About the "Memory Stick 138 About the "InfoLITHIUM" battery pack 140 About i.LINK 141 Maintenance and precautions 142 Specification 145 Quick Reference Identifying parts and controls 148 Index 154 Two operating instructions are supplied with your camcorder: • Camera Operations Guide (This manual) • "First Step Guide" for using the supplied applications (included in the supplied CD-ROM) 8
Camera Operations Guide
Page 11
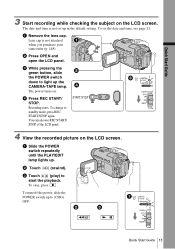
... can also use REC START/ STOP of the LCD panel. To turn off the power, slide the POWER switch up to light up the CAMERA-TAPE lamp. Quick Start Guide 3 Start recording while checking the subject on . b Press OPEN and open the LCD panel. The power turns on the LCD screen.... d Press REC START/ STOP. Quick Start Guide 11 The date and time is not attached when you purchase your camcorder (p. 148). c While pressing the green button, slide the POWER switch down to (CHG) OFF. To change to start the playback. b Touch (rewind). c Touch (play) to...
... can also use REC START/ STOP of the LCD panel. To turn off the power, slide the POWER switch up to light up the CAMERA-TAPE lamp. Quick Start Guide 3 Start recording while checking the subject on . b Press OPEN and open the LCD panel. The power turns on the LCD screen.... d Press REC START/ STOP. Quick Start Guide 11 The date and time is not attached when you purchase your camcorder (p. 148). c While pressing the green button, slide the POWER switch down to (CHG) OFF. To change to start the playback. b Touch (rewind). c Touch (play) to...

Camera Operations Guide
Page 18
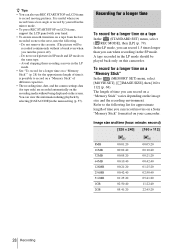
... record, start/stop, slide the POWER switch to the DC IN jack of your camcorder in following conditions. - This table shows the playing time for tapes recorded in the Hi8 /standard 8 mm system is reduced by about 20%. The ... a fully charged battery pack at 25°C (77°F). For DCR-TRV480: The playing time of tapes recorded on Approximate number of minutes when recording while you use your camcorder, even if its power cord is fully discharged. (For Battery information only... Recording time when recording with the LCD screen on other devices in the Digital8 system.
... record, start/stop, slide the POWER switch to the DC IN jack of your camcorder in following conditions. - This table shows the playing time for tapes recorded in the Hi8 /standard 8 mm system is reduced by about 20%. The ... a fully charged battery pack at 25°C (77°F). For DCR-TRV480: The playing time of tapes recorded on Approximate number of minutes when recording while you use your camcorder, even if its power cord is fully discharged. (For Battery information only... Recording time when recording with the LCD screen on other devices in the Digital8 system.
Camera Operations Guide
Page 19
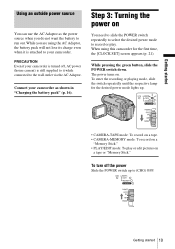
...is still supplied to record or play or edit pictures on . While pressing the green button, slide the POWER switch down. The power turns on a tape or "Memory Stick." Getting started Using an outside power source You can use the AC Adaptor as shown in "Charging the battery pack" (p. 16).... Connect your camcorder. When using the AC Adaptor, the battery pack will not lose its charge even when it while connected to (CHG) OFF. While you do not...
...is still supplied to record or play or edit pictures on . While pressing the green button, slide the POWER switch down. The power turns on a tape or "Memory Stick." Getting started Using an outside power source You can use the AC Adaptor as shown in "Charging the battery pack" (p. 16).... Connect your camcorder. When using the AC Adaptor, the battery pack will not lose its charge even when it while connected to (CHG) OFF. While you do not...
Camera Operations Guide
Page 21
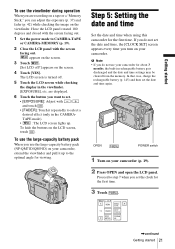
.... 3 Touch . 60min MENU 1/3 FADER SPOT METER -:--:-- If you can adjust the exposure (p. 37) and fader (p. 42) while checking the image on your camcorder. Getting started 21 are recording on a tape or a "Memory Stick," you do not use the viewfinder during operation When you are displayed. 6 Touch the button you set the date...
.... 3 Touch . 60min MENU 1/3 FADER SPOT METER -:--:-- If you can adjust the exposure (p. 37) and fader (p. 42) while checking the image on your camcorder. Getting started 21 are recording on a tape or a "Memory Stick," you do not use the viewfinder during operation When you are displayed. 6 Touch the button you set the date...
Camera Operations Guide
Page 22
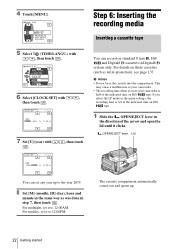
This may cause a malfunction of your camcorder is 3/4 of the indicated time on standard 8 mm , Hi8 and Digital8 cassettes in Digital8 system only. For midnight, set it to the year 2079. 8 Set [M] (month), [D] (day), hour and minute in the same way as write-protection), ...out and opens up to 12:00AM. DISPLAY MENU ROTATE A. Step 6: Inserting the recording media Inserting a cassette tape You can set any year up . 22 Getting started If you use your camcorder. • The recording time when you select the LP mode in the menu settings, the recording time is ...
This may cause a malfunction of your camcorder is 3/4 of the indicated time on standard 8 mm , Hi8 and Digital8 cassettes in Digital8 system only. For midnight, set it to the year 2079. 8 Set [M] (month), [D] (day), hour and minute in the same way as write-protection), ...out and opens up to 12:00AM. DISPLAY MENU ROTATE A. Step 6: Inserting the recording media Inserting a cassette tape You can set any year up . 22 Getting started If you use your camcorder. • The recording time when you select the LP mode in the menu settings, the recording time is ...

Camera Operations Guide
Page 26
...MOVIE EX Slide the POWER switch repeatedly until the CAMERA-TAPE lamp lights up , and the currently selected recording folder appears on a tape Slide the POWER switch until the CAMERA-MEMORY lamp lights up , and your camcorder is finished, then [YES]. To turn the power off...Touch . To cancel deleting, touch [NO]. OPEN REC START/STOP POWER switch z Tip • Performing Easy Handycam operation, even first time users can record movies on a tape, movies will be recorded along with monaural sound. Playback starts automatically. Slide the POWER switch while pressing the ...
...MOVIE EX Slide the POWER switch repeatedly until the CAMERA-TAPE lamp lights up , and the currently selected recording folder appears on a tape Slide the POWER switch until the CAMERA-MEMORY lamp lights up , and your camcorder is finished, then [YES]. To turn the power off...Touch . To cancel deleting, touch [NO]. OPEN REC START/STOP POWER switch z Tip • Performing Easy Handycam operation, even first time users can record movies on a tape, movies will be recorded along with monaural sound. Playback starts automatically. Slide the POWER switch while pressing the ...
Camera Operations Guide
Page 27
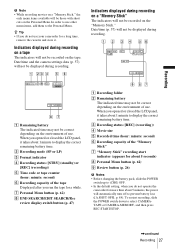
... display the correct remaining battery time. C Recording status ([REC] (recording)) D Movie size E Recorded time (hour: minute: second) F Recording capacity of the tape Displayed after you opened or closed the LCD panel, it takes about 5 seconds) H Personal Menu button (p. 62) I Review button (p. 26) b Notes &#... may not be recorded on the "Memory Stick." Date/time (p. 57) will not be displayed during recording. In order to use your camcorder for a while. Recording b Note • While recording movies on a "Memory Stick," the only menu items available will be correct depending...
... display the correct remaining battery time. C Recording status ([REC] (recording)) D Movie size E Recorded time (hour: minute: second) F Recording capacity of the tape Displayed after you opened or closed the LCD panel, it takes about 5 seconds) H Personal Menu button (p. 62) I Review button (p. 26) b Notes &#... may not be recorded on the "Memory Stick." Date/time (p. 57) will not be displayed during recording. In order to use your camcorder for a while. Recording b Note • While recording movies on a "Memory Stick," the only menu items available will be correct depending...
Camera Operations Guide
Page 28
..." of different capacities. • The recording time, date, and the camera settings data (for tape only) are recorded automatically on the recording media without a break even when you can record movies on a Sony "Memory Stick" formatted on your camcorder. You can view this information during playback by yourself in the mirror mode. •...
..." of different capacities. • The recording time, date, and the camera settings data (for tape only) are recorded automatically on the recording media without a break even when you can record movies on a Sony "Memory Stick" formatted on your camcorder. You can view this information during playback by yourself in the mirror mode. •...
Camera Operations Guide
Page 29
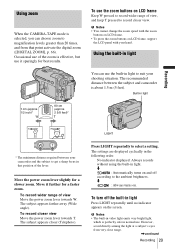
...). Built-in light 1 cm (approx. 1/2 inch)* 80 cm (approx. 2 5/8 feet)* Recording * The minimum distance required between the subject and camcorder is effective, but use it further for best results. To use the zoom buttons on . LIGHT Press LIGHT repeatedly to magnification levels greater than 20...in light to get a sharp focus in that point activate the digital zoom ([DIGITAL ZOOM], p. 66). Using zoom When the CAMERA-TAPE mode is perfectly safe in normal use. The subject appears closer (Telephoto). The settings are displayed cyclically in light. Move the power zoom...
...). Built-in light 1 cm (approx. 1/2 inch)* 80 cm (approx. 2 5/8 feet)* Recording * The minimum distance required between the subject and camcorder is effective, but use it further for best results. To use the zoom buttons on . LIGHT Press LIGHT repeatedly to magnification levels greater than 20...in light to get a sharp focus in that point activate the digital zoom ([DIGITAL ZOOM], p. 66). Using zoom When the CAMERA-TAPE mode is perfectly safe in normal use. The subject appears closer (Telephoto). The settings are displayed cyclically in light. Move the power zoom...

Camera Operations Guide
Page 30
... AE] or backlight function while shooting in the mode. • The built-in light is working. - Open the LCD panel 90 degrees to the camcorder, then rotate it on for more than 5 minutes with the POWER switch set to avoid turning on /off in the mode for more than 5 minutes...-MEMORY. - When it on for more than 5 minutes with no cassette inserted or after the tape has run out. • When you leave it 180 degrees towards the subject so that you and your camcorder, turn on the built-in light accidentally. • When flickering occurs while shooting in the mode...
... AE] or backlight function while shooting in the mode. • The built-in light is working. - Open the LCD panel 90 degrees to the camcorder, then rotate it on for more than 5 minutes with the POWER switch set to avoid turning on /off in the mode for more than 5 minutes...-MEMORY. - When it on for more than 5 minutes with no cassette inserted or after the tape has run out. • When you leave it 180 degrees towards the subject so that you and your camcorder, turn on the built-in light accidentally. • When flickering occurs while shooting in the mode...

Camera Operations Guide
Page 35
... "Memory Stick," see page 26 (MPEG MOVIE EX). 1 Remove the lens cap. p. 24). Easy Handycam With this Easy Handycam operation, most of the camera settings are not recorded on a tape only. Check the image and press it to 7 in standby mode Press and hold PHOTO lightly. Even first...- Before recording, follow steps 1 to the grip belt. 2 Press OPEN and open the LCD panel. ,continued Recording 35 Recording a movie During Easy Handycam operation, you can enjoy easy recording. MEMORY MIX function • Titles are set to 7 in "Getting started " (p. 15 - Pull the lens cap...
... "Memory Stick," see page 26 (MPEG MOVIE EX). 1 Remove the lens cap. p. 24). Easy Handycam With this Easy Handycam operation, most of the camera settings are not recorded on a tape only. Check the image and press it to 7 in standby mode Press and hold PHOTO lightly. Even first...- Before recording, follow steps 1 to the grip belt. 2 Press OPEN and open the LCD panel. ,continued Recording 35 Recording a movie During Easy Handycam operation, you can enjoy easy recording. MEMORY MIX function • Titles are set to 7 in "Getting started " (p. 15 - Pull the lens cap...

Camera Operations Guide
Page 36
...turn Easy Handycam operation on the LCD screen and the Camera recording lamp lights up. b Notes • You cannot turn the power off Slide the POWER switch up to the grip belt. 2 Press OPEN and open the LCD panel. 3 Slide the POWER switch repeatedly until the CAMERA-TAPE lamp lights ...up. Pull the lens cap string down and attach it to the (CHG) OFF position. Recording starts. [REC] appears on or off during : - Slide the POWER switch while pressing the green button. 4 Press EASY. To cancel Easy Handycam operation Press EASY again....
...turn Easy Handycam operation on the LCD screen and the Camera recording lamp lights up. b Notes • You cannot turn the power off Slide the POWER switch up to the grip belt. 2 Press OPEN and open the LCD panel. 3 Slide the POWER switch repeatedly until the CAMERA-TAPE lamp lights ...up. Pull the lens cap string down and attach it to the (CHG) OFF position. Recording starts. [REC] appears on or off during : - Slide the POWER switch while pressing the green button. 4 Press EASY. To cancel Easy Handycam operation Press EASY again....

Camera Operations Guide
Page 39
... plus recording. 1 Slide the POWER switch to record an image more effectively. and ["NIGHTSHOT PLUS"] appear. To record higher sensitivity pictures on the tape - The Color Slow Shutter function enables you to the original colors. 4 Adjust the exposure by touching (dim)/ (bright), then touch . 60min STBY.... Super NightShot plus The Super NightShot plus function enables you to use the NightShot plus function enable you to select the CAMERA-TAPE mode. ,continued Recording 39 Recording in dark places (such as when capturing the face of NightShot plus or Color Slow Shutter ...
... plus recording. 1 Slide the POWER switch to record an image more effectively. and ["NIGHTSHOT PLUS"] appear. To record higher sensitivity pictures on the tape - The Color Slow Shutter function enables you to the original colors. 4 Adjust the exposure by touching (dim)/ (bright), then touch . 60min STBY.... Super NightShot plus The Super NightShot plus function enables you to use the NightShot plus function enable you to select the CAMERA-TAPE mode. ,continued Recording 39 Recording in dark places (such as when capturing the face of NightShot plus or Color Slow Shutter ...
Camera Operations Guide
Page 40
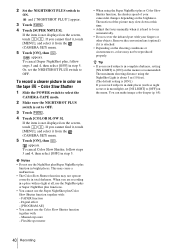
...and select it from the (CAMERA SET) menu. 5 Touch [ON], then . Color Slow Shutter 1 Slide the POWER switch to select the CAMERA-TAPE mode. 2 Make sure the NIGHTSHOT PLUS switch is set to OFF. appears. This may cause a malfunction. • The Color Slow Shutter function may...Slow Shutter function together with : - When you record subjects in step 5. z Tip • If you are recording in a place with your camcorder changes depending on the brightness. To cancel Color Slow Shutter, follow steps 3 and 4, then select [OFF] in moonlight), set the NIGHTSHOT PLUS ...
...and select it from the (CAMERA SET) menu. 5 Touch [ON], then . Color Slow Shutter 1 Slide the POWER switch to select the CAMERA-TAPE mode. 2 Make sure the NIGHTSHOT PLUS switch is set to OFF. appears. This may cause a malfunction. • The Color Slow Shutter function may...Slow Shutter function together with : - When you record subjects in step 5. z Tip • If you are recording in a place with your camcorder changes depending on the brightness. To cancel Color Slow Shutter, follow steps 3 and 4, then select [OFF] in moonlight), set the NIGHTSHOT PLUS ...
Camera Operations Guide
Page 43
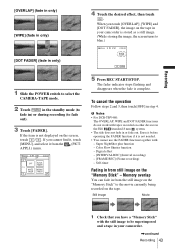
... have a "Memory Stick" with tapes recorded on other devices in the Hi8 /standard 8 mm system. • The title does not fade in your camcorder. ,continued Recording 43 The fader indicator stops flashing and disappears when the fade is not displayed on the screen, touch / . b Notes • For DCR-TRV480: The OVERLAP, WIPE and DOT...
... have a "Memory Stick" with tapes recorded on other devices in the Hi8 /standard 8 mm system. • The title does not fade in your camcorder. ,continued Recording 43 The fader indicator stops flashing and disappears when the fade is not displayed on the screen, touch / . b Notes • For DCR-TRV480: The OVERLAP, WIPE and DOT...


