Camera Operations Guide
Page 4
... cable, be damaged, or this manual are from what you are captured using your camcorder to malfunction. Take pictures of the LCD screen and the viewfinder used in this may appear different from a Windows XP computer. Then, touch the buttons displayed on -screen displays in the following parts... close the LCD panel, or when you insert the connector plug forcibly in the proper direction. Note on connecting other device Before connecting your camcorder to other device such as a VCR or a computer with specific model names are for all models. • Exposing the LCD screen, ...
... cable, be damaged, or this manual are from what you are captured using your camcorder to malfunction. Take pictures of the LCD screen and the viewfinder used in this may appear different from a Windows XP computer. Then, touch the buttons displayed on -screen displays in the following parts... close the LCD panel, or when you insert the connector plug forcibly in the proper direction. Note on connecting other device Before connecting your camcorder to other device such as a VCR or a computer with specific model names are for all models. • Exposing the LCD screen, ...
Camera Operations Guide
Page 10
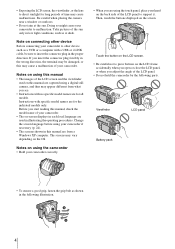
... the battery pack in by itself. it clicks. 2 Insert a cassette into the camcorder. Quick Start Guide Recording movies 1 Attach the charged battery pack to the camcorder. cassette. To charge the battery, see page 16. EJECT lever in the its window-side facing Close the cassette lid after direction of the slides back in...
... the battery pack in by itself. it clicks. 2 Insert a cassette into the camcorder. Quick Start Guide Recording movies 1 Attach the charged battery pack to the camcorder. cassette. To charge the battery, see page 16. EJECT lever in the its window-side facing Close the cassette lid after direction of the slides back in...
Camera Operations Guide
Page 23
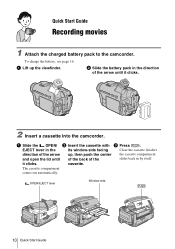
... the "Memory Stick" in . 3 Close the lid. 2 Insert a cassette with the b mark at the bottom left corner until it is inserted without an adaptor (p. 139). Window-side Push the center of the back of the arrow and open the lid. Access lamp Getting started 23 The cassette compartment automatically slides back... the direction of the cassette lightly. 3 Press . The cassette compartment automatically comes out. 2 Take out the cassette, then press . Insert the "Memory Stick" with its window-side facing up. Your camcorder may malfunction when it clicks.
... the "Memory Stick" in . 3 Close the lid. 2 Insert a cassette with the b mark at the bottom left corner until it is inserted without an adaptor (p. 139). Window-side Push the center of the back of the arrow and open the lid. Access lamp Getting started 23 The cassette compartment automatically slides back... the direction of the cassette lightly. 3 Press . The cassette compartment automatically comes out. 2 Take out the cassette, then press . Insert the "Memory Stick" with its window-side facing up. Your camcorder may malfunction when it clicks.

Camera Operations Guide
Page 38
... [AUTO] in the limelight on the screen, touch / . To return the setting to [AUTO]. If the item is not displayed on people next to the window by manually fixing the exposure to [AUTO] (p. 38). 3 Touch [MANUAL]. 60min EXPOSURE: STBY 0:00:00 MANUAL AUTO MANUAL OK 38 Recording SPOT METER STBY 0:00...
... [AUTO] in the limelight on the screen, touch / . To return the setting to [AUTO]. If the item is not displayed on people next to the window by manually fixing the exposure to [AUTO] (p. 38). 3 Touch [MANUAL]. 60min EXPOSURE: STBY 0:00:00 MANUAL AUTO MANUAL OK 38 Recording SPOT METER STBY 0:00...

Camera Operations Guide
Page 41
... the screen. [SPOT FOCUS] flashes while the camera is adjusting the focus. 9 appears. Or set to focus on the screen, touch / . To record a subject behind a window covered with [PROGRAM AE]. Recording AUTO END 3 Touch the subject for an offcenter subject - To record a stationary subject using a tripod. 1 Touch during recording or in...
... the screen. [SPOT FOCUS] flashes while the camera is adjusting the focus. 9 appears. Or set to focus on the screen, touch / . To record a subject behind a window covered with [PROGRAM AE]. Recording AUTO END 3 Touch the subject for an offcenter subject - To record a stationary subject using a tripod. 1 Touch during recording or in...

Camera Operations Guide
Page 64
... to far distance. 64 Using the Menu lesson) ( ) moving subjects such as (landscape) ( ) mountains. This setting also prevents your camcorder. The settings you can record pictures easily in a situation that comes in strong light or reflected light, such as sunsets, general night views,...(CAMERA SET) menu - To select items, see "Selecting menu items" (p. 62). LANDSCAPE** Select when shooting distant subjects such as in windows that requires various techniques by strong light, such as people or portrait) ( ) flowers while creating a soft background. PORTRAIT (soft Select ...
... to far distance. 64 Using the Menu lesson) ( ) moving subjects such as (landscape) ( ) mountains. This setting also prevents your camcorder. The settings you can record pictures easily in a situation that comes in strong light or reflected light, such as sunsets, general night views,...(CAMERA SET) menu - To select items, see "Selecting menu items" (p. 62). LANDSCAPE** Select when shooting distant subjects such as in windows that requires various techniques by strong light, such as people or portrait) ( ) flowers while creating a soft background. PORTRAIT (soft Select ...

Camera Operations Guide
Page 106
...computer to a computer. - For "First Step Guide," see "First Step Guide." Still images and movies are 2 ways to connect your camcorder to a CD-R. Music Video/Slideshow Producer You can view the picture your computer USB Streaming Tool You can select your favorite movies and still...pictures. ImageMixer VCD2 is transferred in folders by selecting from the supplied CDROM, you install the Picture Package software on a Windows computer from thumbnails. Automatic Music Video Producer You can easily create a short original video with your computer Features When you can copy...
...computer to a computer. - For "First Step Guide," see "First Step Guide." Still images and movies are 2 ways to connect your camcorder to a CD-R. Music Video/Slideshow Producer You can view the picture your computer USB Streaming Tool You can select your favorite movies and still...pictures. ImageMixer VCD2 is transferred in folders by selecting from the supplied CDROM, you install the Picture Package software on a Windows computer from thumbnails. Automatic Music Video Producer You can easily create a short original video with your computer Features When you can copy...

Camera Operations Guide
Page 107
... 500 MHz or faster (800 MHz or faster recommended) (For using Picture Package • OS: Microsoft Windows 98, Windows 98SE, Windows 2000 Professional, Windows Millennium Edition, Windows XP Home Edition or Windows XP Professional Standard installation is not supported. To display the Help guide, click the [?] mark on a ... the software stored on DirectX technology. After installing the CD-ROM, reading "Installing the software and "First Step Guide" on your camcorder and computer and making settings, to general operation the first time you can refer to on a computer" (p. 108), start the...
... 500 MHz or faster (800 MHz or faster recommended) (For using Picture Package • OS: Microsoft Windows 98, Windows 98SE, Windows 2000 Professional, Windows Millennium Edition, Windows XP Home Edition or Windows XP Professional Standard installation is not supported. To display the Help guide, click the [?] mark on a ... the software stored on DirectX technology. After installing the CD-ROM, reading "Installing the software and "First Step Guide" on your camcorder and computer and making settings, to general operation the first time you can refer to on a computer" (p. 108), start the...

Camera Operations Guide
Page 108
...USB cable, you cannot copy pictures recorded on a tape to install the software etc., with the supplied CD-ROM on your computer before connecting your camcorder and your computer. When using ImageMixer VCD2 • OS: Mac OS X (v10.1.5 or later) • CPU: iMac, eMac, iBook,... a computer You need to the computer. You can refer to your camcorder to "First Step Guide." To copy recordings from the [FirstStepGuide] folder on the software, refer to the computer with your computer Windows computer: Picture Package (including ImageMixer VCD2) Macintosh computer: ImageMixer VCD2 For...
...USB cable, you cannot copy pictures recorded on a tape to install the software etc., with the supplied CD-ROM on your computer before connecting your camcorder and your computer. When using ImageMixer VCD2 • OS: Mac OS X (v10.1.5 or later) • CPU: iMac, eMac, iBook,... a computer You need to the computer. You can refer to your camcorder to "First Step Guide." To copy recordings from the [FirstStepGuide] folder on the software, refer to the computer with your computer Windows computer: Picture Package (including ImageMixer VCD2) Macintosh computer: ImageMixer VCD2 For...

Camera Operations Guide
Page 109
...the computer before installing the software. 3 Place the CD-ROM in the disc drive of the license agreement] when you that your camcorder is not connected to be installed automatically with your computer 109 In such a case, manually copy "First Step Guide" to your ...Computer]. 2 Double-click [PICTUREPACKAGE] (Disc drive).* *Drive names (such as Administrators for the application to the computer. 2 Turn on the computer. For Windows 2000/Windows XP Log on as (E:)) may vary depending on the computer. 4 Click [Install]. 7 Read [License Agreement], check [I accept the terms of your ...
...the computer before installing the software. 3 Place the CD-ROM in the disc drive of the license agreement] when you that your camcorder is not connected to be installed automatically with your computer 109 In such a case, manually copy "First Step Guide" to your ...Computer]. 2 Double-click [PICTUREPACKAGE] (Disc drive).* *Drive names (such as Administrators for the application to the computer. 2 Turn on the computer. For Windows 2000/Windows XP Log on as (E:)) may vary depending on the computer. 4 Click [Install]. 7 Read [License Agreement], check [I accept the terms of your ...
Camera Operations Guide
Page 112
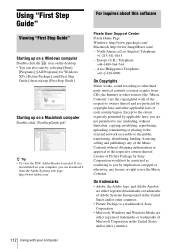
...trademarks or trademarks of Microsoft Corporation in the United States and/or other countries. • Picture Package is a trademark of Sony Corporation. • Microsoft, Windows and Windows Media are not permitted to use the Music Contents. z Tip • To view the PDF, Adobe Reader is needed..."Music Contents") are the copyrighted work of the respective owners thereof and are protected by selecting [Start], [Programs] ([All Programs] for Windows XP), [Picture Package], and [First Step Guide], then start up on a Macintosh computer Double-click "FirstStepGuide.pdf." Except to the ...
...trademarks or trademarks of Microsoft Corporation in the United States and/or other countries. • Picture Package is a trademark of Sony Corporation. • Microsoft, Windows and Windows Media are not permitted to use the Music Contents. z Tip • To view the PDF, Adobe Reader is needed..."Music Contents") are the copyrighted work of the respective owners thereof and are protected by selecting [Start], [Programs] ([All Programs] for Windows XP), [Picture Package], and [First Step Guide], then start up on a Macintosh computer Double-click "FirstStepGuide.pdf." Except to the ...

Camera Operations Guide
Page 114
..." function, follow the steps below to start "Click to DVD Automatic Mode Launcher." 1 Turn on the computer. 2 Click the start up for each Windows XP user. 1 Turn on your computer. 7 Place a writable DVD in the correct direction. b Note • When you insert the connector in...insert the connector forcibly, it starts up and the on-screen instructions appear on the computer. WRITING: The picture is displayed on your camcorder. Taiwan http://vaio-online.sony.com/tw/vaio/ - China http://www.sonystyle.com.cn/vaio/ - CONVERTING: The picture is being converted to a computer. -...
..." function, follow the steps below to start "Click to DVD Automatic Mode Launcher." 1 Turn on the computer. 2 Click the start up for each Windows XP user. 1 Turn on your computer. 7 Place a writable DVD in the correct direction. b Note • When you insert the connector in...insert the connector forcibly, it starts up and the on-screen instructions appear on the computer. WRITING: The picture is displayed on your camcorder. Taiwan http://vaio-online.sony.com/tw/vaio/ - China http://www.sonystyle.com.cn/vaio/ - CONVERTING: The picture is being converted to a computer. -...

Camera Operations Guide
Page 125
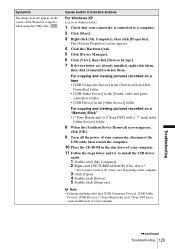
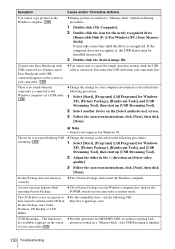
... (p. 83) • The computer does not recognize the "Memory Stick" during camcorder operation such as follows: place the CD-ROM in the (STANDARD SET) menu. (p. 83) (Only when connecting to the Windows computer with an i.LINK cable and use an i.LINK cable. cDisconnect the USB ...the standard software in the (STANDARD SET) menu. (p. 82) (Only when connecting to the Windows computer with a USB cable) You cannot view the pictures recorded on a tape on the camcorder, then connect it again. Troubleshooting ,continued Troubleshooting 125 Connecting to the computer. cDisconnect the cable...
... (p. 83) • The computer does not recognize the "Memory Stick" during camcorder operation such as follows: place the CD-ROM in the (STANDARD SET) menu. (p. 83) (Only when connecting to the Windows computer with an i.LINK cable and use an i.LINK cable. cDisconnect the USB ...the standard software in the (STANDARD SET) menu. (p. 82) (Only when connecting to the Windows computer with a USB cable) You cannot view the pictures recorded on a tape on the camcorder, then connect it again. Troubleshooting ,continued Troubleshooting 125 Connecting to the computer. cDisconnect the cable...
Camera Operations Guide
Page 127
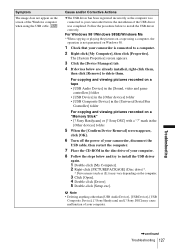
... [? The [System Properties] screen appears. 3 Click the [Device Manager] tab. 4 If devices below are already installed, right-click them . Sony DSC] with a "?" Sony Handycam] or [? Sony DSC] may vary depending on Windows 98. 1 Check that your camcorder is not guaranteed on the computer. 3 Click [Open]. 4 Double-click [Driver]. 5 Double-click [Setup.exe]. Troubleshooting ,continued Troubleshooting 127...
... [? The [System Properties] screen appears. 3 Click the [Device Manager] tab. 4 If devices below are already installed, right-click them . Sony DSC] with a "?" Sony Handycam] or [? Sony DSC] may vary depending on Windows 98. 1 Check that your camcorder is not guaranteed on the computer. 3 Click [Open]. 4 Double-click [Driver]. 5 Double-click [Setup.exe]. Troubleshooting ,continued Troubleshooting 127...
Camera Operations Guide
Page 128
... copying and viewing pictures recorded on the screen of your camcorder is connected to a computer. 2 Right-click [My Computer], then click [Properties]. Sony Handycam] and [? Sony DSC] with a "?" Symptom The image does not appear on a "Memory Stick" • [? Cause and/or Corrective Actions For Windows 2000 Log on the computer. 3 Click [Open]. 4 Double-click [Driver...
... copying and viewing pictures recorded on the screen of your camcorder is connected to a computer. 2 Right-click [My Computer], then click [Properties]. Sony Handycam] and [? Sony DSC] with a "?" Symptom The image does not appear on a "Memory Stick" • [? Cause and/or Corrective Actions For Windows 2000 Log on the computer. 3 Click [Open]. 4 Double-click [Driver...
Camera Operations Guide
Page 129
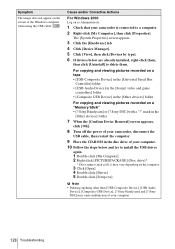
...Administrators. 1 Check that your camcorder, disconnect the USB cable, then restart the computer. 10 Place the CD-ROM in the [Other devices] folder For copying and viewing pictures recorded on the computer. 3 Click [Open]. 4 Double-click [Driver]. 5 Double-click [Setup.exe]. Sony Handycam] and [? Sony Handycam] or [? b Note &#... [Other devices] folder 8 When the [Confirm Device Removal] screen appears, click [OK]. 9 Turn off the power of your camcorder is connected to delete them. Cause and/or Corrective Actions For Windows XP Log on as (E:)) may cause malfunction of the...
...Administrators. 1 Check that your camcorder, disconnect the USB cable, then restart the computer. 10 Place the CD-ROM in the [Other devices] folder For copying and viewing pictures recorded on the computer. 3 Click [Open]. 4 Double-click [Driver]. 5 Double-click [Setup.exe]. Sony Handycam] and [? Sony Handycam] or [? b Note &#... [Other devices] folder 8 When the [Confirm Device Removal] screen appears, click [OK]. 9 Turn off the power of your camcorder is connected to delete them. Cause and/or Corrective Actions For Windows XP Log on as (E:)) may cause malfunction of the...
Camera Operations Guide
Page 130
...1 Select [Start], [Programs] ([All Programs] for the newly recognized drive [Removable Disk (F:)] (For Windows XP, [Sony Memory Stick]). cChange the settings for your computer environment as described in Picture Package Auto Video, Producer, ...Windows XP), [Picture Package], [Handycam Tools], and [USB Streaming Tool], then start up [USB Streaming Tool]. 2 Select another mode. Picture Package does not function correctly. cClose Picture Package on your Windows computer first, then set the POWER switch on the screen of your camcorder to the Windows computer. of your camcorder...
...1 Select [Start], [Programs] ([All Programs] for the newly recognized drive [Removable Disk (F:)] (For Windows XP, [Sony Memory Stick]). cChange the settings for your computer environment as described in Picture Package Auto Video, Producer, ...Windows XP), [Picture Package], [Handycam Tools], and [USB Streaming Tool], then start up [USB Streaming Tool]. 2 Select another mode. Picture Package does not function correctly. cClose Picture Package on your Windows computer first, then set the POWER switch on the screen of your camcorder to the Windows computer. of your camcorder...
Camera Operations Guide
Page 138
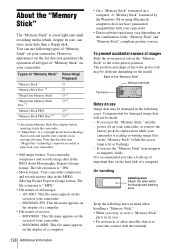
... in the JPEG (Joint Photographic Experts Group) format. MOV00001: This file name appears on the "Memory Stick" to come into the camcorder. *2 "MagicGate" is a copyright protection technology that uses "MagicGate" technology cannot be made. - To prevent accidental erasure of images ...Stick" formatted on a computer: A "Memory Stick" formatted by the Windows OS or using Macintosh computers does not have guaranteed compatibility with the terminal. The file extension is ".JPG." • Movie format: Your camcorder compresses and records picture data in its size, can use . The file...
... in the JPEG (Joint Photographic Experts Group) format. MOV00001: This file name appears on the "Memory Stick" to come into the camcorder. *2 "MagicGate" is a copyright protection technology that uses "MagicGate" technology cannot be made. - To prevent accidental erasure of images ...Stick" formatted on a computer: A "Memory Stick" formatted by the Windows OS or using Macintosh computers does not have guaranteed compatibility with the terminal. The file extension is ".JPG." • Movie format: Your camcorder compresses and records picture data in its size, can use . The file...

Camera Operations Guide
Page 142
...Interface, see page 89, 90. Near strong magnetic fields or mechanical vibration. Near strong radio waves or radiation. The camcorder may differ from rain or sea water. Near windows or outdoors, where the LCD screen, the viewfinder, or the lens may malfunction or become deformed. - Anywhere very... humid. • Operate your camcorder get inside of data that application software supported by a Sony dealer before operating it checked by...
...Interface, see page 89, 90. Near strong magnetic fields or mechanical vibration. Near strong radio waves or radiation. The camcorder may differ from rain or sea water. Near windows or outdoors, where the LCD screen, the viewfinder, or the lens may malfunction or become deformed. - Anywhere very... humid. • Operate your camcorder get inside of data that application software supported by a Sony dealer before operating it checked by...

Camera Operations Guide
Page 156
V Video head 143 Viewfinder 20 Volume (VOLUME) ... 49, 52 W Warning indicators .......... 132 Warning messages........... 132 WHITE FADER 42 Wide angle See Zoom Windows 107, 108 WIPE 43 WORLD TIME 85 Write-protect tab ..... 137, 138 Z Zero set memory 60 Zoom 29 Printed in Japan
V Video head 143 Viewfinder 20 Volume (VOLUME) ... 49, 52 W Warning indicators .......... 132 Warning messages........... 132 WHITE FADER 42 Wide angle See Zoom Windows 107, 108 WIPE 43 WORLD TIME 85 Write-protect tab ..... 137, 138 Z Zero set memory 60 Zoom 29 Printed in Japan


