Operating Instructions
Page 4
... •Viewing images recorded on "Memory Stick"s using the USB cable (except DCR-TRV240) (p. 155) •Viewing images recorded on a tape using the USB cable (p. 94) •Viewing images live on your computer from your camcorder using the USB cable (p. 103) •Capturing images from an analog video... for giving images more impact •Digital zoom [MENU] (p. 24) The default setting is OFF. (To zoom greater than 25×, (DCR-TRV240/TRV340)/15× (DCR-TRV740/TRV840), select the digital zoom power in D ZOOM in the menu settings.) •Fader (p. 44) •Picture effects (p. 47)...
... •Viewing images recorded on "Memory Stick"s using the USB cable (except DCR-TRV240) (p. 155) •Viewing images recorded on a tape using the USB cable (p. 94) •Viewing images live on your computer from your camcorder using the USB cable (p. 103) •Capturing images from an analog video... for giving images more impact •Digital zoom [MENU] (p. 24) The default setting is OFF. (To zoom greater than 25×, (DCR-TRV240/TRV340)/15× (DCR-TRV740/TRV840), select the digital zoom power in D ZOOM in the menu settings.) •Fader (p. 44) •Picture effects (p. 47)...
Operating Instructions
Page 6
... NightShot/ Color Slow Shutter 29 Self-timer recording (except DCR-TRV240 31 Checking recordings - Display function 35 Viewing recordings on TV 38 Advanced Recording Operations Recording still images on your computer (Windows users only 94 Customizing Your Camcorder Changing the menu settings 105 6 Tape Photo recording 39 Using the wide mode 42 Using...
... NightShot/ Color Slow Shutter 29 Self-timer recording (except DCR-TRV240 31 Checking recordings - Display function 35 Viewing recordings on TV 38 Advanced Recording Operations Recording still images on your computer (Windows users only 94 Customizing Your Camcorder Changing the menu settings 105 6 Tape Photo recording 39 Using the wide mode 42 Using...
Operating Instructions
Page 7
...camcorder abroad .......... 193 Maintenance information and precautions 194 Specifications 199 Quick Reference Identifying parts and controls 201 Index 209 7 MEMORY MIX 129 Recording images from a tape as still images 135 Copying still images from a tape... printer 176 Troubleshooting Types of contents "Memory Stick" operations (except DCR-TRV240) Using "Memory Stick" - Getting Started Table of trouble ...Self-diagnosis display 184 Warning indicators and messages .... 185 Additional Information Digital8 system, recording and playback 187 About the "InfoLITHIUM" battery pack ...
...camcorder abroad .......... 193 Maintenance information and precautions 194 Specifications 199 Quick Reference Identifying parts and controls 201 Index 209 7 MEMORY MIX 129 Recording images from a tape as still images 135 Copying still images from a tape... printer 176 Troubleshooting Types of contents "Memory Stick" operations (except DCR-TRV240) Using "Memory Stick" - Getting Started Table of trouble ...Self-diagnosis display 184 Warning indicators and messages .... 185 Additional Information Digital8 system, recording and playback 187 About the "InfoLITHIUM" battery pack ...
Operating Instructions
Page 9
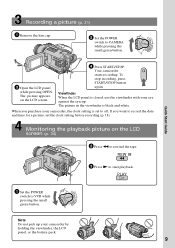
...the POWER switch to start playback. Your camcorder starts recording. When you want to record the date and time ...LCD screen (p. 34) 2 Press m to VCR while pressing the small green button. V POWER CAM M Note Do not pick up your camcorder..., the clock setting is set the clock setting before recording (p. 18). V POWER OFCFR(CHG) CAM M 3 Open the LCD panel while pressing OPEN. Monitoring the playback picture on the LCD.... Viewfinder When the LCD panel is black and white. If you purchase your camcorder by holding the viewfinder, the LCD panel, or the ...
...the POWER switch to start playback. Your camcorder starts recording. When you want to record the date and time ...LCD screen (p. 34) 2 Press m to VCR while pressing the small green button. V POWER CAM M Note Do not pick up your camcorder..., the clock setting is set the clock setting before recording (p. 18). V POWER OFCFR(CHG) CAM M 3 Open the LCD panel while pressing OPEN. Monitoring the playback picture on the LCD.... Viewfinder When the LCD panel is black and white. If you purchase your camcorder by holding the viewfinder, the LCD panel, or the ...
Operating Instructions
Page 10
...and settings on a TV, you can hear a beep to the provision of your recordings on your camcorder plays back tapes recorded in the Digital8 system. Self-timer - Digital zoom 700× LCD Screen 6.2 cm (2.5 type) TRV340 z z 700× 6.2 cm (2.5 type) TRV740 z z 420× 6.2 cm (2.5 type...using your camcorder With your camcorder, check the model number by camcorder model DCR- You, however, cannot use Hi8 /Digital8 video cassettes. The DCR-TRV740 is indicated in the text, for illustration purposes. Not provided * The models with MEMORY marked on a tape. -...
...and settings on a TV, you can hear a beep to the provision of your recordings on your camcorder plays back tapes recorded in the Digital8 system. Self-timer - Digital zoom 700× LCD Screen 6.2 cm (2.5 type) TRV340 z z 700× 6.2 cm (2.5 type) TRV740 z z 420× 6.2 cm (2.5 type...using your camcorder With your camcorder, check the model number by camcorder model DCR- You, however, cannot use Hi8 /Digital8 video cassettes. The DCR-TRV740 is indicated in the text, for illustration purposes. Not provided * The models with MEMORY marked on a tape. -...
Operating Instructions
Page 16
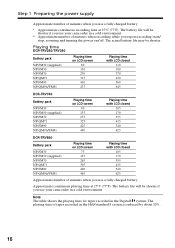
... life may be shorter Playing time DCR-TRV240/TRV340 Battery pack NP-FM30 (supplied) NP-FM50 NP-FM70 NP-QM71 NP-FM90 NP-QM91/FM91 Playing time on LCD screen 80 130 270 315 410 475 Playing time with LCD closed 110 180 370 430 560 645 DCR-TRV740 Battery pack NP-FM30 NP...you use your camcorder in a cold environment. ** Approximate number of minutes when recording while you repeat recording start/ stop, zooming and turning the power on LCD screen 75 125 265 305 400 465 Playing time with LCD closed 105 170 355 415 540 625 Approximate number of tapes recorded in the Digital8 system. The ...
... life may be shorter Playing time DCR-TRV240/TRV340 Battery pack NP-FM30 (supplied) NP-FM50 NP-FM70 NP-QM71 NP-FM90 NP-QM91/FM91 Playing time on LCD screen 80 130 270 315 410 475 Playing time with LCD closed 110 180 370 430 560 645 DCR-TRV740 Battery pack NP-FM30 NP...you use your camcorder in a cold environment. ** Approximate number of minutes when recording while you repeat recording start/ stop, zooming and turning the power on LCD screen 75 125 265 305 400 465 Playing time with LCD closed 105 170 355 415 540 625 Approximate number of tapes recorded in the Digital8 system. The ...
Operating Instructions
Page 19
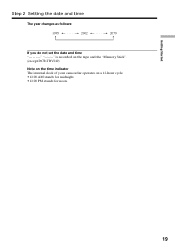
Getting Started Step 2 Setting the date and time The year changes as follows: 1995 T t 2002 T t 2079 If you do not set the date and time is recorded on the tape and the "Memory Stick". (except DCR-TRV240) Note on the time indicator The internal clock of your camcorder operates on a 12-hour cycle. •12:00 AM stands for midnight. •12:00 PM stands for noon. 19
Getting Started Step 2 Setting the date and time The year changes as follows: 1995 T t 2002 T t 2079 If you do not set the date and time is recorded on the tape and the "Memory Stick". (except DCR-TRV240) Note on the time indicator The internal clock of your camcorder operates on a 12-hour cycle. •12:00 AM stands for midnight. •12:00 PM stands for noon. 19

Operating Instructions
Page 20
... appear when you play back the tape on your camcorder is half of indicated time on Hi8 tape. If you select the LP mode in the menu settings, 3/4 of the lid other DCR-TRV240/TRV340/TRV740/TRV840). •The cassette compartment may cause a malfunction. •Your camcorder records pictures in the Digital8 system. • The recording time...
... appear when you play back the tape on your camcorder is half of indicated time on Hi8 tape. If you select the LP mode in the menu settings, 3/4 of the lid other DCR-TRV240/TRV340/TRV740/TRV840). •The cassette compartment may cause a malfunction. •Your camcorder records pictures in the Digital8 system. • The recording time...
Operating Instructions
Page 22
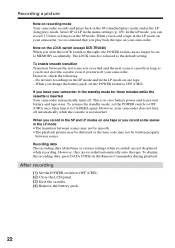
...long as the default setting. If you leave your camcorder. Note on the LOCK switch (except DCR-TRV240) When you slide the LOCK switch to MEMORY accidentally. However, check the following: - When you record in the SP and LP modes on one tape. - To enable smooth transition Transition between scenes. Do... recorded and the next scene is smooth as long as you do not eject the cassette even if you turn off your camcorder does not turn it to OFF (CHG). (2) Close the LCD panel. (3) Eject the cassette. (4) Remove the battery pack. 22 However, they are not displayed while recording.
...long as the default setting. If you leave your camcorder. Note on the LOCK switch (except DCR-TRV240) When you slide the LOCK switch to MEMORY accidentally. However, check the following: - When you record in the SP and LP modes on one tape. - To enable smooth transition Transition between scenes. Do... recorded and the next scene is smooth as long as you do not eject the cassette even if you turn off your camcorder does not turn it to OFF (CHG). (2) Close the LCD panel. (3) Eject the cassette. (4) Remove the battery pack. 22 However, they are not displayed while recording.
Operating Instructions
Page 27
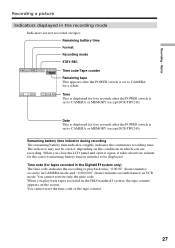
...tape counter. 27 Recording - JUL 4 2002 12:05:56 PM Time This is displayed for the correct remaining battery time in which you close the LCD panel and open it again, it takes about one minute for five seconds after the POWER switch is set to CAMERA or MEMORY (except DCR... a while. Remaining battery time Format Recording mode STBY/REC 50min SP REC 0:00:01 Time code/Tape counter Remaining tape This appears after the POWER switch is set to CAMERA for tapes recorded in the Digital8 system only) The time code indicates the recording or playback time, "0:00:00" (hours:minutes: ...
...tape counter. 27 Recording - JUL 4 2002 12:05:56 PM Time This is displayed for the correct remaining battery time in which you close the LCD panel and open it again, it takes about one minute for five seconds after the POWER switch is set to CAMERA or MEMORY (except DCR... a while. Remaining battery time Format Recording mode STBY/REC 50min SP REC 0:00:01 Time code/Tape counter Remaining tape This appears after the POWER switch is set to CAMERA for tapes recorded in the Digital8 system only) The time code indicates the recording or playback time, "0:00:00" (hours:minutes: ...
Operating Instructions
Page 33
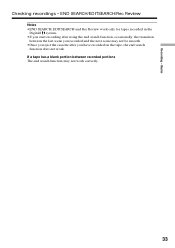
If a tape has a blank portion between the last scene you have recorded on the tape, the end search function does not work correctly. 33 Basics Checking recordings - Recording - END SEARCH/EDITSEARCH/Rec Review Notes •END SEARCH, EDITSEARCH and Rec Review work only for tapes recorded in the Digital8 system. •If you start recording after using the end search function, occasionally, the transition between recorded portions The end search function may not be smooth. •Once you eject the cassette after you recorded and the next scene may not work .
If a tape has a blank portion between the last scene you have recorded on the tape, the end search function does not work correctly. 33 Basics Checking recordings - Recording - END SEARCH/EDITSEARCH/Rec Review Notes •END SEARCH, EDITSEARCH and Rec Review work only for tapes recorded in the Digital8 system. •If you start recording after using the end search function, occasionally, the transition between recorded portions The end search function may not be smooth. •Once you eject the cassette after you recorded and the next scene may not work .
Operating Instructions
Page 34
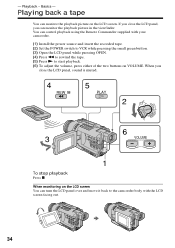
... To adjust the volume, press either of the two buttons on the LCD screen. Playing back a tape You can control playback using the Remote Commander supplied with your camcorder. (1) Install the power source and insert the recorded tape. (2) Set the POWER switch to VCR while pressing the small green ...button. (3) Open the LCD panel while pressing OPEN. (4) Press m to rewind the tape. (5) Press N to the camcorder body with the LCD screen facing out. 34 You can monitor the playback picture on VOLUME. When monitoring on the LCD screen You can monitor the playback picture...
... To adjust the volume, press either of the two buttons on the LCD screen. Playing back a tape You can control playback using the Remote Commander supplied with your camcorder. (1) Install the power source and insert the recorded tape. (2) Set the POWER switch to VCR while pressing the small green ...button. (3) Open the LCD panel while pressing OPEN. (4) Press m to rewind the tape. (5) Press N to the camcorder body with the LCD screen facing out. 34 You can monitor the playback picture on VOLUME. When monitoring on the LCD screen You can monitor the playback picture...
Operating Instructions
Page 35
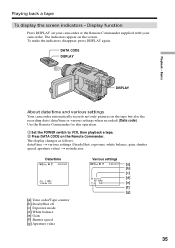
... Remote Commander. Basics DISPLAY About date/time and various settings Your camcorder automatically records not only pictures on your camcorder or the Remote Commander supplied with your camcorder. To make the indicators disappear, press DISPLAY again. Display function Press DISPLAY on the tape but also the recording data (date/time or various settings when...
... Remote Commander. Basics DISPLAY About date/time and various settings Your camcorder automatically records not only pictures on your camcorder or the Remote Commander supplied with your camcorder. To make the indicators disappear, press DISPLAY again. Display function Press DISPLAY on the tape but also the recording data (date/time or various settings when...
Operating Instructions
Page 36
...you use data code function, bars (-- -- --) appear if: - The tape was recorded by a camcorder without the date and time set the POWER switch to VCR. Remaining battery ...DCR-TRV240). When you press DATA CODE on the Remote Commander: date/time y no indicator Notes on the data code function •The data code function works only for the correct remaining battery time to tape damage or noise. - To advance the tape Press M in the Digital8...display changes as follows when you close the LCD panel and open it again, it takes about one minute for tapes recorded in the stop mode. To resume...
...you use data code function, bars (-- -- --) appear if: - The tape was recorded by a camcorder without the date and time set the POWER switch to VCR. Remaining battery ...DCR-TRV240). When you press DATA CODE on the Remote Commander: date/time y no indicator Notes on the data code function •The data code function works only for the correct remaining battery time to tape damage or noise. - To advance the tape Press M in the Digital8...display changes as follows when you close the LCD panel and open it again, it takes about one minute for tapes recorded in the stop mode. To resume...

Operating Instructions
Page 37
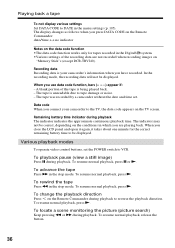
... Remote Commander during playback. however, this function does not work for three minutes, your camcorder automatically enters the stop mode. When you play back a tape in the Digital8 system. In the various playback modes •Noise may appear when your camcorder; To view pictures at double speed Press ×2 on the playback pause mode...
... Remote Commander during playback. however, this function does not work for three minutes, your camcorder automatically enters the stop mode. When you play back a tape in the Digital8 system. In the various playback modes •Noise may appear when your camcorder; To view pictures at double speed Press ×2 on the playback pause mode...
Operating Instructions
Page 39
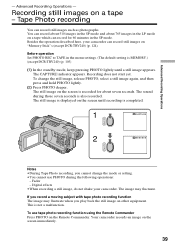
... You can record for about seven seconds. The still image on "Memory Stick"s (except DCR-TRV240) (p. 124). Digital effects •When recording a still image, do not shake your camcorder can record still images such as photographs. If you cannot change the still image, release PHOTO...until recording is completed. 1 CAPTURE PHOTO 2 PHOTO Notes •During Tape Photo recording, you record a moving subject with tape photo recording function The image may fluctuate. Before operation Set PHOTO REC to TAPE in the SP mode. Fader - To use PHOTO during those seven ...
... You can record for about seven seconds. The still image on "Memory Stick"s (except DCR-TRV240) (p. 124). Digital effects •When recording a still image, do not shake your camcorder can record still images such as photographs. If you cannot change the still image, release PHOTO...until recording is completed. 1 CAPTURE PHOTO 2 PHOTO Notes •During Tape Photo recording, you record a moving subject with tape photo recording function The image may fluctuate. Before operation Set PHOTO REC to TAPE in the SP mode. Fader - To use PHOTO during those seven ...

Operating Instructions
Page 40
To record clear and less fluctuated still images We recommend that you record on the screen by pressing PHOTO lightly. Press PHOTO deeper. The still image is then recorded for about seven seconds, and your camcorder returns to the standby mode. Tape Photo recording To use the tape photo recording function during normal CAMERA recording You cannot check an image on "Memory Stick"s. You can record still images on a tape - Recording still images on "Memory Stick"s even in CAMERA mode. (P.124) (except DCR-TRV240) 40
To record clear and less fluctuated still images We recommend that you record on the screen by pressing PHOTO lightly. Press PHOTO deeper. The still image is then recorded for about seven seconds, and your camcorder returns to the standby mode. Tape Photo recording To use the tape photo recording function during normal CAMERA recording You cannot check an image on "Memory Stick"s. You can record still images on a tape - Recording still images on "Memory Stick"s even in CAMERA mode. (P.124) (except DCR-TRV240) 40

Operating Instructions
Page 41
...SET SELFTIMER OFF D ZOOM ON PHOTO REC 16 : 9WIDE STEADYSHOT FRAME REC INT. Advanced Recording Operations Recording still images on tapes with a beep sound. Before operation Set PHOTO REC to TAPE in the menu settings. REC RETURN [MENU] : END To cancel self-timer recording In the standby mode, set to ... MENU to OFF in the menu settings. (The default setting is set SELFTIMER to make the menu settings disappear. (5) Press PHOTO deeper. Except DCR-TRV240 You can also use the Remote Commander for this operation. The self-timer starts counting down from 10 with the self-timer...
...SET SELFTIMER OFF D ZOOM ON PHOTO REC 16 : 9WIDE STEADYSHOT FRAME REC INT. Advanced Recording Operations Recording still images on tapes with a beep sound. Before operation Set PHOTO REC to TAPE in the menu settings. REC RETURN [MENU] : END To cancel self-timer recording In the standby mode, set to ... MENU to OFF in the menu settings. (The default setting is set SELFTIMER to make the menu settings disappear. (5) Press PHOTO deeper. Except DCR-TRV240 You can also use the Remote Commander for this operation. The self-timer starts counting down from 10 with the self-timer...
Operating Instructions
Page 45
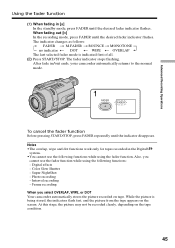
.... Super NightShot - While the picture is indicated first of all. (2) Press START/STOP. After fade in/out ends, your camcorder automatically returns to the normal mode. 1 FADER FADER To cancel the fader function Before pressing START/STOP, press FADER repeatedly until ...- Also, you select OVERLAP, WIPE, or DOT Your camcorder automatically stores the picture recorded on tape. Frame recording When you cannot use the following functions: - Advanced Recording Operations Using the fader function (1) When fading in the Digital8 system. •You cannot use the fader function while ...
.... Super NightShot - While the picture is indicated first of all. (2) Press START/STOP. After fade in/out ends, your camcorder automatically returns to the normal mode. 1 FADER FADER To cancel the fader function Before pressing START/STOP, press FADER repeatedly until ...- Also, you select OVERLAP, WIPE, or DOT Your camcorder automatically stores the picture recorded on tape. Frame recording When you cannot use the following functions: - Advanced Recording Operations Using the fader function (1) When fading in the Digital8 system. •You cannot use the fader function while ...
Operating Instructions
Page 57
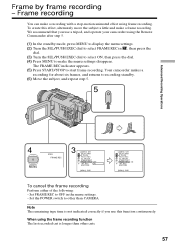
..., then press the dial. (4) Press MENU to make a recording with a stop-motion animated effect using frame recording. Note The remaining tape time is longer than other than CAMERA. When using the frame recording function The last recorded cut is not indicated correctly if you use... a little and make a frame recording. Set FRAME REC to start frame recording. Frame recording You can make the menu settings disappear. Your camcorder makes a recording for about six frames, and returns to other cuts. 57 To create this function continuously. Set the POWER switch to recording ...
..., then press the dial. (4) Press MENU to make a recording with a stop-motion animated effect using frame recording. Note The remaining tape time is longer than other than CAMERA. When using the frame recording function The last recorded cut is not indicated correctly if you use... a little and make a frame recording. Set FRAME REC to start frame recording. Frame recording You can make the menu settings disappear. Your camcorder makes a recording for about six frames, and returns to other cuts. 57 To create this function continuously. Set the POWER switch to recording ...


