Operating Instructions
Page 18
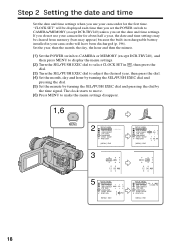
... DCR-TRV240) unless you use your camcorder will be cleared from memory (bars may appear) because the built-in rechargeable battery installed in , then press the dial. (3) Turn the SEL/PUSH EXEC dial to make the menu settings disappear. 1,6 MENU 2 SETUP MENU CLOCK SET USB STREAM ...USBCONNECT LTR SIZE LANGUAGE DEMO MODE RETURN - -:- -:- - [MENU] : END 3 2002 JAN 1 12 00 AM 5 SETUP MENU CLOCK SET USB STREAM USBCONNECT 2002 JUL 4 LTR SIZE LANGUAGE DEMO MODE RETURN 5 30 PM [MENU] ...
... DCR-TRV240) unless you use your camcorder will be cleared from memory (bars may appear) because the built-in rechargeable battery installed in , then press the dial. (3) Turn the SEL/PUSH EXEC dial to make the menu settings disappear. 1,6 MENU 2 SETUP MENU CLOCK SET USB STREAM ...USBCONNECT LTR SIZE LANGUAGE DEMO MODE RETURN - -:- -:- - [MENU] : END 3 2002 JAN 1 12 00 AM 5 SETUP MENU CLOCK SET USB STREAM USBCONNECT 2002 JUL 4 LTR SIZE LANGUAGE DEMO MODE RETURN 5 30 PM [MENU] ...
Operating Instructions
Page 94
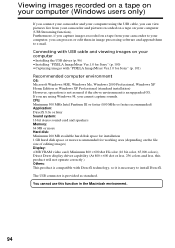
... you can view pictures live from your camcorder and pictures recorded on a tape on your computer (USB Streaming function). You cannot use this product will not operate correctly.) Others: This product is compatible with "PIXELA ImageMixer Ver.1.0 for Sony" (p. 100) •Capturing images with...can process or edit them to install DirectX. The USB connector is an upgraded OS. Connecting with USB cable and viewing images on your computer •Installing the USB driver (p. 96) •Installing "PIXELA ImageMixer Ver.1.0 for Sony" (p. 101) Recommended computer environment OS: Microsoft ...
... you can view pictures live from your camcorder and pictures recorded on a tape on your computer (USB Streaming function). You cannot use this product will not operate correctly.) Others: This product is compatible with "PIXELA ImageMixer Ver.1.0 for Sony" (p. 100) •Capturing images with...can process or edit them to install DirectX. The USB connector is an upgraded OS. Connecting with USB cable and viewing images on your computer •Installing the USB driver (p. 96) •Installing "PIXELA ImageMixer Ver.1.0 for Sony" (p. 101) Recommended computer environment OS: Microsoft ...
Operating Instructions
Page 96
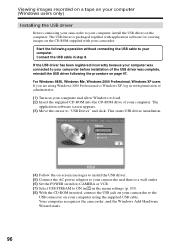
... permission of administrator. (1) Turn on -screen messages to install the USB driver. (5) Connect the AC power adaptor to your camcorder and then to a wall outlet. (6) Set the POWER switch to CAMERA or VCR. (7) Select USB STREAM to ON in in step 8. This starts USB driver installation. (4) Follow the on your computer and allow Windows to...
... permission of administrator. (1) Turn on -screen messages to install the USB driver. (5) Connect the AC power adaptor to your camcorder and then to a wall outlet. (6) Set the POWER switch to CAMERA or VCR. (7) Select USB STREAM to ON in in step 8. This starts USB driver installation. (4) Follow the on your computer and allow Windows to...

Operating Instructions
Page 101
... (1) Turn on your computer and allow Windows to load. (2) Connect one end of the USB cable to the (USB) jack on your camcorder. (4) Set the POWER switch to VCR. Select USB STREAM to ON in in Windows 2000 Professional, you must be authorized as a Power User or ...Administrator. Editing Viewing images recorded on a tape on your computer (Windows users only) Capturing images with "PIXELA ImageMixer Ver.1.0 for Sony...
... (1) Turn on your computer and allow Windows to load. (2) Connect one end of the USB cable to the (USB) jack on your camcorder. (4) Set the POWER switch to VCR. Select USB STREAM to ON in in Windows 2000 Professional, you must be authorized as a Power User or ...Administrator. Editing Viewing images recorded on a tape on your computer (Windows users only) Capturing images with "PIXELA ImageMixer Ver.1.0 for Sony...
Operating Instructions
Page 103
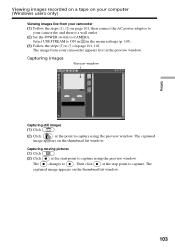
The image from your camcorder (1) Follow the steps (1), (2) on page 101, 102. Capturing images Preview window Capturing still images (1) Click . (2) Click at the start point to capture using the preview ... settings (p. 105). (3) Follow the steps (5) to (7) on page 101, then connect the AC power adaptor to your camcorder and then to a wall outlet. (2) Set the POWER switch to capture using the preview window. Select USB STREAM to ON in in the preview window. Capturing moving pictures (1) Click . (2) Click at the point to CAMERA...
The image from your camcorder (1) Follow the steps (1), (2) on page 101, 102. Capturing images Preview window Capturing still images (1) Click . (2) Click at the start point to capture using the preview ... settings (p. 105). (3) Follow the steps (5) to (7) on page 101, then connect the AC power adaptor to your camcorder and then to a wall outlet. (2) Set the POWER switch to capture using the preview window. Select USB STREAM to ON in in the preview window. Capturing moving pictures (1) Click . (2) Click at the point to CAMERA...
Operating Instructions
Page 113
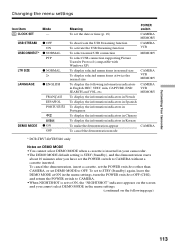
...demonstration mode POWER switch CAMERA MEMORY CAMERA VCR MEMORY CAMERA VCR MEMORY CAMERA VCR MEMORY CAMERA * DCR-TRV740/TRV840 only Notes on the following information indicators in your camcorder. •The DEMO MODE default setting is STBY (Standby), and the demonstration starts about ...normal size To display the following page) 113 Customizing Your Camcorder Changing the menu settings Icon/item CLOCK SET Mode - To cancel the demonstration, insert a cassette, set the POWER switch to other than CAMERA, or set to OFF. USB STREAM z OFF ON USBCONNECT* z NORMAL PTP LTR SIZE LANGUAGE...
...demonstration mode POWER switch CAMERA MEMORY CAMERA VCR MEMORY CAMERA VCR MEMORY CAMERA VCR MEMORY CAMERA * DCR-TRV740/TRV840 only Notes on the following information indicators in your camcorder. •The DEMO MODE default setting is STBY (Standby), and the demonstration starts about ...normal size To display the following page) 113 Customizing Your Camcorder Changing the menu settings Icon/item CLOCK SET Mode - To cancel the demonstration, insert a cassette, set the POWER switch to other than CAMERA, or set to OFF. USB STREAM z OFF ON USBCONNECT* z NORMAL PTP LTR SIZE LANGUAGE...


