
Operating Instructions
Page 2
.... If you have any questions about this product, you call : Sony Customer Information Center 1-800-222-SONY (7669) The number below is subject to operate this Sony Digital Handycam camcorder. Your Digital Handycam is loaded with advanced features, but at the...Sony Service Center nearest you call 1-800-222-SONY (United States only) For the Sony Factory Service Center nearest you may call 416-499-SONY (Canada only) Caution: Do not handle damaged or leaking lithium ion battery. Note: In some areas the disposal of Conformity Trade Name: SONY Model No.: DCR-TRV130 Responsible Party: Sony...
.... If you have any questions about this product, you call : Sony Customer Information Center 1-800-222-SONY (7669) The number below is subject to operate this Sony Digital Handycam camcorder. Your Digital Handycam is loaded with advanced features, but at the...Sony Service Center nearest you call 1-800-222-SONY (United States only) For the Sony Factory Service Center nearest you may call 416-499-SONY (Canada only) Caution: Do not handle damaged or leaking lithium ion battery. Note: In some areas the disposal of Conformity Trade Name: SONY Model No.: DCR-TRV130 Responsible Party: Sony...
Operating Instructions
Page 5
...for a photo - Digital effect ... 41 Using the PROGRAM AE function .... 44 Adjusting the exposure manually ...... 46 Using your camcorder abroad 96 Maintenance information and precautions 97 Specifications 102 Focusing manually 47 Superimposing a title 48 Quick Reference Making your own titles ... Editing Dubbing a tape 63 Dubbing only desired scenes - NightShot/Super NightShot 24 Checking the recording - Insert Editing 77 Customizing Your Camcorder Changing the menu settings 79 Playback - Basics Playing back a tape 27 Viewing the recording on tapes - Picture effect .. 40...
...for a photo - Digital effect ... 41 Using the PROGRAM AE function .... 44 Adjusting the exposure manually ...... 46 Using your camcorder abroad 96 Maintenance information and precautions 97 Specifications 102 Focusing manually 47 Superimposing a title 48 Quick Reference Making your own titles ... Editing Dubbing a tape 63 Dubbing only desired scenes - NightShot/Super NightShot 24 Checking the recording - Insert Editing 77 Customizing Your Camcorder Changing the menu settings 79 Playback - Basics Playing back a tape 27 Viewing the recording on tapes - Picture effect .. 40...
Operating Instructions
Page 6
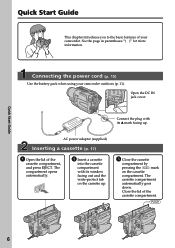
... the cassette compartment by pressing the mark on the cassette compartment. Connecting the power cord (p. 15) Use the battery pack when using your camcorder. Close the lid of the cassette compartment, and press EJECT. AC power adaptor (supplied) Inserting a cassette (p. 17) 1 Open the .... The cassette compartment automatically goes down. Quick Start Guide 6 Quick Start Guide This chapter introduces you to the basic features of your camcorder outdoors (p. 11). See the page in parentheses "( )" for more information. EJECT 2 Insert a cassette into the cassette compartment with ...
... the cassette compartment by pressing the mark on the cassette compartment. Connecting the power cord (p. 15) Use the battery pack when using your camcorder. Close the lid of the cassette compartment, and press EJECT. AC power adaptor (supplied) Inserting a cassette (p. 17) 1 Open the .... The cassette compartment automatically goes down. Quick Start Guide 6 Quick Start Guide This chapter introduces you to the basic features of your camcorder outdoors (p. 11). See the page in parentheses "( )" for more information. EJECT 2 Insert a cassette into the cassette compartment with ...

Operating Instructions
Page 7
...on the LCD screen. 4 Press the red button. OFF (CHARGE) VCR POWER CAMERA 3 Open the LCD panel while pressing OPEN. Your camcorder starts recording. If you purchase your camcorder by holding the viewfinder, the LCD panel, or the battery pack. 7 The picture appears on the LCD screen (p. 27) 2 Press .... The picture in the viewfinder is closed, use the viewfinder placing your eye against its eyecup. PLAY CAMERA Note Do not pick up your camcorder, the clock setting is set the clock setting before recording (p. 16). To stop recording, press the red button again. REW 1 Set the...
...on the LCD screen. 4 Press the red button. OFF (CHARGE) VCR POWER CAMERA 3 Open the LCD panel while pressing OPEN. Your camcorder starts recording. If you purchase your camcorder by holding the viewfinder, the LCD panel, or the battery pack. 7 The picture appears on the LCD screen (p. 27) 2 Press .... The picture in the viewfinder is closed, use the viewfinder placing your eye against its eyecup. PLAY CAMERA Note Do not pick up your camcorder, the clock setting is set the clock setting before recording (p. 16). To stop recording, press the red button again. REW 1 Set the...
Operating Instructions
Page 8
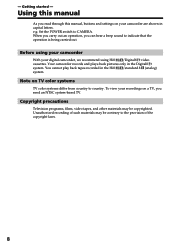
...films, video tapes, and other materials may be copyrighted. Before using your camcorder With your camcorder are shown in capital letters. To view your recordings on your digital camcorder, we recommend using Hi8 /Digital8 video cassettes. When you carry out an operation, you need an NTSC ...system-based TV. Getting started - Your camcorder records and plays back pictures only in the Hi8 /standard ...
...films, video tapes, and other materials may be copyrighted. Before using your camcorder With your camcorder are shown in capital letters. To view your recordings on your digital camcorder, we recommend using Hi8 /Digital8 video cassettes. When you carry out an operation, you need an NTSC ...system-based TV. Getting started - Your camcorder records and plays back pictures only in the Hi8 /standard ...
Operating Instructions
Page 9
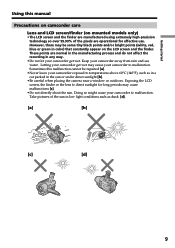
.... These points are operational for long periods may cause malfunctions [c]. •Do not directly shoot the sun. Letting your camcorder get wet. Sometimes this manual Precautions on camcorder care Lens and LCD screen/finder (on mounted models only) •The LCD screen and the finder are manufactured using ...(white, red, blue or green in low light conditions such as in a car parked in any way. •Do not let your camcorder get wet may cause your camcorder to temperatures above 60°C (140°F), such as dusk [d]. [a] [b] [c] [d] 9 Doing so might cause your...
.... These points are operational for long periods may cause malfunctions [c]. •Do not directly shoot the sun. Letting your camcorder get wet. Sometimes this manual Precautions on camcorder care Lens and LCD screen/finder (on mounted models only) •The LCD screen and the finder are manufactured using ...(white, red, blue or green in low light conditions such as in a car parked in any way. •Do not let your camcorder get wet may cause your camcorder to temperatures above 60°C (140°F), such as dusk [d]. [a] [b] [c] [d] 9 Doing so might cause your...
Operating Instructions
Page 10
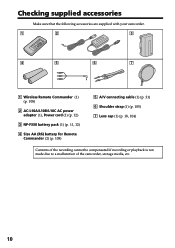
Checking supplied accessories Make sure that the following accessories are supplied with your camcorder. 1 2 3 4 5 6 7 1 Wireless Remote Commander (1) (p. 108) 2 AC-L10A/L10B/L10C AC power adaptor (1), Power cord (1) (p. 12) 3 NP-F330 battery pack (1) (p. 11, 12) 4 Size AA (R6) battery for Remote Commander (2) (p. 108) 5 A/V connecting cable (1) (p. 31) 6 Shoulder strap (1) (p. 105) 7 Lens cap (1) (p. 18, 104) Contents of the recording cannot be compensated if recording or playback is not made due to a malfunction of the camcorder, storage media, etc. 10
Checking supplied accessories Make sure that the following accessories are supplied with your camcorder. 1 2 3 4 5 6 7 1 Wireless Remote Commander (1) (p. 108) 2 AC-L10A/L10B/L10C AC power adaptor (1), Power cord (1) (p. 12) 3 NP-F330 battery pack (1) (p. 11, 12) 4 Size AA (R6) battery for Remote Commander (2) (p. 108) 5 A/V connecting cable (1) (p. 31) 6 Shoulder strap (1) (p. 105) 7 Lens cap (1) (p. 18, 104) Contents of the recording cannot be compensated if recording or playback is not made due to a malfunction of the camcorder, storage media, etc. 10
Operating Instructions
Page 11
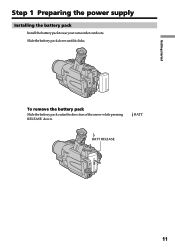
BATT BATT RELEASE 11 Getting started Step 1 Preparing the power supply Installing the battery pack Install the battery pack to use your camcorder outdoors. Slide the battery pack down . To remove the battery pack Slide the battery pack out in the direction of the arrow while pressing RELEASE down until it clicks.
BATT BATT RELEASE 11 Getting started Step 1 Preparing the power supply Installing the battery pack Install the battery pack to use your camcorder outdoors. Slide the battery pack down . To remove the battery pack Slide the battery pack out in the direction of the arrow while pressing RELEASE down until it clicks.
Operating Instructions
Page 12
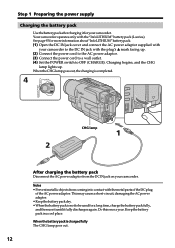
...for more information about "InfoLITHIUM" battery pack. (1) Open the DC IN jack cover and connect the AC power adaptor supplied with your camcorder to OFF (CHARGE). Your camcorder operates only with the metal parts of the DC plug of the AC power adaptor. Notes • Prevent metallic objects from the ...DC IN jack on your camcorder. When the CHG lamp goes out, the charging is completed. 4 VCR POWER OFF (CHARGE) CAMERA CHG lamp 1 2 After charging the battery pack ...
...for more information about "InfoLITHIUM" battery pack. (1) Open the DC IN jack cover and connect the AC power adaptor supplied with your camcorder to OFF (CHARGE). Your camcorder operates only with the metal parts of the DC plug of the AC power adaptor. Notes • Prevent metallic objects from the ...DC IN jack on your camcorder. When the CHG lamp goes out, the charging is completed. 4 VCR POWER OFF (CHARGE) CAMERA CHG lamp 1 2 After charging the battery pack ...
Operating Instructions
Page 13
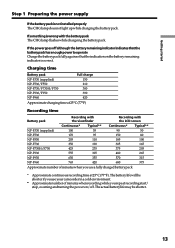
... 765 420 680 375 Approximate number of minutes when you use a fully charged battery pack * Approximatecontinuousrecordingtimeat25°C(77°F).Thebatterylifewillbe shorter if you use your camcorder in a cold environment. * Approximatenumberofminuteswhenrecordingwhileyourepeatrecordingstart/ stop, zooming and turning the power on/off although the battery remaining indicator indicates that the battery pack has enough power...
... 765 420 680 375 Approximate number of minutes when you use a fully charged battery pack * Approximatecontinuousrecordingtimeat25°C(77°F).Thebatterylifewillbe shorter if you use your camcorder in a cold environment. * Approximatenumberofminuteswhenrecordingwhileyourepeatrecordingstart/ stop, zooming and turning the power on/off although the battery remaining indicator indicates that the battery pack has enough power...

Operating Instructions
Page 14
... only with the "InfoLITHIUM" battery. The battery life will be shorter if you use your camcorder in a cold environment. "InfoLITHIUM" is a lithium ion battery pack which can exchange data such as battery consumption with compatible electronic equipment. This unit is "InfoLITHIUM"? "... 185 NP-F730 365 305 NP-F730H/F750 440 375 NP-F930 575 480 NP-F950 675 570 NP-F960 790 680 Approximate number of Sony Corporation. 14
... only with the "InfoLITHIUM" battery. The battery life will be shorter if you use your camcorder in a cold environment. "InfoLITHIUM" is a lithium ion battery pack which can exchange data such as battery consumption with compatible electronic equipment. This unit is "InfoLITHIUM"? "... 185 NP-F730 365 305 NP-F730H/F750 440 375 NP-F930 575 480 NP-F950 675 570 NP-F960 790 680 Approximate number of Sony Corporation. 14

Operating Instructions
Page 15
...IN jack on your camcorder with this unit, disconnect the plug from the AC power source (wall outlet) as long as possible to cut off . Using a car battery Use Sony DC Adaptor/Charger (...optional). 15 This means that you use your camcorder. •The DC IN jack has "source priority". Notes •...;The AC power adaptor can supply power even if the battery pack is attached to your camcorder for a long time, we recommend that the battery pack cannot supply any trouble occurs with the ...
...IN jack on your camcorder with this unit, disconnect the plug from the AC power source (wall outlet) as long as possible to cut off . Using a car battery Use Sony DC Adaptor/Charger (...optional). 15 This means that you use your camcorder. •The DC IN jack has "source priority". Notes •...;The AC power adaptor can supply power even if the battery pack is attached to your camcorder for a long time, we recommend that the battery pack cannot supply any trouble occurs with the ...

Operating Instructions
Page 16
... rechargeable lithium cell will have been discharged. Step 2 Setting the date and time Set the date and time settings when you do not use your camcorder for about 4 months, the date and time settings may be released (bars may appear) because the built-in CAMERA mode, press MENU to display the... S I ZE L ANGUAGE DEMO MODE RETURN [ MENU ] : END The year changes as follows: 1995 T t 2001 T t 2079 Note on the time indicator The internal clock of your camcorder operates on a 12-hour cycle. • 12:00 AM stands for midnight. • 12:00 PM stands for the first time. If you use your...
... rechargeable lithium cell will have been discharged. Step 2 Setting the date and time Set the date and time settings when you do not use your camcorder for about 4 months, the date and time settings may be released (bars may appear) because the built-in CAMERA mode, press MENU to display the... S I ZE L ANGUAGE DEMO MODE RETURN [ MENU ] : END The year changes as follows: 1995 T t 2001 T t 2079 Note on the time indicator The internal clock of your camcorder operates on a 12-hour cycle. • 12:00 AM stands for midnight. • 12:00 PM stands for the first time. If you use your...

Operating Instructions
Page 17
...tape on the cassette compartment. Doing so may cause a malfunction. •Your camcorder records pictures in the Digital8 system. • The recording time when you use standard 8 tape, be closed when you use your...camcorder is half of the cassette compartment. To prevent accidental erasure Slide the write-protect tab on Hi8 /Digital8 tape. If you select the LP mode in step 3. Getting started Step 3 Inserting a cassette We recommend using Hi8 /Digital8 video cassettes. (1) Prepare the power supply (p. 11). (2) Open the lid of the cassette compartment other DCR-TRV130...
...tape on the cassette compartment. Doing so may cause a malfunction. •Your camcorder records pictures in the Digital8 system. • The recording time when you use standard 8 tape, be closed when you use your...camcorder is half of the cassette compartment. To prevent accidental erasure Slide the write-protect tab on Hi8 /Digital8 tape. If you select the LP mode in step 3. Getting started Step 3 Inserting a cassette We recommend using Hi8 /Digital8 video cassettes. (1) Prepare the power supply (p. 11). (2) Open the lid of the cassette compartment other DCR-TRV130...

Operating Instructions
Page 18
... back in the SP (standard play) mode and in microphone during recording. To stop recording, press START/STOP again. Note on the front of your camcorder. Your camcorder starts recording. See "Step 1" to "Step 3" for you play ) mode. The recording lamp lights up . When you record with the viewfinder. 1...In the LP mode, you can record 1.5 times as long as in the LP mode on 18 your camcorder, we recommend that you . (1) Remove the lens cap by pressing both knobs on your camcorder lights up in the viewfinder when you record a tape in the SP mode. Basics - - Recording a ...
... back in the SP (standard play) mode and in microphone during recording. To stop recording, press START/STOP again. Note on the front of your camcorder. Your camcorder starts recording. See "Step 1" to "Step 3" for you play ) mode. The recording lamp lights up . When you record with the viewfinder. 1...In the LP mode, you can record 1.5 times as long as in the LP mode on 18 your camcorder, we recommend that you . (1) Remove the lens cap by pressing both knobs on your camcorder lights up in the viewfinder when you record a tape in the SP mode. Basics - - Recording a ...
Operating Instructions
Page 19
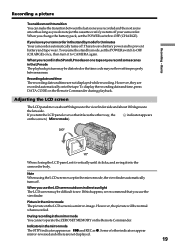
...the ZERO SET MEMORY on the Remote Commander. If you turn the LCD panel over so that you leave your camcorder. Picture in the standby mode for 3 minutes Your camcorder automatically turns off. Some of other way, the indicator appears on the LCD screen is to save battery power...the time code may be difficult to OFF (CHARGE). If this happens, we recommend that it into the camcorder body. Indicators in the mirror mode, the viewfinder automatically turns off your camcorder in the mirror mode The picture on the screen ( Mirror mode). 180° 90° When closing...
...the ZERO SET MEMORY on the Remote Commander. If you turn the LCD panel over so that you leave your camcorder. Picture in the standby mode for 3 minutes Your camcorder automatically turns off. Some of other way, the indicator appears on the LCD screen is to save battery power...the time code may be difficult to OFF (CHARGE). If this happens, we recommend that it into the camcorder body. Indicators in the mirror mode, the viewfinder automatically turns off your camcorder in the mirror mode The picture on the screen ( Mirror mode). 180° 90° When closing...
Operating Instructions
Page 20
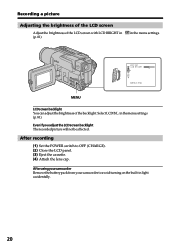
... the brightness of the LCD screen with LCD BRIGHT in (p. 81) in the menu settings. in light accidentally. 20 After using your camcorder Remove the battery pack from your camcorder to OFF (CHARGE). (2) Close the LCD panel. (3) Eject the cassette. (4) Attach the lens cap. Even if you adjust the LCD screen backlight...
... the brightness of the LCD screen with LCD BRIGHT in (p. 81) in the menu settings. in light accidentally. 20 After using your camcorder Remove the battery pack from your camcorder to OFF (CHARGE). (2) Close the LCD panel. (3) Eject the cassette. (4) Attach the lens cap. Even if you adjust the LCD screen backlight...

Operating Instructions
Page 24
..., slide NIGHTSHOT to ON. To cancel the NightShot function, slide NIGHTSHOT to shoot a subject in CAMERA mode. To cancel, press BACK LIGHT again. While your camcorder is in the dark - NIGHTSHOT OFF ON SUPER NIGHTSHOT NightShot Light emitter 24 The . Recording a picture Shooting backlit subjects - For example, you can satisfactorily record...
..., slide NIGHTSHOT to ON. To cancel the NightShot function, slide NIGHTSHOT to shoot a subject in CAMERA mode. To cancel, press BACK LIGHT again. While your camcorder is in the dark - NIGHTSHOT OFF ON SUPER NIGHTSHOT NightShot Light emitter 24 The . Recording a picture Shooting backlit subjects - For example, you can satisfactorily record...

Operating Instructions
Page 25
... the following functions: - The maximum shooting distance using the NightShot function, you keep NIGHTSHOT setting to ON in normal recording, the picture may cause your camcorder to malfunction. •When you can not use the NightShot function in incorrect or unnatural colors. • IffocusingisdifficultwiththeautofocusmodewhenusingtheNightShotfunction, focus manually. While using the NightShot Light...
... the following functions: - The maximum shooting distance using the NightShot function, you keep NIGHTSHOT setting to ON in normal recording, the picture may cause your camcorder to malfunction. •When you can not use the NightShot function in incorrect or unnatural colors. • IffocusingisdifficultwiththeautofocusmodewhenusingtheNightShotfunction, focus manually. While using the NightShot Light...

Operating Instructions
Page 27
...the playback picture in the viewfinder. Playing back a tape You cannot play back the tapes recorded in the Digital8 system. You can turn the LCD panel over and move it back to the camcorder body with the LCD screen facing out [a]. When monitoring on VOLUME. The speaker on the LCD screen.... panel, you can adjust the angle of the two buttons on the LCD screen You can control playback using the Remote Commander supplied with your camcorder is silent when the LCD panel is closed. 4 REW 5 PLAY 2 POWER VCR Playback - Basics OFF (CHARGE) CAMERA 3 6 VOLUME 1 To stop ...
...the playback picture in the viewfinder. Playing back a tape You cannot play back the tapes recorded in the Digital8 system. You can turn the LCD panel over and move it back to the camcorder body with the LCD screen facing out [a]. When monitoring on VOLUME. The speaker on the LCD screen.... panel, you can adjust the angle of the two buttons on the LCD screen You can control playback using the Remote Commander supplied with your camcorder is silent when the LCD panel is closed. 4 REW 5 PLAY 2 POWER VCR Playback - Basics OFF (CHARGE) CAMERA 3 6 VOLUME 1 To stop ...


