
Handycam® Handbook
Page 3
...necessary (p. 16). Black points White, red, blue or green points Exposing the LCD screen or the lens to the Built-in USB Cable (p. 13), if the Built-in USB Cable is not long enough. Rechargeable battery pack NP-FV30 (1) CD-ROM "Handycam" Application Software (1) "PMB" ..." software is pre-loaded on -screen displays in any way. Table of contents Useful recording techniques Read this first Built-in USB Cable Supplied items The numbers in ( ) are the supplied quantity. AC Adaptor (1) Power cord (Mains lead) (1) A/V connecting...
...necessary (p. 16). Black points White, red, blue or green points Exposing the LCD screen or the lens to the Built-in USB Cable (p. 13), if the Built-in USB Cable is not long enough. Rechargeable battery pack NP-FV30 (1) CD-ROM "Handycam" Application Software (1) "PMB" ..." software is pre-loaded on -screen displays in any way. Table of contents Useful recording techniques Read this first Built-in USB Cable Supplied items The numbers in ( ) are the supplied quantity. AC Adaptor (1) Power cord (Mains lead) (1) A/V connecting...

Handycam® Handbook
Page 13
You cannot use Sony portable power unit CP-AH2R/CP-AL (sold separately). The USB charging AC adaptor may not be depleted rapidly. Battery pack NP-FV30 (supplied) NP-FV50 NP-FV70 NP-FV100 AC Adaptor 115 155 195 390 Charging time Built-in USB Cable* 155 315 600 1050 Times... or the connection with the remaining battery indicator at the upper left on with the AC adapter in such situation. Charge with the Built-in USB Cable. Charging time Approximate time (min.) required when you connect the camcorder to a notebook computer that is turned on the LCD screen. To charge ...
You cannot use Sony portable power unit CP-AH2R/CP-AL (sold separately). The USB charging AC adaptor may not be depleted rapidly. Battery pack NP-FV30 (supplied) NP-FV50 NP-FV70 NP-FV100 AC Adaptor 115 155 195 390 Charging time Built-in USB Cable* 155 315 600 1050 Times... or the connection with the remaining battery indicator at the upper left on with the AC adapter in such situation. Charge with the Built-in USB Cable. Charging time Approximate time (min.) required when you connect the camcorder to a notebook computer that is turned on the LCD screen. To charge ...
Handycam® Handbook
Page 18
... camcorder Only "Memory Stick Duo" media that is the file system used with this camcorder by USB cable. Recording media icon The icon displayed on the LCD screen varies depending on memory card (DCR-SX65/SX85). Operation with all recorded contents will be lost. * exFAT is about a half the size of...
... camcorder Only "Memory Stick Duo" media that is the file system used with this camcorder by USB cable. Recording media icon The icon displayed on the LCD screen varies depending on memory card (DCR-SX65/SX85). Operation with all recorded contents will be lost. * exFAT is about a half the size of...

Handycam® Handbook
Page 44
...movies and photos with a computer Creating a disc with One Touch Disc Burn function can save movies and photos recorded on the internal recording media only (DCR-SX65/SX85). 1 Turn on your computer, and place an unused disc on the DVD drive. If any other software than "PMB" starts... automatically, shut it down. 2 Turn on your camcorder, then connect the camcorder to the wall outlet (wall socket) using the Built-in USB Cable. US 44 Movies and photos recorded on your camcorder that have not yet been saved with one touch (One Touch Disc Burn) Notes &#...
...movies and photos with a computer Creating a disc with One Touch Disc Burn function can save movies and photos recorded on the internal recording media only (DCR-SX65/SX85). 1 Turn on your computer, and place an unused disc on the DVD drive. If any other software than "PMB" starts... automatically, shut it down. 2 Turn on your camcorder, then connect the camcorder to the wall outlet (wall socket) using the Built-in USB Cable. US 44 Movies and photos recorded on your camcorder that have not yet been saved with one touch (One Touch Disc Burn) Notes &#...

Handycam® Handbook
Page 45
... screen. Turn on the computer beforehand. Notes Connect your camcorder to the wall outlet (wall socket) using the Built-in USB Cable. 3 Click [Import]. Table of contents Importing movies and photos to a computer Movies and photos recorded on your camcorder can be imported to your... camcorder, then connect the camcorder to save on the camcorder screen. [ USB CONNECT]: Internal memory (DCR-SX65/SX85) [ USB CONNECT]: Memory card The displayed recording media differ depending on the model. If the...
... screen. Turn on the computer beforehand. Notes Connect your camcorder to the wall outlet (wall socket) using the Built-in USB Cable. 3 Click [Import]. Table of contents Importing movies and photos to a computer Movies and photos recorded on your camcorder can be imported to your... camcorder, then connect the camcorder to save on the camcorder screen. [ USB CONNECT]: Internal memory (DCR-SX65/SX85) [ USB CONNECT]: Memory card The displayed recording media differ depending on the model. If the...

Handycam® Handbook
Page 47
...a network when uploading images using such services, you click the help button in USB cable. The User Agreement screen appears. Read the agreement carefully. Index US ...such as blogs) you wish to a computer with the terms and conditions established by Sony ("Sony server"). Starting up . Notes Always connect to download various ..."PMB Portable." [ USB CONNECT]: Internal memory (DCR-SX65/SX85) [ USB CONNECT]: Memory card If the [USB SELECT] screen does not appear, touch (MENU) [Show others] [USB CONNECT] (under [...
...a network when uploading images using such services, you click the help button in USB cable. The User Agreement screen appears. Read the agreement carefully. Index US ...such as blogs) you wish to a computer with the terms and conditions established by Sony ("Sony server"). Starting up . Notes Always connect to download various ..."PMB Portable." [ USB CONNECT]: Internal memory (DCR-SX65/SX85) [ USB CONNECT]: Memory card If the [USB SELECT] screen does not appear, touch (MENU) [Show others] [USB CONNECT] (under [...
Handycam® Handbook
Page 49
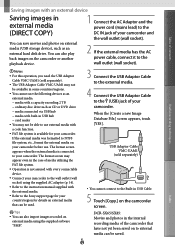
... screen may not be available in USB Cable. 5 Touch [Copy.] on external media (USB storage device), such as CD or DVD drive media connected via USB hub media with every connectable device. Connect your camcorder to the Sony support page for your country/region ...for your camcorder. Index Tips You can save movies and photos on the camcorder screen. You can be used. 3 Connect the USB Adaptor Cable to the external media. 4 Connect the USB Adaptor Cable to your camcorder. DCR-SX65/...
... screen may not be available in USB Cable. 5 Touch [Copy.] on external media (USB storage device), such as CD or DVD drive media connected via USB hub media with every connectable device. Connect your camcorder to the Sony support page for your country/region ...for your camcorder. Index Tips You can save movies and photos on the camcorder screen. You can be used. 3 Connect the USB Adaptor Cable to the external media. 4 Connect the USB Adaptor Cable to your camcorder. DCR-SX65/...
Handycam® Handbook
Page 52
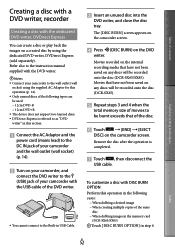
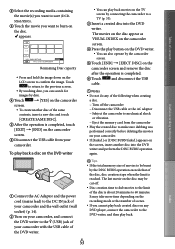
...; When dubbing a desired image When creating multiple copies of the same disc When dubbing images in the memory card (DCR-SX65/SX85) Touch [DISC BURN OPTION] in USB Cable. Insert an unused disc into the DVD writer, and close the disc tray. Remove the disc after the operation is... have not been saved on any discs will be burnt exceeds that have not been saved on any discs will be recorded onto the disc (DCR-SX45). Repeat steps 3 and 4 when the total memory size of movies to the DC IN jack of your camcorder and the wall outlet (wall ...
...; When dubbing a desired image When creating multiple copies of the same disc When dubbing images in the memory card (DCR-SX65/SX85) Touch [DISC BURN OPTION] in USB Cable. Insert an unused disc into the DVD writer, and close the disc tray. Remove the disc after the operation is... have not been saved on any discs will be burnt exceeds that have not been saved on any discs will be recorded onto the disc (DCR-SX45). Repeat steps 3 and 4 when the total memory size of movies to the DC IN jack of your camcorder and the wall outlet (wall ...
Handycam® Handbook
Page 53
... Touch [END] [EJECT DISC] on the camcorder screen and remove the disc after the operation is completed. Touch and disconnect the USB cable. Notes Do not do any DVD player, connect the camcorder to the DVD writer, and then play back. Table of contents &#... the number of your camcorder and the wall outlet (wall socket) (p. 14). Turn on the camcorder screen. Disconnect the USB cable from the camcorder Play the created disc to make sure dubbing was performed correctly before deleting the movies on your camcorder. If...
... Touch [END] [EJECT DISC] on the camcorder screen and remove the disc after the operation is completed. Touch and disconnect the USB cable. Notes Do not do any DVD player, connect the camcorder to the DVD writer, and then play back. Table of contents &#... the number of your camcorder and the wall outlet (wall socket) (p. 14). Turn on the camcorder screen. Disconnect the USB cable from the camcorder Play the created disc to make sure dubbing was performed correctly before deleting the movies on your camcorder. If...
Handycam® Handbook
Page 54
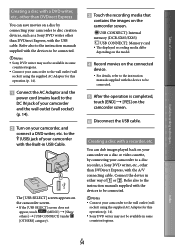
...] (under [OTHERS] category). Touch the recording media that contains the images on the camcorder screen. [ USB CONNECT]: Internal memory (DCR-SX65/SX85) [ USB CONNECT]: Memory card The displayed recording media differ depending on the model. Record movies on the ...on the camcorder screen. Disconnect the USB cable. Connect the device in some countries/regions. Connect your camcorder to the wall outlet (wall socket) using the supplied AC Adaptor for this operation (p. 14). Sony DVD writer may not be available in either...
...] (under [OTHERS] category). Touch the recording media that contains the images on the camcorder screen. [ USB CONNECT]: Internal memory (DCR-SX65/SX85) [ USB CONNECT]: Memory card The displayed recording media differ depending on the model. Record movies on the ...on the camcorder screen. Disconnect the USB cable. Connect the device in some countries/regions. Connect your camcorder to the wall outlet (wall socket) using the supplied AC Adaptor for this operation (p. 14). Sony DVD writer may not be available in either...
Handycam® Handbook
Page 79
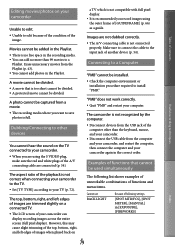
... Check the computer environment or installation procedure required to the input jack of another device (p. 54). Make sure to connect the cable to install "PMB." Examples of functions that is not correct when connecting your camcorder to the TV. Set [TV TYPE] according...sure the red and white plugs of the A/V connecting cable are not dubbed correctly. The A/V connecting cable is recommended you want to your camcorder can add no more than the keyboard, mouse, and your camcorder. Disconnect the USB cable from the Playlist (p. 43). You cannot ...
... Check the computer environment or installation procedure required to the input jack of another device (p. 54). Make sure to connect the cable to install "PMB." Examples of functions that is not correct when connecting your camcorder to the TV. Set [TV TYPE] according...sure the red and white plugs of the A/V connecting cable are not dubbed correctly. The A/V connecting cable is recommended you want to your camcorder can add no more than the keyboard, mouse, and your camcorder. Disconnect the USB cable from the Playlist (p. 43). You cannot ...
Handycam® Handbook
Page 95
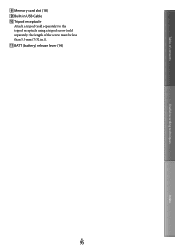
Table of contents Useful recording techniques Memory card slot (18) Built-in USB Cable Tripod receptacle Attach a tripod (sold separately) to the tripod receptacle using a tripod screw (sold separately: the length of the screw must be less than 5.5 mm (7/32 in.)). BATT (battery) release lever (14) US 95 Index
Table of contents Useful recording techniques Memory card slot (18) Built-in USB Cable Tripod receptacle Attach a tripod (sold separately) to the tripod receptacle using a tripod screw (sold separately: the length of the screw must be less than 5.5 mm (7/32 in.)). BATT (battery) release lever (14) US 95 Index

Handycam® Handbook
Page 96
... 66 B BACK LIGHT 67, 79 BATTERY INFO 70 Battery pack 12 BEACH 62 BEEP 72 BLACK FADER 63 BLT-IN ZOOM MIC 67 Built-in USB Cable 3, 13 C CALIBRATION 90 CAMERA DATA 69 CANDLE 62 Capturing a photo from a movie 39 Capturing photos from a movie 46 Charging the battery pack..........12 Charging the...
... 66 B BACK LIGHT 67, 79 BATTERY INFO 70 Battery pack 12 BEACH 62 BEEP 72 BLACK FADER 63 BLT-IN ZOOM MIC 67 Built-in USB Cable 3, 13 C CALIBRATION 90 CAMERA DATA 69 CANDLE 62 Capturing a photo from a movie 39 Capturing photos from a movie 46 Charging the battery pack..........12 Charging the...
Handycam® Handbook
Page 97
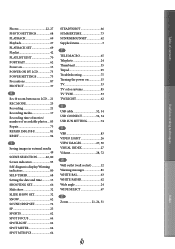
... 24 Thumbnail 35 Tripod 95 Troubleshooting 75 Turning the power on 15 TV 33 TV color systems 85 TV TYPE 33 TWILIGHT 62 U USB cable 52, 54 USB CONNECT 52, 54 USB LUN SETTING 74 V VBR 83 VIDEO LIGHT 26 VIEW IMAGES 27, 30 VISUAL INDEX 27 Volume 28, 72 W Wall outlet (wall socket...
... 24 Thumbnail 35 Tripod 95 Troubleshooting 75 Turning the power on 15 TV 33 TV color systems 85 TV TYPE 33 TWILIGHT 62 U USB cable 52, 54 USB CONNECT 52, 54 USB LUN SETTING 74 V VBR 83 VIDEO LIGHT 26 VIEW IMAGES 27, 30 VISUAL INDEX 27 Volume 28, 72 W Wall outlet (wall socket...
Operating Guide
Page 8
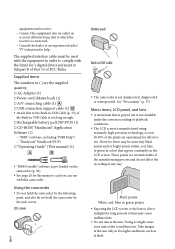
... AC Adaptor (1) Power cord (Mains lead) (1) A/V connecting cable (1) USB connection support cable (1) Attach this camcorder. These points are operational for long periods of the sun only in USB Cable is not long enough. Rechargeable battery pack NP-FV30 (1) CD...the manufacturing process and do not hold the camcorder by the following parts, and also do not affect the recording in USB Cable The camcorder is manufactured using extremely high-precision technology, so over 99.99% of the pixels are normal...
... AC Adaptor (1) Power cord (Mains lead) (1) A/V connecting cable (1) USB connection support cable (1) Attach this camcorder. These points are operational for long periods of the sun only in USB Cable is not long enough. Rechargeable battery pack NP-FV30 (1) CD...the manufacturing process and do not hold the camcorder by the following parts, and also do not affect the recording in USB Cable The camcorder is manufactured using extremely high-precision technology, so over 99.99% of the pixels are normal...
Operating Guide
Page 15
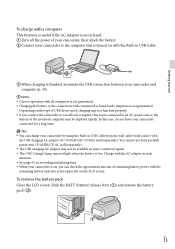
... Connect your camcorder to the computer that is not connected to a notebook computer that is turned on with the Built-in USB Cable. When charging is finished, terminate the USB connection between your camcorder connected for a long time. Tips You can check the approximate amount of remaining battery power... at the upper left on the LCD screen. Slide the BATT (battery) release lever () and remove the battery pack (). You cannot use Sony portable power unit CP-AH2R/CP-AL (sold separately). To remove the battery pack Close the LCD screen.
... Connect your camcorder to the computer that is not connected to a notebook computer that is turned on with the Built-in USB Cable. When charging is finished, terminate the USB connection between your camcorder connected for a long time. Tips You can check the approximate amount of remaining battery power... at the upper left on the LCD screen. Slide the BATT (battery) release lever () and remove the battery pack (). You cannot use Sony portable power unit CP-AH2R/CP-AL (sold separately). To remove the battery pack Close the LCD screen.
Operating Guide
Page 20
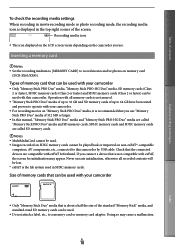
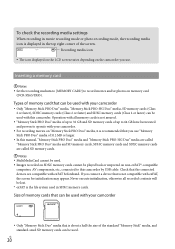
..., AV components, etc., connected to record movies and/or photos on the camcorder you connect a device that is not compatible with this camcorder by USB cable. Types of the standard "Memory Stick" media, and standard-sized SD memory cards can be used. Inserting a memory card Notes ... SDXC memory cards. Size of the screen. Recording media icon The icon displayed on the LCD screen varies depending on memory card (DCR-SX65/SX85). Never execute initialization, otherwise all memory cards is not assured. "Memory Stick PRO Duo" media of up to 32 ...
..., AV components, etc., connected to record movies and/or photos on the camcorder you connect a device that is not compatible with this camcorder by USB cable. Types of the standard "Memory Stick" media, and standard-sized SD memory cards can be used. Inserting a memory card Notes ... SDXC memory cards. Size of the screen. Recording media icon The icon displayed on the LCD screen varies depending on memory card (DCR-SX65/SX85). Never execute initialization, otherwise all memory cards is not assured. "Memory Stick PRO Duo" media of up to 32 ...

Operating Guide
Page 34
... be installed, then proceed to the next screen. Read the terms of your computer. The [USB SELECT] screen appears on the camcorder screen automatically. Touch the one of the media types displayed ... your camcorder. [ USB CONNECT]: Internal memory (DCR-SX65/SX85) [ USB CONNECT]: Memory card The displayed recording media differ depending on the model. If the [USB SELECT] screen does not appear, touch (MENU) [Show others] [USB CONNECT] (under [... camcorder, then connect the camcorder to the computer using the supplied USB cable.
... be installed, then proceed to the next screen. Read the terms of your computer. The [USB SELECT] screen appears on the camcorder screen automatically. Touch the one of the media types displayed ... your camcorder. [ USB CONNECT]: Internal memory (DCR-SX65/SX85) [ USB CONNECT]: Memory card The displayed recording media differ depending on the model. If the [USB SELECT] screen does not appear, touch (MENU) [Show others] [USB CONNECT] (under [... camcorder, then connect the camcorder to the computer using the supplied USB cable.
Operating Guide
Page 35
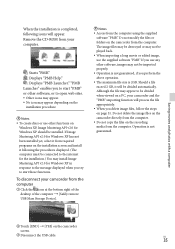
... "PMB." : Displays "PMB Help." : Displays "PMB Launcher." Do not modify the files or folders on the camcorder screen. Disconnect the USB cable. Do not delete the image files on the camcorder directly from the computer using the supplied software "PMB." Should a file exceed 2 GB, it following...ROM from your camcorder from the computer Click the icon at the bottom right of the desktop of the computer [Safely remove USB Mass Storage Device]. Notes Access from the computer. Do not copy the files on the installation procedure. ...
... "PMB." : Displays "PMB Help." : Displays "PMB Launcher." Do not modify the files or folders on the camcorder screen. Disconnect the USB cable. Do not delete the image files on the camcorder directly from the computer using the supplied software "PMB." Should a file exceed 2 GB, it following...ROM from your camcorder from the computer Click the icon at the bottom right of the desktop of the computer [Safely remove USB Mass Storage Device]. Notes Access from the computer. Do not copy the files on the installation procedure. ...
Operating Guide
Page 36
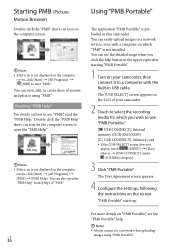
...use "PMB Portable." [ USB CONNECT]: Internal memory (DCR-SX65/SX85) [ USB CONNECT]: Memory card If the [USB SELECT] screen does not appear, touch (MENU) [Show others] [USB CONNECT] (under [OTHERS] category). 3 Click "PMB Portable". The [USB SELECT] screen appears on how... screen, click [Start] [All Programs] [ PMB] to a network service, even with the Built-in USB cable. The User Agreement screen appears. 4 Configure the settings, following the instructions on your camcorder. 2 Touch to select the recording media...
...use "PMB Portable." [ USB CONNECT]: Internal memory (DCR-SX65/SX85) [ USB CONNECT]: Memory card If the [USB SELECT] screen does not appear, touch (MENU) [Show others] [USB CONNECT] (under [OTHERS] category). 3 Click "PMB Portable". The [USB SELECT] screen appears on how... screen, click [Start] [All Programs] [ PMB] to a network service, even with the Built-in USB cable. The User Agreement screen appears. 4 Configure the settings, following the instructions on your camcorder. 2 Touch to select the recording media...


