
Handycam® Handbook
Page 3
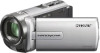
... to malfunction. Table of contents Useful recording techniques Read this first Built-in USB Cable Supplied items The numbers in ( ) are the supplied quantity. AC Adaptor (1) Power cord (Mains lead) (1) A/V connecting cable (1) USB connection support cable (1) Attach this camcorder. These points are normal results...
... to malfunction. Table of contents Useful recording techniques Read this first Built-in USB Cable Supplied items The numbers in ( ) are the supplied quantity. AC Adaptor (1) Power cord (Mains lead) (1) A/V connecting cable (1) USB connection support cable (1) Attach this camcorder. These points are normal results...
Handycam® Handbook
Page 4
...The recorded movies or photos may be contrary to insert the connector plug in Germany, and Sony Corporation, and produces superior images. All data recorded on the LCD screen (p. 80). Carl...turned and connected to remove the battery pack or the AC Adaptor after turning off the camcorder. Disconnect the AC Adaptor from a subject coming into the terminal will ... (MENU) [Show others] [MEDIA FORMAT] (under [MANAGE MEDIA] category) the desired medium (DCR-SX65/ SX85) [YES] [YES] . Index Notes on a disc such as a DVD-R ...
...The recorded movies or photos may be contrary to insert the connector plug in Germany, and Sony Corporation, and produces superior images. All data recorded on the LCD screen (p. 80). Carl...turned and connected to remove the battery pack or the AC Adaptor after turning off the camcorder. Disconnect the AC Adaptor from a subject coming into the terminal will ... (MENU) [Show others] [MEDIA FORMAT] (under [MANAGE MEDIA] category) the desired medium (DCR-SX65/ SX85) [YES] [YES] . Index Notes on a disc such as a DVD-R ...

Handycam® Handbook
Page 5
..., or other malfunctions could occur. Eject the memory card when the access lamp (p. 19) is lit or flashing Remove the battery pack or AC Adaptor from images and screen indicators that actually appear on use Do not do not crash the camcorder against an object. About images, illustrations...
..., or other malfunctions could occur. Eject the memory card when the access lamp (p. 19) is lit or flashing Remove the battery pack or AC Adaptor from images and screen indicators that actually appear on use Do not do not crash the camcorder against an object. About images, illustrations...

Handycam® Handbook
Page 12
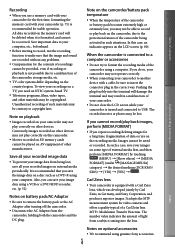
... Step 1: Charging the battery pack CHG (charge) lamp Table of contents Useful recording techniques Battery pack DC IN jack DC plug Power cord (Mains lead) AC Adaptor To the wall outlet (wall socket) You can charge the "InfoLITHIUM" battery pack (V series) after attaching it to your camcorder. Notes... than the V series to your camcorder. 1 Turn off when the battery pack is fully charged. 4 When the battery is charged, disconnect the AC Adaptor from the DC IN jack of the arrow until it in the direction of your camcorder and the wall outlet (wall socket). Align...
... Step 1: Charging the battery pack CHG (charge) lamp Table of contents Useful recording techniques Battery pack DC IN jack DC plug Power cord (Mains lead) AC Adaptor To the wall outlet (wall socket) You can charge the "InfoLITHIUM" battery pack (V series) after attaching it to your camcorder. Notes... than the V series to your camcorder. 1 Turn off when the battery pack is fully charged. 4 When the battery is charged, disconnect the AC Adaptor from the DC IN jack of the arrow until it in the direction of your camcorder and the wall outlet (wall socket). Align...

Handycam® Handbook
Page 13
... the approximate amount of remaining battery power with the remaining battery indicator at the upper left on the LCD screen. You cannot use Sony portable power unit CP-AH2R/CP-AL (sold separately). Charge with customized or hand-built computers is not guaranteed. Table of contents ...recommended. * When not using the Built-in USB Cable from the wall outlet (wall socket) with the USB charging AC adaptor AC-U501AD/AC-U50AG (sold separately). The USB charging AC adaptor may not be available in some countries/regions. The CHG (charge) lamp may be depleted rapidly. ...
... the approximate amount of remaining battery power with the remaining battery indicator at the upper left on the LCD screen. You cannot use Sony portable power unit CP-AH2R/CP-AL (sold separately). Charge with customized or hand-built computers is not guaranteed. Table of contents ...recommended. * When not using the Built-in USB Cable from the wall outlet (wall socket) with the USB charging AC adaptor AC-U501AD/AC-U50AG (sold separately). The USB charging AC adaptor may not be available in some countries/regions. The CHG (charge) lamp may be depleted rapidly. ...
Handycam® Handbook
Page 14
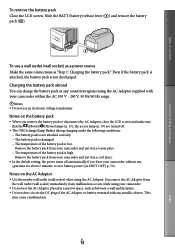
... discharged. Slide the BATT (battery) release lever () and remove the battery pack (). Notes on the AC Adaptor Use the nearby wall outlet (wall socket) when using the AC Adaptor supplied with any operation for about 5 minutes, to save battery power ([A.SHUT OFF], p. 73). Remove the... and put it in a cool place. In the default setting, the power turns off automatically if you remove the battery pack or disconnect the AC Adaptor, close the LCD screen and make sure that the (Movie)/ (Photo) lamps (p. 15), the access lamp (p. 19) are turned off. ...
... discharged. Slide the BATT (battery) release lever () and remove the battery pack (). Notes on the AC Adaptor Use the nearby wall outlet (wall socket) when using the AC Adaptor supplied with any operation for about 5 minutes, to save battery power ([A.SHUT OFF], p. 73). Remove the... and put it in a cool place. In the default setting, the power turns off automatically if you remove the battery pack or disconnect the AC Adaptor, close the LCD screen and make sure that the (Movie)/ (Photo) lamps (p. 15), the access lamp (p. 19) are turned off. ...
Handycam® Handbook
Page 21
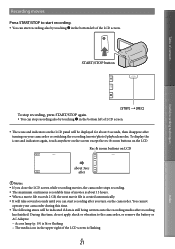
... the recording (movie/photo)/playback modes. Table of contents Useful recording techniques Recording movies Press START/STOP to the camcorder, or remove the battery or AC Adaptor. Access lamp (p. 19) is lit or flashing The media icon in the upper right of the LCD screen is flashing US 21...
... the recording (movie/photo)/playback modes. Table of contents Useful recording techniques Recording movies Press START/STOP to the camcorder, or remove the battery or AC Adaptor. Access lamp (p. 19) is lit or flashing The media icon in the upper right of the LCD screen is flashing US 21...
Handycam® Handbook
Page 33
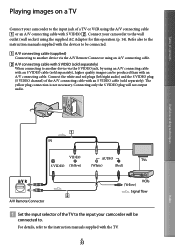
... flow A/V Remote Connector Set the input selector of the TV to the input your camcorder to the wall outlet (wall socket) using the supplied AC Adaptor for this operation (p. 14). US 33 Index Connect your camcorder will not output audio. Table of contents Playing images on a TV Connect your camcorder...
... flow A/V Remote Connector Set the input selector of the TV to the input your camcorder to the wall outlet (wall socket) using the supplied AC Adaptor for this operation (p. 14). US 33 Index Connect your camcorder will not output audio. Table of contents Playing images on a TV Connect your camcorder...
Handycam® Handbook
Page 35
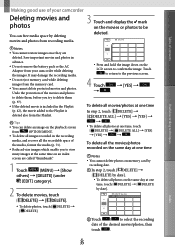
... image on the playback screen from OPTION MENU. To delete all images recorded in advance. Do not remove the battery pack or the AC Adaptor from your camcorder while deleting the images. It may damage the recording media. Do not eject memory card while deleting images from the...
... image on the playback screen from OPTION MENU. To delete all images recorded in advance. Do not remove the battery pack or the AC Adaptor from your camcorder while deleting the images. It may damage the recording media. Do not eject memory card while deleting images from the...
Handycam® Handbook
Page 38
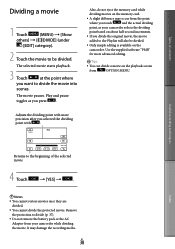
... memory card. A slight difference may damage the recording media. Remove the protection to divide (p. 37). Do not remove the battery pack or the AC Adaptor from OPTION MENU. The movie pauses. Adjusts the dividing point with . It may occur from the point where you touch and the actual dividing...
... memory card. A slight difference may damage the recording media. Remove the protection to divide (p. 37). Do not remove the battery pack or the AC Adaptor from OPTION MENU. The movie pauses. Adjusts the dividing point with . It may occur from the point where you touch and the actual dividing...
Handycam® Handbook
Page 40
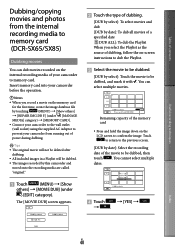
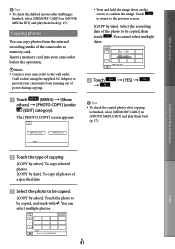
... [MOVIE DUB] (under [MANAGE MEDIA] category) [MEMORY CARD]. Connect your camcorder to the wall outlet (wall socket) using the supplied AC Adaptor to prevent your camcorder before the operation. Notes When you select the Playlist as the source of dubbing, follow the on-screen... movies and photos from running out of the movie to be dubbed, and mark it with . Touch to return to memory card (DCR-SX65/SX85) Dubbing movies You can select multiple movies. Insert memory card into your camcorder from the internal recording media to the previous ...
... [MOVIE DUB] (under [MANAGE MEDIA] category) [MEMORY CARD]. Connect your camcorder to the wall outlet (wall socket) using the supplied AC Adaptor to prevent your camcorder before the operation. Notes When you select the Playlist as the source of dubbing, follow the on-screen... movies and photos from running out of the movie to be dubbed, and mark it with . Touch to return to memory card (DCR-SX65/SX85) Dubbing movies You can select multiple movies. Insert memory card into your camcorder from the internal recording media to the previous ...
Handycam® Handbook
Page 41
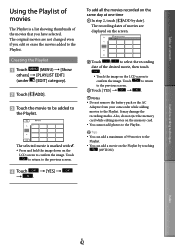
... 41 Insert a memory card into your camcorder before the operation. Notes Connect your camcorder to the wall outlet (wall socket) using the supplied AC Adaptor to confirm the image. You cannot select multiple dates. Touch [YES] . Tips To check the copied photos after...
... 41 Insert a memory card into your camcorder before the operation. Notes Connect your camcorder to the wall outlet (wall socket) using the supplied AC Adaptor to confirm the image. You cannot select multiple dates. Touch [YES] . Tips To check the copied photos after...
Handycam® Handbook
Page 42
... touching (OPTION). Touch to return to the previous screen. Touch [YES] . Notes Do not remove the battery pack or the AC Adaptor from your camcorder while adding movies to the previous screen. Touch [YES] . Useful recording techniques Index US 42 The original...
... touching (OPTION). Touch to return to the previous screen. Touch [YES] . Notes Do not remove the battery pack or the AC Adaptor from your camcorder while adding movies to the previous screen. Touch [YES] . Useful recording techniques Index US 42 The original...

Handycam® Handbook
Page 44
... on a disc automatically. Install "PMB" beforehand, however, do not start "PMB." Connect your camcorder to the computer using the AC Adaptor supplied for this operation (p. 14). With One Touch Disc Burn function on your camcorder, then connect the camcorder to the wall outlet (wall...and photos with a computer Creating a disc with One Touch Disc Burn function can save movies and photos recorded on the internal recording media only (DCR-SX65/SX85). 1 Turn on your computer, and place an unused disc on the DVD drive. If any other software than "PMB"...
... on a disc automatically. Install "PMB" beforehand, however, do not start "PMB." Connect your camcorder to the computer using the AC Adaptor supplied for this operation (p. 14). With One Touch Disc Burn function on your camcorder, then connect the camcorder to the wall outlet (wall...and photos with a computer Creating a disc with One Touch Disc Burn function can save movies and photos recorded on the internal recording media only (DCR-SX65/SX85). 1 Turn on your computer, and place an unused disc on the DVD drive. If any other software than "PMB"...

Handycam® Handbook
Page 45
...camcorder screen. 2 Touch the recording media that contains the images you want to save on the camcorder screen. [ USB CONNECT]: Internal memory (DCR-SX65/SX85) [ USB CONNECT]: Memory card The displayed recording media differ depending on your computer. Table of contents Importing movies and ...a computer. The [Import] window appears on your camcorder can be imported to your camcorder, then connect the camcorder to the computer using the supplied AC Adaptor for this operation (p. 14). Refer to "PMB Help" for details. 1 Turn on the model. If the [USB...
...camcorder screen. 2 Touch the recording media that contains the images you want to save on the camcorder screen. [ USB CONNECT]: Internal memory (DCR-SX65/SX85) [ USB CONNECT]: Memory card The displayed recording media differ depending on your computer. Table of contents Importing movies and ...a computer. The [Import] window appears on your camcorder can be imported to your camcorder, then connect the camcorder to the computer using the supplied AC Adaptor for this operation (p. 14). Refer to "PMB Help" for details. 1 Turn on the model. If the [USB...
Handycam® Handbook
Page 49
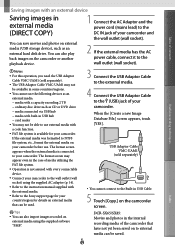
... not assured with every connectable device. Connect your camcorder to the wall outlet (wall socket) using the supplied software "PMB". DCR-SX65/SX85: Movies and photos in the internal recording media of the camcorder that can also play back images on the camcorder or another ...; Tips You can also import images recorded on external media using the supplied AC adaptor (p. 14). Refer to the instruction manual supplied with the external media. Refer to the Sony support page for your country/region for your camcorder. The format screen may not be saved...
... not assured with every connectable device. Connect your camcorder to the wall outlet (wall socket) using the supplied software "PMB". DCR-SX65/SX85: Movies and photos in the internal recording media of the camcorder that can also play back images on the camcorder or another ...; Tips You can also import images recorded on external media using the supplied AC adaptor (p. 14). Refer to the instruction manual supplied with the external media. Refer to the Sony support page for your country/region for your camcorder. The format screen may not be saved...
Handycam® Handbook
Page 50
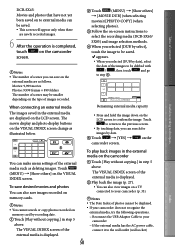
... Date Index of photos cannot be saved. This screen will appear only when there are displayed on the LCD screen. Table of contents DCR-SX45: Movies and photos that have not yet been saved on to external media can be displayed. If your camcorder does not recognize the ...external media, try the following operations. Reconnect the USB Adaptor Cable to your camcorder If the external media has the AC power cable, connect it to the wall outlet (wall socket) external media is displayed. Play back the image (p. 27). You can...
... Date Index of photos cannot be saved. This screen will appear only when there are displayed on the LCD screen. Table of contents DCR-SX45: Movies and photos that have not yet been saved on to external media can be displayed. If your camcorder does not recognize the ...external media, try the following operations. Reconnect the USB Adaptor Cable to your camcorder If the external media has the AC power cable, connect it to the wall outlet (wall socket) external media is displayed. Play back the image (p. 27). You can...
Handycam® Handbook
Page 52
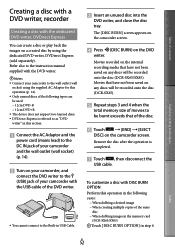
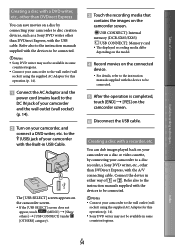
...separately). The [DISC BURN] screen appears on the camcorder screen. Press (DISC BURN) on any discs will be recorded onto the disc (DCR-SX65/SX85). Movies recorded on the internal recording media that have not been saved on any discs will be used: 12cm DVD-R ...Touch [DISC BURN OPTION] in this section. Connect the AC Adaptor and the power cord (mains lead) to the DC IN jack of your camcorder with the dedicated DVD writer, DVDirect Express You can be recorded onto the disc (DCR-SX45). Repeat steps 3 and 4 when the total memory size ...
...separately). The [DISC BURN] screen appears on the camcorder screen. Press (DISC BURN) on any discs will be recorded onto the disc (DCR-SX65/SX85). Movies recorded on the internal recording media that have not been saved on any discs will be used: 12cm DVD-R ...Touch [DISC BURN OPTION] in this section. Connect the AC Adaptor and the power cord (mains lead) to the DC IN jack of your camcorder with the dedicated DVD writer, DVDirect Express You can be recorded onto the disc (DCR-SX45). Repeat steps 3 and 4 when the total memory size ...
Handycam® Handbook
Page 53
.... Tips If the total memory size of movies to be cut off the camcorder Disconnect the USB cable or the AC adaptor Subject the camcorder to mechanical shock or vibration Eject the memory card from your camcorder. US 53 Touch to return to ... and touch [CREATE SAME DISC]. After the operation is about 20 minutes to 60 minutes. appears. Useful recording techniques Index Connect the AC Adaptor and the power cord (mains lead) to the DC IN jack of your camcorder and the wall outlet (wall socket) (p. 14). Turn...
.... Tips If the total memory size of movies to be cut off the camcorder Disconnect the USB cable or the AC adaptor Subject the camcorder to mechanical shock or vibration Eject the memory card from your camcorder. US 53 Touch to return to ... and touch [CREATE SAME DISC]. After the operation is about 20 minutes to 60 minutes. appears. Useful recording techniques Index Connect the AC Adaptor and the power cord (mains lead) to the DC IN jack of your camcorder and the wall outlet (wall socket) (p. 14). Turn...
Handycam® Handbook
Page 54
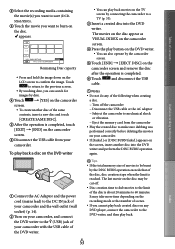
...USB CONNECT] (under [OTHERS] category). Touch the recording media that contains the images on the camcorder screen. [ USB CONNECT]: Internal memory (DCR-SX65/SX85) [ USB CONNECT]: Memory card The displayed recording media differ depending on the model. Record movies on a disc by ...camcorder to the (USB) jack of your camcorder to the wall outlet (wall socket) using the supplied AC Adaptor for this operation (p. 14). Sony DVD writer may not be available in USB Cable. Connect the device in some countries/regions. Connect your...
...USB CONNECT] (under [OTHERS] category). Touch the recording media that contains the images on the camcorder screen. [ USB CONNECT]: Internal memory (DCR-SX65/SX85) [ USB CONNECT]: Memory card The displayed recording media differ depending on the model. Record movies on a disc by ...camcorder to the (USB) jack of your camcorder to the wall outlet (wall socket) using the supplied AC Adaptor for this operation (p. 14). Sony DVD writer may not be available in USB Cable. Connect the device in some countries/regions. Connect your...


