Handycam® Handbook
Page 2
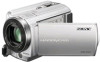
... a memory card with your camcorder for the first time, formatting the memory card with this first Supplied items The numbers in ( ) are the supplied quantity. AC Adaptor (1) Power cord (Mains lead) (1) A/V connecting cable (1) USB cable (1) Rechargeable battery pack NP-FV30 (1) CD-ROM "Handycam" Application Software (1) "PMB...
... a memory card with your camcorder for the first time, formatting the memory card with this first Supplied items The numbers in ( ) are the supplied quantity. AC Adaptor (1) Power cord (Mains lead) (1) A/V connecting cable (1) USB cable (1) Rechargeable battery pack NP-FV30 (1) CD-ROM "Handycam" Application Software (1) "PMB...
Handycam® Handbook
Page 45
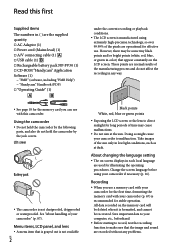
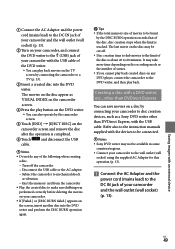
...Refer to the Sony support page for your camcorder. Saving images ...camcorder before use. DCR-SR68/SR88/SX44/SX63: Movies and photos in external media (DIRECT COPY) You can be used. 1 Connect the AC Adaptor and the power cord (mains lead) to the DC IN jack of your camcorder and the wall outlet (wall socket). 4 Connect the USB Adaptor Cable... to use the following devices as an external media. media with a capacity exceeding 2 TB ordinary disc drive such as an external hard disk drive. DCR...
...Refer to the Sony support page for your camcorder. Saving images ...camcorder before use. DCR-SR68/SR88/SX44/SX63: Movies and photos in external media (DIRECT COPY) You can be used. 1 Connect the AC Adaptor and the power cord (mains lead) to the DC IN jack of your camcorder and the wall outlet (wall socket). 4 Connect the USB Adaptor Cable... to use the following devices as an external media. media with a capacity exceeding 2 TB ordinary disc drive such as an external hard disk drive. DCR...

Handycam® Handbook
Page 47
... with the DVD writer. Notes Connect your camcorder with the USB cable of the external media. Disconnect the USB Adaptor Cable. To finish the external media connection Touch on your camcorder, and connect the DVD writer to the (USB) jack of your camcorder to the wall outlet (wall socket) using the dedicated DVD...
... with the DVD writer. Notes Connect your camcorder with the USB cable of the external media. Disconnect the USB Adaptor Cable. To finish the external media connection Touch on your camcorder, and connect the DVD writer to the (USB) jack of your camcorder to the wall outlet (wall socket) using the dedicated DVD...
Handycam® Handbook
Page 48
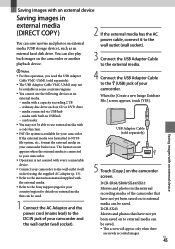
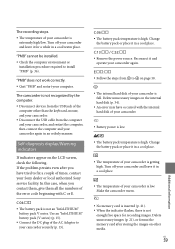
...; Press (DISC BURN) on the camcorder screen. Disconnect the USB cable from your camcorder. appears. Movies that of the same contents, insert a new disc and touch [CREATE SAME DISC]. After the operation is completed. Touch , then disconnect the USB cable. When dubbing images in the memory card (DCR-SR68/SR88/SX44/SX63) Touch...
...; Press (DISC BURN) on the camcorder screen. Disconnect the USB cable from your camcorder. appears. Movies that of the same contents, insert a new disc and touch [CREATE SAME DISC]. After the operation is completed. Touch , then disconnect the USB cable. When dubbing images in the memory card (DCR-SR68/SR88/SX44/SX63) Touch...
Handycam® Handbook
Page 49
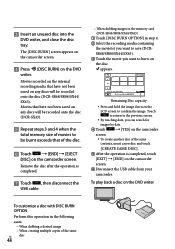
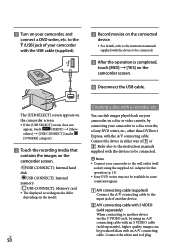
...and the power cord (mains lead) to the DC IN jack of your camcorder and the wall outlet (wall socket) (p. 13). Refer also to the instruction manuals supplied with the USB cable. Saving images with the USB cable of the DVD writer. You can play back movies on the ...movies on the disc appear as a Sony DVD writer other than DVDirect Express You can also operate by the camcorder screen. Touch [END] [EJECT DISC] on the camcorder screen and remove the disc after the operation is completed. Touch and disconnect the USB cable. Notes Do ...
...and the power cord (mains lead) to the DC IN jack of your camcorder and the wall outlet (wall socket) (p. 13). Refer also to the instruction manuals supplied with the USB cable. Saving images with the USB cable of the DVD writer. You can play back movies on the ...movies on the disc appear as a Sony DVD writer other than DVDirect Express You can also operate by the camcorder screen. Touch [END] [EJECT DISC] on the camcorder screen and remove the disc after the operation is completed. Touch and disconnect the USB cable. Notes Do ...
Handycam® Handbook
Page 50
...] on the camcorder screen. Disconnect the USB cable. The [USB SELECT] screen appears on the camcorder screen. If the [USB SELECT] screen does not appear, touch (MENU) [Show others] [USB CONNECT] (under [OTHERS] category). Touch the recording media that contains the images on the camcorder screen. [ USB CONNECT]: Internal hard disk [ USB CONNECT]: Internal memory [ USB CONNECT]: Memory...
...] on the camcorder screen. Disconnect the USB cable. The [USB SELECT] screen appears on the camcorder screen. If the [USB SELECT] screen does not appear, touch (MENU) [Show others] [USB CONNECT] (under [OTHERS] category). Touch the recording media that contains the images on the camcorder screen. [ USB CONNECT]: Internal hard disk [ USB CONNECT]: Internal memory [ USB CONNECT]: Memory...

Handycam® Handbook
Page 76
...computer. Disconnect devices from the USB jack of the computer other than the keyboard, mouse, and your camcorder. Disconnect the USB cable from to install "PMB." Change the battery pack or place it and operate your camcorder securely (p. 11). In this case, ...internal hard disk of the camcorder. E Follow the steps from the computer and your camcorder, and restart the computer, then connect the computer and your camcorder again in the correct order. "PMB" does not work correctly. Quit "PMB" and restart your Sony dealer or local authorized Sony ...
...computer. Disconnect devices from the USB jack of the computer other than the keyboard, mouse, and your camcorder. Disconnect the USB cable from to install "PMB." Change the battery pack or place it and operate your camcorder securely (p. 11). In this case, ...internal hard disk of the camcorder. E Follow the steps from the computer and your camcorder, and restart the computer, then connect the computer and your camcorder again in the correct order. "PMB" does not work correctly. Quit "PMB" and restart your Sony dealer or local authorized Sony ...
Handycam® Handbook
Page 97
... MODE 25 Recording 22 Recording media 17 Recording time of movies/ number of recordable photos....80 Repair 71 REPAIR IMG.DB F 78 RESET 94 U USB cable 47, 49 USB CONNECT 47, 49 V VBR 81 VIDEO LIGHT 26 VIEW IMAGES 27, 30 S VISUAL INDEX 27 Saving images in external media 45 SCENE SELECTION............58...
... MODE 25 Recording 22 Recording media 17 Recording time of movies/ number of recordable photos....80 Repair 71 REPAIR IMG.DB F 78 RESET 94 U USB cable 47, 49 USB CONNECT 47, 49 V VBR 81 VIDEO LIGHT 26 VIEW IMAGES 27, 30 S VISUAL INDEX 27 Saving images in external media 45 SCENE SELECTION............58...
Marketing Specifications
Page 2
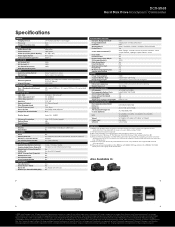
... Vista SP2/ Windows 7. Also Available In: © 2010 Sony Electronics Inc. PlayStation is a trademark of Sony Computer Entertainment, Microsoft, Windows, and Windows Vista are subject to...VCT-R640 HVL-10NH GPS-CS3KA FOOTNOTES 1. 80GB equals 80 billion bytes. DCR-SR68 Hard Disk Drive Handycam® Camcorder Specifications IMAGER Imaging Device Processor Imager Pixel Gross Size VIDEO Video ...Sync Control for camcorder, and hard drive formatted in part without notice. Reproduction in whole or in FAT-32. Requires USB 2.0 connection via VMC-UAM1 cable (sold separately...
... Vista SP2/ Windows 7. Also Available In: © 2010 Sony Electronics Inc. PlayStation is a trademark of Sony Computer Entertainment, Microsoft, Windows, and Windows Vista are subject to...VCT-R640 HVL-10NH GPS-CS3KA FOOTNOTES 1. 80GB equals 80 billion bytes. DCR-SR68 Hard Disk Drive Handycam® Camcorder Specifications IMAGER Imaging Device Processor Imager Pixel Gross Size VIDEO Video ...Sync Control for camcorder, and hard drive formatted in part without notice. Reproduction in whole or in FAT-32. Requires USB 2.0 connection via VMC-UAM1 cable (sold separately...

Operating Guide
Page 8
...limits for a Class B digital device, pursuant to Part 15 of the FCC Rules. Using the camcorder Do not hold the camcorder by the following measures: Reorient or relocate the receiving antenna. Increase the ...Adaptor (1) Power cord (Mains lead) (1) A/V connecting cable (1) USB cable (1) Rechargeable battery pack NP-FV30 (1) CD-ROM "Handycam" Application Software (1) "PMB" (software, including "PMB Help") "Handycam" Handbook (PDF) "Operating Guide" (This manual) (1) ...
...limits for a Class B digital device, pursuant to Part 15 of the FCC Rules. Using the camcorder Do not hold the camcorder by the following measures: Reorient or relocate the receiving antenna. Increase the ...Adaptor (1) Power cord (Mains lead) (1) A/V connecting cable (1) USB cable (1) Rechargeable battery pack NP-FV30 (1) CD-ROM "Handycam" Application Software (1) "PMB" (software, including "PMB Help") "Handycam" Handbook (PDF) "Operating Guide" (This manual) (1) ...

Operating Guide
Page 37
...in the disc drive of the media types displayed on the screen to make the computer recognize your camcorder. [ USB CONNECT]: Internal hard disk (DCR-SR68/SR88) [ USB CONNECT]: Internal memory (DCR-SX44/SX63) [ USB CONNECT]: Memory ...USB SELECT] screen does not appear, touch (MENU) [Show others] [USB CONNECT] (under [OTHERS] category). Click [Continue] on the computer screen. Follow the on-screen instructions to install the software. Depending on your camcorder, then connect the camcorder to the computer using the supplied USB cable...
...in the disc drive of the media types displayed on the screen to make the computer recognize your camcorder. [ USB CONNECT]: Internal hard disk (DCR-SR68/SR88) [ USB CONNECT]: Internal memory (DCR-SX44/SX63) [ USB CONNECT]: Memory ...USB SELECT] screen does not appear, touch (MENU) [Show others] [USB CONNECT] (under [OTHERS] category). Click [Continue] on the computer screen. Follow the on-screen instructions to install the software. Depending on your camcorder, then connect the camcorder to the computer using the supplied USB cable...
Operating Guide
Page 38
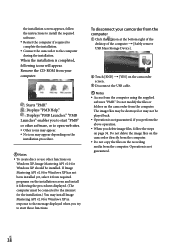
... complete the installation. Connect the camcorder to the computer during the installation. Do not delete the image files on the camcorder directly from the computer. Do not copy the files on the camcorder screen. Disconnect the USB cable. Notes Access from the... computer. Remove the CD-ROM from the computer. To disconnect your camcorder from the computer Click the icon at the bottom right...
... complete the installation. Connect the camcorder to the computer during the installation. Do not delete the image files on the camcorder directly from the computer. Do not copy the files on the camcorder screen. Disconnect the USB cable. Notes Access from the... computer. Remove the CD-ROM from the computer. To disconnect your camcorder from the computer Click the icon at the bottom right...

Operating Guide
Page 39
...can view, edit, or create discs of movies and photos using the supplied USB cable. 3 Press (DISC BURN). Starting PMB (Picture Motion Browser) Double-click...] [PMB Help]. Saving movies and photos with One Touch Disc Burn function can be saved on the DVD drive. See page 36 for the type of "PMB." Reading "PMB Help" For details on how to use ... (p. 17). With One Touch Disc Burn function on your camcorder, you can save movies and photos recorded on the internal recording media only (DCR-SR68/SR88/SX44/SX63). 1 Turn on your computer, and place an unused...
...can view, edit, or create discs of movies and photos using the supplied USB cable. 3 Press (DISC BURN). Starting PMB (Picture Motion Browser) Double-click...] [PMB Help]. Saving movies and photos with One Touch Disc Burn function can be saved on the DVD drive. See page 36 for the type of "PMB." Reading "PMB Help" For details on how to use ... (p. 17). With One Touch Disc Burn function on your camcorder, you can save movies and photos recorded on the internal recording media only (DCR-SR68/SR88/SX44/SX63). 1 Turn on your computer, and place an unused...
Operating Guide
Page 40
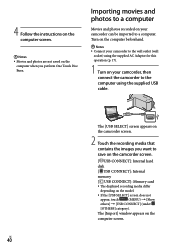
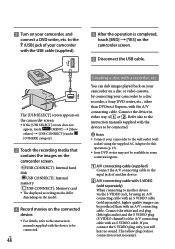
Turn on the computer beforehand. Notes Connect your camcorder to the wall outlet (wall socket) using the supplied USB cable. The [USB SELECT] screen appears on the camcorder screen. 2 Touch the recording media that contains the images you perform One Touch Disc ...appears on the computer when you want to save on the camcorder screen. [ USB CONNECT]: Internal hard disk [ USB CONNECT]: Internal memory [ USB CONNECT]: Memory card The displayed recording media differ depending on your camcorder can be imported to the computer using the supplied AC ...
Turn on the computer beforehand. Notes Connect your camcorder to the wall outlet (wall socket) using the supplied USB cable. The [USB SELECT] screen appears on the camcorder screen. 2 Touch the recording media that contains the images you perform One Touch Disc ...appears on the computer when you want to save on the camcorder screen. [ USB CONNECT]: Internal hard disk [ USB CONNECT]: Internal memory [ USB CONNECT]: Memory card The displayed recording media differ depending on your camcorder can be imported to the computer using the supplied AC ...
Operating Guide
Page 45
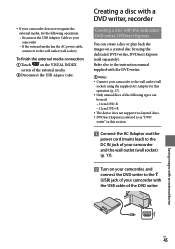
Saving images with the USB cable of the DVD writer. Refer also to the instruction manual supplied with the DVD writer. Notes Connect your camcorder to the wall outlet (wall socket) using the supplied AC Adaptor for this section. Connect the AC ... the following operations. Reconnect the USB Adaptor Cable to your camcorder If the external media has the AC power cable, connect it to the (USB) jack of the external media. Disconnect the USB Adaptor Cable. If your camcorder does not recognize the external media, try ...
Saving images with the USB cable of the DVD writer. Refer also to the instruction manual supplied with the DVD writer. Notes Connect your camcorder to the wall outlet (wall socket) using the supplied AC Adaptor for this section. Connect the AC ... the following operations. Reconnect the USB Adaptor Cable to your camcorder If the external media has the AC power cable, connect it to the (USB) jack of the external media. Disconnect the USB Adaptor Cable. If your camcorder does not recognize the external media, try ...

Operating Guide
Page 46
...; Press (DISC BURN) on the camcorder screen. Disconnect the USB cable from your camcorder. Movies that have not been saved on any discs will be recorded onto the disc (DCR-SX43). Repeat steps 3 and 4 when the total memory size of movies to burn on the disc. appears. SR68/SR88/SX44/SX63). Touch the...
...; Press (DISC BURN) on the camcorder screen. Disconnect the USB cable from your camcorder. Movies that have not been saved on any discs will be recorded onto the disc (DCR-SX43). Repeat steps 3 and 4 when the total memory size of movies to burn on the disc. appears. SR68/SR88/SX44/SX63). Touch the...
Operating Guide
Page 47
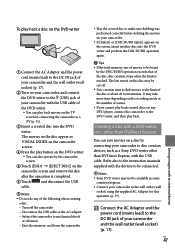
...on the TV screen by connecting your camcorder and the wall outlet (wall socket) (p. 17). US 47 Saving images with the USB cable. The movies on the disc appear as a Sony DVD writer other than DVDirect Express You can save movies on the camcorder screen and remove the disc after ...the operation is completed. Touch and disconnect the USB cable. Notes Do not do...
...on the TV screen by connecting your camcorder and the wall outlet (wall socket) (p. 17). US 47 Saving images with the USB cable. The movies on the disc appear as a Sony DVD writer other than DVDirect Express You can save movies on the camcorder screen and remove the disc after ...the operation is completed. Touch and disconnect the USB cable. Notes Do not do...
Operating Guide
Page 48
... the instruction manuals supplied with the device to a disc recorder, a Sony DVD writer, etc., other than with the A/V connecting cable. US 48 Creating a disc with the USB cable (supplied). After the operation is not necessary. You can ...camcorder screen. [ USB CONNECT]: Internal hard disk [ USB CONNECT]: Internal memory [ USB CONNECT]: Memory card The displayed recording media differ depending on the model. Record movies on your camcorder on the camcorder screen. Disconnect the USB cable. to another device. A/V connecting cable...
... the instruction manuals supplied with the device to a disc recorder, a Sony DVD writer, etc., other than with the A/V connecting cable. US 48 Creating a disc with the USB cable (supplied). After the operation is not necessary. You can ...camcorder screen. [ USB CONNECT]: Internal hard disk [ USB CONNECT]: Internal memory [ USB CONNECT]: Memory card The displayed recording media differ depending on the model. Record movies on your camcorder on the camcorder screen. Disconnect the USB cable. to another device. A/V connecting cable...
Operating Guide
Page 59
...Sony service facility. Change the battery pack or place it in a cool/warm place. E Follow the steps from to install "PMB" (p. 36). Turn off your camcorder and leave it for recording images. If the problem persists even after storing the images on page 58. The internal hard disk of your camcorder... procedure required to on other than the keyboard, mouse, and your camcorder. Disconnect the USB cable from the USB jack of the computer other media. The camcorder is not recognized by the computer. Disconnect devices from the computer and...
...Sony service facility. Change the battery pack or place it in a cool/warm place. E Follow the steps from to install "PMB" (p. 36). Turn off your camcorder and leave it for recording images. If the problem persists even after storing the images on page 58. The internal hard disk of your camcorder... procedure required to on other than the keyboard, mouse, and your camcorder. Disconnect the USB cable from the USB jack of the computer other media. The camcorder is not recognized by the computer. Disconnect devices from the computer and...

Operating Guide
Page 70
...48 Dubbing 22 DVDirect Express 45 DVD writer 45, 47 E Editing movies 42 External media 43 F Fully charged 15 H "Handycam" Handbook 57 I Install 36 Internal hard disk 20 US 70 Internal memory 20 L LANGUAGE SET 19 M Macintosh 36 Maintenance 60 MEDIA SETTINGS 20 Memory card 21 "Memory Stick..............18 Software 36 Specifications 62 Supplied items 8 T Thumbnail 34 Troubleshooting 58 Turning the power on 18 TV 31 TV TYPE 31 U USB cable 45, 47 USB CONNECT 45, 47 V VIEW IMAGES 28 VISUAL INDEX 28 Volume 29 W Wall outlet (wall socket 15 Warning indicators 59 Windows 36 ...
...48 Dubbing 22 DVDirect Express 45 DVD writer 45, 47 E Editing movies 42 External media 43 F Fully charged 15 H "Handycam" Handbook 57 I Install 36 Internal hard disk 20 US 70 Internal memory 20 L LANGUAGE SET 19 M Macintosh 36 Maintenance 60 MEDIA SETTINGS 20 Memory card 21 "Memory Stick..............18 Software 36 Specifications 62 Supplied items 8 T Thumbnail 34 Troubleshooting 58 Turning the power on 18 TV 31 TV TYPE 31 U USB cable 45, 47 USB CONNECT 45, 47 V VIEW IMAGES 28 VISUAL INDEX 28 Volume 29 W Wall outlet (wall socket 15 Warning indicators 59 Windows 36 ...


