Handycam® Handbook
Page 2
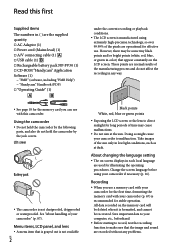
... When you use a memory card with your camcorder for the memory card you can use . Save important data to your camcorder to direct sunlight for illustrating the operating procedures. LCD screen Battery pack The camcorder is formatted, and cannot be ... USB cable (1) Rechargeable battery pack NP-FV30 (1) CD-ROM "Handycam" Application Software (1) "PMB" (software, including "PMB Help") "Handycam" Handbook (PDF) "Operating Guide" (1) under the current recording or playback conditions. The LCD screen...
... When you use a memory card with your camcorder for the memory card you can use . Save important data to your camcorder to direct sunlight for illustrating the operating procedures. LCD screen Battery pack The camcorder is formatted, and cannot be ... USB cable (1) Rechargeable battery pack NP-FV30 (1) CD-ROM "Handycam" Application Software (1) "PMB" (software, including "PMB Help") "Handycam" Handbook (PDF) "Operating Guide" (1) under the current recording or playback conditions. The LCD screen...

Handycam® Handbook
Page 4
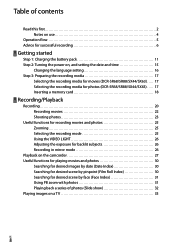
... recording/ playback may damage the internal hard disk drive of your camcorder. Note on using the camcorder at high altitudes (DCR-SR68/SR88) Do not turn on use your camcorder in very loud areas. Confirm the model name of your camcorder. The main differences in ...memory card when the access lamp (p. 19) is lit or flashing Remove the battery pack or AC Adaptor from shock by dropping, the camcorder has a drop sensor function (p. 70). On the drop sensor (DCR-SR68/SR88) To protect the internal hard disk from the camcorder, or subject the camcorder...
... recording/ playback may damage the internal hard disk drive of your camcorder. Note on using the camcorder at high altitudes (DCR-SR68/SR88) Do not turn on use your camcorder in very loud areas. Confirm the model name of your camcorder. The main differences in ...memory card when the access lamp (p. 19) is lit or flashing Remove the battery pack or AC Adaptor from shock by dropping, the camcorder has a drop sensor function (p. 70). On the drop sensor (DCR-SR68/SR88) To protect the internal hard disk from the camcorder, or subject the camcorder...

Handycam® Handbook
Page 5
... flow Getting started (p. 11) Prepare the power source and memory card. Recording movies and photos (p. 20) Recording movies p. 22 Changing the recording mode (p. 25) Expected recording time (MEDIA INFO, p. 67) Shooting photos p. 23 Playing movies and photos Playback on the camcorder p. 27 Playing images on a TV p. 33...
... flow Getting started (p. 11) Prepare the power source and memory card. Recording movies and photos (p. 20) Recording movies p. 22 Changing the recording mode (p. 25) Expected recording time (MEDIA INFO, p. 67) Shooting photos p. 23 Playing movies and photos Playback on the camcorder p. 27 Playing images on a TV p. 33...
Handycam® Handbook
Page 8
...the recording media 17 Selecting the recording media for movies (DCR-SR68/SR88/SX44/SX63).. . . . . 17 Selecting the recording media for photos (DCR-SR68/SR88/SX44/SX63).. . . . . 17 Inserting a memory card 18 Recording/Playback Recording 20 Recording movies 22 Shooting photos ...23 Useful functions for recording movies and photos 25 Zooming 25 Selecting the recording mode 25 Using the VIDEO LIGHT 26 Adjusting the exposure for backlit subjects 26 Recording in mirror mode 26 Playback on the camcorder...
...the recording media 17 Selecting the recording media for movies (DCR-SR68/SR88/SX44/SX63).. . . . . 17 Selecting the recording media for photos (DCR-SR68/SR88/SX44/SX63).. . . . . 17 Inserting a memory card 18 Recording/Playback Recording 20 Recording movies 22 Shooting photos ...23 Useful functions for recording movies and photos 25 Zooming 25 Selecting the recording mode 25 Using the VIDEO LIGHT 26 Adjusting the exposure for backlit subjects 26 Recording in mirror mode 26 Playback on the camcorder...

Handycam® Handbook
Page 9
... of contents Making good use of your camcorder Deleting movies and photos 36 Protecting recorded movies and photos (Protect 38 Dividing a movie 39 Capturing a photo from a movie 40 Dubbing/copying movies and photos from the internal recording media to memory card (DCR-SR68/SR88/SX44/SX63 41 Dubbing movies 41 ... 47 Creating a disc with a DVD writer, etc., other than DVDirect Express 49 Creating a disc with a recorder, etc 50 Customizing your camcorder Using menus 53 Operating menus 53 Using MY MENU 54 Using the OPTION MENU 55 Menu lists 56 MANUAL SETTINGS (Items to adjust for scene...
... of contents Making good use of your camcorder Deleting movies and photos 36 Protecting recorded movies and photos (Protect 38 Dividing a movie 39 Capturing a photo from a movie 40 Dubbing/copying movies and photos from the internal recording media to memory card (DCR-SR68/SR88/SX44/SX63 41 Dubbing movies 41 ... 47 Creating a disc with a DVD writer, etc., other than DVDirect Express 49 Creating a disc with a recorder, etc 50 Customizing your camcorder Using menus 53 Operating menus 53 Using MY MENU 54 Using the OPTION MENU 55 Menu lists 56 MANUAL SETTINGS (Items to adjust for scene...
Handycam® Handbook
Page 17
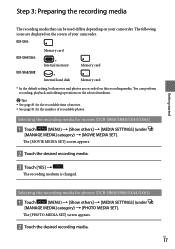
... [PHOTO MEDIA SET]. The [PHOTO MEDIA SET] screen appears. Touch the desired recording media. DCR-SX43: DCR-SX44/SX63: DCR-SR68/SR88: Memory card * Internal memory * Internal hard disk Memory card Memory card * In the default setting, both movies and photos are displayed on the screen of recordable photos. The... 81 for the recordable time of movies. See page 81 for the number of your camcorder. US 17 Getting started Selecting the recording media for movies (DCR-SR68/SR88/SX44/SX63) Touch (MENU) [Show others ] [MEDIA SETTINGS...
... [PHOTO MEDIA SET]. The [PHOTO MEDIA SET] screen appears. Touch the desired recording media. DCR-SX43: DCR-SX44/SX63: DCR-SR68/SR88: Memory card * Internal memory * Internal hard disk Memory card Memory card * In the default setting, both movies and photos are displayed on the screen of recordable photos. The... 81 for the recordable time of movies. See page 81 for the number of your camcorder. US 17 Getting started Selecting the recording media for movies (DCR-SR68/SR88/SX44/SX63) Touch (MENU) [Show others ] [MEDIA SETTINGS...

Handycam® Handbook
Page 18
... the recording medium to [MEMORY CARD] to work with your camcorder For recording movies, it is recommended that you use "Memory Stick PRO Duo" media of memory card that can be used with "Memory Stick PRO" media compatible equipment. Do not attach a label or the like on memory card (DCR-SR68/SR88/SX44/SX63). Types of "Memory Stick" media that...
... the recording medium to [MEMORY CARD] to work with your camcorder For recording movies, it is recommended that you use "Memory Stick PRO Duo" media of memory card that can be used with "Memory Stick PRO" media compatible equipment. Do not attach a label or the like on memory card (DCR-SR68/SR88/SX44/SX63). Types of "Memory Stick" media that...

Handycam® Handbook
Page 19
... FORMAT] (under [MANAGE MEDIA] category) [MEMORY CARD] (DCR-SR68/SR88/SX44/ SX63) [YES] [YES] . If you insert a new memory card. Getting started Open the cover, orient the memory card's notched corner as shown in the wrong direction, the memory card, memory card slot, or image data may be careful so that the memory card does not pop out and drop...
... FORMAT] (under [MANAGE MEDIA] category) [MEMORY CARD] (DCR-SR68/SR88/SX44/ SX63) [YES] [YES] . If you insert a new memory card. Getting started Open the cover, orient the memory card's notched corner as shown in the wrong direction, the memory card, memory card slot, or image data may be careful so that the memory card does not pop out and drop...

Handycam® Handbook
Page 20
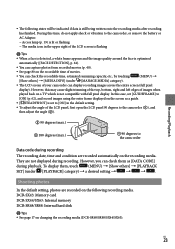
DCR-SR68/SR88 DCR-SX43/SX44/SX63 Tips When you finish recording or when you play back images, close the lens cover. 1 Fasten the grip belt. DCR-SR68/SR88 US 20 DCR-SX43: Memory card DCR-SX44/SX63: Internal memory DCR-SR68/SR88: Internal hard disk Tips See page 17 on the following recording media. To open the lens cover Slide the LENS COVER switch to open. Recording/Playback Recording In the default setting, movies are recorded on changing the recording media (DCR-SR68/SR88/SX44/SX63).
DCR-SR68/SR88 DCR-SX43/SX44/SX63 Tips When you finish recording or when you play back images, close the lens cover. 1 Fasten the grip belt. DCR-SR68/SR88 US 20 DCR-SX43: Memory card DCR-SX44/SX63: Internal memory DCR-SR68/SR88: Internal hard disk Tips See page 17 on the following recording media. To open the lens cover Slide the LENS COVER switch to open. Recording/Playback Recording In the default setting, movies are recorded on changing the recording media (DCR-SR68/SR88/SX44/SX63).
Handycam® Handbook
Page 23
...them as a guide. [ STEADYSHOT] is still being written onto the recording media after recording has finished. DCR-SX43: Memory card DCR-SX44/SX63: Internal memory DCR-SR68/SR88: Internal hard disk Tips See page 17 on the recordable time of movies. You can check the ... a desired setting . During this may cause slight trimming of the top, bottom, right and left edges of your camcorder can check them , touch (MENU) [Show others ] [MEDIA INFO] (under [MANAGE MEDIA] category). The LCD screen ...
...them as a guide. [ STEADYSHOT] is still being written onto the recording media after recording has finished. DCR-SX43: Memory card DCR-SX44/SX63: Internal memory DCR-SR68/SR88: Internal hard disk Tips See page 17 on the recordable time of movies. You can check the ... a desired setting . During this may cause slight trimming of the top, bottom, right and left edges of your camcorder can check them , touch (MENU) [Show others ] [MEDIA INFO] (under [MANAGE MEDIA] category). The LCD screen ...
Handycam® Handbook
Page 27
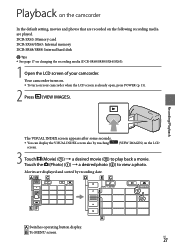
... operating button display. To MENU screen US 27 Movies are played. DCR-SX43: Memory card DCR-SX44/SX63: Internal memory DCR-SR68/SR88: Internal hard disk Tips See page 17 on changing the recording media (DCR-SR68/SR88/SX44/SX63). 1 Open the LCD screen of your camcorder when the LCD screen is already open, press POWER (p. 15). 2 Press (VIEW...
... operating button display. To MENU screen US 27 Movies are played. DCR-SX43: Memory card DCR-SX44/SX63: Internal memory DCR-SR68/SR88: Internal hard disk Tips See page 17 on changing the recording media (DCR-SR68/SR88/SX44/SX63). 1 Open the LCD screen of your camcorder when the LCD screen is already open, press POWER (p. 15). 2 Press (VIEW...

Handycam® Handbook
Page 28
... the OPTION MENU. Displays the screen to select the index type ([DATE INDEX]/[ FILM ROLL]/ [ FACE]) (p. 30, 30, 31). / : Displays movies recorded on a memory card.) Playing movies Your camcorder starts playing the selected movie.
... the OPTION MENU. Displays the screen to select the index type ([DATE INDEX]/[ FILM ROLL]/ [ FACE]) (p. 30, 30, 31). / : Displays movies recorded on a memory card.) Playing movies Your camcorder starts playing the selected movie.
Handycam® Handbook
Page 29
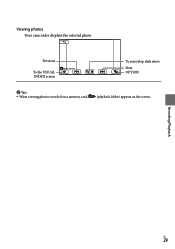
Recording/Playback US 29 Viewing photos Your camcorder displays the selected photo. Previous To the VISUAL INDEX screen To start/stop slide show Next OPTION Tips When viewing photos recorded on a memory card, (playback folder) appears on the screen.
Recording/Playback US 29 Viewing photos Your camcorder displays the selected photo. Previous To the VISUAL INDEX screen To start/stop slide show Next OPTION Tips When viewing photos recorded on a memory card, (playback folder) appears on the screen.
Handycam® Handbook
Page 30
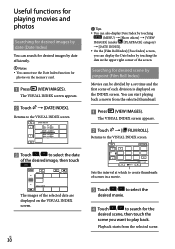
... pinpoint (Film Roll Index) Movies can be divided by date efficiently. Notes You cannot use the Date Index function for photos on the memory card. Press (VIEW IMAGES). Returns to the VISUAL INDEX screen Touch / to create thumbnails of scenes in the upper right corner of the screen...
... pinpoint (Film Roll Index) Movies can be divided by date efficiently. Notes You cannot use the Date Index function for photos on the memory card. Press (VIEW IMAGES). Returns to the VISUAL INDEX screen Touch / to create thumbnails of scenes in the upper right corner of the screen...
Handycam® Handbook
Page 36
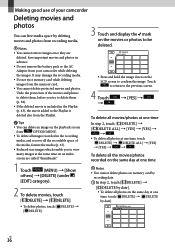
... [ DELETE ALL] [YES] [YES] . To delete all photos on the same day at the same time on memory card by recording date. In step 2, touch [ DELETE] [ DELETE by date]. To delete all photos at one time, touch [ DELETE] [... the battery pack or the AC Adaptor from your camcorder Deleting movies and photos You can delete an image on the LCD screen to be deleted. Press and hold the image down on the playback screen from the memory card. You cannot delete protected movies and photos...
... [ DELETE ALL] [YES] [YES] . To delete all photos on the same day at the same time on memory card by recording date. In step 2, touch [ DELETE] [ DELETE by date]. To delete all photos at one time, touch [ DELETE] [... the battery pack or the AC Adaptor from your camcorder Deleting movies and photos You can delete an image on the LCD screen to be deleted. Press and hold the image down on the playback screen from the memory card. You cannot delete protected movies and photos...

Handycam® Handbook
Page 38
... same day at one time Note You cannot select [ PRT. by date]. To protect all the movies and photos recorded on the memory card. In step 2, touch [ PROTECT] [ PRT. To undo the protection of the desired movies/photos, then touch [UNPROTECT] . Protecting recorded movies...
... same day at one time Note You cannot select [ PRT. by date]. To protect all the movies and photos recorded on the memory card. In step 2, touch [ PROTECT] [ PRT. To undo the protection of the desired movies/photos, then touch [UNPROTECT] . Protecting recorded movies...
Handycam® Handbook
Page 39
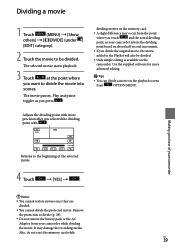
...protected movie. Also, do not eject the memory card while US 39 The movie pauses. Adjusts the dividing point with more advanced editing. Tips You can divide a movie on the playback screen from your camcorder Returns to the beginning of your camcorder while dividing the movie. It may occur ... the point where you divide the original movie, the movie added to divide the movie into scenes. Play and pause toggles as your camcorder selects the dividing point based on the memory card. A slight difference may damage the recording media.
...protected movie. Also, do not eject the memory card while US 39 The movie pauses. Adjusts the dividing point with more advanced editing. Tips You can divide a movie on the playback screen from your camcorder Returns to the beginning of your camcorder while dividing the movie. It may occur ... the point where you divide the original movie, the movie added to divide the movie into scenes. Play and pause toggles as your camcorder selects the dividing point based on the memory card. A slight difference may damage the recording media.
Handycam® Handbook
Page 41
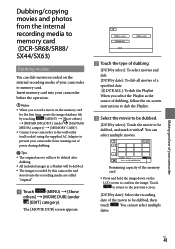
... touching (MENU) [Show others ] [MOVIE DUB] (under [MANAGE MEDIA] category) [MEMORY CARD]. Connect your camcorder to the wall outlet (wall socket) using the supplied AC Adaptor to prevent your camcorder from the internal recording media to memory card (DCR-SR68/SR88/ SX44/SX63) Dubbing movies You can select multiple movies. You cannot select multiple...
... touching (MENU) [Show others ] [MOVIE DUB] (under [MANAGE MEDIA] category) [MEMORY CARD]. Connect your camcorder to the wall outlet (wall socket) using the supplied AC Adaptor to prevent your camcorder from the internal recording media to memory card (DCR-SR68/SR88/ SX44/SX63) Dubbing movies You can select multiple movies. You cannot select multiple...
Handycam® Handbook
Page 42
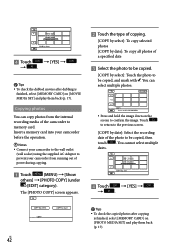
... the operation. Notes Connect your camcorder from the internal recording media of the camcorder to prevent your camcorder to the wall outlet (wall socket) using the supplied AC Adaptor to memory card. Copying photos You can select multiple photos. Press and hold the.... Touch [YES] . Tips To check the dubbed movies after copying is finished, select [MEMORY CARD] on [PHOTO MEDIA SET] and play them back (p. 17). The [PHOTO COPY] screen appears. Touch the type of copying. [COPY by ...
... the operation. Notes Connect your camcorder from the internal recording media of the camcorder to prevent your camcorder to the wall outlet (wall socket) using the supplied AC Adaptor to memory card. Copying photos You can select multiple photos. Press and hold the.... Touch [YES] . Tips To check the dubbed movies after copying is finished, select [MEMORY CARD] on [PHOTO MEDIA SET] and play them back (p. 17). The [PHOTO COPY] screen appears. Touch the type of copying. [COPY by ...

Handycam® Handbook
Page 43
... the image on the LCD screen to the Playlist appear. Movies added to confirm the image. Also, do not eject the memory card while editing movies on the memory card. You cannot add photos to the Playlist. Tips You can add a maximum of 99 movies...the previous screen. Touch [YES] . Notes Do not remove the battery pack or the AC Adaptor from your camcorder US 43 Creating the Playlist Touch (MENU) [Show others ] [PLAYLIST] (under [EDIT] category). Touch [ ADD]. ...
... the image on the LCD screen to the Playlist appear. Movies added to confirm the image. Also, do not eject the memory card while editing movies on the memory card. You cannot add photos to the Playlist. Tips You can add a maximum of 99 movies...the previous screen. Touch [YES] . Notes Do not remove the battery pack or the AC Adaptor from your camcorder US 43 Creating the Playlist Touch (MENU) [Show others ] [PLAYLIST] (under [EDIT] category). Touch [ ADD]. ...


