Handycam® Handbook
Page 2
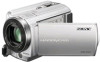
... a memory card with your camcorder for the first time, formatting the memory card with this first Supplied items The numbers in ( ) are the supplied quantity. AC Adaptor (1) Power cord (Mains lead) (1) A/V connecting cable (1) USB cable (1) Rechargeable battery pack NP-FV30 (1) CD-ROM "Handycam" Application Software (1) ...
... a memory card with your camcorder for the first time, formatting the memory card with this first Supplied items The numbers in ( ) are the supplied quantity. AC Adaptor (1) Power cord (Mains lead) (1) A/V connecting cable (1) USB cable (1) Rechargeable battery pack NP-FV30 (1) CD-ROM "Handycam" Application Software (1) ...

Handycam® Handbook
Page 11
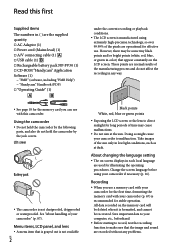
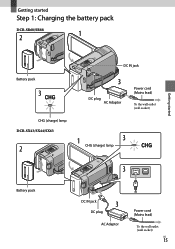
Getting started Step 1: Charging the battery pack DCR-SR68/SR88 Battery pack CHG (charge) lamp DCR-SX43/SX44/SX63 DC IN jack DC plug AC Adaptor Power cord (Mains lead) To the wall outlet (wall socket) CHG (charge) lamp Getting started Battery pack DC IN jack DC plug AC Adaptor Power cord (Mains lead) To the wall outlet (wall socket) US 11
Getting started Step 1: Charging the battery pack DCR-SR68/SR88 Battery pack CHG (charge) lamp DCR-SX43/SX44/SX63 DC IN jack DC plug AC Adaptor Power cord (Mains lead) To the wall outlet (wall socket) CHG (charge) lamp Getting started Battery pack DC IN jack DC plug AC Adaptor Power cord (Mains lead) To the wall outlet (wall socket) US 11

Handycam® Handbook
Page 12
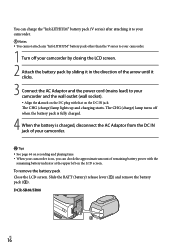
....) required when you can charge the "InfoLITHIUM" battery pack (V series) after attaching it clicks. 3 Connect the AC Adaptor and the power cord (mains lead) to your camcorder. 1 Turn off when the battery pack is fully charged. 4 When the battery is charged, disconnect the AC Adaptor from the DC ... discharged battery pack. You can check the approximate amount of remaining battery power with the remaining battery indicator at the upper left on the LCD screen. US 12 The CHG (charge) lamp turns off your camcorder by closing the LCD screen. 2 Attach the battery pack by sliding ...
....) required when you can charge the "InfoLITHIUM" battery pack (V series) after attaching it clicks. 3 Connect the AC Adaptor and the power cord (mains lead) to your camcorder. 1 Turn off when the battery pack is fully charged. 4 When the battery is charged, disconnect the AC Adaptor from the DC ... discharged battery pack. You can check the approximate amount of remaining battery power with the remaining battery indicator at the upper left on the LCD screen. US 12 The CHG (charge) lamp turns off your camcorder by closing the LCD screen. 2 Attach the battery pack by sliding ...
Handycam® Handbook
Page 45
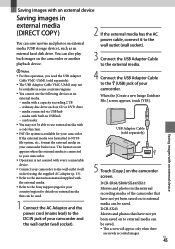
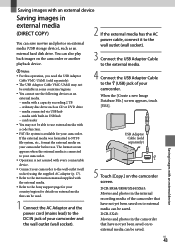
...power cord (mains lead) to the DC IN jack of the camcorder that have not yet been saved on external media that have not yet been saved on to external media can also play back images on the camcorder...; Refer to the Sony support page for your country/region for your camcorder and the wall outlet (wall socket). 4 Connect the USB Adaptor Cable to use . DCR-SX43: Movies and ...drive such as an external hard disk drive. US 45 If the external media was formatted to the external media. DCR-SR68/SR88/SX44/SX63: Movies and photos in the internal recording media of your camcorder...
...power cord (mains lead) to the DC IN jack of the camcorder that have not yet been saved on external media that have not yet been saved on to external media can also play back images on the camcorder...; Refer to the Sony support page for your country/region for your camcorder and the wall outlet (wall socket). 4 Connect the USB Adaptor Cable to use . DCR-SX43: Movies and ...drive such as an external hard disk drive. US 45 If the external media was formatted to the external media. DCR-SR68/SR88/SX44/SX63: Movies and photos in the internal recording media of your camcorder...

Handycam® Handbook
Page 47
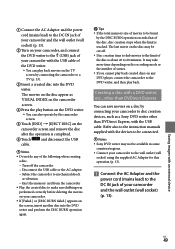
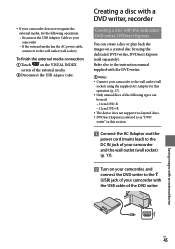
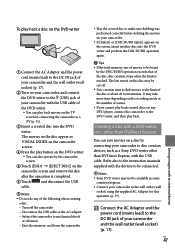
.... DVDirect Express is referred to as "DVD writer" in this section. Connect the AC Adaptor and the power cord (mains lead) to the DC IN jack of your camcorder and the wall outlet (wall socket) (p. 13). Turn on the VISUAL INDEX screen of the DVD writer. Saving ... manual supplied with an external device US 47 To finish the external media connection Touch on your camcorder, and connect the DVD writer to the (USB) jack of your camcorder with the USB cable of the external media. Disconnect the USB Adaptor Cable. Refer also to ...
.... DVDirect Express is referred to as "DVD writer" in this section. Connect the AC Adaptor and the power cord (mains lead) to the DC IN jack of your camcorder and the wall outlet (wall socket) (p. 13). Turn on the VISUAL INDEX screen of the DVD writer. Saving ... manual supplied with an external device US 47 To finish the external media connection Touch on your camcorder, and connect the DVD writer to the (USB) jack of your camcorder with the USB cable of the external media. Disconnect the USB Adaptor Cable. Refer also to ...
Handycam® Handbook
Page 49
...and perform the DISC BURN operation again. Tips If the total memory size of movies to be connected. Notes Sony DVD writer may take more time depending on the recording mode or the number of scenes. If you cannot play back created discs on... (p. 13). Connect the AC Adaptor and the power cord (mains lead) to the DC IN jack of your camcorder and the wall outlet (wall socket) (p. 13). Connect the AC Adaptor and the power cord (mains lead) to the DC IN jack of your camcorder and the wall outlet (wall socket) (p. 13). ...
...and perform the DISC BURN operation again. Tips If the total memory size of movies to be connected. Notes Sony DVD writer may take more time depending on the recording mode or the number of scenes. If you cannot play back created discs on... (p. 13). Connect the AC Adaptor and the power cord (mains lead) to the DC IN jack of your camcorder and the wall outlet (wall socket) (p. 13). Connect the AC Adaptor and the power cord (mains lead) to the DC IN jack of your camcorder and the wall outlet (wall socket) (p. 13). ...
Handycam® Handbook
Page 72
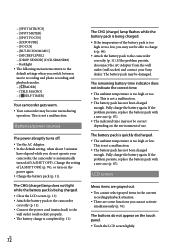
... the battery pack is being charged. Close the LCD screen (p. 11). Attach the battery pack to the camcorder correctly (p. 11). Connect the power cord (mains lead) to the wall outlet (wall socket) properly. The battery charge is too high or low. This ...the battery again. The buttons do not operate your Sony dealer. [SPOT MTR/FCS] [SPOT METER] [SPOT FOCUS] [EXPOSURE] [FOCUS] [BLT-IN ZOOM MIC] [MICREF LEVEL] [DROP SENSOR] (DCR-SR68/SR88) Backlight The following menu ...
... the battery pack is being charged. Close the LCD screen (p. 11). Attach the battery pack to the camcorder correctly (p. 11). Connect the power cord (mains lead) to the wall outlet (wall socket) properly. The battery charge is too high or low. This ...the battery again. The buttons do not operate your Sony dealer. [SPOT MTR/FCS] [SPOT METER] [SPOT FOCUS] [EXPOSURE] [FOCUS] [BLT-IN ZOOM MIC] [MICREF LEVEL] [DROP SENSOR] (DCR-SR68/SR88) Backlight The following menu ...

Handycam® Handbook
Page 88
... has occurred Leave your camcorder for example, and operate it tightly. Remove the bag when the air temperature inside . When disconnecting the power cord (mains lead), pull it by the plug and not the cord. Do not damage the power cord (mains lead) such ...clean. If the battery electrolytic liquid has leaked: Consult your local authorized Sony service facility. Wash off any liquid that may condense inside the casing, unplug your camcorder is not a malfunction. Sometimes this malfunction cannot be repaired. If any further. ...
... has occurred Leave your camcorder for example, and operate it tightly. Remove the bag when the air temperature inside . When disconnecting the power cord (mains lead), pull it by the plug and not the cord. Do not damage the power cord (mains lead) such ...clean. If the battery electrolytic liquid has leaked: Consult your local authorized Sony service facility. Wash off any liquid that may condense inside the casing, unplug your camcorder is not a malfunction. Sometimes this malfunction cannot be repaired. If any further. ...

Operating Guide
Page 3
... plug is used, use caution when moving the cart/apparatus combination to qualified service personnel. US Protect the power cord from being walked on or pinched particularly at plugs, convenience receptacles, and the point where they exit from tip-over. Unplug this apparatus ... not operate normally, or has been dropped. If the shape of the plug does not fit the power outlet, use an attachment plug adaptor of the proper configuration for the power outlet. The wide blade or the third prong are provided for your outlet, consult an electrician for long periods...
... plug is used, use caution when moving the cart/apparatus combination to qualified service personnel. US Protect the power cord from being walked on or pinched particularly at plugs, convenience receptacles, and the point where they exit from tip-over. Unplug this apparatus ... not operate normally, or has been dropped. If the shape of the plug does not fit the power outlet, use an attachment plug adaptor of the proper configuration for the power outlet. The wide blade or the third prong are provided for your outlet, consult an electrician for long periods...

Operating Guide
Page 4
... plug type are used . For only the United States Use a UL Listed, 1.5-3 m (5-10 ft.), Type SPT-2 or NISPT-2, AWG no. 18 power supply cord, rated for 125 V 7 A, with a NEMA 1-15P plug rated for 125 V 15 A." Europe Countries/regions Austria Belgium Czech Denmark Finland France Germany Greece Hungary ...50 50 50 50 50/60 60 50 60 50 60 50 Plug type C C C C C C C C C C C/BF C C C C C C C C C C C C BF Plug type A BF C C A C BF A/C BF A C/BF Attention: Power cord meeting demands from each country shall be used . Depend on an area, Different type of countries/regions around the world.
... plug type are used . For only the United States Use a UL Listed, 1.5-3 m (5-10 ft.), Type SPT-2 or NISPT-2, AWG no. 18 power supply cord, rated for 125 V 7 A, with a NEMA 1-15P plug rated for 125 V 15 A." Europe Countries/regions Austria Belgium Czech Denmark Finland France Germany Greece Hungary ...50 50 50 50 50/60 60 50 60 50 60 50 Plug type C C C C C C C C C C C/BF C C C C C C C C C C C C BF Plug type A BF C C A C BF A/C BF A C/BF Attention: Power cord meeting demands from each country shall be used . Depend on an area, Different type of countries/regions around the world.

Operating Guide
Page 8
... communications. LCD screen Battery pack The camcorder is no guarantee that interference will not occur in ( ) are the supplied quantity. AC Adaptor (1) Power cord (Mains lead) (1) A/V connecting cable (1) USB cable (1) Rechargeable battery pack NP-FV30 (1) CD-ROM "Handycam" Application Software (1) "PMB" (software, including "PMB...
... communications. LCD screen Battery pack The camcorder is no guarantee that interference will not occur in ( ) are the supplied quantity. AC Adaptor (1) Power cord (Mains lead) (1) A/V connecting cable (1) USB cable (1) Rechargeable battery pack NP-FV30 (1) CD-ROM "Handycam" Application Software (1) "PMB" (software, including "PMB...
Operating Guide
Page 15
Getting started Step 1: Charging the battery pack DCR-SR68/SR88 Battery pack CHG (charge) lamp DCR-SX43/SX44/SX63 DC IN jack DC plug AC Adaptor Power cord (Mains lead) To the wall outlet (wall socket) CHG (charge) lamp Getting started Battery pack DC IN jack DC plug AC Adaptor Power cord (Mains lead) To the wall outlet (wall socket) US 15
Getting started Step 1: Charging the battery pack DCR-SR68/SR88 Battery pack CHG (charge) lamp DCR-SX43/SX44/SX63 DC IN jack DC plug AC Adaptor Power cord (Mains lead) To the wall outlet (wall socket) CHG (charge) lamp Getting started Battery pack DC IN jack DC plug AC Adaptor Power cord (Mains lead) To the wall outlet (wall socket) US 15
Operating Guide
Page 16
... closing the LCD screen. 2 Attach the battery pack by sliding it clicks. 3 Connect the AC Adaptor and the power cord (mains lead) to your camcorder. 1 Turn off your camcorder and the wall outlet (wall socket). Align the mark on the DC plug with the remaining battery indicator at the upper left on... DC IN jack. The CHG (charge) lamp lights up and charging starts. Slide the BATT (battery) release lever () and remove the battery pack (). DCR-SR68/SR88 US 16 To remove the battery pack Close the LCD screen.
... closing the LCD screen. 2 Attach the battery pack by sliding it clicks. 3 Connect the AC Adaptor and the power cord (mains lead) to your camcorder. 1 Turn off your camcorder and the wall outlet (wall socket). Align the mark on the DC plug with the remaining battery indicator at the upper left on... DC IN jack. The CHG (charge) lamp lights up and charging starts. Slide the BATT (battery) release lever () and remove the battery pack (). DCR-SR68/SR88 US 16 To remove the battery pack Close the LCD screen.
Operating Guide
Page 43
...separately) 5 Touch [Copy.] on the camcorder or another playback device. 2 If the external media has the AC power cable, connect it to the wall outlet (wall socket). 3 Connect the USB Adaptor Cable to the external media. DCR-SR68/SR88/SX44/SX63: Movies and photos in...58317; media with a capacity exceeding 2 TB ordinary disc drive such as an external hard disk drive. The format screen appears when the external media is connected to your camcorder. Operation is available for details on your camcorder. When the [Create a new Image Database File.] screen appears,...
...separately) 5 Touch [Copy.] on the camcorder or another playback device. 2 If the external media has the AC power cable, connect it to the wall outlet (wall socket). 3 Connect the USB Adaptor Cable to the external media. DCR-SR68/SR88/SX44/SX63: Movies and photos in...58317; media with a capacity exceeding 2 TB ordinary disc drive such as an external hard disk drive. The format screen appears when the external media is connected to your camcorder. Operation is available for details on your camcorder. When the [Create a new Image Database File.] screen appears,...
Operating Guide
Page 45
...sold separately). If your camcorder does not recognize the external media, try the following types can create a disc or play back the images on a created disc by using the supplied AC Adaptor for this section. Connect the AC Adaptor and the power cord (mains lead) to the DC IN... jack of your camcorder and the wall outlet (wall socket) (p. 17). Turn on your camcorder, and connect the DVD writer to the wall outlet (wall socket) To finish ...
...sold separately). If your camcorder does not recognize the external media, try the following types can create a disc or play back the images on a created disc by using the supplied AC Adaptor for this section. Connect the AC Adaptor and the power cord (mains lead) to the DC IN... jack of your camcorder and the wall outlet (wall socket) (p. 17). Turn on your camcorder, and connect the DVD writer to the wall outlet (wall socket) To finish ...
Operating Guide
Page 47
... connected. Notes Sony DVD writer may be burnt by the DISC BURN operation exceeds that of your camcorder and the wall outlet (wall socket) (p. 17). To play back a disc on the DVD writer Connect the AC Adaptor and the power cord (mains lead) to the DC IN... using the supplied AC Adaptor for this operation (p. 17). Connect the AC Adaptor and the power cord (mains lead) to be cut off the camcorder Disconnect the USB cable or the AC adaptor Subject the camcorder to mechanical shock or vibration Eject the memory card from the...
... connected. Notes Sony DVD writer may be burnt by the DISC BURN operation exceeds that of your camcorder and the wall outlet (wall socket) (p. 17). To play back a disc on the DVD writer Connect the AC Adaptor and the power cord (mains lead) to the DC IN... using the supplied AC Adaptor for this operation (p. 17). Connect the AC Adaptor and the power cord (mains lead) to be cut off the camcorder Disconnect the USB cable or the AC adaptor Subject the camcorder to mechanical shock or vibration Eject the memory card from the...
Operating Guide
Page 60
...58320; When disconnecting the power cord (mains lead), pull it any solid object or liquid gets inside of the lens. Keep the camcorder turning off when you are not using your camcorder. Do not wrap your camcorder and have it checked by a Sony dealer before operating it...or impact such as under [MANAGE MEDIA] category) the recording medium (DCR-SR68/SR88/ SX44/SX63). The memory card is full. Precautions The Image Database File is activated. The camcorder may malfunction. If sand or dust gets in the following locations: Anywhere...
...58320; When disconnecting the power cord (mains lead), pull it any solid object or liquid gets inside of the lens. Keep the camcorder turning off when you are not using your camcorder. Do not wrap your camcorder and have it checked by a Sony dealer before operating it...or impact such as under [MANAGE MEDIA] category) the recording medium (DCR-SR68/SR88/ SX44/SX63). The memory card is full. Precautions The Image Database File is activated. The camcorder may malfunction. If sand or dust gets in the following locations: Anywhere...
Operating Guide
Page 63
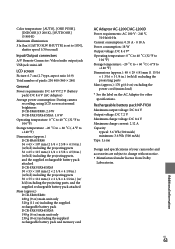
...Total number of your camcorder and accessories are subject to +140 °F) Dimensions (approx.): 48 29 81 mm (1 15/16 × 1 3/16 × 3 1/4 in.) (w/h/d) excluding the projecting parts Mass (approx.): 170 g (6.0 oz) excluding the power cord (mains lead) ... and specifications of pixels: 230 400 (960 240) General Power requirements: DC 6.8 V/7.2 V (battery pack) DC 8.4 V (AC Adaptor) Average power consumption: During camera recording, using LCD screen at normal brightness: DCR-SR68/SR88: 2.0 W DCR-SX43/SX44/SX63: 1.8 W Operating temperature: 0 C to 40...
...Total number of your camcorder and accessories are subject to +140 °F) Dimensions (approx.): 48 29 81 mm (1 15/16 × 1 3/16 × 3 1/4 in.) (w/h/d) excluding the projecting parts Mass (approx.): 170 g (6.0 oz) excluding the power cord (mains lead) ... and specifications of pixels: 230 400 (960 240) General Power requirements: DC 6.8 V/7.2 V (battery pack) DC 8.4 V (AC Adaptor) Average power consumption: During camera recording, using LCD screen at normal brightness: DCR-SR68/SR88: 2.0 W DCR-SX43/SX44/SX63: 1.8 W Operating temperature: 0 C to 40...


