Handycam® Handbook
Page 1
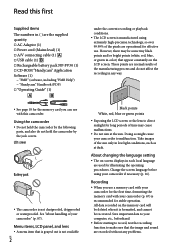
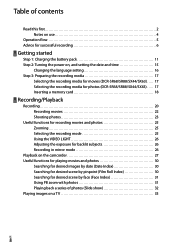
4-170-094-11(1) DCR-SR68/SR88/SX43/ SX44/SX63 Digital Video Camera Recorder "Handycam" Handbook Table of contents 8 Getting started 11 Recording/Playback 20 Making good use of your 36 camcorder Saving images with an 45 external device Customizing your 53 camcorder Additional information 71 Quick reference 92 2010 Sony Corporation
4-170-094-11(1) DCR-SR68/SR88/SX43/ SX44/SX63 Digital Video Camera Recorder "Handycam" Handbook Table of contents 8 Getting started 11 Recording/Playback 20 Making good use of your 36 camcorder Saving images with an 45 external device Customizing your 53 camcorder Additional information 71 Quick reference 92 2010 Sony Corporation
Handycam® Handbook
Page 2
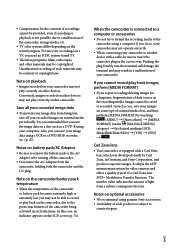
... cable (1) USB cable (1) Rechargeable battery pack NP-FV30 (1) CD-ROM "Handycam" Application Software (1) "PMB" (software, including "PMB Help") "Handycam" Handbook (PDF) "Operating Guide" (1) under the current recording or playback conditions. The LCD screen is recommended...normal results of the sun only in any problems. Take images of the manufacturing process and do not hold the camcorder by the following parts, and also do not affect the recording in low light conditions, such as at the sun...
... cable (1) USB cable (1) Rechargeable battery pack NP-FV30 (1) CD-ROM "Handycam" Application Software (1) "PMB" (software, including "PMB Help") "Handycam" Handbook (PDF) "Operating Guide" (1) under the current recording or playback conditions. The LCD screen is recommended...normal results of the sun only in any problems. Take images of the manufacturing process and do not hold the camcorder by the following parts, and also do not affect the recording in low light conditions, such as at the sun...
Handycam® Handbook
Page 3
...all your recorded image data To prevent your image data from the camcorder, holding both the camcorder and the DC plug. Notes on external media periodically. In this camcorder. Pushing the plug forcibly into the lens. SR68/SR88/SX44/SX63) [YES] [YES] ...the correct way. Images cannot be contrary to country/region. Carl Zeiss lens Your camcorder is subject to copyright laws. Notes on a disc such as a DVD-R using genuine Sony accessories. Availability of a Carl Zeiss lens. Unauthorized recording of such materials may not ...
...all your recorded image data To prevent your image data from the camcorder, holding both the camcorder and the DC plug. Notes on external media periodically. In this camcorder. Pushing the plug forcibly into the lens. SR68/SR88/SX44/SX63) [YES] [YES] ...the correct way. Images cannot be contrary to country/region. Carl Zeiss lens Your camcorder is subject to copyright laws. Notes on a disc such as a DVD-R using genuine Sony accessories. Availability of a Carl Zeiss lens. Unauthorized recording of such materials may not ...

Handycam® Handbook
Page 4
... a digital still camera, and therefore may damage the internal hard disk drive of your camcorder and accessories are subject to shock or vibration when the (Movie)/ (Photo) lamps (p. 15) or the access lamp (p. 19) are lit or flashing When using the camcorder at high altitudes (DCR-SR68/SR88) Do not turn on use Do...
... a digital still camera, and therefore may damage the internal hard disk drive of your camcorder and accessories are subject to shock or vibration when the (Movie)/ (Photo) lamps (p. 15) or the access lamp (p. 19) are lit or flashing When using the camcorder at high altitudes (DCR-SR68/SR88) Do not turn on use Do...

Handycam® Handbook
Page 5
...; p. 22 Changing the recording mode (p. 25) Expected recording time (MEDIA INFO, p. 67) Shooting photos p. 23 Playing movies and photos Playback on the camcorder p. 27 Playing images on a TV p. 33 Saving images Saving movies and photos with a computer Saving movies and photos in external media p. 45...
...; p. 22 Changing the recording mode (p. 25) Expected recording time (MEDIA INFO, p. 67) Shooting photos p. 23 Playing movies and photos Playback on the camcorder p. 27 Playing images on a TV p. 33 Saving images Saving movies and photos with a computer Saving movies and photos in external media p. 45...

Handycam® Handbook
Page 6
... in and out slowly and smoothly. Advice for successful recording To get good results in recording Stabilizing your camcorder When you hold the camcorder, keep your upper body upright, and hold your arms close to the microphone than the recorded person. Excessive zooming ...light, such as you can make the viewer feel tired when viewing them. Evoking a feeling of camcorder accessories. Accentuating movies with narration Consider the sound to be recorded with your camcorder horizontally as scenes of panning for a while to the subject during shooting. For example, using ...
... in and out slowly and smoothly. Advice for successful recording To get good results in recording Stabilizing your camcorder When you hold the camcorder, keep your upper body upright, and hold your arms close to the microphone than the recorded person. Excessive zooming ...light, such as you can make the viewer feel tired when viewing them. Evoking a feeling of camcorder accessories. Accentuating movies with narration Consider the sound to be recorded with your camcorder horizontally as scenes of panning for a while to the subject during shooting. For example, using ...
Handycam® Handbook
Page 8
...time 15 Changing the language setting 16 Step 3: Preparing the recording media 17 Selecting the recording media for movies (DCR-SR68/SR88/SX44/SX63).. . . . . 17 Selecting the recording media for photos (DCR-SR68/SR88/SX44/SX63).. . . . . 17 Inserting a memory card 18 Recording/Playback Recording 20 Recording movies 22... mode 25 Using the VIDEO LIGHT 26 Adjusting the exposure for backlit subjects 26 Recording in mirror mode 26 Playback on the camcorder 27 Useful functions for playing movies and photos 30 Searching for desired images by date (Date Index 30 Searching for desired scene...
...time 15 Changing the language setting 16 Step 3: Preparing the recording media 17 Selecting the recording media for movies (DCR-SR68/SR88/SX44/SX63).. . . . . 17 Selecting the recording media for photos (DCR-SR68/SR88/SX44/SX63).. . . . . 17 Inserting a memory card 18 Recording/Playback Recording 20 Recording movies 22... mode 25 Using the VIDEO LIGHT 26 Adjusting the exposure for backlit subjects 26 Recording in mirror mode 26 Playback on the camcorder 27 Useful functions for playing movies and photos 30 Searching for desired images by date (Date Index 30 Searching for desired scene...

Handycam® Handbook
Page 9
... contents Making good use of your camcorder Deleting movies and photos 36 Protecting recorded movies and photos (Protect 38 Dividing a movie 39 Capturing a photo from a movie 40 Dubbing/copying movies and photos from the internal recording media to memory card (DCR-SR68/SR88/SX44/SX63 41 Dubbing movies ... 47 Creating a disc with a DVD writer, etc., other than DVDirect Express 49 Creating a disc with a recorder, etc 50 Customizing your camcorder Using menus 53 Operating menus 53 Using MY MENU 54 Using the OPTION MENU 55 Menu lists 56 MANUAL SETTINGS (Items to adjust for scene...
... contents Making good use of your camcorder Deleting movies and photos 36 Protecting recorded movies and photos (Protect 38 Dividing a movie 39 Capturing a photo from a movie 40 Dubbing/copying movies and photos from the internal recording media to memory card (DCR-SR68/SR88/SX44/SX63 41 Dubbing movies ... 47 Creating a disc with a DVD writer, etc., other than DVDirect Express 49 Creating a disc with a recorder, etc 50 Customizing your camcorder Using menus 53 Operating menus 53 Using MY MENU 54 Using the OPTION MENU 55 Menu lists 56 MANUAL SETTINGS (Items to adjust for scene...
Handycam® Handbook
Page 10
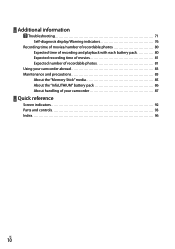
Additional information Troubleshooting 71 Self-diagnosis display/Warning indicators 76 Recording time of movies/number of recordable photos 80 Expected time of recording and playback with each battery pack 80 Expected recording time of movies 81 Expected number of recordable photos 81 Using your camcorder abroad 83 Maintenance and precautions 85 About the "Memory Stick" media 85 About the "InfoLITHIUM" battery pack 86 About handling of your camcorder 87 Quick reference Screen indicators 92 Parts and controls 93 Index 96 US 10
Additional information Troubleshooting 71 Self-diagnosis display/Warning indicators 76 Recording time of movies/number of recordable photos 80 Expected time of recording and playback with each battery pack 80 Expected recording time of movies 81 Expected number of recordable photos 81 Using your camcorder abroad 83 Maintenance and precautions 85 About the "Memory Stick" media 85 About the "InfoLITHIUM" battery pack 86 About handling of your camcorder 87 Quick reference Screen indicators 92 Parts and controls 93 Index 96 US 10

Handycam® Handbook
Page 12
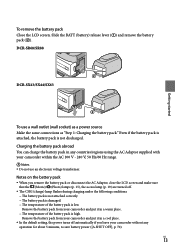
... battery pack is fully charged. 4 When the battery is charged, disconnect the AC Adaptor from the DC IN jack of remaining battery power with the camcorder at the upper left on the DC IN jack. Battery pack NP-FV30 (supplied) NP-FV50 NP-FV70 NP-FV100 Charging time 115 155 195... on, you fully charge a fully discharged battery pack. US 12 You can check the approximate amount of your camcorder. Tips See page 80 on recording and playing time. When your camcorder and the wall outlet (wall socket). Align the mark on the DC plug with that on...
... battery pack is fully charged. 4 When the battery is charged, disconnect the AC Adaptor from the DC IN jack of remaining battery power with the camcorder at the upper left on the DC IN jack. Battery pack NP-FV30 (supplied) NP-FV50 NP-FV70 NP-FV100 Charging time 115 155 195... on, you fully charge a fully discharged battery pack. US 12 You can check the approximate amount of your camcorder. Tips See page 80 on recording and playing time. When your camcorder and the wall outlet (wall socket). Align the mark on the DC plug with that on...
Handycam® Handbook
Page 13
...The temperature of the battery pack is not discharged. Notes on the battery pack When you leave your camcorder without any countries/regions using the AC Adaptor supplied with your camcorder and put it in any operation for about 5 minutes, to save battery power ([A.SHUT OFF], p. 70). Remove...Remove the battery pack from your camcorder within the AC 100 V - 240 V, 50 Hz/60 Hz range. Notes Do not use a wall outlet (wall socket) as a power source Make the same connections as "Step 1: Charging the battery pack." DCR-SR68/SR88 DCR-SX43/SX44/SX63 To use an...
...The temperature of the battery pack is not discharged. Notes on the battery pack When you leave your camcorder without any countries/regions using the AC Adaptor supplied with your camcorder and put it in any operation for about 5 minutes, to save battery power ([A.SHUT OFF], p. 70). Remove...Remove the battery pack from your camcorder within the AC 100 V - 240 V, 50 Hz/60 Hz range. Notes Do not use a wall outlet (wall socket) as a power source Make the same connections as "Step 1: Charging the battery pack." DCR-SR68/SR88 DCR-SX43/SX44/SX63 To use an...

Handycam® Handbook
Page 14
This may cause a malfunction. Disconnect the AC Adaptor from the wall outlet (wall socket) immediately if any malfunction occurs while using the AC Adaptor. US 14 Notes on the AC Adaptor Use the nearby wall outlet (wall socket) when using your camcorder. Do not use the AC Adaptor placed in a narrow space, such as between a wall and furniture. Do not short-circuit the DC plug of the AC Adaptor or battery terminal with any metallic objects.
This may cause a malfunction. Disconnect the AC Adaptor from the wall outlet (wall socket) immediately if any malfunction occurs while using the AC Adaptor. US 14 Notes on the AC Adaptor Use the nearby wall outlet (wall socket) when using your camcorder. Do not use the AC Adaptor placed in a narrow space, such as between a wall and furniture. Do not short-circuit the DC plug of the AC Adaptor or battery terminal with any metallic objects.

Handycam® Handbook
Page 15
... started Step 2: Turning the power on, and setting the date and time 1 Open the LCD screen of your camcorder when the LCD screen is not on the screen, touch / until the item appears. 3 Set [DST SET] or [SUMMERTIME], date and time, then touch . When ...
... started Step 2: Turning the power on, and setting the date and time 1 Open the LCD screen of your camcorder when the LCD screen is not on the screen, touch / until the item appears. 3 Set [DST SET] or [SUMMERTIME], date and time, then touch . When ...

Handycam® Handbook
Page 16
...SET] (under [PLAYBACK] category) [DATA CODE] [DATE/ TIME] . You can turn off your camcorder also by pressing POWER. When [POWER ON BY LCD] (p. 70) is turned Tips You can turn off the operation beeps by pressing... not appear during recording, but they are automatically recorded on the recording media, and can change the on-screen displays to [OFF], turn off your camcorder by touching (MENU) [Show others] [SOUND/DISP SET] (under [GENERAL SET] category) [BEEP] [OFF] ...
...SET] (under [PLAYBACK] category) [DATA CODE] [DATE/ TIME] . You can turn off your camcorder also by pressing POWER. When [POWER ON BY LCD] (p. 70) is turned Tips You can turn off the operation beeps by pressing... not appear during recording, but they are automatically recorded on the recording media, and can change the on-screen displays to [OFF], turn off your camcorder by touching (MENU) [Show others] [SOUND/DISP SET] (under [GENERAL SET] category) [BEEP] [OFF] ...
Handycam® Handbook
Page 17
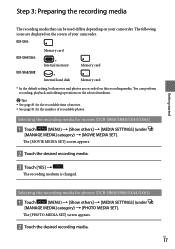
The [PHOTO MEDIA SET] screen appears. Touch the desired recording media. DCR-SX43: DCR-SX44/SX63: DCR-SR68/SR88: Memory card * Internal memory * Internal hard disk Memory card Memory card * In the default setting, both movies and photos are displayed on the screen of your camcorder. The [MOVIE MEDIA SET] screen appears. Touch the desired recording...
The [PHOTO MEDIA SET] screen appears. Touch the desired recording media. DCR-SX43: DCR-SX44/SX63: DCR-SR68/SR88: Memory card * Internal memory * Internal hard disk Memory card Memory card * In the default setting, both movies and photos are displayed on the screen of your camcorder. The [MOVIE MEDIA SET] screen appears. Touch the desired recording...

Handycam® Handbook
Page 18
... of up to 32 GB are guaranteed to record movies and/or photos on memory card (DCR-SR68/SR88/SX44/SX63). US 18 The recording medium is recommended that can be used with your camcorder Only "Memory Stick PRO Duo" media, "Memory Stick PRO-HG Duo" media, SD memory cards and SDHC... memory cards can be used with your camcorder.) "Memory Stick PRO Duo" media can be used . Types of "Memory Stick" media that can be used with this manual, "Memory Stick PRO Duo" ...
... of up to 32 GB are guaranteed to record movies and/or photos on memory card (DCR-SR68/SR88/SX44/SX63). US 18 The recording medium is recommended that can be used with your camcorder Only "Memory Stick PRO Duo" media, "Memory Stick PRO-HG Duo" media, SD memory cards and SDHC... memory cards can be used with your camcorder.) "Memory Stick PRO Duo" media can be used . Types of "Memory Stick" media that can be used with this manual, "Memory Stick PRO Duo" ...
Handycam® Handbook
Page 21
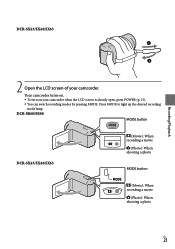
Press MODE to light up the desired recording mode lamp. DCR-SR68/SR88 MODE button DCR-SX43/SX44/SX63 (Movie): When recording a movie (Photo): When shooting a photo MODE button (Movie): When recording a movie (Photo): When shooting a photo US 21 DCR-SX43/SX44/SX63 Recording/Playback 2 Open the LCD screen of your camcorder when the LCD screen is already open, press POWER (p. 15). You can switch recording modes by pressing MODE. Your camcorder turns on. To turn on your camcorder.
Press MODE to light up the desired recording mode lamp. DCR-SR68/SR88 MODE button DCR-SX43/SX44/SX63 (Movie): When recording a movie (Photo): When shooting a photo MODE button (Movie): When recording a movie (Photo): When shooting a photo US 21 DCR-SX43/SX44/SX63 Recording/Playback 2 Open the LCD screen of your camcorder when the LCD screen is already open, press POWER (p. 15). You can switch recording modes by pressing MODE. Your camcorder turns on. To turn on your camcorder.

Handycam® Handbook
Page 22
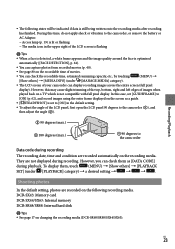
DCR-SR68/SR88 DCR-SX43/SX44/SX63 START/STOP button [STBY] [REC] To stop recording, press ... in the bottom left of movies is about 3 seconds, then disappear after you turn on the camcorder. You cannot operate your camcorder or switching the recording (movie/photo)/playback modes. To display the icons and indicators again, touch ...anywhere on the screen except the rec & zoom buttons on your camcorder during this time. Recording movies Press START/STOP to start recording. You can start recording after turning on...
DCR-SR68/SR88 DCR-SX43/SX44/SX63 START/STOP button [STBY] [REC] To stop recording, press ... in the bottom left of movies is about 3 seconds, then disappear after you turn on the camcorder. You cannot operate your camcorder or switching the recording (movie/photo)/playback modes. To display the icons and indicators again, touch ...anywhere on the screen except the rec & zoom buttons on your camcorder during this time. Recording movies Press START/STOP to start recording. You can start recording after turning on...
Handycam® Handbook
Page 23
...from recorded movies (p. 40). See page 80 on the recording media. During this time, do not apply shock or vibration to the camcorder, or remove the battery or AC Adaptor. Access lamp (p. 19) is not compatible with full pixel display. To display them as ...; . DCR-SX43: Memory card DCR-SX44/SX63: Internal memory DCR-SR68/SR88: Internal hard disk Tips See page 17 on a TV which is lit or flashing The media icon in the default setting. To adjust the angle of your camcorder can check the recordable time, ...
...from recorded movies (p. 40). See page 80 on the recording media. During this time, do not apply shock or vibration to the camcorder, or remove the battery or AC Adaptor. Access lamp (p. 19) is not compatible with full pixel display. To display them as ...; . DCR-SX43: Memory card DCR-SX44/SX63: Internal memory DCR-SR68/SR88: Internal hard disk Tips See page 17 on a TV which is lit or flashing The media icon in the default setting. To adjust the angle of your camcorder can check the recordable time, ...
Handycam® Handbook
Page 25
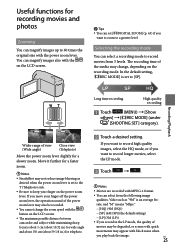
... mode. Recording/Playback Wider range of movies may be recorded. You cannot change , depending on the LCD screen. The minimum possible distance between camcorder and subject while maintaining sharp focus is set to the T (Telephoto) side. Be sure to a greater level. rate, and "M" means "Mbps." [HQ] (9M...
... mode. Recording/Playback Wider range of movies may be recorded. You cannot change , depending on the LCD screen. The minimum possible distance between camcorder and subject while maintaining sharp focus is set to the T (Telephoto) side. Be sure to a greater level. rate, and "M" means "Mbps." [HQ] (9M...


