Operating Guide
Page 7
... may vary depending on disposal/transfer If you can save your image data using your camcorder if necessary (p. 12). Note on the operating system of the computer. * Refer also to "Handycam Handbook" (PDF) and "PMB Guide." About language setting The on-screen displays in this...and "Memory Stick PRO Duo" are called as a DVD-R using a computer. Change the screen language before using a VCR, or a DVD/HDD recorder*. Unauthorized recording of such materials may look different from Windows Vista, and may not be contrary to the copyright laws. About this manual &#...
... may vary depending on disposal/transfer If you can save your image data using your camcorder if necessary (p. 12). Note on the operating system of the computer. * Refer also to "Handycam Handbook" (PDF) and "PMB Guide." About language setting The on-screen displays in this...and "Memory Stick PRO Duo" are called as a DVD-R using a computer. Change the screen language before using a VCR, or a DVD/HDD recorder*. Unauthorized recording of such materials may look different from Windows Vista, and may not be contrary to the copyright laws. About this manual &#...
Operating Guide
Page 23
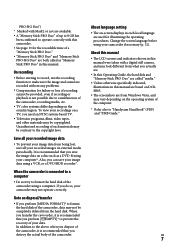
...CONNECT], [ USB CONNECT], [DISC BURN] (MANAGE MEDIA) category MOVIE MEDIA SET*1 PHOTO MEDIA SET*1 MEDIA INFO MEDIA FORMAT*1 REPAIR IMG.DB F. [HDD], [MEMORY STICK] [HDD], [MEMORY STICK] [HDD], [MEMORY STICK] [HDD], [MEMORY STICK] (SETTINGS) category MOVIE SETTINGS [REC MODE], [NIGHTSHOT LIGHT], [WIDE SELECT], [DIGITAL ZOOM], [STEADYSHOT], [AUTO SLW SHUTTR], [...SET [DEMO MODE], [CALIBRATION], [A.SHUT OFF], [QUICK ON STBY], [REMOTE CTRL]*2, [DROP SENSOR] *1 You can set the item during Easy Handycam operation. *2 DCR-SR65/SR85 *3 The menu name is changed to [SOUND SETTINGS] during Easy...
...CONNECT], [ USB CONNECT], [DISC BURN] (MANAGE MEDIA) category MOVIE MEDIA SET*1 PHOTO MEDIA SET*1 MEDIA INFO MEDIA FORMAT*1 REPAIR IMG.DB F. [HDD], [MEMORY STICK] [HDD], [MEMORY STICK] [HDD], [MEMORY STICK] [HDD], [MEMORY STICK] (SETTINGS) category MOVIE SETTINGS [REC MODE], [NIGHTSHOT LIGHT], [WIDE SELECT], [DIGITAL ZOOM], [STEADYSHOT], [AUTO SLW SHUTTR], [...SET [DEMO MODE], [CALIBRATION], [A.SHUT OFF], [QUICK ON STBY], [REMOTE CTRL]*2, [DROP SENSOR] *1 You can set the item during Easy Handycam operation. *2 DCR-SR65/SR85 *3 The menu name is changed to [SOUND SETTINGS] during Easy...
Operating Guide
Page 24
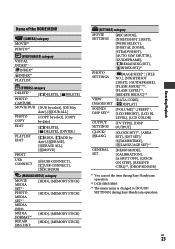
...can dub to some type of a computer. Creating a DVD with the USB cable You can save images imported to VCRs, DVD/HDD recorders. Saving images on the hard disk of external media such as described below . Creating a DVD with the A/V connecting cable ... FOCUS], [TELE MACRO], [EXPOSURE], [SPOT METER], [SCENE SELECTION], [WHITE BAL.], [COLOR SLOW SHTR], [S. Connecting your camcorder. You can save the images recorded on the supplied CDROM. For details, see "Handycam Handbook" (PDF). NIGHTSHOT PLS] tab [FADER], [D.EFFECT], [PICT.EFFECT] tab [BLT-IN ZOOM MIC], [MICREF LEVEL],...
...can dub to some type of a computer. Creating a DVD with the USB cable You can save images imported to VCRs, DVD/HDD recorders. Saving images on the hard disk of external media such as described below . Creating a DVD with the A/V connecting cable ... FOCUS], [TELE MACRO], [EXPOSURE], [SPOT METER], [SCENE SELECTION], [WHITE BAL.], [COLOR SLOW SHTR], [S. Connecting your camcorder. You can save the images recorded on the supplied CDROM. For details, see "Handycam Handbook" (PDF). NIGHTSHOT PLS] tab [FADER], [D.EFFECT], [PICT.EFFECT] tab [BLT-IN ZOOM MIC], [MICREF LEVEL],...
Handycam® Handbook
Page 4
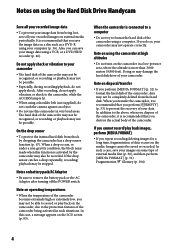
... drop sensor function (p. 67). After recording, do so, your camcorder may damage the hard disk drive of the camcorder, it is lit. When using a VCR, or a DVD/HDD recorder (p. 46). In addition to prevent the recovery of the camcorder may not be recognized, or recording or playback may also be... the camcorder being lost, save your image data using a shoulder belt (not supplied), do not apply shock. It is recommended that you do not apply vibration or shock to the protection features of data occurs on the media. Notes on using the Hard Disk Drive Handycam Save all...
... drop sensor function (p. 67). After recording, do so, your camcorder may damage the hard disk drive of the camcorder, it is lit. When using a VCR, or a DVD/HDD recorder (p. 46). In addition to prevent the recovery of the camcorder may not be recognized, or recording or playback may also be... the camcorder being lost, save your image data using a shoulder belt (not supplied), do not apply shock. It is recommended that you do not apply vibration or shock to the protection features of data occurs on the media. Notes on using the Hard Disk Drive Handycam Save all...

Handycam® Handbook
Page 36
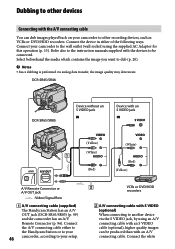
...to the limited capacity of the media, make sure that you can save images recorded on your camcorder. For details, see "PMB Guide." Connecting with selected images You can save the images recorded on the camcorder as a DVD-R or a computer. Creating a DVD with the USB cable You can dub ...Duo" using "Picture Motion Browser" on the supplied CD-ROM, you save images recorded on the camcorder on the hard disk of your computer on the hard disk to your camcorder directly to VCRs, DVD/HDD recorders. Refer to other devices Connecting with the A/V connecting cable You can dub to a DVD...
...to the limited capacity of the media, make sure that you can save images recorded on your camcorder. For details, see "PMB Guide." Connecting with selected images You can save the images recorded on the camcorder as a DVD-R or a computer. Creating a DVD with the USB cable You can dub ...Duo" using "Picture Motion Browser" on the supplied CD-ROM, you save images recorded on the camcorder on the hard disk of your computer on the hard disk to your camcorder directly to VCRs, DVD/HDD recorders. Refer to other devices Connecting with the A/V connecting cable You can dub to a DVD...
Handycam® Handbook
Page 46
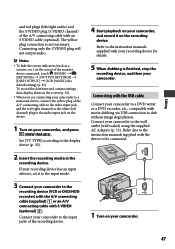
..., such as VCRs or DVD/HDD recorders. VCRs or DVD/HDD recorders A/V connecting cable with an S VIDEO jack (Yellow) (White) (Red) (White) (Red) (Yellow) A/V Remote Connector or A/V OUT jack : Video/Signal flow A/V connecting cable (supplied) The Handycam Station has an A/V OUT jack (DCR-SR65/SR85) (p. 99) and the camcorder has an A/V Remote Connector (p. 96...
..., such as VCRs or DVD/HDD recorders. VCRs or DVD/HDD recorders A/V connecting cable with an S VIDEO jack (Yellow) (White) (Red) (White) (Red) (Yellow) A/V Remote Connector or A/V OUT jack : Video/Signal flow A/V connecting cable (supplied) The Handycam Station has an A/V OUT jack (DCR-SR65/SR85) (p. 99) and the camcorder has an A/V Remote Connector (p. 96...
Handycam® Handbook
Page 47
...] [DISP OUTPUT] [LCD PANEL] (the default setting) (p. 65). Set [TV TYPE] according to the recording device (VCR or DVD/HDD recorder) with the A/V connecting cable (supplied) or an A/V connecting cable with an S VIDEO cable (optional). If your recording device has an input ...wall socket) using the supplied AC Adaptor (p. 13). The yellow plug connection is finished, stop the recording device, and then your camcorder. Connect your camcorder to dub without image degradation. Connecting only the S VIDEO plug will not output audio. Notes To hide the...
...] [DISP OUTPUT] [LCD PANEL] (the default setting) (p. 65). Set [TV TYPE] according to the recording device (VCR or DVD/HDD recorder) with the A/V connecting cable (supplied) or an A/V connecting cable with an S VIDEO cable (optional). If your recording device has an input ...wall socket) using the supplied AC Adaptor (p. 13). The yellow plug connection is finished, stop the recording device, and then your camcorder. Connect your camcorder to dub without image degradation. Connecting only the S VIDEO plug will not output audio. Notes To hide the...

Handycam® Handbook
Page 52
...deleted. Do not attempt the following operations when [Executing...] is activated, do not remove the "Memory Stick PRO Duo" from your camcorder to the wall outlet (wall socket) using the supplied AC Adaptor for this operation (p. 13). Notes To avoid the... (HOME) (MANAGE MEDIA) [MEDIA FORMAT] [MEMORY STICK]. 1 Touch (HOME) (MANAGE MEDIA) [MEDIA FORMAT] [HDD]. 2 Touch [YES] [YES]. 3 When [Completed.] appears, touch . 3 Touch [YES] [YES]. 4 When [Completed.] appears, touch . Notes &#...
...deleted. Do not attempt the following operations when [Executing...] is activated, do not remove the "Memory Stick PRO Duo" from your camcorder to the wall outlet (wall socket) using the supplied AC Adaptor for this operation (p. 13). Notes To avoid the... (HOME) (MANAGE MEDIA) [MEDIA FORMAT] [MEMORY STICK]. 1 Touch (HOME) (MANAGE MEDIA) [MEDIA FORMAT] [HDD]. 2 Touch [YES] [YES]. 3 When [Completed.] appears, touch . 3 Touch [YES] [YES]. 4 When [Completed.] appears, touch . Notes &#...

Handycam® Handbook
Page 53
...HOME) (MANAGE MEDIA) [MEDIA FORMAT] [HDD]. The [ FORMAT] screen appears. Notes The actual performing time for a few seconds. Utilizing recording media 53 When you dispose of the camcorder. Do not disconnect the AC Adaptor during the operation. While ... Connect the AC Adaptor to the DC IN jack on your camcorder. Tips You can perform this way, it is as follows: DCR-SR45: approx. 30 minutes DCR-SR46/SR65: approx. 40 minutes DCR-SR85: approx. 60 minutes If you stop performing ...
...HOME) (MANAGE MEDIA) [MEDIA FORMAT] [HDD]. The [ FORMAT] screen appears. Notes The actual performing time for a few seconds. Utilizing recording media 53 When you dispose of the camcorder. Do not disconnect the AC Adaptor during the operation. While ... Connect the AC Adaptor to the DC IN jack on your camcorder. Tips You can perform this way, it is as follows: DCR-SR45: approx. 30 minutes DCR-SR46/SR65: approx. 40 minutes DCR-SR85: approx. 60 minutes If you stop performing ...

Handycam® Handbook
Page 54
...DB F.] [HDD] or [MEMORY STICK]. Repairing of movies/ still images in the media and repairs any inconsistencies found , touch to finish. 3 Touch [YES]. 4 When [Completed.] appears, touch . Notes Do not apply mechanical shock or vibration to the camcorder during this operation. .... While the image database file on the "Memory Stick PRO Duo" are done separately. 2 Touch [YES]. Your camcorder will check the management file. Repairing the image database file This function checks the management information and the consistency of a "Memory Stick...
...DB F.] [HDD] or [MEMORY STICK]. Repairing of movies/ still images in the media and repairs any inconsistencies found , touch to finish. 3 Touch [YES]. 4 When [Completed.] appears, touch . Notes Do not apply mechanical shock or vibration to the camcorder during this operation. .... While the image database file on the "Memory Stick PRO Duo" are done separately. 2 Touch [YES]. Your camcorder will check the management file. Repairing the image database file This function checks the management information and the consistency of a "Memory Stick...
Handycam® Handbook
Page 84
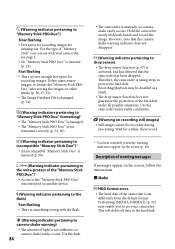
... steps to camera-shake warning) The amount of the hard disk under stable conditions. (Warning on the screen (p. 64). Use the camcorder under all data in the hard disk. This will delete all possible situations. For the type of "Memory Stick" you to "Memory Stick PRO... the "Memory Stick PRO Duo")* Access to the "Memory Stick PRO Duo" was restricted on the screen, follow the instructions. Media HDD format error. The hard disk of warning messages If messages appear on another device. (Warning indicator pertaining to the flash) Fast flashing ...
... steps to camera-shake warning) The amount of the hard disk under stable conditions. (Warning on the screen (p. 64). Use the camcorder under all data in the hard disk. This will delete all possible situations. For the type of "Memory Stick" you to "Memory Stick PRO... the "Memory Stick PRO Duo")* Access to the "Memory Stick PRO Duo" was restricted on the screen, follow the instructions. Media HDD format error. The hard disk of warning messages If messages appear on another device. (Warning indicator pertaining to the flash) Fast flashing ...
Handycam® Handbook
Page 105
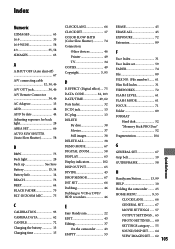
...102 DISP OUTPUT 65 DIVIDE 43 DROP SENSOR 67 DST SET 66 Dubbing 46 Dubbing to VCR or DVD/ HDD recorders 46 E Easy Handycam 22 EDIT 43 Editing 37 On the camcorder.......... 43 EMPTY 53 ERASE 45 ERASE ALL 45 EXPOSURE 72 Extension 89 F Face Index 31 Face Index set...89 FORMAT Hard disk 52 "Memory Stick PRO Duo 52 Fragmentation 104 G GENERAL SET 67 Grip belt 19 GUIDEFRAME 58 H Handycam Station........... 13, 99 HELP 10 Holding the camcorder......... 25 HOME MENU 9, 55 CLOCK/LANG 66 GENERAL SET 67 MOVIE SETTINGS....... 57 OUTPUT SETTINGS.... 65 PHOTO SETTINGS...... 60 SETTINGS...
...102 DISP OUTPUT 65 DIVIDE 43 DROP SENSOR 67 DST SET 66 Dubbing 46 Dubbing to VCR or DVD/ HDD recorders 46 E Easy Handycam 22 EDIT 43 Editing 37 On the camcorder.......... 43 EMPTY 53 ERASE 45 ERASE ALL 45 EXPOSURE 72 Extension 89 F Face Index 31 Face Index set...89 FORMAT Hard disk 52 "Memory Stick PRO Duo 52 Fragmentation 104 G GENERAL SET 67 Grip belt 19 GUIDEFRAME 58 H Handycam Station........... 13, 99 HELP 10 Holding the camcorder......... 25 HOME MENU 9, 55 CLOCK/LANG 66 GENERAL SET 67 MOVIE SETTINGS....... 57 OUTPUT SETTINGS.... 65 PHOTO SETTINGS...... 60 SETTINGS...

Handycam® Handbook
Page 107
... cable 12, 47, 49 USB CONNECT 89 USB jack 96, 99 USB SELECT 47 Using abroad 87 V V-OUT/PANEL 65 VBR 104 VCR or DVD/HDD recorders 46 VIEW IMAGES SET 62 VISUAL INDEX 23, 29 VOLUME 30, 64 Volume adjustment 30 W Wall outlet (Wall socket)...... 13 Warning indicators 83 Warning...
... cable 12, 47, 49 USB CONNECT 89 USB jack 96, 99 USB SELECT 47 Using abroad 87 V V-OUT/PANEL 65 VBR 104 VCR or DVD/HDD recorders 46 VIEW IMAGES SET 62 VISUAL INDEX 23, 29 VOLUME 30, 64 Volume adjustment 30 W Wall outlet (Wall socket)...... 13 Warning indicators 83 Warning...


