
Operating Guide
Page 6
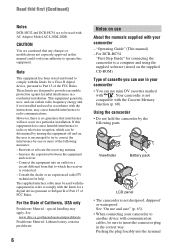
... Material: Lithium battery contains perchlorate. 6 Notes on use mini DV cassettes marked with AC Adaptor Model AC-L200/L200B. Increase the separation between the equipment and receiver. - The supplied interface cable must be sure to insert the connector plug in accordance with ...) - Viewfinder Battery pack LCD panel • The camcorder is no guarantee that to another device with communication cables, be used with your camcorder to which the receiver is connected. - Read thid first (Continued) Notes DCR-HC52 and DCR-HC54 are to be determined by turning the equipment off...
... Material: Lithium battery contains perchlorate. 6 Notes on use mini DV cassettes marked with AC Adaptor Model AC-L200/L200B. Increase the separation between the equipment and receiver. - The supplied interface cable must be sure to insert the connector plug in accordance with ...) - Viewfinder Battery pack LCD panel • The camcorder is no guarantee that to another device with communication cables, be used with your camcorder to which the receiver is connected. - Read thid first (Continued) Notes DCR-HC52 and DCR-HC54 are to be determined by turning the equipment off...
Operating Guide
Page 35
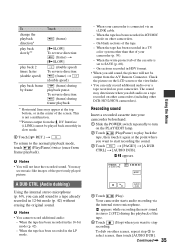
... add sound to turn on other camcorders (including other DCR-HC52/HC54 camcorders). b Notes • You cannot record additional audio: - When your camcorder. X appears. 60min A DUB CTRL 0:00:00:00 RET. This is not a malfunction. **Pictures output from the DV Interface (i.LINK) cannot be output ... When the tape has been recorded in 4CH MIC mode on other camcorders. - On blank sections of the previously played picture. AUDIO DUB 4 Touch (Play). Your camcorder starts audio recording via an i.LINK cable. - To Touch change the playback direction* play back slowly** play ...
... add sound to turn on other camcorders (including other DCR-HC52/HC54 camcorders). b Notes • You cannot record additional audio: - When your camcorder. X appears. 60min A DUB CTRL 0:00:00:00 RET. This is not a malfunction. **Pictures output from the DV Interface (i.LINK) cannot be output ... When the tape has been recorded in 4CH MIC mode on other camcorders. - On blank sections of the previously played picture. AUDIO DUB 4 Touch (Play). Your camcorder starts audio recording via an i.LINK cable. - To Touch change the playback direction* play back slowly** play ...
Operating Guide
Page 44
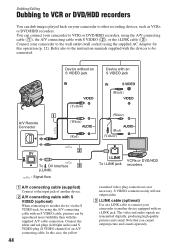
... (Black) 1 A/V Remote Connector (Yellow) (White) (Red) (White) (Red) (Yellow) 2 DV To DV Interface 3 (i.LINK) : Signal flow A A/V connecting cable (supplied) Connect to the input jack of an A/V connecting cable. In this operation (p. 12). Dubbing/Editing Dubbing to VCR or DVD/HDD recorders You can connect your camcorder to VCRs or DVD/HDD recorders, using the A/V connecting...
... (Black) 1 A/V Remote Connector (Yellow) (White) (Red) (White) (Red) (Yellow) 2 DV To DV Interface 3 (i.LINK) : Signal flow A A/V connecting cable (supplied) Connect to the input jack of an A/V connecting cable. In this operation (p. 12). Dubbing/Editing Dubbing to VCR or DVD/HDD recorders You can connect your camcorder to VCRs or DVD/HDD recorders, using the A/V connecting...
Operating Guide
Page 45
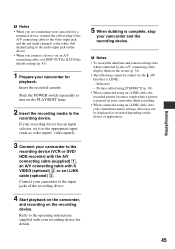
.... • When you connect a device via the DV Interface (i.LINK): - Indicators - Insert the recorded cassette. Connect your camcorder to turn on the PLAY/EDIT lamp. 2 Insert the recording media in the recording device. Pictures edited using [P EFFECT] (p. 38) • When connected using an i.LINK cable, data code (date/time/camera settings data) may...
.... • When you connect a device via the DV Interface (i.LINK): - Indicators - Insert the recorded cassette. Connect your camcorder to turn on the PLAY/EDIT lamp. 2 Insert the recording media in the recording device. Pictures edited using [P EFFECT] (p. 38) • When connected using an i.LINK cable, data code (date/time/camera settings data) may...
Operating Guide
Page 46
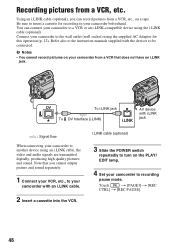
... a cassette for this operation (p. 12). Connect your camcorder from a VCR that you can connect your camcorder to your camcorder beforehand. DV To i.LINK jack AV device with the devices to the wall outlet (wall socket) using the supplied AC Adaptor for recording in your camcorder with an i.LINK cable. 2 Insert a cassette into the VCR. b Notes •...
... a cassette for this operation (p. 12). Connect your camcorder from a VCR that you can connect your camcorder to your camcorder beforehand. DV To i.LINK jack AV device with the devices to the wall outlet (wall socket) using the supplied AC Adaptor for recording in your camcorder with an i.LINK cable. 2 Insert a cassette into the VCR. b Notes •...
Operating Guide
Page 49
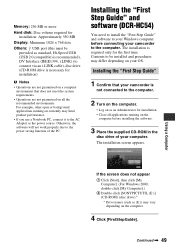
...before installing the software. 3 Place the supplied CD-ROM in the disc drive of the PC. Installing the "First Step Guide" and software (DCR-HC54) You need to install the "First Step Guide" and software to the computer. 2 Turn on the computer. • Log on ...USB (USB 2.0 compatible) is recommended), DV Interface (IEEE1394, i.LINK) (to the computer. Installing the "First Step Guide" 1 Confirm that does not meet the system requirements. • Operations are not guaranteed on a computer environment that your camcorder to connect via an i.LINK cable), disc drive (CD-ROM drive is...
...before installing the software. 3 Place the supplied CD-ROM in the disc drive of the PC. Installing the "First Step Guide" and software (DCR-HC54) You need to install the "First Step Guide" and software to the computer. 2 Turn on the computer. • Log on ...USB (USB 2.0 compatible) is recommended), DV Interface (IEEE1394, i.LINK) (to the computer. Installing the "First Step Guide" 1 Confirm that does not meet the system requirements. • Operations are not guaranteed on a computer environment that your camcorder to connect via an i.LINK cable), disc drive (CD-ROM drive is...
Operating Guide
Page 62
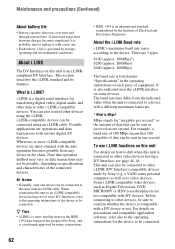
...LINK-compatible devices can be connected using the i.LINK. When two or more i.LINK-compatible devices are not compatible with an i.LINK cable. The baud rate may not be connected. This section describes the i.LINK standard and its features. You can be connected to this...application software, refer also to the operating instructions for the IEEE 1394 data transport bus proposed by Sony, and is a trademark approved by many corporations. • IEEE 1394 is a more DV Interfaces, refer to the operating instructions of data can also be sent in the operating instructions of...
...LINK-compatible devices can be connected using the i.LINK. When two or more i.LINK-compatible devices are not compatible with an i.LINK cable. The baud rate may not be connected. This section describes the i.LINK standard and its features. You can be connected to this...application software, refer also to the operating instructions for the IEEE 1394 data transport bus proposed by Sony, and is a trademark approved by many corporations. • IEEE 1394 is a more DV Interfaces, refer to the operating instructions of data can also be sent in the operating instructions of...
Operating Guide
Page 63
...heaters or in a car parked in the following conditions are not using your local authorized Sony service facility. - If your camcorder, it by a Sony dealer before connecting or disconnecting the i.LINK cable. Eject the cassette, turn off any liquid that may be able to OFF(CHG)...record properly. - If there is brought directly from a cold place to -4-pin cable (during DV dubbing). Near strong magnetic fields or mechanical vibration. Noise may malfunction. - They may condense inside your camcorder get wet, for 1H.] appears. If sand or dust gets in these operating ...
...heaters or in a car parked in the following conditions are not using your local authorized Sony service facility. - If your camcorder, it by a Sony dealer before connecting or disconnecting the i.LINK cable. Eject the cassette, turn off any liquid that may be able to OFF(CHG)...record properly. - If there is brought directly from a cold place to -4-pin cable (during DV dubbing). Near strong magnetic fields or mechanical vibration. Noise may malfunction. - They may condense inside your camcorder get wet, for 1H.] appears. If sand or dust gets in these operating ...


