
Operating Guide
Page 5
... following two conditions: (1) This device may call: Sony Customer Information Center 1-800222-SONY (7669). The number below . Model No. ACNo. You can help preserve our environment by returning your used with the Handycam Station Model DCRA-C155 and AC Adaptor Model AC-L200... harmful interference, and (2) this equipment. Battery pack This device complies with Part 15 of Conformity Trade Name: SONY Model No.: DCR-HC48 Responsible Party: Sony Electronics Inc. Refer to the collection and recycling location nearest you have any questions about this device must accept ...
... following two conditions: (1) This device may call: Sony Customer Information Center 1-800222-SONY (7669). The number below . Model No. ACNo. You can help preserve our environment by returning your used with the Handycam Station Model DCRA-C155 and AC Adaptor Model AC-L200... harmful interference, and (2) this equipment. Battery pack This device complies with Part 15 of Conformity Trade Name: SONY Model No.: DCR-HC48 Responsible Party: Sony Electronics Inc. Refer to the collection and recycling location nearest you have any questions about this device must accept ...

Operating Guide
Page 7
... the LCD screen, the viewfinder, or the lens to OFF (CHG) when you insert the camcorder into the Handycam Station or remove the camcorder from the Handycam Station holding both the Handycam Station and the DC plug. • Be sure to slide the POWER switch to direct sunlight... for illustrating the operating procedures. Change the screen language before using your camcorder attached to the Handycam Station to output audio and video signals. • Disconnect the AC Adaptor from it. Continued , 7 However, there may cause...
... the LCD screen, the viewfinder, or the lens to OFF (CHG) when you insert the camcorder into the Handycam Station or remove the camcorder from the Handycam Station holding both the Handycam Station and the DC plug. • Be sure to slide the POWER switch to direct sunlight... for illustrating the operating procedures. Change the screen language before using your camcorder attached to the Handycam Station to output audio and video signals. • Disconnect the AC Adaptor from it. Continued , 7 However, there may cause...
Operating Guide
Page 9
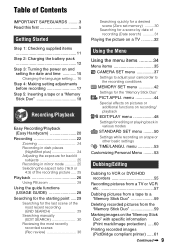
...4: Making setting adjustments before recording 17 Step 5: Inserting a tape or a "Memory Stick Duo 18 Recording/Playback Easy Recording/Playback (Easy Handycam 20 Recording 22 Zooming 24 Recording in dark places (NightShot plus 24 Adjusting the exposure for backlit subjects 25 Recording in mirror mode 25 ...on a TV ...........32 Using the Menu Using the menu items .......... 34 Menu items 35 CAMERA SET menu 37 Settings to adjust your camcorder to a "Memory Stick Duo 59 Deleting recorded pictures from a tape to the recording conditions MEMORY SET menu 42 Settings for editing or...
...4: Making setting adjustments before recording 17 Step 5: Inserting a tape or a "Memory Stick Duo 18 Recording/Playback Easy Recording/Playback (Easy Handycam 20 Recording 22 Zooming 24 Recording in dark places (NightShot plus 24 Adjusting the exposure for backlit subjects 25 Recording in mirror mode 25 ...on a TV ...........32 Using the Menu Using the menu items .......... 34 Menu items 35 CAMERA SET menu 37 Settings to adjust your camcorder to a "Memory Stick Duo 59 Deleting recorded pictures from a tape to the recording conditions MEMORY SET menu 42 Settings for editing or...

Operating Guide
Page 11
A/V connecting cable (1) (p. 32, 55) USB cable (1) (p. 61) 11 AC Adaptor (1) (p. 12) Rechargeable battery pack NP-FH40 (1) (p. 12, 80) Power cord (1) (p. 12) CD-ROM "Handycam Application Software" (1) (p. 63) Operating Guide (This manual) (1) Handycam Station (1) (p. 12, 93) Wireless Remote Commander (1) (p. 93) A button-type lithium battery is already installed. The number in the parentheses indicates the number of that you have following items supplied with your camcorder. Getting Started Getting Started Step 1: Checking supplied items Make sure that item supplied.
A/V connecting cable (1) (p. 32, 55) USB cable (1) (p. 61) 11 AC Adaptor (1) (p. 12) Rechargeable battery pack NP-FH40 (1) (p. 12, 80) Power cord (1) (p. 12) CD-ROM "Handycam Application Software" (1) (p. 63) Operating Guide (This manual) (1) Handycam Station (1) (p. 12, 93) Wireless Remote Commander (1) (p. 93) A button-type lithium battery is already installed. The number in the parentheses indicates the number of that you have following items supplied with your camcorder. Getting Started Getting Started Step 1: Checking supplied items Make sure that item supplied.

Operating Guide
Page 12
... (H series) (p. 80) after attaching it into place (2). 4 Connect the power cord to the AC Adaptor and the wall outlet. 5 Insert the camcorder into the Handycam Station securely, all the way to the bottom. CHG (charge) lamp 12 The CHG (charge) lamp lights up , connect the AC Adaptor to OFF...pack other than the H series to your camcorder. 1 Align the terminals of the battery pack and your camcorder (1), then attach the battery pack and click it to your camcoder from the Handycam Station. 2 Slide the POWER switch to the DC IN jack on the Handycam Station. The CHG (charge) lamp turns...
... (H series) (p. 80) after attaching it into place (2). 4 Connect the power cord to the AC Adaptor and the wall outlet. 5 Insert the camcorder into the Handycam Station securely, all the way to the bottom. CHG (charge) lamp 12 The CHG (charge) lamp lights up , connect the AC Adaptor to OFF...pack other than the H series to your camcorder. 1 Align the terminals of the battery pack and your camcorder (1), then attach the battery pack and click it to your camcoder from the Handycam Station. 2 Slide the POWER switch to the DC IN jack on the Handycam Station. The CHG (charge) lamp turns...

Operating Guide
Page 13
POWER switch To remove your camcorder from the Handycam Station Turn off the power, then remove the camcorder from the DC IN jack holding both the Handycam Station and the DC plug. To remove the battery pack 1 Turn off the power, then connect the AC Adaptor to a ... camcorder. Continued , 13 The battery pack will not lose its charge in the direction of the arrow. Getting Started b Notes • When inserting the camcorder into the Handycam Station, close the DC IN jack cover. • Disconnect the AC Adaptor from the Handycam Station holding both your camcorder and the Handycam...
POWER switch To remove your camcorder from the Handycam Station Turn off the power, then remove the camcorder from the DC IN jack holding both the Handycam Station and the DC plug. To remove the battery pack 1 Turn off the power, then connect the AC Adaptor to a ... camcorder. Continued , 13 The battery pack will not lose its charge in the direction of the arrow. Getting Started b Notes • When inserting the camcorder into the Handycam Station, close the DC IN jack cover. • Disconnect the AC Adaptor from the Handycam Station holding both your camcorder and the Handycam...

Operating Guide
Page 15
... immediately if any malfunction occurs while using the AC Adaptor. CAMERA-MEMORY: To record on . The [CLOCK SET] screen appears. Touch the button on your camcorder is turned off, AC power (house current) is recommended.) • The recording and playback time will not be supplied from the wall outlet. The battery... change the POWER switch position. On the AC Adaptor • Use the nearby wall outlet when using your camcorder or the Handycam Station, even when the power cord is disconnected from the battery as long as the AC Adaptor is worn-out (for the first time. If ...
... immediately if any malfunction occurs while using the AC Adaptor. CAMERA-MEMORY: To record on . The [CLOCK SET] screen appears. Touch the button on your camcorder is turned off, AC power (house current) is recommended.) • The recording and playback time will not be supplied from the wall outlet. The battery... change the POWER switch position. On the AC Adaptor • Use the nearby wall outlet when using your camcorder or the Handycam Station, even when the power cord is disconnected from the battery as long as the AC Adaptor is worn-out (for the first time. If ...

Operating Guide
Page 16
... clock starts. For midnight, set only [DATE/TIME])). • If the buttons on the touch panel do not use your camcorder for [DATA CODE] (During Easy Handycam operation, you leave your camcorder without any operation attempted for [D] (day), hour and minute. To reset the date and time You can set it to 12...
... clock starts. For midnight, set only [DATE/TIME])). • If the buttons on the touch panel do not use your camcorder for [DATA CODE] (During Easy Handycam operation, you leave your camcorder without any operation attempted for [D] (day), hour and minute. To reset the date and time You can set it to 12...

Operating Guide
Page 20
... REC START/STOP F (or C) to start recording.* 60min EASY REC GUIDE MENU The indicator changes from detailed adjustments. Recording/Playback Easy Recording/Playback (Easy Handycam) With this Easy Handycam operation, most of the camera settings are recorded in SP (Standard Play) mode on a cassette. ** Still images are automatically optimally adjusted, which frees...
... REC START/STOP F (or C) to start recording.* 60min EASY REC GUIDE MENU The indicator changes from detailed adjustments. Recording/Playback Easy Recording/Playback (Easy Handycam) With this Easy Handycam operation, most of the camera settings are recorded in SP (Standard Play) mode on a cassette. ** Still images are automatically optimally adjusted, which frees...

Operating Guide
Page 21
... 28) B Rewind/Fast forward C Stop D Play/Pause toggles MENU B C A GUIDE (p. 28) B Tape playback C Previous/Next D Delete (p. 59) x To cancel Easy Handycam operation Press EASY A again. Recording/Playback Playing back movies/still images Slide the POWER switch E to turn on the screen B as follows. Touch the buttons...details on settings. • Almost all the settings return to their defaults automatically (p. 35). • is not displayed during Easy Handycam are attempted. • BACK LIGHT button (p. 25) • Pressing and holding DISP/BATT INFO button (p. 17) •...
... 28) B Rewind/Fast forward C Stop D Play/Pause toggles MENU B C A GUIDE (p. 28) B Tape playback C Previous/Next D Delete (p. 59) x To cancel Easy Handycam operation Press EASY A again. Recording/Playback Playing back movies/still images Slide the POWER switch E to turn on the screen B as follows. Touch the buttons...details on settings. • Almost all the settings return to their defaults automatically (p. 35). • is not displayed during Easy Handycam are attempted. • BACK LIGHT button (p. 25) • Pressing and holding DISP/BATT INFO button (p. 17) •...

Operating Guide
Page 29
Searching for the starting point Searching for about 5 seconds, and the camcorder enters the standby mode at the point where the last recording has finished. When the PLAY/EDIT lamp lights up (p. 22). Make sure that the ... recorded sections on the tape. z Tips • You can also select [END SEARCH] from the menu. Continued , 29 Recording/Playback Unavailable settings during Easy Handycam During Easy Handycam operation, some items are unavailable. Follow the instruction to cancel the operation. Touch t . 6 0 min END SEARCH EXECUTING 1 0:00:00 CANCEL Touch here to cancel...
Searching for the starting point Searching for about 5 seconds, and the camcorder enters the standby mode at the point where the last recording has finished. When the PLAY/EDIT lamp lights up (p. 22). Make sure that the ... recorded sections on the tape. z Tips • You can also select [END SEARCH] from the menu. Continued , 29 Recording/Playback Unavailable settings during Easy Handycam During Easy Handycam operation, some items are unavailable. Follow the instruction to cancel the operation. Touch t . 6 0 min END SEARCH EXECUTING 1 0:00:00 CANCEL Touch here to cancel...
Operating Guide
Page 32
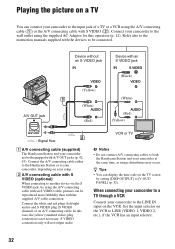
... A/V connecting cable either to the Handycam Station or to be reproduced more faithfully than with the supplied A/V cable connection. In this operation (p. 12). Refer also to the instruction manuals supplied with the devices to your camcorder, depending on your setup. Connect... (White) (Red) (White) (Red) (Yellow) A/V OUT 2 : Signal flow A A/V connecting cable (supplied) The Handycam Station and your camcorder are both the Handycam Station and your camcorder at the same time, as image disturbance may occur. Device without an S VIDEO jack Device with an S VIDEO cable, pictures...
... A/V connecting cable either to the Handycam Station or to be reproduced more faithfully than with the supplied A/V cable connection. In this operation (p. 12). Refer also to the instruction manuals supplied with the devices to your camcorder, depending on your setup. Connect... (White) (Red) (White) (Red) (Yellow) A/V OUT 2 : Signal flow A A/V connecting cable (supplied) The Handycam Station and your camcorder are both the Handycam Station and your camcorder at the same time, as image disturbance may occur. Device without an S VIDEO jack Device with an S VIDEO cable, pictures...

Operating Guide
Page 34
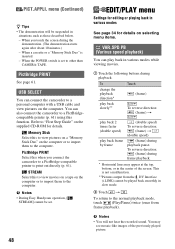
...). 1 Touch . 6 0 min STBY 0:00:00 MENU DISP GUIDE 1/3 SCENE SELECT LCD BRIGHT TELE MACRO FADER 2 Touch the desired item. x To use menu items during Easy Handycam operation. Unavailable items will be grayed out. Touch / to select the item, then touch . (The process in step 3 is the same as you decide not... desired menu. CAMERA-TAPE lamp: settings on a tape CAMERA-MEMORY lamp: Duo" settings on the screen, touch / until the item is not displayed during Easy Handycam operation is displayed. 3 Select the desired setting, then touch .
...). 1 Touch . 6 0 min STBY 0:00:00 MENU DISP GUIDE 1/3 SCENE SELECT LCD BRIGHT TELE MACRO FADER 2 Touch the desired item. x To use menu items during Easy Handycam operation. Unavailable items will be grayed out. Touch / to select the item, then touch . (The process in step 3 is the same as you decide not... desired menu. CAMERA-TAPE lamp: settings on a tape CAMERA-MEMORY lamp: Duo" settings on the screen, touch / until the item is not displayed during Easy Handycam operation is displayed. 3 Select the desired setting, then touch .

Operating Guide
Page 35
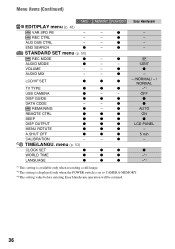
... Menu Menu items Available menu items (z) vary depending on which lamp is lit. FILE NO. - PICT.APPLI. z - - - z - - - - - z - z Easy Handycam AUTO - SERIES - -*3 -*3 OFF - REC FOLDER - z - z - ALL ERASE - USB SELECT - z Continued , 35 z AUTOSLW SHTR z SPOT FOCUS z FOCUS z TELE... - MEMORY PLAY/EDIT z - z - - z - - - OFF ON - menu (p. 44) FADER z SLIDE SHOW - z z z z z z z z z - z - - - - OFF OFF - During Easy Handycam operation, the following settings are automatically applied (p. 20). z -
... Menu Menu items Available menu items (z) vary depending on which lamp is lit. FILE NO. - PICT.APPLI. z - - - z - - - - - z - z Easy Handycam AUTO - SERIES - -*3 -*3 OFF - REC FOLDER - z - z - ALL ERASE - USB SELECT - z Continued , 35 z AUTOSLW SHTR z SPOT FOCUS z FOCUS z TELE... - MEMORY PLAY/EDIT z - z - - z - - - OFF ON - menu (p. 44) FADER z SLIDE SHOW - z z z z z z z z z - z - - - - OFF OFF - During Easy Handycam operation, the following settings are automatically applied (p. 20). z -
Operating Guide
Page 36
... only when recording a still image. *2 The setting is displayed only when the POWER switch is set to CAMERA-MEMORY. *3 The setting value before entering Easy Handycam operation will be retained. 36 REC CTRL - z - - z SP - - 12BIT - z AUTO z z ON z z z z z LCD PANEL z z - Menu items (Continued) TAPE...REC MODE z AUDIO MODE z VOLUME - TIME/LANGU. menu (p. 53) CLOCK SET z WORLD TIME z LANGUAGE z MEMORY PLAY/EDIT Easy Handycam - z - - z - - z z - /NORMAL/ - / NORMAL z z -*3 - - OFF z z z - z z 5 min -
... only when recording a still image. *2 The setting is displayed only when the POWER switch is set to CAMERA-MEMORY. *3 The setting value before entering Easy Handycam operation will be retained. 36 REC CTRL - z - - z SP - - 12BIT - z AUTO z z ON z z z z z LCD PANEL z z - Menu items (Continued) TAPE...REC MODE z AUDIO MODE z VOLUME - TIME/LANGU. menu (p. 53) CLOCK SET z WORLD TIME z LANGUAGE z MEMORY PLAY/EDIT Easy Handycam - z - - z - - z z - /NORMAL/ - / NORMAL z z -*3 - - OFF z z z - z z 5 min -

Operating Guide
Page 42
...Stick Duo" (MB) and the number of 16:9 (wide), [IMAGE SIZE] is set to CAMERA-MEMORY. • [BURST] cannot be set during Easy Handycam operation. b Notes • [BURST] can record several still images one after another by pressing PHOTO. b Notes • Image quality is set a screen...VGA (0.3M) ( ) Allows for the maximum number of images to be set only when the POWER switch is automatically fixed to [FINE] during Easy Handycam operation. • The maximum number of images are operating with different exposures at the best exposure. b Notes • [IMAGE SIZE] can compare ...
...Stick Duo" (MB) and the number of 16:9 (wide), [IMAGE SIZE] is set to CAMERA-MEMORY. • [BURST] cannot be set during Easy Handycam operation. b Notes • [BURST] can record several still images one after another by pressing PHOTO. b Notes • Image quality is set a screen...VGA (0.3M) ( ) Allows for the maximum number of images to be set only when the POWER switch is automatically fixed to [FINE] during Easy Handycam operation. • The maximum number of images are operating with different exposures at the best exposure. b Notes • [IMAGE SIZE] can compare ...
Operating Guide
Page 48
...(frame) t (double speed) (frame) during the demonstration. (The demonstration starts again after about 10 minutes.) - b Notes • During Easy Handycam operation, [ STREAM] cannot be set to the normal playback mode, touch (Play/Pause) twice (once from the DV Interface (i.LINK) cannot be ...suspended in situations such as those described below. - When you connect the camcorder to a PictBridge-compatible printer to print out directly (p. 61). PictBridge PRINT See page 61. To return to other than CAMERA-TAPE. When...
...(frame) t (double speed) (frame) during the demonstration. (The demonstration starts again after about 10 minutes.) - b Notes • During Easy Handycam operation, [ STREAM] cannot be set to the normal playback mode, touch (Play/Pause) twice (once from the DV Interface (i.LINK) cannot be ...suspended in situations such as those described below. - When you connect the camcorder to a PictBridge-compatible printer to print out directly (p. 61). PictBridge PRINT See page 61. To return to other than CAMERA-TAPE. When...

Operating Guide
Page 52
... REMOTE CTRL (Remote control) The default setting is not automatically turned off. z Tips • Set to [OFF] to prevent your camcorder from responding to use the supplied Remote Commander (p. 93). V-OUT/PANEL Shows displays such as those described below. • When you do...indicator for more than approximately 5 minutes. If you record a picture without setting the clock and [--:--:--] will appear. • During Easy Handycam operation, you can set the POWER switch to [NEVER]. OPPOSITE Scrolls the menu items upwards by touching . OFF Cancels the beeping sound and...
... REMOTE CTRL (Remote control) The default setting is not automatically turned off. z Tips • Set to [OFF] to prevent your camcorder from responding to use the supplied Remote Commander (p. 93). V-OUT/PANEL Shows displays such as those described below. • When you do...indicator for more than approximately 5 minutes. If you record a picture without setting the clock and [--:--:--] will appear. • During Easy Handycam operation, you can set the POWER switch to [NEVER]. OPPOSITE Scrolls the menu items upwards by touching . OFF Cancels the beeping sound and...

Operating Guide
Page 55
...A/V OUT 2 DV To DV Interface (i.LINK) 3 To i.LINK jack VCRs or DVD/HDD recorders : Signal flow A A/V connecting cable (supplied) The Handycam Station and your camcorder to another device via the S VIDEO jack, by using the A/V connecting cable with an S VIDEO cable, pictures can be connected. Connect the white and... output picture and sound separately. Continued , 55 You can connect your setup. Connect the A/V connecting cable either to the Handycam Station or to your camcorder, depending on your camcorder to be reproduced more faithfully than with A/V OUT jacks (p. 92, 93).
...A/V OUT 2 DV To DV Interface (i.LINK) 3 To i.LINK jack VCRs or DVD/HDD recorders : Signal flow A A/V connecting cable (supplied) The Handycam Station and your camcorder to another device via the S VIDEO jack, by using the A/V connecting cable with an S VIDEO cable, pictures can be connected. Connect the white and... output picture and sound separately. Continued , 55 You can connect your setup. Connect the A/V connecting cable either to the Handycam Station or to your camcorder, depending on your camcorder to be reproduced more faithfully than with A/V OUT jacks (p. 92, 93).

Operating Guide
Page 61
...lamp. 2 Connect the (USB) jack (p. 93) of models that are not PictBridge compatible. Insert the "Memory Stick Duo" containing still images into your camcorder to be printed. 4 Touch t [END]. Touch [END] when printing is completed. Connect the AC Adaptor to a computer. Touch t [MENU] t...1 Select the image to turn on the printer. b Notes • We cannot guarantee the operation of the Handycam Station to the printer using a PictBridge compliant printer without connecting the camcorder to obtain power from the wall outlet (p. 12). Touch t [MENU] t (PICT.APPLI.) t [USB SELECT...
...lamp. 2 Connect the (USB) jack (p. 93) of models that are not PictBridge compatible. Insert the "Memory Stick Duo" containing still images into your camcorder to be printed. 4 Touch t [END]. Touch [END] when printing is completed. Connect the AC Adaptor to a computer. Touch t [MENU] t...1 Select the image to turn on the printer. b Notes • We cannot guarantee the operation of the Handycam Station to the printer using a PictBridge compliant printer without connecting the camcorder to obtain power from the wall outlet (p. 12). Touch t [MENU] t (PICT.APPLI.) t [USB SELECT...


