Operating Guide
Page 4
When the power cord or plug is left unattended and unused for service. If the set has been subject to determine that the set is in the operating instructions. Replacement parts When replacement parts are required, be sure the service technician has used replacement parts specified by being dropped, or the cabinet has been damaged. - Safety Check Upon completion of any service or repairs to the set to qualified service personnel. If...
When the power cord or plug is left unattended and unused for service. If the set has been subject to determine that the set is in the operating instructions. Replacement parts When replacement parts are required, be sure the service technician has used replacement parts specified by being dropped, or the cabinet has been damaged. - Safety Check Upon completion of any service or repairs to the set to qualified service personnel. If...
Operating Guide
Page 5
... FCC Rules. Regulatory Information Declaration of the FCC Rules. DCR-HC48 Serial No. Operation is subject to these numbers whenever you have any questions about this device must accept any changes or modifications not expressly approved in the space provided below is to be used rechargeable batteries to operate this manual thoroughly, and retain it for the FCC related matters only...
... FCC Rules. Regulatory Information Declaration of the FCC Rules. DCR-HC48 Serial No. Operation is subject to these numbers whenever you have any questions about this device must accept any changes or modifications not expressly approved in the space provided below is to be used rechargeable batteries to operate this manual thoroughly, and retain it for the FCC related matters only...

Operating Guide
Page 14
... Charging time 125 135 170 390 Recording time Approximate time (min.) available when you use a fully charged battery pack. Playing time Approximate time (min.) available when you repeat recording start/stop soon. Middle: When the LCD backlight turns off and zooming. Remaining battery (approx.) 90 99 Recording capacity (approx.) You can view the battery information for about 7 seconds. Indicator Status Sufficient power remaining Battery low, recording/ playback will stop , turning the power on/off . b Notes • All times...
... Charging time 125 135 170 390 Recording time Approximate time (min.) available when you use a fully charged battery pack. Playing time Approximate time (min.) available when you repeat recording start/stop soon. Middle: When the LCD backlight turns off and zooming. Remaining battery (approx.) 90 99 Recording capacity (approx.) You can view the battery information for about 7 seconds. Indicator Status Sufficient power remaining Battery low, recording/ playback will stop , turning the power on/off . b Notes • All times...

Operating Guide
Page 16
... automatically recorded on the tape, and can change the on-screen displays to save battery power ([A.SHUT OFF], p. 52). For midday, set only [DATE/TIME])). • If the buttons on the touch panel do not use your camcorder for about 3 months, the built-in rechargeable battery gets discharged and the date and time settings may be displayed during playback (see page 51 for [DATA CODE] (During Easy Handycam operation, you leave your camcorder without any operation...
... automatically recorded on the tape, and can change the on-screen displays to save battery power ([A.SHUT OFF], p. 52). For midday, set only [DATE/TIME])). • If the buttons on the touch panel do not use your camcorder for about 3 months, the built-in rechargeable battery gets discharged and the date and time settings may be displayed during playback (see page 51 for [DATA CODE] (During Easy Handycam operation, you leave your camcorder without any operation...

Operating Guide
Page 28
... displayed frame. 4 Adjust the magnification with the zoom buttons on the LCD frame. The desired setting screen appears. Playback (Continued) Using PB zoom You can be adjusted with T (Telephoto). To cancel, touch [END]. e.g., to record night views Touch [SHOOT GUIDE] t [SELECT SCENE] t / to the basic operations. Adjust the settings according to 5 times the original size. b Notes • You cannot change the zoom speed with W (Wide angle)/T (Telephoto). GUIDE P-MENU Your camcorder has 3 guide functions as shown below. SHOOT GUIDE: USEFUL GUIDE: DISP GUIDE...
... displayed frame. 4 Adjust the magnification with the zoom buttons on the LCD frame. The desired setting screen appears. Playback (Continued) Using PB zoom You can be adjusted with T (Telephoto). To cancel, touch [END]. e.g., to record night views Touch [SHOOT GUIDE] t [SELECT SCENE] t / to the basic operations. Adjust the settings according to 5 times the original size. b Notes • You cannot change the zoom speed with W (Wide angle)/T (Telephoto). GUIDE P-MENU Your camcorder has 3 guide functions as shown below. SHOOT GUIDE: USEFUL GUIDE: DISP GUIDE...

Operating Guide
Page 34
... menu screen. Using the Menu Using the menu items 1 Slide the POWER switch in the direction of Personal Menu On Personal Menu, short-cuts for viewing/editing 2 Touch the LCD screen to select the item, then touch . (The process in step 3 is the same as you decide not to change the setting, touch to return to turn on the screen, touch / until the item is not displayed during Easy Handycam operation...
... menu screen. Using the Menu Using the menu items 1 Slide the POWER switch in the direction of Personal Menu On Personal Menu, short-cuts for viewing/editing 2 Touch the LCD screen to select the item, then touch . (The process in step 3 is the same as you decide not to change the setting, touch to return to turn on the screen, touch / until the item is not displayed during Easy Handycam operation...
Operating Guide
Page 36
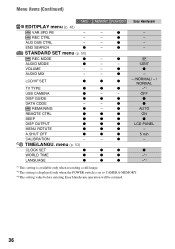
... SET z WORLD TIME z LANGUAGE z MEMORY PLAY/EDIT Easy Handycam - z - - z z - z z z z z -*3 z z -*3 *1 This setting is available only when recording a still image. *2 The setting is displayed only when the POWER switch is set to CAMERA-MEMORY. *3 The setting value before entering Easy Handycam operation will be retained. 36 REC CTRL - LCD/VF SET z TV TYPE z USB CAMERA z DISP GUIDE z DATA CODE - z SP - - 12BIT - z z - /NORMAL/ - / NORMAL z z -*3 - - END SEARCH z STANDARD SET menu (p. 50) REC MODE z AUDIO MODE z VOLUME - TIME...
... SET z WORLD TIME z LANGUAGE z MEMORY PLAY/EDIT Easy Handycam - z - - z z - z z z z z -*3 z z -*3 *1 This setting is available only when recording a still image. *2 The setting is displayed only when the POWER switch is set to CAMERA-MEMORY. *3 The setting value before entering Easy Handycam operation will be retained. 36 REC CTRL - LCD/VF SET z TV TYPE z USB CAMERA z DISP GUIDE z DATA CODE - z SP - - 12BIT - z z - /NORMAL/ - / NORMAL z z -*3 - - END SEARCH z STANDARD SET menu (p. 50) REC MODE z AUDIO MODE z VOLUME - TIME...

Operating Guide
Page 46
... recording, trailing afterimages are reversed. Suitable for [OLD MOVIE]. • Effects added to pictures. z Tips • You can be output. • You cannot add effects to a picture during playback. SOLARIZE Pictures appear as a pale pastel drawing. b Notes • Adjust the focus manually using special effects on a "Memory Stick Duo" (p. 59) or record them on another VCR/DVD device, etc. (p. 55). PICT.APPLI. b Notes • Effects added to externally input pictures...
... recording, trailing afterimages are reversed. Suitable for [OLD MOVIE]. • Effects added to pictures. z Tips • You can be output. • You cannot add effects to a picture during playback. SOLARIZE Pictures appear as a pale pastel drawing. b Notes • Adjust the focus manually using special effects on a "Memory Stick Duo" (p. 59) or record them on another VCR/DVD device, etc. (p. 55). PICT.APPLI. b Notes • Effects added to externally input pictures...
Operating Guide
Page 47
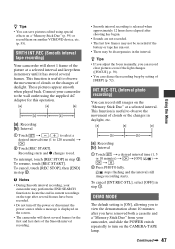
... camcorder to the wall outlet using special effects on a "Memory Stick Duo" (p. 59) or record them in memory until it has stored several frames for this operation. [a]: Recording [b]: Interval 1 Touch t / to select a desired interval time (1 to 120 seconds) t . 2 Touch [REC START]. DEMO MODE The default setting is displayed on another VCR/DVD device, etc. (p. 55). stops flashing and the interval still image recording starts. To resume, touch [REC START]. Recording starts and z changes to view...
... camcorder to the wall outlet using special effects on a "Memory Stick Duo" (p. 59) or record them in memory until it has stored several frames for this operation. [a]: Recording [b]: Interval 1 Touch t / to select a desired interval time (1 to 120 seconds) t . 2 Touch [REC START]. DEMO MODE The default setting is displayed on another VCR/DVD device, etc. (p. 55). stops flashing and the interval still image recording starts. To resume, touch [REC START]. Recording starts and z changes to view...
Operating Guide
Page 49
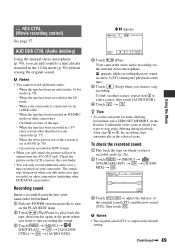
... start recording the sound. 3 Touch t [MENU] t (EDIT/PLAY) t t [AUD DUB CTRL] t t [AUDIO DUB]. b Notes • You cannot record additional audio: - When the tape has been recorded in 4CH MIC mode on your camcorder is output at the selected scene. The sound may deteriorate when you can only record additional audio over a tape recorded on other DCR-HC48 camcorders). AUD DUB CTRL (Audio dubbing) Using the internal stereo microphone (p. 90), you dub audio on a tape recorded on the LCD screen or...
... start recording the sound. 3 Touch t [MENU] t (EDIT/PLAY) t t [AUD DUB CTRL] t t [AUDIO DUB]. b Notes • You cannot record additional audio: - When the tape has been recorded in 4CH MIC mode on your camcorder is output at the selected scene. The sound may deteriorate when you can only record additional audio over a tape recorded on other DCR-HC48 camcorders). AUD DUB CTRL (Audio dubbing) Using the internal stereo microphone (p. 90), you dub audio on a tape recorded on the LCD screen or...

Operating Guide
Page 52
... Handycam operation, you start/stop recording, or operate the touch panel. REMAINING B AUTO Displays the remaining tape indicator for more than approximately 5 minutes. DISP OUTPUT B LCD PANEL Shows displays such as the time code on the LCD screen and in the same area. STANDARD SET menu (Continued) b Notes • The exposure adjustment value (0EV), a shutter speed, and the aperture value appear when still images on a "Memory Stick Duo" are played back. • In the [DATE/TIME] data display...
... Handycam operation, you start/stop recording, or operate the touch panel. REMAINING B AUTO Displays the remaining tape indicator for more than approximately 5 minutes. DISP OUTPUT B LCD PANEL Shows displays such as the time code on the LCD screen and in the same area. STANDARD SET menu (Continued) b Notes • The exposure adjustment value (0EV), a shutter speed, and the aperture value appear when still images on a "Memory Stick Duo" are played back. • In the [DATE/TIME] data display...

Operating Guide
Page 56
... paused on your camcorder for playback. Pictures edited using [PICT.EFFECT] (p. 46), [D.EFFECT] (p. 45) or PB zoom (p. 28). • When connected using an i.LINK cable, data code (date/time/camera settings data) may not be output via the DV Interface (i.LINK): - Indicators - Dubbing to VCR or DVD/HDD recorders (Continued) b Notes • When you are connecting your camcorder to a monaural device, connect the yellow plug of the A/V connecting cable to the video input jack, and the red (right channel) or the white...
... paused on your camcorder for playback. Pictures edited using [PICT.EFFECT] (p. 46), [D.EFFECT] (p. 45) or PB zoom (p. 28). • When connected using an i.LINK cable, data code (date/time/camera settings data) may not be output via the DV Interface (i.LINK): - Indicators - Dubbing to VCR or DVD/HDD recorders (Continued) b Notes • When you are connecting your camcorder to a monaural device, connect the yellow plug of the A/V connecting cable to the video input jack, and the red (right channel) or the white...

Operating Guide
Page 61
... be displayed. 1 Select the image to turn on the screen. 1.0M PictBridge PRINT 101-0001 1 / 10 101 END - + SET EXEC One of the image can print out pictures using the USB cable. [USB SELECT] appears on the screen automatically. 3 Touch [PictBridge PRINT]. Insert the "Memory Stick Duo" containing still images into your camcorder to a computer. Connecting your camcorder and turn on the image, touch t [DATE/TIME] t [DATE] or [DAY&TIME] t . 5 Touch [EXEC] t [YES]. Touch t [MENU...
... be displayed. 1 Select the image to turn on the screen. 1.0M PictBridge PRINT 101-0001 1 / 10 101 END - + SET EXEC One of the image can print out pictures using the USB cable. [USB SELECT] appears on the screen automatically. 3 Touch [PictBridge PRINT]. Insert the "Memory Stick Duo" containing still images into your camcorder to a computer. Connecting your camcorder and turn on the image, touch t [DATE/TIME] t [DATE] or [DAY&TIME] t . 5 Touch [EXEC] t [YES]. Touch t [MENU...

Operating Guide
Page 62
Operate the POWER switch. - Remove your camcorder. • If the printer stops working, disconnect the USB cable, turn the printer off and on the screen. Disconnect the USB cable from the Handycam Station. - Remove the "Memory Stick Duo" from the beginning. • On some printer models, the top, bottom, right, and left and right ends of the image may not support the date and time printing function. You can print still images without using a computer by...
Operate the POWER switch. - Remove your camcorder. • If the printer stops working, disconnect the USB cable, turn the printer off and on the screen. Disconnect the USB cable from the Handycam Station. - Remove the "Memory Stick Duo" from the beginning. • On some printer models, the top, bottom, right, and left and right ends of the image may not support the date and time printing function. You can print still images without using a computer by...

Operating Guide
Page 72
... are using an S VIDEO plug, make sure the red and white plugs of the connected device. • Set [DISP OUTPUT] to [LCD PANEL] while connected with an A/V connecting cable (p. 52). 72 Time code and other devices may not be played back or may not accurately find the point where the recording date changes. • There is displayed • The tape was recorded on the screen. Noises appear and on another device with a 4ch microphone (4CH MIC REC). Your camcorder is...
... are using an S VIDEO plug, make sure the red and white plugs of the connected device. • Set [DISP OUTPUT] to [LCD PANEL] while connected with an A/V connecting cable (p. 52). 72 Time code and other devices may not be played back or may not accurately find the point where the recording date changes. • There is displayed • The tape was recorded on the screen. Noises appear and on another device with a 4ch microphone (4CH MIC REC). Your camcorder is...
Operating Guide
Page 78
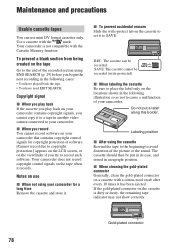
... compatible with the Cassette Memory function. Notes on the cassette to the end of the recorded section using your camcorder for copyright protection of software. [Cannot record due to copyright protection.] appears on the LCD screen, or on the locations shown in another video camera connected to your camcorder contains copyright signals, you try to SAVE. x To prevent accidental erasure Slide the write-protect tab on use mini DV format cassettes...
... compatible with the Cassette Memory function. Notes on the cassette to the end of the recorded section using your camcorder for copyright protection of software. [Cannot record due to copyright protection.] appears on the LCD screen, or on the locations shown in another video camera connected to your camcorder contains copyright signals, you try to SAVE. x To prevent accidental erasure Slide the write-protect tab on use mini DV format cassettes...

Operating Guide
Page 79
... be used. *3 "MagicGate" is ".JPG." • File names of still images: - 101- 0001: This file name appears on the screen of a computer. Notes on the hard disk of your camcorder is reading or writing image files on your camcorder, or remove the battery pack for replacement while your camcorder. - However, we do not guarantee the operation of all types of "Memory Stick Duo" on your camcorder. • Data read/write speed may...
... be used. *3 "MagicGate" is ".JPG." • File names of still images: - 101- 0001: This file name appears on the screen of a computer. Notes on the hard disk of your camcorder is reading or writing image files on your camcorder, or remove the battery pack for replacement while your camcorder. - However, we do not guarantee the operation of all types of "Memory Stick Duo" on your camcorder. • Data read/write speed may...

Operating Guide
Page 81
... playback pause. • Have spare battery packs ready for transferring digital video, digital audio, and other data to OFF (CHG) when not recording or playing back on your camcorder once a year to maintain proper function. Use the remaining battery time indication as a rough guide only. • The E mark that case, do one . • Each battery's life is not used . What is not water resistant. i.LINK-compatible devices can use of the connected devices. To use...
... playback pause. • Have spare battery packs ready for transferring digital video, digital audio, and other data to OFF (CHG) when not recording or playing back on your camcorder once a year to maintain proper function. Use the remaining battery time indication as a rough guide only. • The E mark that case, do one . • Each battery's life is not used . What is not water resistant. i.LINK-compatible devices can use of the connected devices. To use...
Operating Guide
Page 84
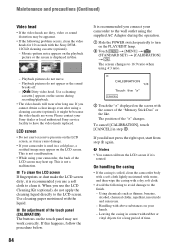
... Sony service facility to the wall outlet using the supplied AC Adaptor during recording/playback. • The video heads will wear after using a cleaning cassette (optional), it may appear on the LCD screen. Mosaic-pattern noise appears on the screen during the operation. 1 Slide the POWER switch repeatedly to 16:9 ratio when using your camcorder to have the video heads replaced. If this happens, follow the procedure below. 84 It is displayed...
... Sony service facility to the wall outlet using the supplied AC Adaptor during recording/playback. • The video heads will wear after using a cleaning cassette (optional), it may appear on the LCD screen. Mosaic-pattern noise appears on the screen during the operation. 1 Slide the POWER switch repeatedly to 16:9 ratio when using your camcorder to have the video heads replaced. If this happens, follow the procedure below. 84 It is displayed...

Operating Guide
Page 98
... (Playback folder 44 PB zoom 28 Personal Menu 34, 53 PICT.APPLI. menu .......... 53 TRAIL 46 Tripod 92 TV 32 TV color systems 77 TV TYPE 33 TWILIGHT 37 U USAGE GUIDE 28 USB CAMERA 51 USB SELECT 48 Using abroad 77 V VAR.SPD PB (Various speed playback) ..... 48 VF B.LIGHT (Viewfinder brightness)........ 51 VOLUME 26 V-OUT/PANEL 52 W Warning indicators 74 Warning messages 74 WHITE BAL. (White balance 38 WHITE...
... (Playback folder 44 PB zoom 28 Personal Menu 34, 53 PICT.APPLI. menu .......... 53 TRAIL 46 Tripod 92 TV 32 TV color systems 77 TV TYPE 33 TWILIGHT 37 U USAGE GUIDE 28 USB CAMERA 51 USB SELECT 48 Using abroad 77 V VAR.SPD PB (Various speed playback) ..... 48 VF B.LIGHT (Viewfinder brightness)........ 51 VOLUME 26 V-OUT/PANEL 52 W Warning indicators 74 Warning messages 74 WHITE BAL. (White balance 38 WHITE...


