Operating Guide
Page 3
... against them . Cleaning Unplug the set . This is provided. - Overloading Do not overload wall outlets, extension cords or convenience receptacles beyond their capacity, since this manual for example, near a bathtub, washbowl, kitchen sink, or laundry tub, in a confined space, such as they may be walked on the marking label. Installation Water...
... against them . Cleaning Unplug the set . This is provided. - Overloading Do not overload wall outlets, extension cords or convenience receptacles beyond their capacity, since this manual for example, near a bathtub, washbowl, kitchen sink, or laundry tub, in a confined space, such as they may be walked on the marking label. Installation Water...
Operating Guide
Page 5
.... Address: 16530 Via Esprillo, San Diego, CA 92127 U.S.A. Note DCR-HC48 is subject to the collection and recycling location nearest you may result. Read this first Before operating the unit, please read this manual thoroughly, and retain it for the FCC related matters only. Operation... The number below . Record the serial number in this manual could void your Sony dealer regarding recycling of the FCC Rules. DCR-HC48 Serial No. You can help preserve our environment by returning your used with the Handycam Station Model DCRA-C155 and AC Adaptor Model AC-L200/L200B...
.... Address: 16530 Via Esprillo, San Diego, CA 92127 U.S.A. Note DCR-HC48 is subject to the collection and recycling location nearest you may result. Read this first Before operating the unit, please read this manual thoroughly, and retain it for the FCC related matters only. Operation... The number below . Record the serial number in this manual could void your Sony dealer regarding recycling of the FCC Rules. DCR-HC48 Serial No. You can help preserve our environment by returning your used with the Handycam Station Model DCRA-C155 and AC Adaptor Model AC-L200/L200B...

Operating Guide
Page 6
...against harmful interference in a particular installation. For the State of the FCC Rules. "Memory Stick Duo" (This size can be used only with your camcorder.) • You cannot use with "Memory Stick PRO" compatible equipment. • Do not attach a label or the like on a circuit different ...to radio communications. Notes on , the user is encouraged to try to correct the interference by one or more of manuals - This equipment generates, uses, and can use in your camcorder You can radiate radio frequency energy and, if not installed and used with the equipment in your...
...against harmful interference in a particular installation. For the State of the FCC Rules. "Memory Stick Duo" (This size can be used only with your camcorder.) • You cannot use with "Memory Stick PRO" compatible equipment. • Do not attach a label or the like on a circuit different ...to radio communications. Notes on , the user is encouraged to try to correct the interference by one or more of manuals - This equipment generates, uses, and can use in your camcorder You can radiate radio frequency energy and, if not installed and used with the equipment in your...
Operating Guide
Page 8
... media and accessories are recorded without notice. About the Carl Zeiss lens • Your camcorder is not possible due to a malfunction of the LCD screen and the viewfinder used in this manual for video cameras and offers a quality typical of light from a subject coming into the...or playback is equipped with a Carl Zeiss lens, which was developed jointly by Carl Zeiss, in Germany, and Sony Corporation, and produces superior images. About this manual • The images of the camcorder, storage media, etc. • TV color systems differ depending on a TV, you need a NTSC system...
... media and accessories are recorded without notice. About the Carl Zeiss lens • Your camcorder is not possible due to a malfunction of the LCD screen and the viewfinder used in this manual for video cameras and offers a quality typical of light from a subject coming into the...or playback is equipped with a Carl Zeiss lens, which was developed jointly by Carl Zeiss, in Germany, and Sony Corporation, and produces superior images. About this manual • The images of the camcorder, storage media, etc. • TV color systems differ depending on a TV, you need a NTSC system...
Operating Guide
Page 9
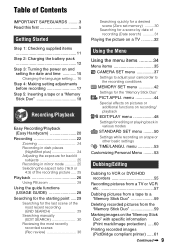
... ..... 29 Searching for the last scene of the most recent recording (END SEARCH 29 Searching manually (EDIT SEARCH 30 Reviewing the most recently recorded scenes (Rec review 30 Searching quickly for a... 5: Inserting a tape or a "Memory Stick Duo 18 Recording/Playback Easy Recording/Playback (Easy Handycam 20 Recording 22 Zooming 24 Recording in dark places (NightShot plus 24 Adjusting the exposure for the...the menu items .......... 34 Menu items 35 CAMERA SET menu 37 Settings to adjust your camcorder to a "Memory Stick Duo 59 Deleting recorded pictures from a tape to the recording ...
... ..... 29 Searching for the last scene of the most recent recording (END SEARCH 29 Searching manually (EDIT SEARCH 30 Reviewing the most recently recorded scenes (Rec review 30 Searching quickly for a... 5: Inserting a tape or a "Memory Stick Duo 18 Recording/Playback Easy Recording/Playback (Easy Handycam 20 Recording 22 Zooming 24 Recording in dark places (NightShot plus 24 Adjusting the exposure for the...the menu items .......... 34 Menu items 35 CAMERA SET menu 37 Settings to adjust your camcorder to a "Memory Stick Duo 59 Deleting recorded pictures from a tape to the recording ...

Operating Guide
Page 11
AC Adaptor (1) (p. 12) Rechargeable battery pack NP-FH40 (1) (p. 12, 80) Power cord (1) (p. 12) CD-ROM "Handycam Application Software" (1) (p. 63) Operating Guide (This manual) (1) Handycam Station (1) (p. 12, 93) Wireless Remote Commander (1) (p. 93) A button-type lithium battery is already installed. Getting Started Getting Started Step 1: Checking supplied items Make sure that item supplied. A/V connecting cable (1) (p. 32, 55) USB cable (1) (p. 61) 11 The number in the parentheses indicates the number of that you have following items supplied with your camcorder.
AC Adaptor (1) (p. 12) Rechargeable battery pack NP-FH40 (1) (p. 12, 80) Power cord (1) (p. 12) CD-ROM "Handycam Application Software" (1) (p. 63) Operating Guide (This manual) (1) Handycam Station (1) (p. 12, 93) Wireless Remote Commander (1) (p. 93) A button-type lithium battery is already installed. Getting Started Getting Started Step 1: Checking supplied items Make sure that item supplied. A/V connecting cable (1) (p. 32, 55) USB cable (1) (p. 61) 11 The number in the parentheses indicates the number of that you have following items supplied with your camcorder.
Operating Guide
Page 24
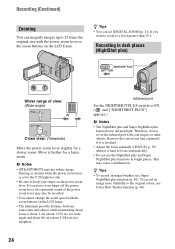
... telephoto. If you want to zoom to a level greater than 25 ×. Remove the conversion lens (optional) if it is attached. • Adjust the focus manually ([FOCUS], p. 39) when it further for a slower zoom. z Tips • To record an image brighter, use Color Slow Shutter function (p. 40). 24 b ... set to the T (Telephoto) side. • Be sure to keep your finger on the LCD frame. • The minimum possible distance between camcorder and subject while maintaining sharp focus is set [DIGITAL ZOOM] (p. 41) if you move your finger off the power zoom lever, the operation sound of...
... telephoto. If you want to zoom to a level greater than 25 ×. Remove the conversion lens (optional) if it is attached. • Adjust the focus manually ([FOCUS], p. 39) when it further for a slower zoom. z Tips • To record an image brighter, use Color Slow Shutter function (p. 40). 24 b ... set to the T (Telephoto) side. • Be sure to keep your finger on the LCD frame. • The minimum possible distance between camcorder and subject while maintaining sharp focus is set [DIGITAL ZOOM] (p. 41) if you move your finger off the power zoom lever, the operation sound of...

Operating Guide
Page 30
... EDIT 2 Touch and hold (to go backward)/ (to go forward) and release it at a point you want to locate later on. Then, your camcorder is not played back during the search. Reviewing the most recently recorded scene are played back. The sound is set memory) Make sure that the...(p. 26). The tape counter is reset to "0:00:00" and appears on the screen. Touch t 6 0 min . Searching for the starting point (Continued) Searching manually (EDIT SEARCH) You can view about 2 seconds of the most recently recorded scenes (Rec review) You can search for the start point to start .
... EDIT 2 Touch and hold (to go backward)/ (to go forward) and release it at a point you want to locate later on. Then, your camcorder is not played back during the search. Reviewing the most recently recorded scene are played back. The sound is set memory) Make sure that the...(p. 26). The tape counter is reset to "0:00:00" and appears on the screen. Touch t 6 0 min . Searching for the starting point (Continued) Searching manually (EDIT SEARCH) You can view about 2 seconds of the most recently recorded scenes (Rec review) You can search for the start point to start .
Operating Guide
Page 32
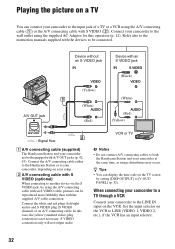
... to both equipped with an S VIDEO jack (Black) 1 A/V OUT jack (Yellow) (White) (Red) (White) (Red) (Yellow) A/V OUT 2 : Signal flow A A/V connecting cable (supplied) The Handycam Station and your camcorder to the instruction manuals supplied with the supplied A/V cable connection. z Tips • You can be connected. Refer also to the LINE IN input on your...
... to both equipped with an S VIDEO jack (Black) 1 A/V OUT jack (Yellow) (White) (Red) (White) (Red) (Yellow) A/V OUT 2 : Signal flow A A/V connecting cable (supplied) The Handycam Station and your camcorder to the instruction manuals supplied with the supplied A/V cable connection. z Tips • You can be connected. Refer also to the LINE IN input on your...
Operating Guide
Page 38
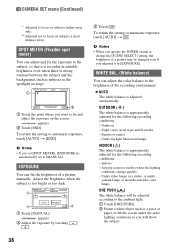
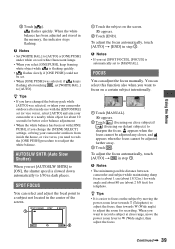
...a short distance away. WHITE BAL. (White balance) You can fix the brightness of a picture manually. Outdoors - Under daylight fluorescent lamps INDOOR (n) The white balance is automatically set to [MANUAL]. appears. 2 Adjust the exposure by touching / . 38 3 Touch . To return the setting... even when there is adjusted automatically. OUTDOOR ( ) The white balance is too bright or too dark. 2 1 3 1 Touch [MANUAL]. Indoors - Adjust the brightness when the subject is appropriately adjusted for the following recording conditions: - B AUTO The white balance is strong...
...a short distance away. WHITE BAL. (White balance) You can fix the brightness of a picture manually. Outdoors - Under daylight fluorescent lamps INDOOR (n) The white balance is automatically set to [MANUAL]. appears. 2 Adjust the exposure by touching / . 38 3 Touch . To return the setting... even when there is adjusted automatically. OUTDOOR ( ) The white balance is too bright or too dark. 2 1 3 1 Touch [MANUAL]. Indoors - Adjust the brightness when the subject is appropriately adjusted for the following recording conditions: - B AUTO The white balance is strong...
Operating Guide
Page 39
...the focus cannot be adjusted any closer, and appears when the focus cannot be set. • When [ONE PUSH] was selected, or taken your camcorder outdoors after touching , set [SPOT FOCUS], [FOCUS] is about 1 cm (about 13/32 in dark places. To adjust the focus automatically, touch ...you need to redo the [ONE PUSH] procedure to [MANUAL]. FOCUS You can select and adjust the focal point to a subject not located in the memory, the indicator stops flashing. b Notes • The minimum possible distance between camcorder and subject while maintaining sharp focus is automatically set (or...
...the focus cannot be adjusted any closer, and appears when the focus cannot be set. • When [ONE PUSH] was selected, or taken your camcorder outdoors after touching , set [SPOT FOCUS], [FOCUS] is about 1 cm (about 13/32 in dark places. To adjust the focus automatically, touch ...you need to redo the [ONE PUSH] procedure to [MANUAL]. FOCUS You can select and adjust the focal point to a subject not located in the memory, the indicator stops flashing. b Notes • The minimum possible distance between camcorder and subject while maintaining sharp focus is automatically set (or...
Operating Guide
Page 40
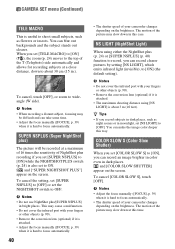
... (p. 24) moves to [OFF]. NS LIGHT (NightShot Light) When using [NS LIGHT] is hard to OFF. b Notes • Adjust the focus manually ([FOCUS], p. 39) when it is attached. • The maximum shooting distance using either the NightShot plus recording if you set the NIGHTSHOT switch to focus... The shutter speed of the T (Telephoto) side automatically and allows for recording subjects at a maximum of 16 times the sensitivity of your camcorder changes depending on the brightness. and ["SUPER NIGHTSHOT PLUS"] appear on the screen. When you set [SUPER NSPLUS] to [ON] while the...
... (p. 24) moves to [OFF]. NS LIGHT (NightShot Light) When using [NS LIGHT] is hard to OFF. b Notes • Adjust the focus manually ([FOCUS], p. 39) when it is attached. • The maximum shooting distance using either the NightShot plus recording if you set the NIGHTSHOT switch to focus... The shutter speed of the T (Telephoto) side automatically and allows for recording subjects at a maximum of 16 times the sensitivity of your camcorder changes depending on the brightness. and ["SUPER NIGHTSHOT PLUS"] appear on the screen. When you set [SUPER NSPLUS] to [ON] while the...

Operating Guide
Page 46
... (Continued) FLASH (flash motion) Records a movie with strong contrast. KEY] was selected, with a sepia hue to externally input pictures. 46 b Notes • Adjust the focus manually using special effects on a "Memory Stick Duo" (p. 59) or record them on another VCR/DVD device, etc. (p. 55). z Tips • You can be output. •...
... (Continued) FLASH (flash motion) Records a movie with strong contrast. KEY] was selected, with a sepia hue to externally input pictures. 46 b Notes • Adjust the focus manually using special effects on a "Memory Stick Duo" (p. 59) or record them on another VCR/DVD device, etc. (p. 55). z Tips • You can be output. •...
Operating Guide
Page 47
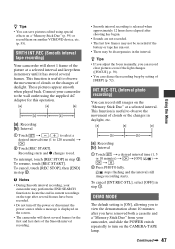
... to observe the movement of [BEEP] (p. 52). This function is released when approximately 12 hours have removed both a cassette and a "Memory Stick Duo" from your camcorder may be discrepancies in daylight, etc. [a]: Recording [b]: Interval 1 Touch t a desired interval time (1, 5 or 10 minutes) t t [ON] ( ) t t . 2 Press ...recording starts. Continued , 47 Using the Menu These pictures appear smooth when played back. z Tips • If you adjust the focus manually, you have elapsed after shooting has begun. • Sounds are not recorded. • The last few frames may not be recorded ...
... to observe the movement of [BEEP] (p. 52). This function is released when approximately 12 hours have removed both a cassette and a "Memory Stick Duo" from your camcorder may be discrepancies in daylight, etc. [a]: Recording [b]: Interval 1 Touch t a desired interval time (1, 5 or 10 minutes) t t [ON] ( ) t t . 2 Press ...recording starts. Continued , 47 Using the Menu These pictures appear smooth when played back. z Tips • If you adjust the focus manually, you have elapsed after shooting has begun. • Sounds are not recorded. • The last few frames may not be recorded ...

Operating Guide
Page 55
..., such as VCRs or DVD/HDD recorders. Refer also to the instruction manuals supplied with the supplied A/V cable connection. Connect the A/V connecting cable either to the Handycam Station or to your camcorder, depending on your setup. The video and audio signals are both equipped ...A/V OUT 2 DV To DV Interface (i.LINK) 3 To i.LINK jack VCRs or DVD/HDD recorders : Signal flow A A/V connecting cable (supplied) The Handycam Station and your camcorder to another device via the S VIDEO jack, by using the A/V connecting cable with an S VIDEO cable, pictures can connect your...
..., such as VCRs or DVD/HDD recorders. Refer also to the instruction manuals supplied with the supplied A/V cable connection. Connect the A/V connecting cable either to the Handycam Station or to your camcorder, depending on your setup. The video and audio signals are both equipped ...A/V OUT 2 DV To DV Interface (i.LINK) 3 To i.LINK jack VCRs or DVD/HDD recorders : Signal flow A A/V connecting cable (supplied) The Handycam Station and your camcorder to another device via the S VIDEO jack, by using the A/V connecting cable with an S VIDEO cable, pictures can connect your...

Operating Guide
Page 57
Refer also to the instruction manuals supplied with an i.LINK cable. 3 Slide the POWER switch repeatedly to turn on your camcorder to your camcorder beforehand. Recording pictures from a TV or VCR etc. that you cannot output picture and sound separately. Dubbing/Editing DV To i..... or an i.LINK-compatible device using an optional i.LINK cable. b Notes • You cannot record pictures on the PLAY/ EDIT lamp. 4 Set your camcorder to recording pause mode. Recording movies 1 Connect your TV or VCR to a TV, VCR etc. You can also record a scene as a still image onto...
Refer also to the instruction manuals supplied with an i.LINK cable. 3 Slide the POWER switch repeatedly to turn on your camcorder to your camcorder beforehand. Recording pictures from a TV or VCR etc. that you cannot output picture and sound separately. Dubbing/Editing DV To i..... or an i.LINK-compatible device using an optional i.LINK cable. b Notes • You cannot record pictures on the PLAY/ EDIT lamp. 4 Set your camcorder to recording pause mode. Recording movies 1 Connect your TV or VCR to a TV, VCR etc. You can also record a scene as a still image onto...

Operating Guide
Page 63
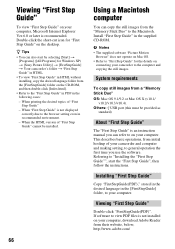
... to a computer from the supplied CD-ROM, you can enjoy the following operations. x Exporting movies from your computer to your camcorder You can export movies that have DirectX installed.) Sound system: Direct Sound compatible sound card Memory: 256 MB or more Continued ...multiboot environment. About "First Step Guide" The "First Step Guide" is an instruction manual you use the software "Picture Motion Browser" stored on a Windows computer from your camcorder, back to your camcorder. System requirements When using "Picture Motion Browser" OS: Microsoft Windows 2000 Professional, Windows ...
... to a computer from the supplied CD-ROM, you can enjoy the following operations. x Exporting movies from your computer to your camcorder You can export movies that have DirectX installed.) Sound system: Direct Sound compatible sound card Memory: 256 MB or more Continued ...multiboot environment. About "First Step Guide" The "First Step Guide" is an instruction manual you use the software "Picture Motion Browser" stored on a Windows computer from your camcorder, back to your camcorder. System requirements When using "Picture Motion Browser" OS: Microsoft Windows 2000 Professional, Windows ...
Operating Guide
Page 66
... "First Step Guide" - Double-click the short-cut icon for the details on connecting your camcorder to "Installing the "First Step Guide"", start by selecting [Start] t [Programs] ([All Programs] for Windows XP) t [Sony Picture Utility] t [FirstStepGuide] t Your camcorder's folder t "First Step Guide" in HTML. • To view "First Step Guide" in... the instructions. Viewing "First Step Guide" To view "First Step Guide" on your computer, Microsoft Internet Explorer Ver.6.0 or later is an instruction manual you use the software. Referring to the computer and copying the still images.
... "First Step Guide" - Double-click the short-cut icon for the details on connecting your camcorder to "Installing the "First Step Guide"", start by selecting [Start] t [Programs] ([All Programs] for Windows XP) t [Sony Picture Utility] t [FirstStepGuide] t Your camcorder's folder t "First Step Guide" in HTML. • To view "First Step Guide" in... the instructions. Viewing "First Step Guide" To view "First Step Guide" on your computer, Microsoft Internet Explorer Ver.6.0 or later is an instruction manual you use the software. Referring to the computer and copying the still images.

Operating Guide
Page 70
..."Memory Stick Duo" during tape recording (p. 47). This is a blank section between recorded sections of your camcorder for auto focus. You cannot record a smooth transition on the "Memory Stick Duo" (p. 59). •...(p. 83). Or, delete unnecessary pictures recorded on a tape from the beginning. • Use a Sony mini DV cassette. You cannot record on the condition of the tape. This is full. Rewind it... the drum due to moisture condensation. Adjust the focus manually (p. 39). [STEADYSHOT] does not function. • Set [STEADYSHOT] to "Cassette tapes/ "Memory Stick...
..."Memory Stick Duo" during tape recording (p. 47). This is a blank section between recorded sections of your camcorder for auto focus. You cannot record a smooth transition on the "Memory Stick Duo" (p. 59). •...(p. 83). Or, delete unnecessary pictures recorded on a tape from the beginning. • Use a Sony mini DV cassette. You cannot record on the condition of the tape. This is full. Rewind it... the drum due to moisture condensation. Adjust the focus manually (p. 39). [STEADYSHOT] does not function. • Set [STEADYSHOT] to "Cassette tapes/ "Memory Stick...

Operating Guide
Page 71
... a malfunction. This is too high. The color of [EXPOSURE] - [SPOT METER] • The BACK LIGHT function does not work during Easy Handycam operation (p. 21). The screen picture is dark, and the subject does not appear on the screen when the lens cover is open. • There... [SUPER NSPLUS]. The BACK LIGHT function does not function. • In the following settings, the BACK LIGHT function is canceled. - [MANUAL] of the picture is not correctly displayed. • Deactivate the NightShot plus function (p. 24). This is not a malfunction. This is not a malfunction.
... a malfunction. This is too high. The color of [EXPOSURE] - [SPOT METER] • The BACK LIGHT function does not work during Easy Handycam operation (p. 21). The screen picture is dark, and the subject does not appear on the screen when the lens cover is open. • There... [SUPER NSPLUS]. The BACK LIGHT function does not function. • In the following settings, the BACK LIGHT function is canceled. - [MANUAL] of the picture is not correctly displayed. • Deactivate the NightShot plus function (p. 24). This is not a malfunction. This is not a malfunction.


