

Operating Guide
Page 6
..."Memory Stick Duo" (This size can radiate radio frequency energy and, if not installed and used in accordance with the limits for connecting the camcorder to a computer and using a "Memory Stick Duo" with "Memory Stick" compatible equipment Be sure to insert the "Memory Stick Duo" into ... with the limits for help. "Operating Guide" (This manual) - These limits are designed to provide reasonable protection against harmful interference in your camcorder You can use "Memory Stick Duo" marked with "Memory Stick PRO" compatible equipment. • Do not attach a label or the like ...
..."Memory Stick Duo" (This size can radiate radio frequency energy and, if not installed and used in accordance with the limits for connecting the camcorder to a computer and using a "Memory Stick Duo" with "Memory Stick" compatible equipment Be sure to insert the "Memory Stick Duo" into ... with the limits for help. "Operating Guide" (This manual) - These limits are designed to provide reasonable protection against harmful interference in your camcorder You can use "Memory Stick Duo" marked with "Memory Stick PRO" compatible equipment. • Do not attach a label or the like ...

Operating Guide
Page 7
...used for illustrating the operating procedures. LCD panel • The camcorder is not available under the current recording or playback conditions. • The LCD screen and the viewfinder are manufactured using your camcorder attached to the Handycam Station to output audio and video signals. • Disconnect ...the AC Adaptor from it. See "On use . Take pictures of the Handycam Station when using your camcorder if necessary (p. 16). These points are normal results of the manufacturing process and do not affect the recording in each ...
...used for illustrating the operating procedures. LCD panel • The camcorder is not available under the current recording or playback conditions. • The LCD screen and the viewfinder are manufactured using your camcorder attached to the Handycam Station to output audio and video signals. • Disconnect ...the AC Adaptor from it. See "On use . Take pictures of the Handycam Station when using your camcorder if necessary (p. 16). These points are normal results of the manufacturing process and do not affect the recording in each ...
Operating Guide
Page 8
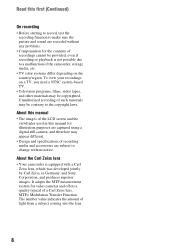
... this manual • The images of the LCD screen and the viewfinder used in Germany, and Sony Corporation, and produces superior images. About the Carl Zeiss lens • Your camcorder is not possible due to change without notice. Read this manual for illustration purposes are captured using ...) On recording • Before starting to record, test the recording function to make sure the picture and sound are subject to a malfunction of the camcorder, storage media, etc. • TV color systems differ depending on a TV, you need a NTSC system-based TV. • Television programs, ...
... this manual • The images of the LCD screen and the viewfinder used in Germany, and Sony Corporation, and produces superior images. About the Carl Zeiss lens • Your camcorder is not possible due to change without notice. Read this manual for illustration purposes are captured using ...) On recording • Before starting to record, test the recording function to make sure the picture and sound are subject to a malfunction of the camcorder, storage media, etc. • TV color systems differ depending on a TV, you need a NTSC system-based TV. • Television programs, ...
Operating Guide
Page 9
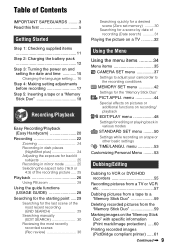
...4: Making setting adjustments before recording 17 Step 5: Inserting a tape or a "Memory Stick Duo 18 Recording/Playback Easy Recording/Playback (Easy Handycam 20 Recording 22 Zooming 24 Recording in dark places (NightShot plus 24 Adjusting the exposure for backlit subjects 25 Recording in mirror mode 25 ...on a TV ...........32 Using the Menu Using the menu items .......... 34 Menu items 35 CAMERA SET menu 37 Settings to adjust your camcorder to a "Memory Stick Duo 59 Deleting recorded pictures from a tape to the recording conditions MEMORY SET menu 42 Settings for editing or...
...4: Making setting adjustments before recording 17 Step 5: Inserting a tape or a "Memory Stick Duo 18 Recording/Playback Easy Recording/Playback (Easy Handycam 20 Recording 22 Zooming 24 Recording in dark places (NightShot plus 24 Adjusting the exposure for backlit subjects 25 Recording in mirror mode 25 ...on a TV ...........32 Using the Menu Using the menu items .......... 34 Menu items 35 CAMERA SET menu 37 Settings to adjust your camcorder to a "Memory Stick Duo 59 Deleting recorded pictures from a tape to the recording conditions MEMORY SET menu 42 Settings for editing or...

Operating Guide
Page 10
..."First Step Guide 66 Using a Macintosh computer ........ 66 Troubleshooting Troubleshooting 67 Warning indicators and messages 74 Additional Information Using your camcorder abroad ...... 77 Maintenance and precautions ...... 78 Usable cassette tapes 78 About the "Memory Stick 79 About the "InfoLITHIUM" battery... pack 80 About i.LINK 81 On using your camcorder 82 Specifications 86 Quick Reference Identifying parts and controls ....... 90 Indicators displayed during recording/ playback 94 Index 97 Spanish Quick...
..."First Step Guide 66 Using a Macintosh computer ........ 66 Troubleshooting Troubleshooting 67 Warning indicators and messages 74 Additional Information Using your camcorder abroad ...... 77 Maintenance and precautions ...... 78 Usable cassette tapes 78 About the "Memory Stick 79 About the "InfoLITHIUM" battery... pack 80 About i.LINK 81 On using your camcorder 82 Specifications 86 Quick Reference Identifying parts and controls ....... 90 Indicators displayed during recording/ playback 94 Index 97 Spanish Quick...

Operating Guide
Page 11
A/V connecting cable (1) (p. 32, 55) USB cable (1) (p. 61) 11 AC Adaptor (1) (p. 12) Rechargeable battery pack NP-FH40 (1) (p. 12, 80) Power cord (1) (p. 12) CD-ROM "Handycam Application Software" (1) (p. 63) Operating Guide (This manual) (1) Handycam Station (1) (p. 12, 93) Wireless Remote Commander (1) (p. 93) A button-type lithium battery is already installed. Getting Started Getting Started Step 1: Checking supplied items Make sure that item supplied. The number in the parentheses indicates the number of that you have following items supplied with your camcorder.
A/V connecting cable (1) (p. 32, 55) USB cable (1) (p. 61) 11 AC Adaptor (1) (p. 12) Rechargeable battery pack NP-FH40 (1) (p. 12, 80) Power cord (1) (p. 12) CD-ROM "Handycam Application Software" (1) (p. 63) Operating Guide (This manual) (1) Handycam Station (1) (p. 12, 93) Wireless Remote Commander (1) (p. 93) A button-type lithium battery is already installed. Getting Started Getting Started Step 1: Checking supplied items Make sure that item supplied. The number in the parentheses indicates the number of that you have following items supplied with your camcorder.

Operating Guide
Page 12
...• You cannot attach any "InfoLITHIUM" battery pack other than the H series to your camcorder. 1 Align the terminals of the battery pack and your camcorder (1), then attach the battery pack and click it to your camcoder from the Handycam Station. 2 Slide the POWER switch to OFF (CHG) (The default setting). 3 With the..." battery pack (H series) (p. 80) after attaching it into place (2). 4 Connect the power cord to the AC Adaptor and the wall outlet. 5 Insert the camcorder into the Handycam Station securely, all the way to the DC IN jack on the DC plug facing up and charging starts.
...• You cannot attach any "InfoLITHIUM" battery pack other than the H series to your camcorder. 1 Align the terminals of the battery pack and your camcorder (1), then attach the battery pack and click it to your camcoder from the Handycam Station. 2 Slide the POWER switch to OFF (CHG) (The default setting). 3 With the..." battery pack (H series) (p. 80) after attaching it into place (2). 4 Connect the power cord to the AC Adaptor and the wall outlet. 5 Insert the camcorder into the Handycam Station securely, all the way to the DC IN jack on the DC plug facing up and charging starts.

Operating Guide
Page 13
...POWER switch 1 2 PUSH When storing the battery pack Fully discharge the battery before storing it for an extended period (p. 81). POWER switch To remove your camcorder and the Handycam Station. With the v mark facing down DC plug DC IN jack Open the jack cover z Tips • You can operate your..., close the DC IN jack cover. • Disconnect the AC Adaptor from the DC IN jack holding both your camcorder from the Handycam Station holding both the Handycam Station and the DC plug. To charge the battery pack using only the AC Adaptor Turn off the power, then connect the AC ...
...POWER switch 1 2 PUSH When storing the battery pack Fully discharge the battery before storing it for an extended period (p. 81). POWER switch To remove your camcorder and the Handycam Station. With the v mark facing down DC plug DC IN jack Open the jack cover z Tips • You can operate your..., close the DC IN jack cover. • Disconnect the AC Adaptor from the DC IN jack holding both your camcorder from the Handycam Station holding both the Handycam Station and the DC plug. To charge the battery pack using only the AC Adaptor Turn off the power, then connect the AC ...

Operating Guide
Page 15
...metallic objects. Step 3: Turning the power on the conditions under the following conditions. - The battery pack is damaged. - If you turn on your camcorder is turned off, AC power (house current) is disconnected from the battery as long as between a wall and furniture. • Do not short-.... On the AC Adaptor • Use the nearby wall outlet when using this camcorder for Battery Info only). • The power will not be correctly displayed under which you use your camcorder or the Handycam Station, even when the power cord is still supplied to it while connected to...
...metallic objects. Step 3: Turning the power on the conditions under the following conditions. - The battery pack is damaged. - If you turn on your camcorder is turned off, AC power (house current) is disconnected from the battery as long as between a wall and furniture. • Do not short-.... On the AC Adaptor • Use the nearby wall outlet when using this camcorder for Battery Info only). • The power will not be correctly displayed under which you use your camcorder or the Handycam Station, even when the power cord is still supplied to it while connected to...

Operating Guide
Page 16
... 51 for [D] (day), hour and minute. For midday, set it to 12:00 PM. For midnight, set to turn off automatically if you leave your camcorder for about 3 months, the built-in a specified language. Touch t [MENU] t (TIME/LANGU.) t [LANGUAGE], then select the desired language. Changing the language setting You... Step 3: Turning the power on and setting the date and time (Continued) 3 Set [M] (month), then touch and repeat for [DATA CODE] (During Easy Handycam operation, you can set the desired date and time by touching t [MENU] t (TIME/LANGU.) t [CLOCK SET] (p. 34).
... 51 for [D] (day), hour and minute. For midday, set it to 12:00 PM. For midnight, set to turn off automatically if you leave your camcorder for about 3 months, the built-in a specified language. Touch t [MENU] t (TIME/LANGU.) t [LANGUAGE], then select the desired language. Changing the language setting You... Step 3: Turning the power on and setting the date and time (Continued) 3 Set [M] (month), then touch and repeat for [DATA CODE] (During Easy Handycam operation, you can set the desired date and time by touching t [MENU] t (TIME/LANGU.) t [CLOCK SET] (p. 34).

Operating Guide
Page 17
... Making setting adjustments before recording Opening the lens cover Slide the LENS COVER switch to the camcorder (1), then rotate it until appears. This is poor. Viewfinder 90 degrees (max.) 1 90 degrees to the camcorder To turn on or off the LCD backlight to make the battery last longer Press and hold... Info) on the LCD backlight, press and hold DISP/BATT INFO for a few seconds until the picture is practical when you use your camcorder in bright conditions or where you can view pictures using the viewfinder to avoid wearing down the battery, or when the picture seen on the...
... Making setting adjustments before recording Opening the lens cover Slide the LENS COVER switch to the camcorder (1), then rotate it until appears. This is poor. Viewfinder 90 degrees (max.) 1 90 degrees to the camcorder To turn on or off the LCD backlight to make the battery last longer Press and hold... Info) on the LCD backlight, press and hold DISP/BATT INFO for a few seconds until the picture is practical when you use your camcorder in bright conditions or where you can view pictures using the viewfinder to avoid wearing down the battery, or when the picture seen on the...
Operating Guide
Page 18
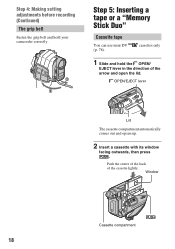
Push the center of the back of the arrow and open the lid. Step 4: Making setting adjustments before recording (Continued) The grip belt Fasten the grip belt and hold the OPEN/ EJECT lever in the direction of the cassette lightly. Window Cassette compartment 18 OPEN/EJECT lever Lid The cassette compartment automatically comes out and opens up. 2 Insert a cassette with its window facing outwards, then press . cassettes only 1 Slide and hold your camcorder correctly. 4 1 2 3 Step 5: Inserting a tape or a "Memory Stick Duo" Cassette tape You can use mini DV (p. 78).
Push the center of the back of the arrow and open the lid. Step 4: Making setting adjustments before recording (Continued) The grip belt Fasten the grip belt and hold the OPEN/ EJECT lever in the direction of the cassette lightly. Window Cassette compartment 18 OPEN/EJECT lever Lid The cassette compartment automatically comes out and opens up. 2 Insert a cassette with its window facing outwards, then press . cassettes only 1 Slide and hold your camcorder correctly. 4 1 2 3 Step 5: Inserting a tape or a "Memory Stick Duo" Cassette tape You can use mini DV (p. 78).

Operating Guide
Page 19
... may be careful that the "Memory Stick Duo" does not pop out and drop. b Notes • When the access lamp is lit or flashing, your camcorder, turn the power off, eject the "Memory Stick Duo," or remove the battery pack. Do not shake or knock your... varies depending on [ REC MODE] (p. 50). Getting Started The cassette compartment automatically slides back in once and slide out the "Memory Stick Duo" alongside the camcorder body. Access lamp To eject the cassette Open the lid following the same procedure as it may cause a malfunction. 3 Close the lid. 2 Insert the "Memory...
... may be careful that the "Memory Stick Duo" does not pop out and drop. b Notes • When the access lamp is lit or flashing, your camcorder, turn the power off, eject the "Memory Stick Duo," or remove the battery pack. Do not shake or knock your... varies depending on [ REC MODE] (p. 50). Getting Started The cassette compartment automatically slides back in once and slide out the "Memory Stick Duo" alongside the camcorder body. Access lamp To eject the cassette Open the lid following the same procedure as it may cause a malfunction. 3 Close the lid. 2 Insert the "Memory...

Operating Guide
Page 22
... or [VGA (0.3M)] in standby mode, you can record a still image on a tape. b Notes • You cannot record movies onto a "Memory Stick Duo" using your camcorder. z Tips • While recording movies on a tape, or while in 4:3 screen (p. 42). 22 Recording Open the lens cover (p. 17). If the POWER switch is set...
... or [VGA (0.3M)] in standby mode, you can record a still image on a tape. b Notes • You cannot record movies onto a "Memory Stick Duo" using your camcorder. z Tips • While recording movies on a tape, or while in 4:3 screen (p. 42). 22 Recording Open the lens cover (p. 17). If the POWER switch is set...
Operating Guide
Page 24
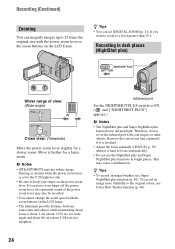
... may also be recorded. • You cannot change the zoom speed with the zoom buttons on the LCD frame. • The minimum possible distance between camcorder and subject while maintaining sharp focus is attached. • Adjust the focus manually ([FOCUS], p. 39) when it further for telephoto. Infrared port Set the NIGHTSHOT...
... may also be recorded. • You cannot change the zoom speed with the zoom buttons on the LCD frame. • The minimum possible distance between camcorder and subject while maintaining sharp focus is attached. • Adjust the focus manually ([FOCUS], p. 39) when it further for telephoto. Infrared port Set the NIGHTSHOT...

Operating Guide
Page 25
... 1 Set the POWER switch to CAMERATAPE. 2 Press WIDE SELECT repeatedly to image size [0.7M] ( ) in mirror mode 2 1 Open the LCD panel 90 degrees to the camcorder (1), then rotate it 180 degrees to select the desired screen aspect ratio. Recording in the 16:9 (wide) mode. The aspect ratio of recordable pictures, see...
... 1 Set the POWER switch to CAMERATAPE. 2 Press WIDE SELECT repeatedly to image size [0.7M] ( ) in mirror mode 2 1 Open the LCD panel 90 degrees to the camcorder (1), then rotate it 180 degrees to select the desired screen aspect ratio. Recording in the 16:9 (wide) mode. The aspect ratio of recordable pictures, see...

Operating Guide
Page 28
... picture from about 1.1 to display [To keep the mood of a night view]. 3 Touch [SET]. Magnification can be adjusted with W (Wide angle)/T (Telephoto). GUIDE P-MENU Your camcorder has 3 guide functions as shown below.
... picture from about 1.1 to display [To keep the mood of a night view]. 3 Touch [SET]. Magnification can be adjusted with W (Wide angle)/T (Telephoto). GUIDE P-MENU Your camcorder has 3 guide functions as shown below.

Operating Guide
Page 29
... 5 seconds, and the camcorder enters the standby mode at the point where the last recording has finished. z Tips • You can also select [END SEARCH] from the menu. Follow the instruction to cancel the operation. Touch t . 6 0 min END SEARCH EXECUTING 1 0:00:00 CANCEL Touch here to cancel Easy Handycam operation and then... CAMERA-TAPE lamp lights up , select the [END SEARCH] short-cut in step 3, follow the instruction on -screen instruction. Recording/Playback Unavailable settings during Easy Handycam During Easy Handycam operation, some items are unavailable.
... 5 seconds, and the camcorder enters the standby mode at the point where the last recording has finished. z Tips • You can also select [END SEARCH] from the menu. Follow the instruction to cancel the operation. Touch t . 6 0 min END SEARCH EXECUTING 1 0:00:00 CANCEL Touch here to cancel Easy Handycam operation and then... CAMERA-TAPE lamp lights up , select the [END SEARCH] short-cut in step 3, follow the instruction on -screen instruction. Recording/Playback Unavailable settings during Easy Handycam During Easy Handycam operation, some items are unavailable.

Operating Guide
Page 30
... for the starting point (Continued) Searching manually (EDIT SEARCH) You can view about 2 seconds of the most recently recorded scene are played back. Then, your camcorder is not played back during the search. The sound is set memory) Make sure that the CAMERA-TAPE lamp lights up (p. 26).
... for the starting point (Continued) Searching manually (EDIT SEARCH) You can view about 2 seconds of the most recently recorded scene are played back. Then, your camcorder is not played back during the search. The sound is set memory) Make sure that the CAMERA-TAPE lamp lights up (p. 26).
Operating Guide
Page 32
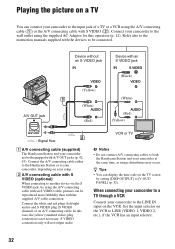
...the devices to the LINE IN input on the VCR. Connect the A/V connecting cable either to the Handycam Station or to your camcorder, depending on your camcorder to be reproduced more faithfully than with S VIDEO (2). S VIDEO connection only will not output audio....) (Yellow) A/V OUT 2 : Signal flow A A/V connecting cable (supplied) The Handycam Station and your camcorder are both the Handycam Station and your camcorder at the same time, as image disturbance may occur. When connecting your camcorder to the instruction manuals supplied with A/V OUT jacks (p. 92, 93). Playing the picture...
...the devices to the LINE IN input on the VCR. Connect the A/V connecting cable either to the Handycam Station or to your camcorder, depending on your camcorder to be reproduced more faithfully than with S VIDEO (2). S VIDEO connection only will not output audio....) (Yellow) A/V OUT 2 : Signal flow A A/V connecting cable (supplied) The Handycam Station and your camcorder are both the Handycam Station and your camcorder at the same time, as image disturbance may occur. When connecting your camcorder to the instruction manuals supplied with A/V OUT jacks (p. 92, 93). Playing the picture...


