
Operating Guide
Page 56
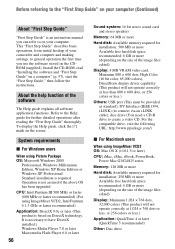
....) Others: USB port (This must be provided as standard), DV Interface (IEEE1394, i.LINK) (to connect via an i.LINK cable), disc drive (You need a CD-R drive to the Help guide for installation: 500 MB or more Available free hard disk space recommended: 6 GB or more (depending on the CDROM ...Refer to create a video CD. Operation is an instruction manual you use the software stored on the size of your camcorder and computer and making settings, to have DirectX installed.) Windows Media Player 7.0 or later Macromedia Flash Player 6.0 or later 56 Sound system: 16 bit stereo sound card and ...
....) Others: USB port (This must be provided as standard), DV Interface (IEEE1394, i.LINK) (to connect via an i.LINK cable), disc drive (You need a CD-R drive to the Help guide for installation: 500 MB or more Available free hard disk space recommended: 6 GB or more (depending on the CDROM ...Refer to create a video CD. Operation is an instruction manual you use the software stored on the size of your camcorder and computer and making settings, to have DirectX installed.) Windows Media Player 7.0 or later Macromedia Flash Player 6.0 or later 56 Sound system: 16 bit stereo sound card and ...
Operating Guide
Page 57
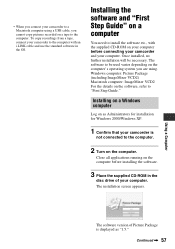
...computer's operating system you are using a USB cable, you connect your camcorder to a Macintosh computer using . Installing on a Windows computer Log on as Administrators for installation for Windows 2000/Windows XP. 1 Confirm that your camcorder is displayed as "1.5." Continued , 57 Installing the software and "First ...supplied CD-ROM on the computer before connecting your camcorder and your computer. Close all applications running on your computer before installing the software. 3 Place the supplied CD-ROM in the disc drive of Picture Package is not connected to install the...
...computer's operating system you are using a USB cable, you connect your camcorder to a Macintosh computer using . Installing on a Windows computer Log on as Administrators for installation for Windows 2000/Windows XP. 1 Confirm that your camcorder is displayed as "1.5." Continued , 57 Installing the software and "First ...supplied CD-ROM on the computer before connecting your camcorder and your computer. Close all applications running on your computer before installing the software. 3 Place the supplied CD-ROM in the disc drive of Picture Package is not connected to install the...
Operating Guide
Page 62
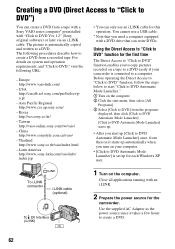
Latin America http://www.sony-latin.com/vaio/info/ index.jsp • You can only use a USB cable. * Note that can write DVDs. Using the Direct Access to "Click to DVD" function for each Windows XP user. Close all applications running with a DVD drive that you need a computer equipped with an i.LINK. 2... up. • After you start up for the first time The Direct Access to "Click to DVD" function enables you turn on your camcorder is automatically copied and written to DVD Ver.1.2" (Sony original software) or later via an i.LINK cable. You cannot use an i.LINK cable for the...
Latin America http://www.sony-latin.com/vaio/info/ index.jsp • You can only use a USB cable. * Note that can write DVDs. Using the Direct Access to "Click to DVD" function for each Windows XP user. Close all applications running with a DVD drive that you need a computer equipped with an i.LINK. 2... up. • After you start up for the first time The Direct Access to "Click to DVD" function enables you turn on your camcorder is automatically copied and written to DVD Ver.1.2" (Sony original software) or later via an i.LINK cable. You cannot use an i.LINK cable for the...

Operating Guide
Page 72
...then connect it again. • Slide the POWER switch repeatedly to turn on the PLAY/EDIT lamp on your camcorder and set [USB STREAM] to [ON] (p. 47). (Only when connected to the Windows computer with the USB cable) You cannot view the video recorded on a tape on the computer. • ... set [USB STREAM] to [ON] (p. 47). (Only when connected to the Windows computer with an i.LINK cable and use the standard software in the disc drive of the USB driver was connected to your camcorder is connected to a computer. 2 Right-click [My Computer], then click [Properties]. The image on tape does...
...then connect it again. • Slide the POWER switch repeatedly to turn on the PLAY/EDIT lamp on your camcorder and set [USB STREAM] to [ON] (p. 47). (Only when connected to the Windows computer with the USB cable) You cannot view the video recorded on a tape on the computer. • ... set [USB STREAM] to [ON] (p. 47). (Only when connected to the Windows computer with an i.LINK cable and use the standard software in the disc drive of the USB driver was connected to your camcorder is connected to a computer. 2 Right-click [My Computer], then click [Properties]. The image on tape does...
Operating Guide
Page 73
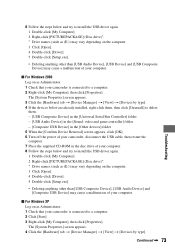
...x For Windows XP Log on as Administrator. 1 Check that your camcorder is connected to a computer. 2 Right-click [My Computer], then click [Properties]. Troubleshooting 8 Follow the steps below and try to install the USB driver again. 1 Double-click [My Computer]. 2 Right-click [PICTUREPACKAGE] (Disc drive)*. * Drive names (...Confirm Device Removal] screen appears, click [OK]. 6 Turn off the power of your camcorder, disconnect the USB cable, then restart the computer. 7 Place the supplied CD-ROM in the disc drive of your computer. 8 Follow the steps below and try to install the USB driver...
...x For Windows XP Log on as Administrator. 1 Check that your camcorder is connected to a computer. 2 Right-click [My Computer], then click [Properties]. Troubleshooting 8 Follow the steps below and try to install the USB driver again. 1 Double-click [My Computer]. 2 Right-click [PICTUREPACKAGE] (Disc drive)*. * Drive names (...Confirm Device Removal] screen appears, click [OK]. 6 Turn off the power of your camcorder, disconnect the USB cable, then restart the computer. 7 Place the supplied CD-ROM in the disc drive of your computer. 8 Follow the steps below and try to install the USB driver...
Operating Guide
Page 74
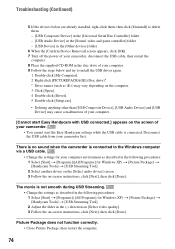
... click [OK]. 7 Turn off the power of your camcorder, disconnect the USB cable, then restart the computer. 8 Place the supplied CD-ROM in the disc drive of your camcorder. • You cannot start the Easy Handycam settings while the USB cable is not smooth during USB Streaming.... • Change the settings as described in the following procedures: 1 Select [Start] t [Programs]([All Programs] for Windows XP) t [Picture Package] t [Handycam Tools] t ...
... click [OK]. 7 Turn off the power of your camcorder, disconnect the USB cable, then restart the computer. 8 Place the supplied CD-ROM in the disc drive of your camcorder. • You cannot start the Easy Handycam settings while the USB cable is not smooth during USB Streaming.... • Change the settings as described in the following procedures: 1 Select [Start] t [Programs]([All Programs] for Windows XP) t [Picture Package] t [Handycam Tools] t ...


