
Operating Guide
Page 8
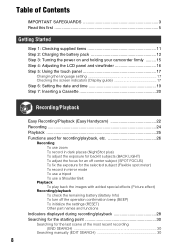
...battery pack 12 Step 3: Turning the power on and holding your camcorder firmly ......... 15 Step 4: Adjusting the LCD panel and viewfinder 16 Step 5: Using the touch panel 17 Changing the language setting 17 Checking the screen indicators (Display guide 17 Step 6: Setting the date and time ...19 Step 7: Inserting a Cassette 20 Recording/Playback Easy Recording/Playback (Easy Handycam 22 Recording 24 Playback 25 Functions...
...battery pack 12 Step 3: Turning the power on and holding your camcorder firmly ......... 15 Step 4: Adjusting the LCD panel and viewfinder 16 Step 5: Using the touch panel 17 Changing the language setting 17 Checking the screen indicators (Display guide 17 Step 6: Setting the date and time ...19 Step 7: Inserting a Cassette 20 Recording/Playback Easy Recording/Playback (Easy Handycam 22 Recording 24 Playback 25 Functions...
Operating Guide
Page 17
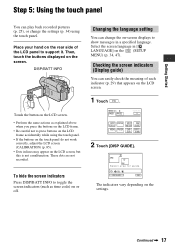
... Press DISP/BATT INFO to press buttons on the LCD frame accidentally while using the touch panel. Select area for guide. Continued , 17 These dots are not recorded. Checking the screen indicators (Display guide) You can easily check the meaning of the LCD panel to show messages in a... specified language. Select the screen language in [ LANGUAGE] on the settings. DISP/BATT INFO Touch the button on the LCD screen. • Perform the same actions as explained above when you press the buttons on the LCD frame...
... Press DISP/BATT INFO to press buttons on the LCD frame accidentally while using the touch panel. Select area for guide. Continued , 17 These dots are not recorded. Checking the screen indicators (Display guide) You can easily check the meaning of the LCD panel to show messages in a... specified language. Select the screen language in [ LANGUAGE] on the settings. DISP/BATT INFO Touch the button on the LCD screen. • Perform the same actions as explained above when you press the buttons on the LCD frame...
Operating Guide
Page 18
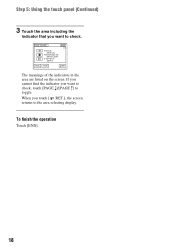
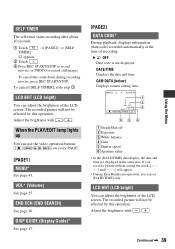
DISP GUIDE FOCUS: MANUAL PROGRAM AE: SPOTLIGHT P EFFECT: SEPIA END 1/2 PAGE PAGE RET. When you touch [ RET.], the screen returns to the area selecting display. If you cannot find the indicator you want to check. To finish the operation Touch [END]. 18 Step 5: Using the touch panel (Continued) 3 Touch the area including the indicator that you want to check, touch [PAGE r]/[PAGE R] to toggle. The meanings of the indicators in the area are listed on the screen.
DISP GUIDE FOCUS: MANUAL PROGRAM AE: SPOTLIGHT P EFFECT: SEPIA END 1/2 PAGE PAGE RET. When you touch [ RET.], the screen returns to the area selecting display. If you cannot find the indicator you want to check. To finish the operation Touch [END]. 18 Step 5: Using the touch panel (Continued) 3 Touch the area including the indicator that you want to check, touch [PAGE r]/[PAGE R] to toggle. The meanings of the indicators in the area are listed on the screen.
Operating Guide
Page 19
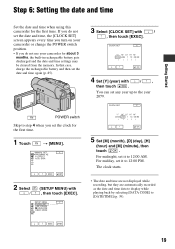
... SET Y MDHM 2 0 0 6 JAN 1 12 : 0 0 AM OK 4 Set [Y] (year) with / , then touch [EXEC]. CLOCK SET Y MDHM 2 0 0 6 J A N 1 1 2 : 0 0 AM OK 5 Set [M] (month), [D] (day), [H] (hour) and [M] (minute), then touch . For midnight, set the date and time, the [CLOCK SET] screen appears every time you turn on your camcorder for the first time. Step 6: Setting the date and time...
... SET Y MDHM 2 0 0 6 JAN 1 12 : 0 0 AM OK 4 Set [Y] (year) with / , then touch [EXEC]. CLOCK SET Y MDHM 2 0 0 6 J A N 1 1 2 : 0 0 AM OK 5 Set [M] (month), [D] (day), [H] (hour) and [M] (minute), then touch . For midnight, set the date and time, the [CLOCK SET] screen appears every time you turn on your camcorder for the first time. Step 6: Setting the date and time...

Operating Guide
Page 23
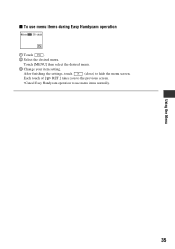
... Easy Handycam operation Touch and [MENU] to OFF(CHG), slide it C Rewind/Fast forward x To cancel Easy Handycam operation Press EASY C again. x Unavailable buttons during Easy Handycam During Easy Handycam operation, the following buttons are unavailable, since the items are set to display adjustable menu settings. disappears from the screen D. x Adjustable menu settings during Easy Handycam are...
... Easy Handycam operation Touch and [MENU] to OFF(CHG), slide it C Rewind/Fast forward x To cancel Easy Handycam operation Press EASY C again. x Unavailable buttons during Easy Handycam During Easy Handycam operation, the following buttons are unavailable, since the items are set to display adjustable menu settings. disappears from the screen D. x Adjustable menu settings during Easy Handycam are...
Operating Guide
Page 30
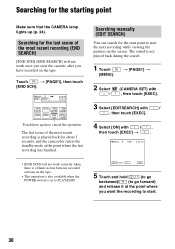
... viewing the pictures on the screen. SCH SURE Touch here again to PLAY/EDIT. t [PAGE1] t 2 Select / (CAMERA SET) with , then touch [EXEC]. 3 Select [EDITSEARCH] with / , then touch [EXEC]. 4 Select [ON] with / , then touch [EXEC] t . 60min... STBY 0:00:00 • [END SCH] will not work correctly when there is a blank section between recorded sections on the tape. Searching manually (EDIT SEARCH) You can search for about 5 seconds, and the camcorder...
... viewing the pictures on the screen. SCH SURE Touch here again to PLAY/EDIT. t [PAGE1] t 2 Select / (CAMERA SET) with , then touch [EXEC]. 3 Select [EDITSEARCH] with / , then touch [EXEC]. 4 Select [ON] with / , then touch [EXEC] t . 60min... STBY 0:00:00 • [END SCH] will not work correctly when there is a blank section between recorded sections on the tape. Searching manually (EDIT SEARCH) You can search for about 5 seconds, and the camcorder...

Operating Guide
Page 34
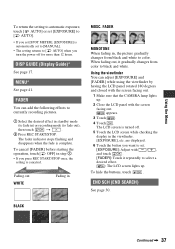
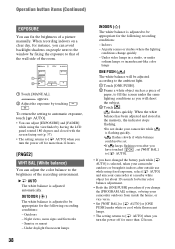
...To use menu items For details of the items, see page 36. 1 Touch . 2 Touch the desired page. 3 Touch the desired button. 4 Select the desired setting, then touch t •With some settings, you to the previous screen. 34 The menu index screen appears. 2 Select the desired menu. CAMERA lamp: settings for recording on the... same as that in the direction of the arrow repeatedly to turn on a tape PLAY/EDIT lamp: settings for viewing/editing 2 Touch the LCD screen to select the menu item. Using the Menu Using the menu items Follow the instructions below to use each of the menu items ...
...To use menu items For details of the items, see page 36. 1 Touch . 2 Touch the desired page. 3 Touch the desired button. 4 Select the desired setting, then touch t •With some settings, you to the previous screen. 34 The menu index screen appears. 2 Select the desired menu. CAMERA lamp: settings for recording on the... same as that in the direction of the arrow repeatedly to turn on a tape PLAY/EDIT lamp: settings for viewing/editing 2 Touch the LCD screen to select the menu item. Using the Menu Using the menu items Follow the instructions below to use each of the menu items ...
Operating Guide
Page 35
Using the Menu 35 Touch [MENU] then select the desired menu. 3 Change your item setting. Each touch of [ RET.] takes you to the previous screen. •Cancel Easy Handycam operation to hide the menu screen. After finishing the settings, touch (close) to use menu items during Easy Handycam operation 60min STBY 0:00:00 FN 1 Touch . 2 Select the desired menu. x To use menu items normally.
Using the Menu 35 Touch [MENU] then select the desired menu. 3 Change your item setting. Each touch of [ RET.] takes you to the previous screen. •Cancel Easy Handycam operation to hide the menu screen. After finishing the settings, touch (close) to use menu items during Easy Handycam operation 60min STBY 0:00:00 FN 1 Touch . 2 Select the desired menu. x To use menu items normally.
Operating Guide
Page 36
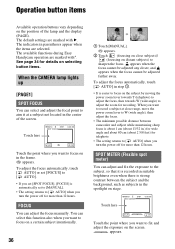
...indicators in step 1. • It is strong contrast between camcorder and subject while maintaining sharp focus is automatically set to [... on distant subjects) to fix and adjust the exposure on the position of the screen. To adjust the focus automatically, touch [ AUTO] in parentheses appear when the items are selected. SPOT METER (Flexible ... 5/8 feet) for more than 12 hours. The available functions during Easy Handycam operation are marked with *. Touch here 60min STBY SPOT FOCUS 0:00:00 AUTO OK Touch the point where you want to record a subject at a subject not ...
...indicators in step 1. • It is strong contrast between camcorder and subject while maintaining sharp focus is automatically set to [... on distant subjects) to fix and adjust the exposure on the position of the screen. To adjust the focus automatically, touch [ AUTO] in parentheses appear when the items are selected. SPOT METER (Flexible ... 5/8 feet) for more than 12 hours. The available functions during Easy Handycam operation are marked with *. Touch here 60min STBY SPOT FOCUS 0:00:00 AUTO OK Touch the point where you want to record a subject at a subject not ...
Operating Guide
Page 37
... the picture gradually changes from color to black and white. When fading out, it repeatedly to select a desired effect. : The LCD screen lights up. appears. 3 Touch . 4 Touch . END SCH (END SEARCH) See page 30. DISP GUIDE (Display Guide)* See page 17. FADER You can adjust [EXPOSURE] and ...the viewfinder by having the LCD panel rotated 180 degrees and closed with the screen facing out. 1 Make sure that the CAMERA lamp lights up. 2 Close the LCD panel with / , and touch . [FADER]: Touch it gradually changes from black and white to color. FADER MONOTONE When fading ...
... the picture gradually changes from color to black and white. When fading out, it repeatedly to select a desired effect. : The LCD screen lights up. appears. 3 Touch . 4 Touch . END SCH (END SEARCH) See page 30. DISP GUIDE (Display Guide)* See page 17. FADER You can adjust [EXPOSURE] and ...the viewfinder by having the LCD panel rotated 180 degrees and closed with the screen facing out. 1 Make sure that the CAMERA lamp lights up. 2 Close the LCD panel with / , and touch . [FADER]: Touch it gradually changes from black and white to color. FADER MONOTONE When fading ...
Operating Guide
Page 38
... to the brightness of paper, to fill the screen under sodium lamps or incandescent-like color lamps ONE PUSH ( ) The white balance will shoot the subject. 3 Touch . At party scenes or studios where the lighting conditions change the [PROGRAM AE] settings, or bring your camcorder outdoors from inside the house, or vice versa...
... to the brightness of paper, to fill the screen under sodium lamps or incandescent-like color lamps ONE PUSH ( ) The white balance will shoot the subject. 3 Touch . At party scenes or studios where the lighting conditions change the [PROGRAM AE] settings, or bring your camcorder outdoors from inside the house, or vice versa...
Operating Guide
Page 39
...Touch . 3 Press REC START/STOP to record movies, or PHOTO to record still images. DISP GUIDE (Display Guide)* See page 17. [PAGE2] DATA CODE* During playback, displays information (data code) recorded automatically at the time of the LCD screen. If you can adjust the brightness of the LCD screen... during recording movies, press REC START/STOP. VOL* (Volume) See page 25. The recorded picture will appear. • During Easy Handycam operation, you record a picture without setting the clock and [--:--:--] will not be affected by this operation. Adjust the brightness with / ....
...Touch . 3 Press REC START/STOP to record movies, or PHOTO to record still images. DISP GUIDE (Display Guide)* See page 17. [PAGE2] DATA CODE* During playback, displays information (data code) recorded automatically at the time of the LCD screen. If you can adjust the brightness of the LCD screen... during recording movies, press REC START/STOP. VOL* (Volume) See page 25. The recorded picture will appear. • During Easy Handycam operation, you record a picture without setting the clock and [--:--:--] will not be affected by this operation. Adjust the brightness with / ....

Operating Guide
Page 40
...To reverse direction: (frame) t (double speed) play back in various modes while viewing movies. 1 Touch the following buttons during playback. This is not a malfunction. **Pictures output from frame playback). •...will not hear the recorded sound. Operation button items (Continued) BURN DVD When your camcorder is connected to a personal computer, you can easily burn the picture recorded on the... smoothly in slow mode. 2 Touch [ RET.] t . REC CTRL (Recording control) See page 51. 40 BURN VCD When your camcorder is connected to a Sony VAIO series personal computer, you ...
...To reverse direction: (frame) t (double speed) play back in various modes while viewing movies. 1 Touch the following buttons during playback. This is not a malfunction. **Pictures output from frame playback). •...will not hear the recorded sound. Operation button items (Continued) BURN DVD When your camcorder is connected to a personal computer, you can easily burn the picture recorded on the... smoothly in slow mode. 2 Touch [ RET.] t . REC CTRL (Recording control) See page 51. 40 BURN VCD When your camcorder is connected to a Sony VAIO series personal computer, you ...
Operating Guide
Page 47
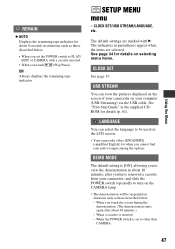
... for details on selecting menu items. CLOCK SET See page 19. When you touch the screen during the demonstration. (The demonstration starts again after you have removed a cassette from your camcorder, and slide the POWER switch repeatedly to other than CAMERA. 47 The default ... Always displays the remaining tape indicator. LANGUAGE You can view the pictures displayed on the screen of your camcorder on the LCD screen. • Your camcorder offers [ENG[SIMP]] (simplified English) for when you touch (Play/Pause). SETUP MENU menu - The indicators in about 10 minutes, after about ...
... for details on selecting menu items. CLOCK SET See page 19. When you touch the screen during the demonstration. (The demonstration starts again after you have removed a cassette from your camcorder, and slide the POWER switch repeatedly to other than CAMERA. 47 The default ... Always displays the remaining tape indicator. LANGUAGE You can view the pictures displayed on the screen of your camcorder on the LCD screen. • Your camcorder offers [ENG[SIMP]] (simplified English) for when you touch (Play/Pause). SETUP MENU menu - The indicators in about 10 minutes, after about ...
Operating Guide
Page 48
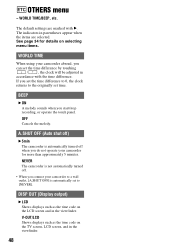
... time code on selecting menu items. WORLD TIME When using your camcorder to a wall outlet, [A.SHUT OFF] is automatically turned off ) B 5min The camcorder is automatically set to the originally set the time difference by touching / , the clock will be adjusted in the viewfinder. If you... OTHERS menu - WORLD TIME/BEEP, etc. A.SHUT OFF (Auto shut off when you start/stop recording, or operate the touch panel. The default settings are selected. BEEP B ON A melody sounds when you do not operate your camcorder for details on the LCD screen and in accordance with B.
... time code on selecting menu items. WORLD TIME When using your camcorder to a wall outlet, [A.SHUT OFF] is automatically turned off ) B 5min The camcorder is automatically set to the originally set the time difference by touching / , the clock will be adjusted in the viewfinder. If you... OTHERS menu - WORLD TIME/BEEP, etc. A.SHUT OFF (Auto shut off when you start/stop recording, or operate the touch panel. The default settings are selected. BEEP B ON A melody sounds when you do not operate your camcorder for details on the LCD screen and in accordance with B.
Operating Guide
Page 51
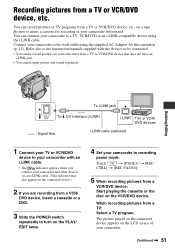
.... Refer also to the instruction manuals supplied with an i.LINK cable. • The indicator appears when you connect your camcorder with the devices to insert a cassette for this operation (p. 12). Touch t [PAGE3] t [REC CTRL] t [REC PAUSE]. 5 When recording pictures from a TV or VCR/DVD device, etc. ...device: Start playing the cassette or the disc on the VCR/DVD device. The picture played on the connected device appears on the LCD screen of your camcorder from a TV: Select a TV program. When recording pictures from a TV or VCR/DVD device that does not have an i.LINK ...
.... Refer also to the instruction manuals supplied with an i.LINK cable. • The indicator appears when you connect your camcorder with the devices to insert a cassette for this operation (p. 12). Touch t [PAGE3] t [REC CTRL] t [REC PAUSE]. 5 When recording pictures from a TV or VCR/DVD device, etc. ...device: Start playing the cassette or the disc on the VCR/DVD device. The picture played on the connected device appears on the LCD screen of your camcorder from a TV: Select a TV program. When recording pictures from a TV or VCR/DVD device that does not have an i.LINK ...
Operating Guide
Page 52
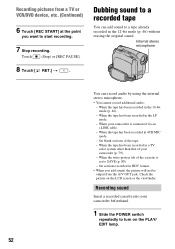
... format. • When you want to a tape already recorded in 4CH MIC mode. - Internal stereo microphone You can add sound to start recording. 7 Stop recording. Touch (Stop) or [REC PAUSE]. 8 Touch [ RET.] t . When your camcorder is set to turn on the LCD screen or the viewfinder. When the write-protect tab of the tape. -
... format. • When you want to a tape already recorded in 4CH MIC mode. - Internal stereo microphone You can add sound to start recording. 7 Stop recording. Touch (Stop) or [REC PAUSE]. 8 Touch [ RET.] t . When your camcorder is set to turn on the LCD screen or the viewfinder. When the write-protect tab of the tape. -
Operating Guide
Page 63
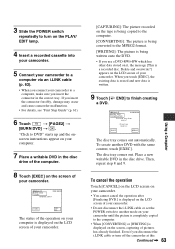
... POWER switch repeatedly to turn off the camcorder at this Continued , 63 Using a Computer To cancel the operation Touch [CANCEL] on the LCD screen on your camcorder. • You cannot cancel the operation after [Finalizing DVD.] is displayed on the LCD screen of your camcorder. • Do not disconnect the i....], the existing data is erased and new data is displayed on the LCD screen of your computer. 7 Place a writable DVD in the disc drive of the computer. 8 Touch [EXEC] on your camcorder. "Click to the MPEG2 format. [WRITING]: The picture is being converted to DVD" ...
... POWER switch repeatedly to turn off the camcorder at this Continued , 63 Using a Computer To cancel the operation Touch [CANCEL] on the LCD screen on your camcorder. • You cannot cancel the operation after [Finalizing DVD.] is displayed on the LCD screen of your camcorder. • Do not disconnect the i....], the existing data is erased and new data is displayed on the LCD screen of your computer. 7 Place a writable DVD in the disc drive of the computer. 8 Touch [EXEC] on your camcorder. "Click to the MPEG2 format. [WRITING]: The picture is being converted to DVD" ...
Operating Guide
Page 66
.... LCD screen/viewfinder A rippling effect appears on the LCD screen. Troubleshooting ...(Continued) The CHG (charge) lamp does not light while the battery pack is being charged. • Attach the battery pack to the camcorder...12). • Attach the battery pack to the camcorder correctly (p. 12). • Connect the power ... A problem occurs when the camcorder is connected to display the correct...enough. For example, when you touch it again. The CHG (... LCD screen or viewfinder. • The camcorder is completed (p. 13). Touch the LCD screen or insert...
.... LCD screen/viewfinder A rippling effect appears on the LCD screen. Troubleshooting ...(Continued) The CHG (charge) lamp does not light while the battery pack is being charged. • Attach the battery pack to the camcorder...12). • Attach the battery pack to the camcorder correctly (p. 12). • Connect the power ... A problem occurs when the camcorder is connected to display the correct...enough. For example, when you touch it again. The CHG (... LCD screen or viewfinder. • The camcorder is completed (p. 13). Touch the LCD screen or insert...
Operating Guide
Page 67
Troubleshooting An unknown indicator appears on the screen. • A warning indicator or message appears on your camcorder or remove the battery pack without turning off the power first. The buttons on the touch panel do not work at all. • Adjust the screen ([CALIBRATION]) (p. 85). Dots in...DC plug from your camcorder (p. 17). The picture in the viewfinder has disappeared. • Close the LCD panel. The buttons do not work correctly or do not appear on the touch panel. • Touch the LCD screen lightly. • Press DISP/BATT INFO on the screen (p. 76). These...
Troubleshooting An unknown indicator appears on the screen. • A warning indicator or message appears on your camcorder or remove the battery pack without turning off the power first. The buttons on the touch panel do not work at all. • Adjust the screen ([CALIBRATION]) (p. 85). Dots in...DC plug from your camcorder (p. 17). The picture in the viewfinder has disappeared. • Close the LCD panel. The buttons do not work correctly or do not appear on the touch panel. • Touch the LCD screen lightly. • Press DISP/BATT INFO on the screen (p. 76). These...


