
Operating Guide
Page 3
... dangerous voltage points or short out parts that it is not likely to operate from the wall outlet before operating the appliance, and keep this manual for this can result in . Carefully observe all warnings, precautions and instructions on the set may cause hazards. Use Power Sources This set . IMPORTANT SAFEGUARDS...
... dangerous voltage points or short out parts that it is not likely to operate from the wall outlet before operating the appliance, and keep this manual for this can result in . Carefully observe all warnings, precautions and instructions on the set may cause hazards. Use Power Sources This set . IMPORTANT SAFEGUARDS...
Operating Guide
Page 5
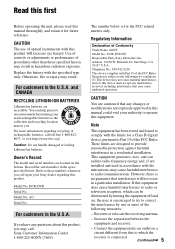
...5 Refer to operate this equipment. ACSerial No. Regulatory Information Declaration of rechargeable batteries, call upon your used in this manual could void your authority to these numbers whenever you call toll free 1-800-8228837, or visit http://www.rbrc.org/... Trade Name: SONY Model No.: DCR-DVD505 Responsible Party:Sony Electronics Inc. Reorient or relocate the receiving antenna. - For customers in the U.S.A. These limits are recyclable. For more of optical instruments with the instructions, may cause undesired operation. Model No. DCR-DVD Serial No. Address...
...5 Refer to operate this equipment. ACSerial No. Regulatory Information Declaration of rechargeable batteries, call upon your used in this manual could void your authority to these numbers whenever you call toll free 1-800-8228837, or visit http://www.rbrc.org/... Trade Name: SONY Model No.: DCR-DVD505 Responsible Party:Sony Electronics Inc. Reorient or relocate the receiving antenna. - For customers in the U.S.A. These limits are recyclable. For more of optical instruments with the instructions, may cause undesired operation. Model No. DCR-DVD Serial No. Address...
Operating Guide
Page 6
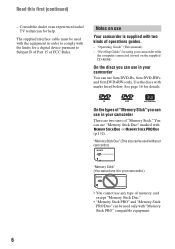
... "Memory Stick" you can use in your camcorder You can use 8cm DVD-Rs, 8cm DVD-RWs and 8cm DVD+RWs only. You can use "Memory Stick Duo" marked with the limits for using your camcorder There are two sizes of FCC Rules. "Operating Guide" (This manual) - Notes on the supplied CD-ROM) ...On the discs you can be used with your camcorder) "...
... "Memory Stick" you can use in your camcorder You can use 8cm DVD-Rs, 8cm DVD-RWs and 8cm DVD+RWs only. You can use "Memory Stick Duo" marked with the limits for using your camcorder There are two sizes of FCC Rules. "Operating Guide" (This manual) - Notes on the supplied CD-ROM) ...On the discs you can be used with your camcorder) "...
Operating Guide
Page 8
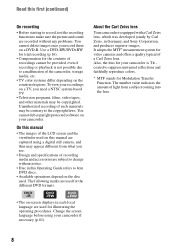
...Sony Corporation, and produces superior images. On this manual • The images of such materials may be contrary to the copyright laws. DVD +RW • The on-screen displays in this Operating Guide refers to 8cm DVD discs. • Available operations depend on this manual are captured using your camcorder.... Unauthorized recording of the LCD screen and the viewfinder used on the disc used. About the Carl Zeiss lens Your camcorder is not possible due to...
...Sony Corporation, and produces superior images. On this manual • The images of such materials may be contrary to the copyright laws. DVD +RW • The on-screen displays in this Operating Guide refers to 8cm DVD discs. • Available operations depend on this manual are captured using your camcorder.... Unauthorized recording of the LCD screen and the viewfinder used on the disc used. About the Carl Zeiss lens Your camcorder is not possible due to...
Operating Guide
Page 16
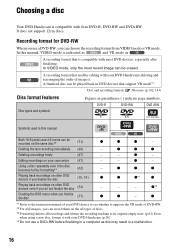
...*1. Editing recordings on your DVD Handycam (p.28). *4 Do not use a DVD-RW, you use a DVD+RW before finalizing in a malfunction. 16 In this manual, VIDEO mode is compatible with 8cm DVD-R, DVD-RW and DVD+RW. A recording format that enables editing with your DVD Handycam (deleting and rearranging the order... medium to see whether it supports the VR mode of DVD-RW. *2 For still images, you can record them on other DVD devices even if you finalize the disc (57) z z - A recording format that is compatible with your camcorder (87) - z z z Deleting recordings freely (87...
...*1. Editing recordings on your DVD Handycam (p.28). *4 Do not use a DVD-RW, you use a DVD+RW before finalizing in a malfunction. 16 In this manual, VIDEO mode is compatible with 8cm DVD-R, DVD-RW and DVD+RW. A recording format that enables editing with your DVD Handycam (deleting and rearranging the order... medium to see whether it supports the VR mode of DVD-RW. *2 For still images, you can record them on other DVD devices even if you finalize the disc (57) z z - A recording format that is compatible with your camcorder (87) - z z z Deleting recordings freely (87...
Operating Guide
Page 19
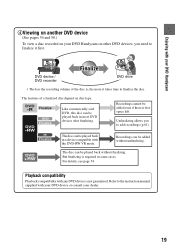
... 54. Refer to the instruction manual supplied with your DVD device or consult your DVD Handycam on other DVD devices, you to add recordings (p.61). The disc can be played back in a device compatible with the DVD-RW VR mode. But finalizing is not guaranteed. Enjoying with your DVD Handycam 4Viewing on another DVD device (See pages 54 and...
... 54. Refer to the instruction manual supplied with your DVD device or consult your DVD Handycam on other DVD devices, you to add recordings (p.61). The disc can be played back in a device compatible with the DVD-RW VR mode. But finalizing is not guaranteed. Enjoying with your DVD Handycam 4Viewing on another DVD device (See pages 54 and...
Operating Guide
Page 20
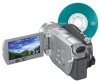
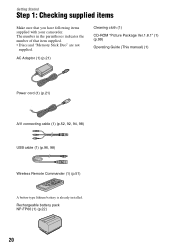
...battery pack NP-FP60 (1) (p.22) 20 The number in the parentheses indicates the number of that you have following items supplied with your camcorder. Getting Started Step 1: Checking supplied items Make sure that item supplied. • Discs and "Memory Stick Duo" are not supplied. ...AC Adaptor (1) (p.21) Cleaning cloth (1) CD-ROM "Picture Package Ver.1.8.1" (1) (p.99) Operating Guide (This manual) (1) Power cord (1) (p.21) A/V connecting cable (1) (p.52, 92, 94, 98) USB cable (1) (p.96, 98) Wireless Remote Commander (1) (p.51) A button...
...battery pack NP-FP60 (1) (p.22) 20 The number in the parentheses indicates the number of that you have following items supplied with your camcorder. Getting Started Step 1: Checking supplied items Make sure that item supplied. • Discs and "Memory Stick Duo" are not supplied. ...AC Adaptor (1) (p.21) Cleaning cloth (1) CD-ROM "Picture Package Ver.1.8.1" (1) (p.99) Operating Guide (This manual) (1) Power cord (1) (p.21) A/V connecting cable (1) (p.52, 92, 94, 98) USB cable (1) (p.96, 98) Wireless Remote Commander (1) (p.51) A button...

Operating Guide
Page 31
... on a DVD-R/DVDRW (VIDEO mode). - when you intend to view pictures on the TV screen may be shorter in the 16:9 (wide) mode is set. To play back pictures after connecting your camcorder to a TV Set [TV TYPE] to [16:9] or [4:3] according to your device. For details, refer to the instruction manuals supplied...
... on a DVD-R/DVDRW (VIDEO mode). - when you intend to view pictures on the TV screen may be shorter in the 16:9 (wide) mode is set. To play back pictures after connecting your camcorder to a TV Set [TV TYPE] to [16:9] or [4:3] according to your device. For details, refer to the instruction manuals supplied...
Operating Guide
Page 33
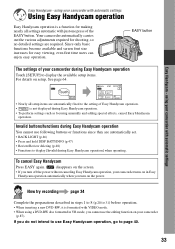
... settings automatic with VIDEO mode. • When using a DVD-RW disc formatted in Easy Handycam operation automatically when you turn off the power without canceling Easy Handycam operation, your camcorder during Easy Handycam operation. • To perform settings such as focusing manually and adding special effects, cancel Easy Handycam operation. Since only basic functions become available and...
... settings automatic with VIDEO mode. • When using a DVD-RW disc formatted in Easy Handycam operation automatically when you turn off the power without canceling Easy Handycam operation, your camcorder during Easy Handycam operation. • To perform settings such as focusing manually and adding special effects, cancel Easy Handycam operation. Since only basic functions become available and...
Operating Guide
Page 39
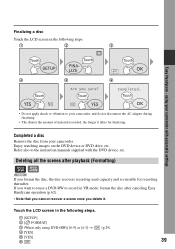
.... 1 [SETUP] 2 [ FORMAT] 3 (When only using your camcorder with automatic settings 4 5 6 • Do not apply shock or vibration to the instruction manuals supplied with the DVD device, etc. Finalizing a disc Touch the LCD screen in the following steps. 1 2 3 Easy Handycam - Enjoy watching images on the DVD device or DVD drive, etc. using DVD+RW)[16:9] or [4:3] t (p.29) 4 [YES...
.... 1 [SETUP] 2 [ FORMAT] 3 (When only using your camcorder with automatic settings 4 5 6 • Do not apply shock or vibration to the instruction manuals supplied with the DVD device, etc. Finalizing a disc Touch the LCD screen in the following steps. 1 2 3 Easy Handycam - Enjoy watching images on the DVD device or DVD drive, etc. using DVD+RW)[16:9] or [4:3] t (p.29) 4 [YES...
Operating Guide
Page 44
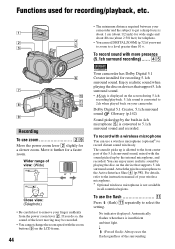
...Telephoto) • Be careful not to remove your finger suddenly from the power zoom lever 2. Attach the wireless microphone to the instruction manual of your wireless microphone. * Optional wireleess microphone is not available in 4ch microphone 5 is converted to 5.1ch surround sound and recorded...sound is insufficient ambient light. No indicator displayed: Automatically flashes when there is converted to 2ch when played back on your camcorder. Enjoy realistic sound when playing the disc on devices that supports 5.1ch surround sound. To record sound with more realistic ...
...Telephoto) • Be careful not to remove your finger suddenly from the power zoom lever 2. Attach the wireless microphone to the instruction manual of your wireless microphone. * Optional wireleess microphone is not available in 4ch microphone 5 is converted to 5.1ch surround sound and recorded...sound is insufficient ambient light. No indicator displayed: Automatically flashes when there is converted to 2ch when played back on your camcorder. Enjoy realistic sound when playing the disc on devices that supports 5.1ch surround sound. To record sound with more realistic ...
Operating Guide
Page 45
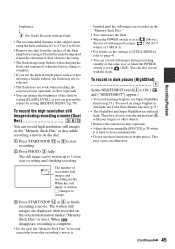
... hard to 3 from after recording a movie is finished until finishing recording. When the still image is complete. • If you can also record with your camcorder from start recording until the still images are displayed, then recorded on the disc. 1 Press START/STOP qs or 8to start recording. 2 Press PHOTO 3 fully... complete. • Do not eject the "Memory Stick Duo" from your fingers or other objects. • Remove the conversion lens (optional). • Adjust the focus manually ([FOCUS], p.70) when it .
... hard to 3 from after recording a movie is finished until finishing recording. When the still image is complete. • If you can also record with your camcorder from start recording until the still images are displayed, then recorded on the disc. 1 Press START/STOP qs or 8to start recording. 2 Press PHOTO 3 fully... complete. • Do not eject the "Memory Stick Duo" from your fingers or other objects. • Remove the conversion lens (optional). • Adjust the focus manually ([FOCUS], p.70) when it .

Operating Guide
Page 50
... time is a reference page. You can check them as [DATA CODE] during recording or playback, following indicators displayed. n Meaning Picture effect (75) Digital effect (75) Manual focus (70) PROGRAM AE (68) Backlight (46) White balance (69) WIDE SELECT (31) SteadyShot off (25) Center Indicator E ( ) is recorded automatically on the disc and...) Bottom Indicator 9 . Indicators displayed during recording/playback (continued) Indicators on the LCD screen and viewfinder When you can view the recording date and time on a DVD device, etc. (p.58, [SUB-T DATE], p.81). 50
... time is a reference page. You can check them as [DATA CODE] during recording or playback, following indicators displayed. n Meaning Picture effect (75) Digital effect (75) Manual focus (70) PROGRAM AE (68) Backlight (46) White balance (69) WIDE SELECT (31) SteadyShot off (25) Center Indicator E ( ) is recorded automatically on the disc and...) Bottom Indicator 9 . Indicators displayed during recording/playback (continued) Indicators on the LCD screen and viewfinder When you can view the recording date and time on a DVD device, etc. (p.58, [SUB-T DATE], p.81). 50

Operating Guide
Page 52
... to another device via an S VIDEO jack, and play back the disc, set [TV TYPE] to be connected. Refer also to the instruction manuals supplied with your camcorder to a TV compatible with the ID-1/ID-2 system, or via the S VIDEO jack, by using an A/V connecting cable with an S VIDEO cable... TV is not necessary. The TV switches to LINE (VIDEO 1, VIDEO 2, etc.), if the VCR has an input selector. Set the input selector on your camcorder and press PLAY/EDIT. 2 Touch t [SETUP] t STANDARD SET t [TV TYPE] t [16:9] or [4:3] t . • When you connect your TV. • When you will...
... to another device via an S VIDEO jack, and play back the disc, set [TV TYPE] to be connected. Refer also to the instruction manuals supplied with your camcorder to a TV compatible with the ID-1/ID-2 system, or via the S VIDEO jack, by using an A/V connecting cable with an S VIDEO cable... TV is not necessary. The TV switches to LINE (VIDEO 1, VIDEO 2, etc.), if the VCR has an input selector. Set the input selector on your camcorder and press PLAY/EDIT. 2 Touch t [SETUP] t STANDARD SET t [TV TYPE] t [16:9] or [4:3] t . • When you connect your TV. • When you will...

Operating Guide
Page 58
.... • Do not use the 8cm CD adaptor with your DVD device or consult your camcorder can display the recording date and time where the subtitles normally appear (p.81). Refer to the instruction manual supplied with your dealer. If you have created a DVD menu DVD +RW You can select the desired scene in the position...
.... • Do not use the 8cm CD adaptor with your DVD device or consult your camcorder can display the recording date and time where the subtitles normally appear (p.81). Refer to the instruction manual supplied with your dealer. If you have created a DVD menu DVD +RW You can select the desired scene in the position...

Operating Guide
Page 59
...on the disc are displayed in the JPEG format. Playing back movies Use a DVD drive that have been copied from the disc to the hard disk of your computer. 2 Play back the ...disc using a DVD playback application. • The disc may occur accidentally in this operation since you must have been...refer to the instruction manuals of your computer. Or, double-click the [My Computer] icon on the desktop. 3 Right-click the DVD drive with an 8cm DVD as it may cause a malfunction. • Even when you use a DVD+RW, you use ...
...on the disc are displayed in the JPEG format. Playing back movies Use a DVD drive that have been copied from the disc to the hard disk of your computer. 2 Play back the ...disc using a DVD playback application. • The disc may occur accidentally in this operation since you must have been...refer to the instruction manuals of your computer. Or, double-click the [My Computer] icon on the desktop. 3 Right-click the DVD drive with an 8cm DVD as it may cause a malfunction. • Even when you use a DVD+RW, you use ...
Operating Guide
Page 68
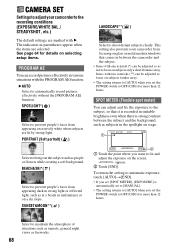
... focusing on glass or metal mesh in windows that it is recorded in suitable brightness even when there is automatically set to [MANUAL]. • The setting returns to [AUTO] when you set the POWER switch to OFF (CHG) for more than 12 hours. SPOTLIGHT*( ) Select ... appearing dark in various situations with B. SUNSET&MOON**( ) 1 Touch the point where you set [SPOT METER], [EXPOSURE] is strong contrast between the camcorder and the subject. • Items with one asterisk (*) can record pictures effectively in strong light or reflected light, such as not to focus on subjects...
... focusing on glass or metal mesh in windows that it is recorded in suitable brightness even when there is automatically set to [MANUAL]. • The setting returns to [AUTO] when you set the POWER switch to OFF (CHG) for more than 12 hours. SPOTLIGHT*( ) Select ... appearing dark in various situations with B. SUNSET&MOON**( ) 1 Touch the point where you set [SPOT METER], [EXPOSURE] is strong contrast between the camcorder and the subject. • Items with one asterisk (*) can record pictures effectively in strong light or reflected light, such as not to focus on subjects...

Operating Guide
Page 69
...for the following recording conditions: - At party scenes or studios where the lighting conditions change the [PROGRAM AE] settings, or bring your camcorder at a studio, or under sodium lamps or incandescentlike color lamps ONE PUSH ( ) The white balance will shoot the subject. 3 ...than 12 hours. 69 appears. 2 Adjust the exposure by fixing the exposure to that of the wall side of the room. 1 Touch [MANUAL]. Under daylight fluorescent lamps INDOOR (n) The white balance is adjusted automatically. Outdoors - Sunrise or sunset - Indoors - Night views, neon signs...
...for the following recording conditions: - At party scenes or studios where the lighting conditions change the [PROGRAM AE] settings, or bring your camcorder at a studio, or under sodium lamps or incandescentlike color lamps ONE PUSH ( ) The white balance will shoot the subject. 3 ...than 12 hours. 69 appears. 2 Adjust the exposure by fixing the exposure to that of the wall side of the room. 1 Touch [MANUAL]. Under daylight fluorescent lamps INDOOR (n) The white balance is adjusted automatically. Outdoors - Sunrise or sunset - Indoors - Night views, neon signs...
Operating Guide
Page 70
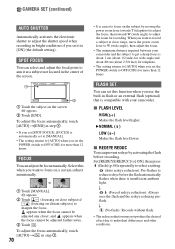
... select a setting. (Auto redeye reduction): Pre-flashes to reduce redeye before the flash automatically flashes when there is compatible with your camcorder and the subject to get a sharp focus is easier to focus on the subject by activating the flash before recording. Select this ...you want to focus on a certain subject intentionally. 1 Touch [MANUAL]. 9 appears. 2 Touch (focusing on close range, move the power zoom lever to W (wide angle), then adjust the focus. • The minimum distance required between your camcorder. To adjust the focus automatically, touch [AUTO]t[END] in ...
... select a setting. (Auto redeye reduction): Pre-flashes to reduce redeye before the flash automatically flashes when there is compatible with your camcorder and the subject to get a sharp focus is easier to focus on the subject by activating the flash before recording. Select this ...you want to focus on a certain subject intentionally. 1 Touch [MANUAL]. 9 appears. 2 Touch (focusing on close range, move the power zoom lever to W (wide angle), then adjust the focus. • The minimum distance required between your camcorder. To adjust the focus automatically, touch [AUTO]t[END] in ...

Operating Guide
Page 71
...infrared light while using NightShot. The right side of the picture may cause a malfunction. • Do not cover the infrared port with your camcorder changes depending on the Remote Commander (p.51). Press START/STOP when [ SELFTIMER] is performed digitally. 71 To cancel the self-timer, select... (p.45). • Remove the conversion lens (optional). • Adjust the focus manually ([FOCUS], p.70) when it is hard to [OFF]. • Do not use the self-timer with your camcorder changes depending on the Remote Commander (p.51). The zooming zone appears when you are using...
...infrared light while using NightShot. The right side of the picture may cause a malfunction. • Do not cover the infrared port with your camcorder changes depending on the Remote Commander (p.51). Press START/STOP when [ SELFTIMER] is performed digitally. 71 To cancel the self-timer, select... (p.45). • Remove the conversion lens (optional). • Adjust the focus manually ([FOCUS], p.70) when it is hard to [OFF]. • Do not use the self-timer with your camcorder changes depending on the Remote Commander (p.51). The zooming zone appears when you are using...


