
Operating Guide
Page 10
using your camcorder 24 Step 4: Adjusting the LCD screen and viewfinder 25 Step 5: Using the touch panel 26 Step 6: Setting the date and time 27 Step 7: Inserting a disc or a "Memory Stick Duo 28 Step 8: Selecting the aspect ratio (16:9 or 4:3) of Contents Enjoying with your DVD Handycam What you can do with your DVD Handycam 14 Choosing a disc...
using your camcorder 24 Step 4: Adjusting the LCD screen and viewfinder 25 Step 5: Using the touch panel 26 Step 6: Setting the date and time 27 Step 7: Inserting a disc or a "Memory Stick Duo 28 Step 8: Selecting the aspect ratio (16:9 or 4:3) of Contents Enjoying with your DVD Handycam What you can do with your DVD Handycam 14 Choosing a disc...
Operating Guide
Page 14
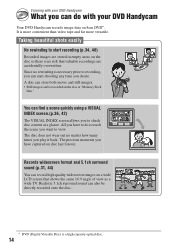
...versatile. It is a high-capacity optical disc. 14 Enjoying with your DVD Handycam What you can do is necessary prior to recording, you can find a scene quickly using a VISUAL INDEX screen.(p.36, 42) The VISUAL INDEX screen allows you want to check disc content at a glance. The precious moments... you have to do with your DVD Handycam Your DVD Handycam records image data on the disc or "Memory Stick Duo." The disc does not wear out no rewinding is touch the ...
...versatile. It is a high-capacity optical disc. 14 Enjoying with your DVD Handycam What you can do is necessary prior to recording, you can find a scene quickly using a VISUAL INDEX screen.(p.36, 42) The VISUAL INDEX screen allows you want to check disc content at a glance. The precious moments... you have to do with your DVD Handycam Your DVD Handycam records image data on the disc or "Memory Stick Duo." The disc does not wear out no rewinding is touch the ...
Operating Guide
Page 26
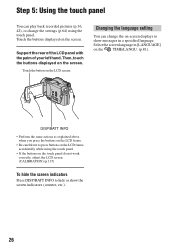
... the LCD panel with the palm of your left hand. Step 5: Using the touch panel You can change the settings (p.64) using the touch panel. • If the buttons on the touch panel do not work correctly, adjust the LCD screen. (CALIBRATION) (p.137) To hide the screen indicators Press DISP/BATT INFO to show the...
... the LCD panel with the palm of your left hand. Step 5: Using the touch panel You can change the settings (p.64) using the touch panel. • If the buttons on the touch panel do not work correctly, adjust the LCD screen. (CALIBRATION) (p.137) To hide the screen indicators Press DISP/BATT INFO to show the...
Operating Guide
Page 27
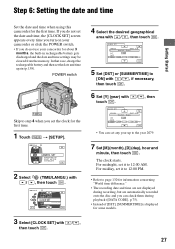
... date and time, the [CLOCK SET] screen appears every time you turn on your camcorder or slide the POWER switch. • If you set the clock for the first time. 1 Touch t [SETUP]. 2 Select (TIME/LANGU.) with / , then touch . 4 Select the desired geographical area with / , then touch . 5 Set [DST] or [SUMMERTIME]...settings may be cleared from the memory. The clock starts. POWER switch Skip to step 4 when you do not use your camcorder for some models. 3 Select [CLOCK SET] with / , then touch . 27 If you can set it to the year 2079. 7 Set [M] (month), [D] (day), hour and minute...
... date and time, the [CLOCK SET] screen appears every time you turn on your camcorder or slide the POWER switch. • If you set the clock for the first time. 1 Touch t [SETUP]. 2 Select (TIME/LANGU.) with / , then touch . 4 Select the desired geographical area with / , then touch . 5 Set [DST] or [SUMMERTIME]...settings may be cleared from the memory. The clock starts. POWER switch Skip to step 4 when you do not use your camcorder for some models. 3 Select [CLOCK SET] with / , then touch . 27 If you can set it to the year 2079. 7 Set [M] (month), [D] (day), hour and minute...
Operating Guide
Page 28
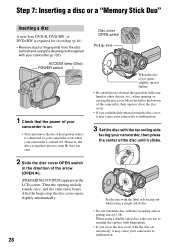
...• If you catch the belt when closing the disc cover. Step 7: Inserting a disc or a "Memory Stick Duo" Inserting a disc A new 8cm DVD-R, DVD-RW, or DVD+RW is required for recording (p.16). • Remove dust or fingerprints from the disc beforehand, using the cleaning cloth supplied with the disc set...when a power source is on the LCD screen. Set the disc with the label side facing out when using a single-sided disc. • Do not touch the disc with your hand or other objects, etc., when opening melody sounds once, and the camcorder beeps. Then the opening or closing the ...
...• If you catch the belt when closing the disc cover. Step 7: Inserting a disc or a "Memory Stick Duo" Inserting a disc A new 8cm DVD-R, DVD-RW, or DVD+RW is required for recording (p.16). • Remove dust or fingerprints from the disc beforehand, using the cleaning cloth supplied with the disc set...when a power source is on the LCD screen. Set the disc with the label side facing out when using a single-sided disc. • Do not touch the disc with your hand or other objects, etc., when opening melody sounds once, and the camcorder beeps. Then the opening or closing the ...
Operating Guide
Page 29
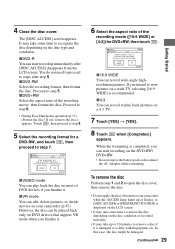
... to be damaged. 29 Getting Started FORMAT : 16:9 Select aspect ratio of movie to play back the disc on various DVD devices. The [DISC ACCESS] screen appears. xDVD-R You can record wide-angle highresolution pictures. You do not need to proceed to change. 16:9 WIDE 4:3...step 6. • During Easy Handycam operation (p.33), [Format the disc? If not, remove the disc.] appears. Touch , then proceed to remove a disc if it is damaged or is completed, you intend to your camcorder (p.87). FORMAT : VIDEO Can playback on most of DVD devices if you finalize it ....
... to be damaged. 29 Getting Started FORMAT : 16:9 Select aspect ratio of movie to play back the disc on various DVD devices. The [DISC ACCESS] screen appears. xDVD-R You can record wide-angle highresolution pictures. You do not need to proceed to change. 16:9 WIDE 4:3...step 6. • During Easy Handycam operation (p.33), [Format the disc? If not, remove the disc.] appears. Touch , then proceed to remove a disc if it is damaged or is completed, you intend to your camcorder (p.87). FORMAT : VIDEO Can playback on most of DVD devices if you finalize it ....
Operating Guide
Page 33
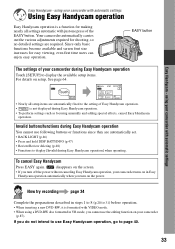
... editing function on the power. using your camcorder during Easy Handycam operation. • To perform settings such as focusing manually and adding special effects, cancel Easy Handycam operation. Since only basic functions become available and screen font size increases for shooting, so no ... When inserting a new DVD-RW, it is not displayed during Easy Handycam operation Touch [SETUP] to page 40. 33 disappears on the screen. • If you turn on your camcorder with VIDEO mode. • When using your camcorder (p.87). Your camcorder automatically carries out the ...
... editing function on the power. using your camcorder during Easy Handycam operation. • To perform settings such as focusing manually and adding special effects, cancel Easy Handycam operation. Since only basic functions become available and screen font size increases for shooting, so no ... When inserting a new DVD-RW, it is not displayed during Easy Handycam operation Touch [SETUP] to page 40. 33 disappears on the screen. • If you turn on your camcorder with VIDEO mode. • When using your camcorder (p.87). Your camcorder automatically carries out the ...
Operating Guide
Page 35
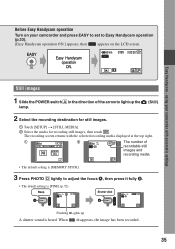
using your camcorder and press EASY to set to Easy Handycam operation (p.33). [Easy Handycam operation ON.] appears, then appears on the LCD screen. The recording screen returns with automatic settings Still images 1 Slide the POWER switch A in the direction of recordable still ...up the lamp. (Still) 2 Select the recording destination for still images. 1 Touch [SETUP] t [STILL MEDIA]. 2 Select the media for recording still images, then touch . Before Easy Handycam operation Turn on your camcorder with the selected recording media displayed at the top right. 1 2 The number of...
using your camcorder and press EASY to set to Easy Handycam operation (p.33). [Easy Handycam operation ON.] appears, then appears on the LCD screen. The recording screen returns with automatic settings Still images 1 Slide the POWER switch A in the direction of recordable still ...up the lamp. (Still) 2 Select the recording destination for still images. 1 Touch [SETUP] t [STILL MEDIA]. 2 Select the media for recording still images, then touch . Before Easy Handycam operation Turn on your camcorder with the selected recording media displayed at the top right. 1 2 The number of...
Operating Guide
Page 36
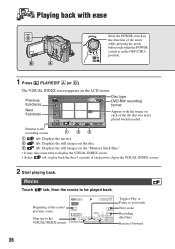
... the movie to the VISUAL INDEX screen) Toggles Play or Pause as you touch Next scene Recording date/time Reverse/ Forward 36 Beginning of the scene/ previous scene Stop (go to be played back. Previous 6 pictures Next 6 pictures Disc type DVD-RW recording format Appears with ease ...Slide the POWER switch in the direction of the tab that was lastly played back/recorded. Playing back with the image on the LCD screen. Returns to the recording screen 1 23 1 tab: Displays the movies. ...
... the movie to the VISUAL INDEX screen) Toggles Play or Pause as you touch Next scene Recording date/time Reverse/ Forward 36 Beginning of the scene/ previous scene Stop (go to be played back. Previous 6 pictures Next 6 pictures Disc type DVD-RW recording format Appears with ease ...Slide the POWER switch in the direction of the tab that was lastly played back/recorded. Playing back with the image on the LCD screen. Returns to the recording screen 1 23 1 tab: Displays the movies. ...
Operating Guide
Page 37
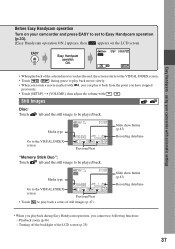
... date/time Media type Go to the VISUAL INDEX screen Previous/Next • Touch to play it back from the point you cannot use following functions: - Before Easy Handycam operation Turn on your camcorder with automatic settings • When playback of the ...selected movie reaches the end, the screen returns to the VISUAL INDEX screen. • Touch / during Easy Handycam operation, you have stopped previously. • Touch [SETUP] t [VOLUME], then...
... date/time Media type Go to the VISUAL INDEX screen Previous/Next • Touch to play it back from the point you cannot use following functions: - Before Easy Handycam operation Turn on your camcorder with automatic settings • When playback of the ...selected movie reaches the end, the screen returns to the VISUAL INDEX screen. • Touch / during Easy Handycam operation, you have stopped previously. • Touch [SETUP] t [VOLUME], then...
Operating Guide
Page 39
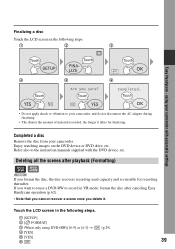
... camcorder with the DVD device, etc. Deleting all the scenes after canceling Easy Handycam operation (p.62). • Note that you cannot recover a scene once you want to reuse a DVD-RW to the instruction manuals supplied with automatic settings 4 5 6 • Do not apply shock or vibration to your camcorder. Touch the LCD screen in the following steps. 1 2 3 Easy Handycam...
... camcorder with the DVD device, etc. Deleting all the scenes after canceling Easy Handycam operation (p.62). • Note that you cannot recover a scene once you want to reuse a DVD-RW to the instruction manuals supplied with automatic settings 4 5 6 • Do not apply shock or vibration to your camcorder. Touch the LCD screen in the following steps. 1 2 3 Easy Handycam...
Operating Guide
Page 41
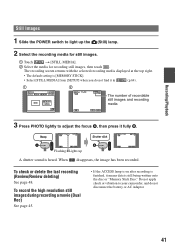
The recording screen returns with the selected recording media displayed at the top right. • The default setting is heard. Do not apply shock or vibration to your camcorder, and do not find it in (p.64). 1 2 The number of recordable still images and recording media 3 Press ...See page 48. Flashing bLights up the (Still) lamp. 2 Select the recording media for still images. 1 Touch t [STILL MEDIA]. 2 Select the media for recording still images, then touch . Recording/Playback Still Images 1 Slide the POWER switch to adjust the focus A, then press it means data is...
The recording screen returns with the selected recording media displayed at the top right. • The default setting is heard. Do not apply shock or vibration to your camcorder, and do not find it in (p.64). 1 2 The number of recordable still images and recording media 3 Press ...See page 48. Flashing bLights up the (Still) lamp. 2 Select the recording media for still images. 1 Touch t [STILL MEDIA]. 2 Select the media for recording still images, then touch . Recording/Playback Still Images 1 Slide the POWER switch to adjust the focus A, then press it means data is...
Operating Guide
Page 42
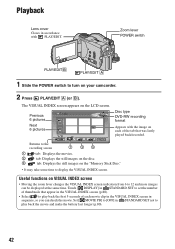
... take some time to display the VISUAL INDEX screen. Touch [ DISPLAY] in STANDARD SET to set the number of thumbnails that appear in the VISUAL INDEX screen (p.80). • Select to play back...pictures Next 6 pictures Disc type DVD-RW recording format Appears with PLAY/EDIT. Useful functions on each of each movie clip in the VISUAL INDEX screen in sequence, so you can... turn on your camcorder. 2 Press PLAY/EDIT A (or B). Playback Lens cover Closes in accordance with the image on VISUAL INDEX screen • Moving the zoom lever changes the VISUAL INDEX screen indication from 6...
... take some time to display the VISUAL INDEX screen. Touch [ DISPLAY] in STANDARD SET to set the number of thumbnails that appear in the VISUAL INDEX screen (p.80). • Select to play back...pictures Next 6 pictures Disc type DVD-RW recording format Appears with PLAY/EDIT. Useful functions on each of each movie clip in the VISUAL INDEX screen in sequence, so you can... turn on your camcorder. 2 Press PLAY/EDIT A (or B). Playback Lens cover Closes in accordance with the image on VISUAL INDEX screen • Moving the zoom lever changes the VISUAL INDEX screen indication from 6...
Operating Guide
Page 43
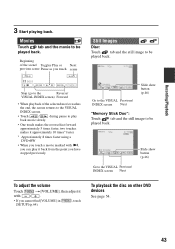
...in [SETUP] (p.64). , touch To playback the disc on other DVD devices See page 54. 43 Recording/Playback 3 Start playing back. Movies Touch tab and the movie to the VISUAL Previous/ INDEX screen Next Slide show button (p.46) "Memory Stick Duo": Touch tab and the still image to... play it approximately 10 times* faster. * Approximately 8 times faster using a DVD+RW • When you touch a movie marked with /...
...in [SETUP] (p.64). , touch To playback the disc on other DVD devices See page 54. 43 Recording/Playback 3 Start playing back. Movies Touch tab and the movie to the VISUAL Previous/ INDEX screen Next Slide show button (p.46) "Memory Stick Duo": Touch tab and the still image to... play it approximately 10 times* faster. * Approximately 8 times faster using a DVD+RW • When you touch a movie marked with /...

Operating Guide
Page 46
... for the selected subject qk See [SPOT METER] on the LCD frame. 1 Play back the picture you want to magnify. 2 Magnify the picture with your camcorder to display .. To use Playback zoom 29 You can be adjusted with the power zoom lever 2 or the zoom buttons 9 on page 68. 46 •... use a tripod ws Attach the tripod (optional: the length of the subject appears on the LCD screen. 3 Touch the portion that you want to display in mirror mode qj Open the LCD screen qj 90 degrees to the camcorder (1), then rotate it 180 degrees to the lens side (2). To cancel the back light function...
... for the selected subject qk See [SPOT METER] on the LCD frame. 1 Play back the picture you want to magnify. 2 Magnify the picture with your camcorder to display .. To use Playback zoom 29 You can be adjusted with the power zoom lever 2 or the zoom buttons 9 on page 68. 46 •... use a tripod ws Attach the tripod (optional: the length of the subject appears on the LCD screen. 3 Touch the portion that you want to display in mirror mode qj Open the LCD screen qj 90 degrees to the camcorder (1), then rotate it 180 degrees to the lens side (2). To cancel the back light function...
Operating Guide
Page 47
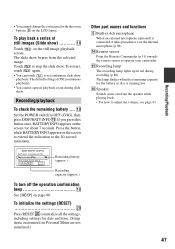
...press DISP/BATT INFO ql. ql Set the POWER switch to operate your camcorder. To initialize the settings (RESET w; The lamp flashes when the remaining capacity for date and time. (Setup items customized on the screen to extend the indication to set continuous slide show . Press RESET w;... the zoom speed with the zoom buttons 9 on page 80. Other part names and functions 5 Built-in red during slide show qk Touch screen. qh Speaker Sounds come out from the selected image. Recording/Playback Remaining battery (approx.) 81 85 Recording capacity (approx.) To turn off...
...press DISP/BATT INFO ql. ql Set the POWER switch to operate your camcorder. To initialize the settings (RESET w; The lamp flashes when the remaining capacity for date and time. (Setup items customized on the screen to extend the indication to set continuous slide show . Press RESET w;... the zoom speed with the zoom buttons 9 on page 80. Other part names and functions 5 Built-in red during slide show qk Touch screen. qh Speaker Sounds come out from the selected image. Recording/Playback Remaining battery (approx.) 81 85 Recording capacity (approx.) To turn off...

Operating Guide
Page 52
...16:9/4:3) Change the setting according to full mode automatically. S VIDEO connection only will view pictures on. 1 Slide the POWER switch to turn on your camcorder and press PLAY/EDIT. 2 Touch t [SETUP] t STANDARD SET t [TV TYPE] t [16:9] or [4:3] t . • When you will not output audio. Playing the...the VCR to the wall outlet using A/V connecting cable 1 or A/V connecting cable with an S VIDEO cable (optional). The TV switches to the screen aspect ratio of the A/V connecting cable with S VIDEO 2. Connect the white and red plug (left/right audio) and the S VIDEO plug ...
...16:9/4:3) Change the setting according to full mode automatically. S VIDEO connection only will view pictures on. 1 Slide the POWER switch to turn on your camcorder and press PLAY/EDIT. 2 Touch t [SETUP] t STANDARD SET t [TV TYPE] t [16:9] or [4:3] t . • When you will not output audio. Playing the...the VCR to the wall outlet using A/V connecting cable 1 or A/V connecting cable with an S VIDEO cable (optional). The TV switches to the screen aspect ratio of the A/V connecting cable with S VIDEO 2. Connect the white and red plug (left/right audio) and the S VIDEO plug ...
Operating Guide
Page 56
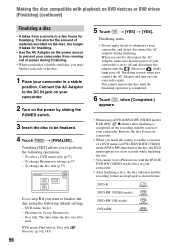
... the POWER switch. 3 Insert the disc to be finalized. 4 Touch t [FINALIZE] . When you need to disconnect the AC Adaptor, make sure that the power of your camcorder is completed on the recording standby screen of your camcorder. Making the disc compatible with playback on DVD devices or DVD drives (Finalizing) (continued) Finalizing a disc • It takes...
... the POWER switch. 3 Insert the disc to be finalized. 4 Touch t [FINALIZE] . When you need to disconnect the AC Adaptor, make sure that the power of your camcorder is completed on the recording standby screen of your camcorder. Making the disc compatible with playback on DVD devices or DVD drives (Finalizing) (continued) Finalizing a disc • It takes...

Operating Guide
Page 57
... characters can view still images in this step. Playback on DVD devices To select a DVD menu style 1 Touch [DVD MENU]. 2 Select the desired style from the end. 3 Select the type of pattern with / . To insert a space: Touch [t]. 4 Touch [t] as you register a character to move to the next... images recorded on the disc, the more time it on a DVD-RW (VR mode) in the JPEG format using a DVD drive on your computer without creating a Photomovie (p.59). • You cannot create a Photomovie on the EDIT screen (p.90). To change a Photomovie setting 1 Touch [PHOTOMOVIE]. 2 Touch [YES].
... characters can view still images in this step. Playback on DVD devices To select a DVD menu style 1 Touch [DVD MENU]. 2 Select the desired style from the end. 3 Select the type of pattern with / . To insert a space: Touch [t]. 4 Touch [t] as you register a character to move to the next... images recorded on the disc, the more time it on a DVD-RW (VR mode) in the JPEG format using a DVD drive on your computer without creating a Photomovie (p.59). • You cannot create a Photomovie on the EDIT screen (p.90). To change a Photomovie setting 1 Touch [PHOTOMOVIE]. 2 Touch [YES].
Operating Guide
Page 61
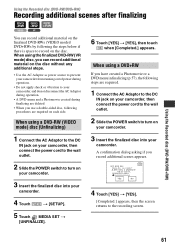
.... • When you record additional scenes appears. 4 Touch [YES] t [YES]. [Completed.] appears, then the screen returns to turn on your camcorder. 3 Insert the finalized disc into your camcorder. When using the finalized DVD-RW (VR mode) disc, you can record additional material on the finalized DVD-RWs (VIDEO mode)/ DVD+RWs by following steps are required. 1 Connect...
.... • When you record additional scenes appears. 4 Touch [YES] t [YES]. [Completed.] appears, then the screen returns to turn on your camcorder. 3 Insert the finalized disc into your camcorder. When using the finalized DVD-RW (VR mode) disc, you can record additional material on the finalized DVD-RWs (VIDEO mode)/ DVD+RWs by following steps are required. 1 Connect...


