Operating Guide
Page 8
... lens for your recordings on a TV, you record them on -screen displays in Germany, and Sony Corporation, and produces superior images. DVD +RW • The on a DVD-R. On this manual • The images of recording media and accessories are subject to change without any problems. You cannot delete images once you need a NTSC system-based TV. • Television programs, films, video tapes, and other materials may be copyrighted. Change the screen language before using a digital still camera...
... lens for your recordings on a TV, you record them on -screen displays in Germany, and Sony Corporation, and produces superior images. DVD +RW • The on a DVD-R. On this manual • The images of recording media and accessories are subject to change without any problems. You cannot delete images once you need a NTSC system-based TV. • Television programs, films, video tapes, and other materials may be copyrighted. Change the screen language before using a digital still camera...

Operating Guide
Page 10
... use zoom To record sound with your DVD Handycam 14 Choosing a disc 16 Using your DVD Handycam 18 Getting Started Step 1: Checking supplied items 20 Step 2: Charging the battery pack 21 Step 3: Turning the power on a DVD player (Finalizing 38 Recording/Playback Recording 40 Playback 42 Functions used for playing back on , and holding your DVD Handycam What you can do with more presence (5.1ch surround recording) To use the flash To record the high resolution still images during recording a movie (Dual Rec...
... use zoom To record sound with your DVD Handycam 14 Choosing a disc 16 Using your DVD Handycam 18 Getting Started Step 1: Checking supplied items 20 Step 2: Charging the battery pack 21 Step 3: Turning the power on a DVD player (Finalizing 38 Recording/Playback Recording 40 Playback 42 Functions used for playing back on , and holding your DVD Handycam What you can do with more presence (5.1ch surround recording) To use the flash To record the high resolution still images during recording a movie (Dual Rec...
Operating Guide
Page 11
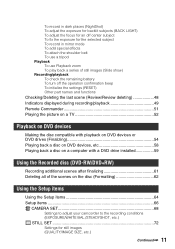
... zoom To play back a series of still images (Slide show) Recording/playback To check the remaining battery To turn off the operation confirmation beep To initialize the settings (RESET) Other part names and functions Checking/Deleting the last scene (Review/Review deleting 48 Indicators displayed during recording/playback 49 Remote Commander 51 Playing the picture on a TV 52 Playback on DVD devices Making the disc compatible with playback on DVD devices or DVD drives (Finalizing 54 Playing back a disc on DVD devices, etc 58 Playing back a disc on a computer with a DVD drive installed...
... zoom To play back a series of still images (Slide show) Recording/playback To check the remaining battery To turn off the operation confirmation beep To initialize the settings (RESET) Other part names and functions Checking/Deleting the last scene (Review/Review deleting 48 Indicators displayed during recording/playback 49 Remote Commander 51 Playing the picture on a TV 52 Playback on DVD devices Making the disc compatible with playback on DVD devices or DVD drives (Finalizing 54 Playing back a disc on DVD devices, etc 58 Playing back a disc on a computer with a DVD drive installed...
Operating Guide
Page 12
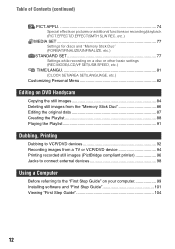
... basic settings (REC MODE/LCD/VF SET/USB SPEED, etc.) TIME/LANGU 81 (CLOCK SET/AREA SET/LANGUAGE, etc.) Customizing Personal Menu 82 Editing on DVD Handycam Copying the still images 84 Deleting still images from the "Memory Stick Duo 86 Editing the original data 87 Creating the Playlist 88 Playing the Playlist 91 Dubbing, Printing Dubbing to VCR/DVD devices 92 Recording images from a TV or VCR/DVD device 94 Printing recorded still images (PictBridge compliant printer 96 Jacks to connect external devices 98 Using...
... basic settings (REC MODE/LCD/VF SET/USB SPEED, etc.) TIME/LANGU 81 (CLOCK SET/AREA SET/LANGUAGE, etc.) Customizing Personal Menu 82 Editing on DVD Handycam Copying the still images 84 Deleting still images from the "Memory Stick Duo 86 Editing the original data 87 Creating the Playlist 88 Playing the Playlist 91 Dubbing, Printing Dubbing to VCR/DVD devices 92 Recording images from a TV or VCR/DVD device 94 Printing recorded still images (PictBridge compliant printer 96 Jacks to connect external devices 98 Using...
Operating Guide
Page 14
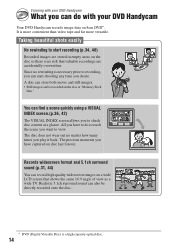
... scene you want to do with your DVD Handycam Your DVD Handycam records image data on the disc or "Memory Stick Duo." Taking beautiful shots easily No rewinding to check disc content at a glance. A disc can store both movie and still images. • Still images can find a scene quickly using a VISUAL INDEX screen.(p.36, 42) The VISUAL INDEX screen allows you to start shooting any time you desire. The precious moments you...
... scene you want to do with your DVD Handycam Your DVD Handycam records image data on the disc or "Memory Stick Duo." Taking beautiful shots easily No rewinding to check disc content at a glance. A disc can store both movie and still images. • Still images can find a scene quickly using a VISUAL INDEX screen.(p.36, 42) The VISUAL INDEX screen allows you to start shooting any time you desire. The precious moments you...
Operating Guide
Page 17
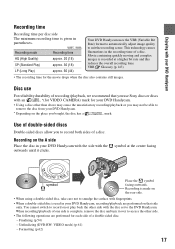
... (Long Play) approx. 60 (44) Your DVD Handycam uses the VBR (Variable Bit Rate) format to automatically adjust image quality to the DVD Handycam. symbol at a higher bit rate and this reduces the overall recording time. Unfinalizing (DVD-RW: VIDEO mode) (p.61) - VBR Glossary (p.143) • The recording time for each side of one side is complete, remove the disc and turn it clicks. Disc use Sony discs or discs with an *(for VIDEO CAMERA) mark...
... (Long Play) approx. 60 (44) Your DVD Handycam uses the VBR (Variable Bit Rate) format to automatically adjust image quality to the DVD Handycam. symbol at a higher bit rate and this reduces the overall recording time. Unfinalizing (DVD-RW: VIDEO mode) (p.61) - VBR Glossary (p.143) • The recording time for each side of one side is complete, remove the disc and turn it clicks. Disc use Sony discs or discs with an *(for VIDEO CAMERA) mark...

Operating Guide
Page 18
... do after recording? You can delete or edit You can be played back on various DVD devices * Select the mode on your DVD Handycam (See pages 36 and 42) You can also connect it to a TV for viewing (p.52). Using your DVD Handycam 1Preparing (See page 20 to 31.) Select the disc that best suits your DVD Handycam and format (p.28). Repeated use of a disc To save recorded To use one disc images repeatedly...
... do after recording? You can delete or edit You can be played back on various DVD devices * Select the mode on your DVD Handycam (See pages 36 and 42) You can also connect it to a TV for viewing (p.52). Using your DVD Handycam 1Preparing (See page 20 to 31.) Select the disc that best suits your DVD Handycam and format (p.28). Repeated use of a disc To save recorded To use one disc images repeatedly...
Operating Guide
Page 29
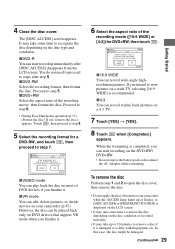
... Camcorder VIDEO VR OK xVIDEO mode You can start recording immediately after step 5. FORMAT : 16:9 Select aspect ratio of the recording movie, then format the disc. When the formatting is dirty with fingerprints, etc. The [DISC ACCESS] screen appears. xDVD+RW Select the aspect ratio of movie to view pictures on a 4:3 TV. 7 Touch [YES] t [YES]. 8 Touch when [Completed.] appears. If not, remove the disc.] appears. If you can play...
... Camcorder VIDEO VR OK xVIDEO mode You can start recording immediately after step 5. FORMAT : 16:9 Select aspect ratio of the recording movie, then format the disc. When the formatting is dirty with fingerprints, etc. The [DISC ACCESS] screen appears. xDVD+RW Select the aspect ratio of movie to view pictures on a 4:3 TV. 7 Touch [YES] t [YES]. 8 Touch when [Completed.] appears. If not, remove the disc.] appears. If you can play...
Operating Guide
Page 33
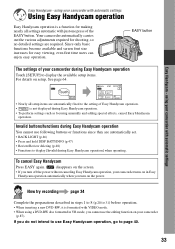
... various adjustments required for easy viewing, even first time users can enjoy easy operation. CLOCK SET BEEP • Nearly all settings automatic with VIDEO mode. • When using a DVD-RW disc formatted in Easy Handycam operation automatically when you turn off the power without canceling Easy Handycam operation, your camcorder (p.87). Now try recording page 34 Complete the preparations described in steps 1 to 8 (p.20 to the setting of Easy Handycam operation. • is formatted with...
... various adjustments required for easy viewing, even first time users can enjoy easy operation. CLOCK SET BEEP • Nearly all settings automatic with VIDEO mode. • When using a DVD-RW disc formatted in Easy Handycam operation automatically when you turn off the power without canceling Easy Handycam operation, your camcorder (p.87). Now try recording page 34 Complete the preparations described in steps 1 to 8 (p.20 to the setting of Easy Handycam operation. • is formatted with...
Operating Guide
Page 44
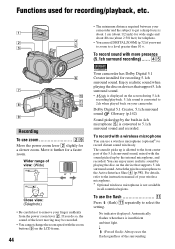
... internal microphone, and recorded. The sound it further for a faster zoom. Attach the wireless microphone to the front center part of the lever moving may be recorded. • You cannot change the zoom speed with more realistic sound by playing the disc on the LCD frame. 44 Your camcorder has Dolby Digital 5.1 Creator installed for recording 5.1ch surround sound. No indicator displayed: Automatically flashes when there is insufficient ambient light. To record sound with the zoom buttons...
... internal microphone, and recorded. The sound it further for a faster zoom. Attach the wireless microphone to the front center part of the lever moving may be recorded. • You cannot change the zoom speed with more realistic sound by playing the disc on the LCD frame. 44 Your camcorder has Dolby Digital 5.1 Creator installed for recording 5.1ch surround sound. No indicator displayed: Automatically flashes when there is insufficient ambient light. To record sound with the zoom buttons...
Operating Guide
Page 47
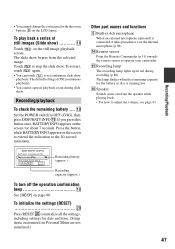
... over the internal microphone (p.98). Recording/Playback Remaining battery (approx.) 81 85 Recording capacity (approx.) To turn off the operation confirmation beep qk See [BEEP] on the LCD frame. To initialize the settings (RESET w; Press RESET w; • You cannot change the zoom speed with the zoom buttons 9 on page 80. Press the button while BATTERY INFO appears on Personal Menu are not initialized.) 47 on the screen for date and time. (Setup items customized...
... over the internal microphone (p.98). Recording/Playback Remaining battery (approx.) 81 85 Recording capacity (approx.) To turn off the operation confirmation beep qk See [BEEP] on the LCD frame. To initialize the settings (RESET w; Press RESET w; • You cannot change the zoom speed with the zoom buttons 9 on page 80. Press the button while BATTERY INFO appears on Personal Menu are not initialized.) 47 on the screen for date and time. (Setup items customized...
Operating Guide
Page 77
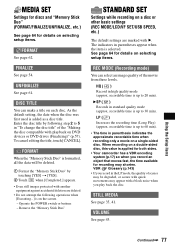
... you play back the disc. recordable time is formatted, all the data will be degraded, or scenes with quick movements may appear with playback on DVD devices or DVD drives (Finalizing)" (p.57). recordable time is on the screen. - VOLUME See page 43. See page 64 for details on selecting setup items. FORMAT See page 62. FINALIZE See page 54. Remove the "Memory Stick Duo" STANDARD SET Settings while recording on a disc or other basic settings (REC MODE/LCD/VF SET/USB SPEED...
... you play back the disc. recordable time is formatted, all the data will be degraded, or scenes with quick movements may appear with playback on DVD devices or DVD drives (Finalizing)" (p.57). recordable time is on the screen. - VOLUME See page 43. See page 64 for details on selecting setup items. FORMAT See page 62. FINALIZE See page 54. Remove the "Memory Stick Duo" STANDARD SET Settings while recording on a disc or other basic settings (REC MODE/LCD/VF SET/USB SPEED...
Operating Guide
Page 80
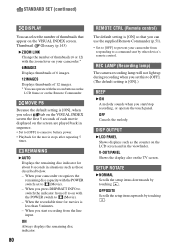
... /stop recording, or operate the touch panel. DISP OUTPUT B LCD PANEL Shows displays such as those described below. - OPPOSITE Scrolls the setup items upwards by touching . ON Always displays the remaining disc indicator. 80 REMOTE CTRL (Remote control) The default setting is [ON], when you set to [OFF]. (The default setting is less than 5 minutes. - When your camcorder recognizes the remaining disc capacity with the POWER switch set this to (Movie). - MOVIE...
... /stop recording, or operate the touch panel. DISP OUTPUT B LCD PANEL Shows displays such as those described below. - OPPOSITE Scrolls the setup items upwards by touching . ON Always displays the remaining disc indicator. 80 REMOTE CTRL (Remote control) The default setting is [ON], when you set to [OFF]. (The default setting is less than 5 minutes. - When your camcorder recognizes the remaining disc capacity with the POWER switch set this to (Movie). - MOVIE...
Operating Guide
Page 92
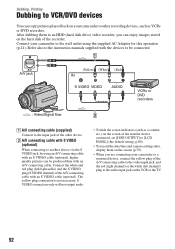
... (Red) IN S VIDEO VIDEO AUDIO VCRs or DVD recorders : Video/Signal flow 1 A/V connecting cable (supplied) Connect to the input jack of the other recording devices, such as a counter, etc.) on the screen of the monitor device connected, set [DISP OUTPUT] to [LCD PANEL] (the default setting, p.80). • To record the date/time and camera settings data, display them to an HDD (hard disk drive) video recorder, you are connecting your camcorder to other device. 2 A/V connecting cable with the devices to be produced than with an S VIDEO cable (optional). Connect the white and red plug...
... (Red) IN S VIDEO VIDEO AUDIO VCRs or DVD recorders : Video/Signal flow 1 A/V connecting cable (supplied) Connect to the input jack of the other recording devices, such as a counter, etc.) on the screen of the monitor device connected, set [DISP OUTPUT] to [LCD PANEL] (the default setting, p.80). • To record the date/time and camera settings data, display them to an HDD (hard disk drive) video recorder, you are connecting your camcorder to other device. 2 A/V connecting cable with the devices to be produced than with an S VIDEO cable (optional). Connect the white and red plug...
Operating Guide
Page 99
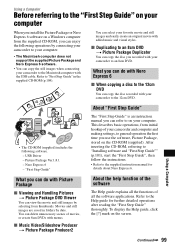
... disc recorded with added music and visual styles. About the help function of the software The Help guide explains all the functions of all the software applications. To display the Help guide, click the [?] mark on the CD-ROM (supplied). x Music Video/Slideshow Producer t Picture Package Producer2 About "First Step Guide" The "First Step Guide" is an instruction manual you use the software, Picture Package, stored on the screen. 99 USB Driver - You can view the movie...
... disc recorded with added music and visual styles. About the help function of the software The Help guide explains all the functions of all the software applications. To display the Help guide, click the [?] mark on the CD-ROM (supplied). x Music Video/Slideshow Producer t Picture Package Producer2 About "First Step Guide" The "First Step Guide" is an instruction manual you use the software, Picture Package, stored on the screen. 99 USB Driver - You can view the movie...
Operating Guide
Page 104
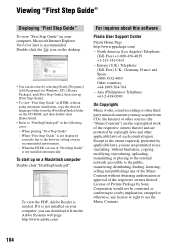
... Picture Package by Sony Corporation would not be construed as conferring to you by implication, estoppel or otherwise, any license or right to use (including, without limitation, copying, modifying, reproducing, uploading, transmitting or placing to the external network accessible to the public, transferring, distributing, lending, licensing, selling and publishing) any of the Music Contents without using automatic installation, copy the desired language...
... Picture Package by Sony Corporation would not be construed as conferring to you by implication, estoppel or otherwise, any license or right to use (including, without limitation, copying, modifying, reproducing, uploading, transmitting or placing to the external network accessible to the public, transferring, distributing, lending, licensing, selling and publishing) any of the Music Contents without using automatic installation, copy the desired language...
Operating Guide
Page 110
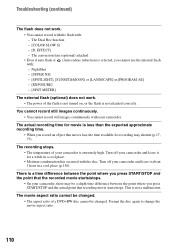
...] - Troubleshooting (continued) The flash does not work . • The power of a DVD+RW disc cannot be a slight time difference between the point where you press START/STOP and the point that the recorded movie starts/stops. • On your camcorder, there may be changed . • The aspect ratio of the flash is not turned on, or the flash is not a malfunction. The Dual Rec function - [COLOR SLOW S] - [D. The actual recording time for recording...
...] - Troubleshooting (continued) The flash does not work . • The power of a DVD+RW disc cannot be a slight time difference between the point where you press START/STOP and the point that the recorded movie starts/stops. • On your camcorder, there may be changed . • The aspect ratio of the flash is not turned on, or the flash is not a malfunction. The Dual Rec function - [COLOR SLOW S] - [D. The actual recording time for recording...
Operating Guide
Page 111
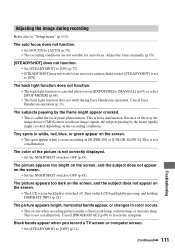
Adjusting the image during Easy Handycam operation. This is set [EXPOSURE] to [MANUAL] (p.69) or select [SPOT METER] (p.68). • The back light function does not work for auto focus. Black bands appear when you record a TV screen or computer screen. • Set [STEADYSHOT] to "Setup items" (p.113). Adjust the focus manually (p.70). [STEADYSHOT] does not function. • Set [STEADYSHOT] to [ON]. The color of the way the image device (CMOS sensor) reads out image signals, the...
Adjusting the image during Easy Handycam operation. This is set [EXPOSURE] to [MANUAL] (p.69) or select [SPOT METER] (p.68). • The back light function does not work for auto focus. Black bands appear when you record a TV screen or computer screen. • Set [STEADYSHOT] to "Setup items" (p.113). Adjust the focus manually (p.70). [STEADYSHOT] does not function. • Set [STEADYSHOT] to [ON]. The color of the way the image device (CMOS sensor) reads out image signals, the...

Operating Guide
Page 132
...- 0001: This file name appears on use . There is about the half size of a floppy disk. About the "Memory Stick" A "Memory Stick" is a compact, portable IC recording medium with a data capacity that exceeds the capacity of a standard "Memory Stick" in your camcorder. The speed of data transfer varies depending on the combination of a computer. • A "Memory Stick Duo" formatted by a computer (Windows OS/Mac OS) does not have guaranteed compatibility with the...
...- 0001: This file name appears on use . There is about the half size of a floppy disk. About the "Memory Stick" A "Memory Stick" is a compact, portable IC recording medium with a data capacity that exceeds the capacity of a standard "Memory Stick" in your camcorder. The speed of data transfer varies depending on the combination of a computer. • A "Memory Stick Duo" formatted by a computer (Windows OS/Mac OS) does not have guaranteed compatibility with the...
Operating Guide
Page 146
...) P.MENU ....See Personal Menu Q QUALITY 72 R Rechargeable battery pack See Battery Recordable still images ........73 Recording 34, 40 Recording format............16, 29 Recording lamp (REC LAMP 47, 80 Recording time 22 REC MODE 77 REDEYE REDUC 70 REMAINING 80 Remaining battery 49 Remaining display Battery 47 Disc 49 "Memory Stick Duo" ....47 Remote Commander 51 Remote sensor 47 RESET 47 Review 48 Review deleting 48 S Self-diagnosis display.........123 SELF-TIMER 71 SEPIA 75 Setup 64 CAMERA SET 68 MEDIA SET 77 Personal Menu...
...) P.MENU ....See Personal Menu Q QUALITY 72 R Rechargeable battery pack See Battery Recordable still images ........73 Recording 34, 40 Recording format............16, 29 Recording lamp (REC LAMP 47, 80 Recording time 22 REC MODE 77 REDEYE REDUC 70 REMAINING 80 Remaining battery 49 Remaining display Battery 47 Disc 49 "Memory Stick Duo" ....47 Remote Commander 51 Remote sensor 47 RESET 47 Review 48 Review deleting 48 S Self-diagnosis display.........123 SELF-TIMER 71 SEPIA 75 Setup 64 CAMERA SET 68 MEDIA SET 77 Personal Menu...


