
Operating Guide
Page 1
Operating Guide DCR-DVD505/DVD905 © 2006 Sony Corporation 2-661-367-11(1) Enjoying with your DVD Handycam 14 Getting Started 20 Easy Handycam 33 Recording /Playback 40 Playback on DVD devices 54 Using the Recorded disc 61 Using the Setup items 64 Editing on DVD Handycam 84 Dubbing, Printing 92 Using a Computer 99 Troubleshooting 105 Additional Information 129 Glossary, Index 142
Operating Guide DCR-DVD505/DVD905 © 2006 Sony Corporation 2-661-367-11(1) Enjoying with your DVD Handycam 14 Getting Started 20 Easy Handycam 33 Recording /Playback 40 Playback on DVD devices 54 Using the Recorded disc 61 Using the Setup items 64 Editing on DVD Handycam 84 Dubbing, Printing 92 Using a Computer 99 Troubleshooting 105 Additional Information 129 Glossary, Index 142

Operating Guide
Page 10
...camcorder with automatic settings Using Easy Handycam operation 33 Recording with ease 34 Playing back with ease 36 Preparation for playing back on a DVD player (Finalizing 38 Recording/Playback Recording 40 Playback 42 Functions used for recording/playback, etc 44 Recording To use zoom To record sound with your DVD Handycam... 14 Choosing a disc 16 Using your DVD Handycam 18 Getting Started Step 1: Checking supplied items 20 Step 2: Charging the battery pack 21 Step 3:...
...camcorder with automatic settings Using Easy Handycam operation 33 Recording with ease 34 Playing back with ease 36 Preparation for playing back on a DVD player (Finalizing 38 Recording/Playback Recording 40 Playback 42 Functions used for recording/playback, etc 44 Recording To use zoom To record sound with your DVD Handycam... 14 Choosing a disc 16 Using your DVD Handycam 18 Getting Started Step 1: Checking supplied items 20 Step 2: Charging the battery pack 21 Step 3:...
Operating Guide
Page 12
... MODE/LCD/VF SET/USB SPEED, etc.) TIME/LANGU 81 (CLOCK SET/AREA SET/LANGUAGE, etc.) Customizing Personal Menu 82 Editing on DVD Handycam Copying the still images 84 Deleting still images from the "Memory Stick Duo 86 Editing the original data 87 Creating the Playlist 88 Playing the... Playlist 91 Dubbing, Printing Dubbing to VCR/DVD devices 92 Recording images from a TV or VCR/DVD device 94 Printing recorded still images (PictBridge compliant printer 96 Jacks to connect external devices 98 Using a Computer ...
... MODE/LCD/VF SET/USB SPEED, etc.) TIME/LANGU 81 (CLOCK SET/AREA SET/LANGUAGE, etc.) Customizing Personal Menu 82 Editing on DVD Handycam Copying the still images 84 Deleting still images from the "Memory Stick Duo 86 Editing the original data 87 Creating the Playlist 88 Playing the... Playlist 91 Dubbing, Printing Dubbing to VCR/DVD devices 92 Recording images from a TV or VCR/DVD device 94 Printing recorded still images (PictBridge compliant printer 96 Jacks to connect external devices 98 Using a Computer ...
Operating Guide
Page 14
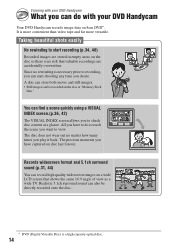
... is a high-capacity optical disc. 14 Taking beautiful shots easily No rewinding to start shooting any time you have to do with your DVD Handycam Your DVD Handycam records image data on disc last forever. The disc does not wear out no risk that shows the same 16:9 angle of view as....(p.36, 42) The VISUAL INDEX screen allows you can record high quality widescreen images on the disc or "Memory Stick Duo." Enjoying with your DVD Handycam What you to check disc content at a glance. Records widescreen format and 5.1ch surround sound (p.31, 44) You can do is more convenient...
... is a high-capacity optical disc. 14 Taking beautiful shots easily No rewinding to start shooting any time you have to do with your DVD Handycam Your DVD Handycam records image data on disc last forever. The disc does not wear out no risk that shows the same 16:9 angle of view as....(p.36, 42) The VISUAL INDEX screen allows you can record high quality widescreen images on the disc or "Memory Stick Duo." Enjoying with your DVD Handycam What you to check disc content at a glance. Records widescreen format and 5.1ch surround sound (p.31, 44) You can do is more convenient...
Operating Guide
Page 15
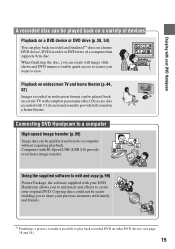
...can be played back on a home theater. Using the supplied software to edit and copy (p.99) Picture Package, the software supplied with your DVD Handycam allows you want to provide full sound on a wide TV with complete panoramic effect. When finalizing the disc, you can create still image ...slide shows and DVD menus to enable quick access to scenes you to add music and effects to a computer without requiring playback. Enjoying with your DVD Handycam A recorded disc can be played back on a variety of a computer that ...
...can be played back on a home theater. Using the supplied software to edit and copy (p.99) Picture Package, the software supplied with your DVD Handycam allows you want to provide full sound on a wide TV with complete panoramic effect. When finalizing the disc, you can create still image ...slide shows and DVD menus to enable quick access to scenes you to add music and effects to a computer without requiring playback. Enjoying with your DVD Handycam A recorded disc can be played back on a variety of a computer that ...
Operating Guide
Page 16
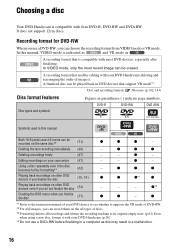
... (38, 54) z Playing back recordings on your camcorder (87) - z z z z *1z*1 z - - *3z*4 Creating the DVD menu when you can record them on the same disc*2 (31) Deleting the last recording immediately (48) z z z - - z - A recording format that is compatible with your DVD Handycam (deleting and rearranging the order of DVD-RW. *2 For still images, you can choose the...
... (38, 54) z Playing back recordings on your camcorder (87) - z z z z *1z*1 z - - *3z*4 Creating the DVD menu when you can record them on the same disc*2 (31) Deleting the last recording immediately (48) z z z - - z - A recording format that is compatible with your DVD Handycam (deleting and rearranging the order of DVD-RW. *2 For still images, you can choose the...
Operating Guide
Page 17
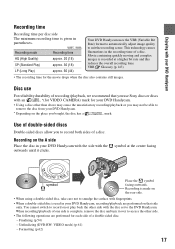
...-sided discs Double-sided discs allow you bought, the disc has a mark. Recording on that you use Sony discs or discs with an *(for VIDEO CAMERA) mark for your DVD Handycam. • Using a disc other than above may cause the unsatisfactory recording/playback or you may not be...to record on or play back the other side. • The following operations are performed on the A side Place the disc in your DVD Handycam, recording/playback are performed for the movie drops when the disc also contains still images. Finalizing (p.54) - Disc use For reliability durability of...
...-sided discs Double-sided discs allow you bought, the disc has a mark. Recording on that you use Sony discs or discs with an *(for VIDEO CAMERA) mark for your DVD Handycam. • Using a disc other than above may cause the unsatisfactory recording/playback or you may not be...to record on or play back the other side. • The following operations are performed on the A side Place the disc in your DVD Handycam, recording/playback are performed for the movie drops when the disc also contains still images. Finalizing (p.54) - Disc use For reliability durability of...

Operating Guide
Page 18
... disc can be played back on various DVD devices * Select the mode on the right page 18 Repeated use of a disc To save recorded To use one disc images repeatedly What would you have just anytime (p.87). Using your DVD Handycam 1Preparing (See page 20 to 31.) ...Select the disc that best suits your DVD Handycam and format (p.28). Deleting and editing images in your DVD Handycam Playing back disc on your DVD Handycam (See pages 36 and 42) You can only delete ...
... disc can be played back on various DVD devices * Select the mode on the right page 18 Repeated use of a disc To save recorded To use one disc images repeatedly What would you have just anytime (p.87). Using your DVD Handycam 1Preparing (See page 20 to 31.) ...Select the disc that best suits your DVD Handycam and format (p.28). Deleting and editing images in your DVD Handycam Playing back disc on your DVD Handycam (See pages 36 and 42) You can only delete ...
Operating Guide
Page 19
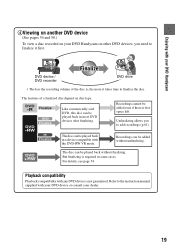
...can be played back in a device compatible with your DVD device or consult your DVD Handycam on other DVD devices, you to the instruction manual supplied with the DVD-RW VR mode. But finalizing is required in most DVD devices after finalizing. Finalize The disc can be added...space left. Refer to add recordings (p.61). DVD device / DVD recorder Finalize DVD drive • The less the recording volume of a finalized disc depend on your dealer. 19 Playback compatibility Playback compatibility with your DVD Handycam 4Viewing on another DVD device (See pages 54 and 58.) To ...
...can be played back in a device compatible with your DVD device or consult your DVD Handycam on other DVD devices, you to the instruction manual supplied with the DVD-RW VR mode. But finalizing is required in most DVD devices after finalizing. Finalize The disc can be added...space left. Refer to add recordings (p.61). DVD device / DVD recorder Finalize DVD drive • The less the recording volume of a finalized disc depend on your dealer. 19 Playback compatibility Playback compatibility with your DVD Handycam 4Viewing on another DVD device (See pages 54 and 58.) To ...
Operating Guide
Page 29
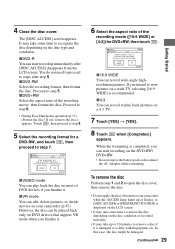
... most of the recording movie ([16:9 WIDE] or [4:3]) for a DVD-RW, and touch , then proceed to remove a disc if it . xDVD-R You can edit, delete pictures, or divide movies on your camcorder while the ACCESS lamp lights up to 10 minutes to step 7. xDVD... start recording immediately after step 5. xVR mode You can start recording on various DVD devices. Format again to be damaged. 29 Getting Started The [DISC ACCESS] screen appears. Proceed to step 6. • During Easy Handycam operation (p.33), [Format the disc? If not, remove the disc.] appears....
... most of the recording movie ([16:9 WIDE] or [4:3]) for a DVD-RW, and touch , then proceed to remove a disc if it . xDVD-R You can edit, delete pictures, or divide movies on your camcorder while the ACCESS lamp lights up to 10 minutes to step 7. xDVD... start recording immediately after step 5. xVR mode You can start recording on various DVD devices. Format again to be damaged. 29 Getting Started The [DISC ACCESS] screen appears. Proceed to step 6. • During Easy Handycam operation (p.33), [Format the disc? If not, remove the disc.] appears....
Operating Guide
Page 33
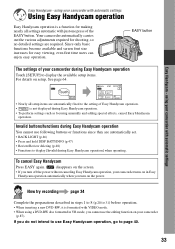
... turn off the power without canceling Easy Handycam operation, your camcorder (p.87). Now try recording page 34 Complete the preparations described in steps 1 to 8 (p.20 to 31) before operation. • When inserting a new DVD-RW, it is formatted with automatic settings Easy Handycam - Invalid buttons/functions during Easy Handycam operation] when operating. disappears on the...
... turn off the power without canceling Easy Handycam operation, your camcorder (p.87). Now try recording page 34 Complete the preparations described in steps 1 to 8 (p.20 to 31) before operation. • When inserting a new DVD-RW, it is formatted with automatic settings Easy Handycam - Invalid buttons/functions during Easy Handycam operation] when operating. disappears on the...
Operating Guide
Page 35
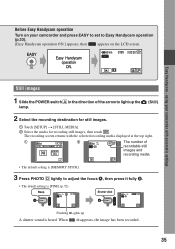
... MEDIA]. 2 Select the media for recording still images, then touch . using your camcorder and press EASY to set to adjust the focus A, then press it fully B. • The deault setting is heard. Before Easy Handycam operation Turn on your camcorder with the selected recording media displayed at the top right. 1 2 The number of...
... MEDIA]. 2 Select the media for recording still images, then touch . using your camcorder and press EASY to set to adjust the focus A, then press it fully B. • The deault setting is heard. Before Easy Handycam operation Turn on your camcorder with the selected recording media displayed at the top right. 1 2 The number of...
Operating Guide
Page 37
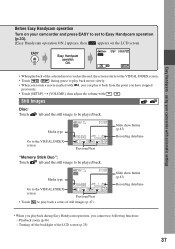
... of still images (p.47). Turning off the backlight of the LCD screen (p.25) 37 using your camcorder and press EASY to set to the VISUAL INDEX screen. • Touch / during Easy Handycam operation, you have stopped previously. • Touch [SETUP] t [VOLUME], then adjust the volume ...with / . Still Images Disc: Touch tab and the still image to be played back. Easy Handycam - Before Easy Handycam operation Turn on your camcorder with automatic settings • When playback of the selected movie reaches the end, the screen returns to Easy...
... of still images (p.47). Turning off the backlight of the LCD screen (p.25) 37 using your camcorder and press EASY to set to the VISUAL INDEX screen. • Touch / during Easy Handycam operation, you have stopped previously. • Touch [SETUP] t [VOLUME], then adjust the volume ...with / . Still Images Disc: Touch tab and the still image to be played back. Easy Handycam - Before Easy Handycam operation Turn on your camcorder with automatic settings • When playback of the selected movie reaches the end, the screen returns to Easy...
Operating Guide
Page 38
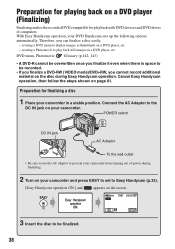
... finalized. 38 Preparation for playing back on a DVD player (Finalizing) Finalizing makes the recorded DVD compatible for finalizing a disc 1 Place your camcorder in a stable position. With Easy Handycam operation, your camcorder. creating a Photomovie to display images as thumbnails on a DVD player, etc. creating a DVD menu to play back still images on a DVD player, etc. - Connect the AC Adaptor...
... finalized. 38 Preparation for playing back on a DVD player (Finalizing) Finalizing makes the recorded DVD compatible for finalizing a disc 1 Place your camcorder in a stable position. With Easy Handycam operation, your camcorder. creating a Photomovie to display images as thumbnails on a DVD player, etc. creating a DVD menu to play back still images on a DVD player, etc. - Connect the AC Adaptor...
Operating Guide
Page 39
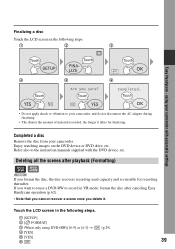
... the scenes after canceling Easy Handycam operation (p.62). • Note that you cannot recover a scene once you format the disc, the disc recovers recording used capacity and is reusable for finalizing. If you want to reuse a DVD-RW to your camcorder. Enjoy watching images on the DVD device or DVD drive, etc. Refer also to...
... the scenes after canceling Easy Handycam operation (p.62). • Note that you cannot recover a scene once you format the disc, the disc recovers recording used capacity and is reusable for finalizing. If you want to reuse a DVD-RW to your camcorder. Enjoy watching images on the DVD device or DVD drive, etc. Refer also to...
Operating Guide
Page 63
Using the Recorded disc (DVD-RW/DVD+RW) • During Easy Handycam operation (p.33), the screen in step 5 does not appear even if you insert a DVD-RW in your camcorder. Proceed to step 7. • You cannot format a disc that has been protected on other devices. Cancel the protection with the original devices, and then format it. 63
Using the Recorded disc (DVD-RW/DVD+RW) • During Easy Handycam operation (p.33), the screen in step 5 does not appear even if you insert a DVD-RW in your camcorder. Proceed to step 7. • You cannot format a disc that has been protected on other devices. Cancel the protection with the original devices, and then format it. 63

Operating Guide
Page 65
... in step 2.) 3 Select the desired item. • You can also touch the item directly to change the item without changing the setting. • Cancel Easy Handycam operation (p.33) to select it. 4 Customize the item. If you decide not to change the setup items during Easy...
... in step 2.) 3 Select the desired item. • You can also touch the item directly to change the item without changing the setting. • Cancel Easy Handycam operation (p.33) to select it. 4 Customize the item. If you decide not to change the setup items during Easy...
Operating Guide
Page 66
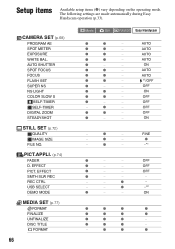
...USB SELECT DEMO MODE MEDIA SET (p.77) FORMAT FINALIZE UNFINALIZE DISC TITLE FORMAT 66 Movie Still PLAY/EDIT Easy Handycam z z - z z - FINE z -*1 z - - z - - - - z z z - - z - z - - z - - z z z z - - z z - z z - z - - OFF OFF OFF - - -*2 ON z z z z z z z z z z z - z z - z z - z - - z - - - z - The following settings are made automatically during Easy Handycam operation (p.33). z z - z - - AUTO SHUTTER SPOT FOCUS FOCUS FLASH SET SUPER NS NS LIGHT COLOR SLOW S SELF-TIMER...
...USB SELECT DEMO MODE MEDIA SET (p.77) FORMAT FINALIZE UNFINALIZE DISC TITLE FORMAT 66 Movie Still PLAY/EDIT Easy Handycam z z - z z - FINE z -*1 z - - z - - - - z z z - - z - z - - z - - z z z z - - z z - z z - z - - OFF OFF OFF - - -*2 ON z z z z z z z z z z z - z z - z z - z - - z - - - z - The following settings are made automatically during Easy Handycam operation (p.33). z z - z - - AUTO SHUTTER SPOT FOCUS FOCUS FLASH SET SUPER NS NS LIGHT COLOR SLOW S SELF-TIMER...
Operating Guide
Page 67
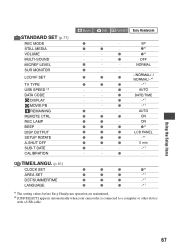
...PANEL z z z -*1 z z z 5 min z - - -*1 - - NORMAL z - - - TIME/LANGU. (p.81) CLOCK SET z z z z*1 AREA SET z z z -*1 DST/SUMMERTIME z z z -*1 LANGUAGE z z z -*1 *1 The setting values before Easy Handycam operation are maintained. *2 [USB SELECT] appears automatically when your camcorder is connected to a computer or other device with a USB cable. STANDARD SET (p.77) REC MODE STILL MEDIA VOLUME MULTI-SOUND MICREF...BEEP DISP OUTPUT SETUP ROTATE A.SHUT OFF SUB-T DATE CALIBRATION Movie Still PLAY/EDIT Easy Handycam z - - SP z z -
...PANEL z z z -*1 z z z 5 min z - - -*1 - - NORMAL z - - - TIME/LANGU. (p.81) CLOCK SET z z z z*1 AREA SET z z z -*1 DST/SUMMERTIME z z z -*1 LANGUAGE z z z -*1 *1 The setting values before Easy Handycam operation are maintained. *2 [USB SELECT] appears automatically when your camcorder is connected to a computer or other device with a USB cable. STANDARD SET (p.77) REC MODE STILL MEDIA VOLUME MULTI-SOUND MICREF...BEEP DISP OUTPUT SETUP ROTATE A.SHUT OFF SUB-T DATE CALIBRATION Movie Still PLAY/EDIT Easy Handycam z - - SP z z -
Operating Guide
Page 84
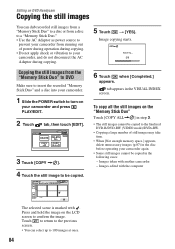
...• Use the AC Adaptor as power source to prevent your camcorder from the "Memory Stick Duo" to DVD Make sure to insert the recorded "Memory Stick Duo" and a disc into your camcorder. 1 Slide the POWER switch to turn on your camcorder and press PLAY/EDIT. 2 Touch tab, then touch [EDIT...and hold the image on the LCD screen to your camcorder again. • Some still images cannot be copied. 6 Touch when [Completed.] appears. Editing on DVD Handycam Copying the still images You can select up to the finalized DVD-R/DVD-RW (VIDEO mode)/DVD+RW. • Copying a large number of power ...
...• Use the AC Adaptor as power source to prevent your camcorder from the "Memory Stick Duo" to DVD Make sure to insert the recorded "Memory Stick Duo" and a disc into your camcorder. 1 Slide the POWER switch to turn on your camcorder and press PLAY/EDIT. 2 Touch tab, then touch [EDIT...and hold the image on the LCD screen to your camcorder again. • Some still images cannot be copied. 6 Touch when [Completed.] appears. Editing on DVD Handycam Copying the still images You can select up to the finalized DVD-R/DVD-RW (VIDEO mode)/DVD+RW. • Copying a large number of power ...


