
Operating Instructions
Page 6
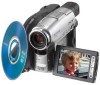
... use ? 8cm DVD-Rs and 8cm DVD-RWs are different in VIDEO mode. The number of recordable times is the difference between these two types cannot be used in your recordings. Which disc can use the following ways. Choose the one that meets your needs. 8cm DVD-R You can I choose between DVD-R and DVD-RW? DVD-RWs can I use the following discs: • DMW30 (single-sided disc) • DMW60DS (double-sided disc) Discs...
... use ? 8cm DVD-Rs and 8cm DVD-RWs are different in VIDEO mode. The number of recordable times is the difference between these two types cannot be used in your recordings. Which disc can use the following ways. Choose the one that meets your needs. 8cm DVD-R You can I choose between DVD-R and DVD-RW? DVD-RWs can I use the following discs: • DMW30 (single-sided disc) • DMW60DS (double-sided disc) Discs...
Operating Instructions
Page 10
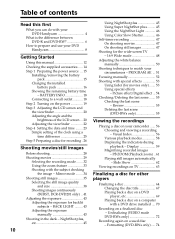
... clock using a time difference 25 Step 5 Preparing a disc for recording . 26 Shooting movies/still images Before shooting 28 Shooting movies 29 Selecting the recording mode ....... 32 Using the zoom feature 33 Shooting with the subject checking the image - BATTERY INFO 18 Connecting to prepare and use your DVD Handycam 8 Getting Started Using this manual 12 Checking the supplied accessories ..... 14 Step 1 Preparing the power source ... 15 Installing/removing the battery pack 15 Charging the installed battery pack 16 Showing the remaining battery time - Formatting (DVD-RWs...
... clock using a time difference 25 Step 5 Preparing a disc for recording . 26 Shooting movies/still images Before shooting 28 Shooting movies 29 Selecting the recording mode ....... 32 Using the zoom feature 33 Shooting with the subject checking the image - BATTERY INFO 18 Connecting to prepare and use your DVD Handycam 8 Getting Started Using this manual 12 Checking the supplied accessories ..... 14 Step 1 Preparing the power source ... 15 Installing/removing the battery pack 15 Charging the installed battery pack 16 Showing the remaining battery time - Formatting (DVD-RWs...
Operating Instructions
Page 11
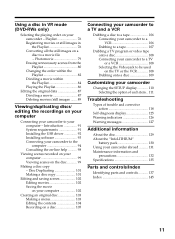
... and precautions 132 Specifications 135 Parts and controls/Index Identifying parts and controls 137 Index 145 11 Getting Started Using a disc in the Playlist 76 Converting all the still images on a disc to a movie file - Introduction 91 System requirements 91 Installing the USB driver 92 Installing software 93 Connecting your camcorder to the computer 94 Consulting the on-line help .......... 98 Viewing scenes recorded on your computer - Photomovie 79 Erasing unnecessary scenes...
... and precautions 132 Specifications 135 Parts and controls/Index Identifying parts and controls 137 Index 145 11 Getting Started Using a disc in the Playlist 76 Converting all the still images on a disc to a movie file - Introduction 91 System requirements 91 Installing the USB driver 92 Installing software 93 Connecting your camcorder to the computer 94 Consulting the on-line help .......... 98 Viewing scenes recorded on your computer - Photomovie 79 Erasing unnecessary scenes...
Operating Instructions
Page 12
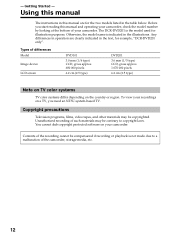
..., video tapes, and other materials may be contrary to a malfunction of your camcorder. Before you need an NTSC system-based TV. Types of the recording cannot be copyrighted. To view your recordings on the country or region. Contents of differences Model Image device LCD screen DVD101 3.0 mm (1/6 type) CCD, gross approx. 680 000 pixels 6.2 cm (2.5 type) DVD201 3.6 mm (1/5 type) CCD, gross approx. 1 070 000 pixels 6.2 cm (2.5 type) Note on TV color systems...
..., video tapes, and other materials may be contrary to a malfunction of your camcorder. Before you need an NTSC system-based TV. Types of the recording cannot be copyrighted. To view your recordings on the country or region. Contents of differences Model Image device LCD screen DVD101 3.0 mm (1/6 type) CCD, gross approx. 680 000 pixels 6.2 cm (2.5 type) DVD201 3.6 mm (1/5 type) CCD, gross approx. 1 070 000 pixels 6.2 cm (2.5 type) Note on TV color systems...
Operating Instructions
Page 29
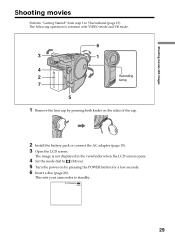
... with VIDEO mode and VR mode. 6 3 1 4 2 Recording lamp 7 5 1 Remove the lens cap by pressing both knobs on by pressing the POWER button for a few seconds. 6 Insert a disc (page 26). The following operation is not displayed in the viewfinder when the LCD screen opens. 4 Set the mode dial to (Movie). 5 Turn the power on the sides of the cap. 2 Install the battery pack or connect the AC adaptor (page 15). 3 Open the LCD screen. Shooting movies/still images Shooting movies Perform...
... with VIDEO mode and VR mode. 6 3 1 4 2 Recording lamp 7 5 1 Remove the lens cap by pressing both knobs on by pressing the POWER button for a few seconds. 6 Insert a disc (page 26). The following operation is not displayed in the viewfinder when the LCD screen opens. 4 Set the mode dial to (Movie). 5 Turn the power on the sides of the cap. 2 Install the battery pack or connect the AC adaptor (page 15). 3 Open the LCD screen. Shooting movies/still images Shooting movies Perform...
Operating Instructions
Page 32
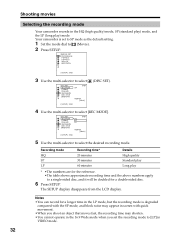
... above numbers apply to a single-sided disc, and it will be doubled for a longer time in the LP mode, but the recording mode is set the recording mode to [LP] in VIDEO mode. 32 Recording mode HQ SP LP Recording time* 20 minutes 30 minutes 60 minutes Details High quality Standard play Long play ) mode. MANUAL SET PROGRAM AE P EFFECT D EFFECT WHT BAL AUTO SHTR [ SETUP ] : END 3 Use the multi-selector to select DISC SET REC MODE FORMAT...
... above numbers apply to a single-sided disc, and it will be doubled for a longer time in the LP mode, but the recording mode is set the recording mode to [LP] in VIDEO mode. 32 Recording mode HQ SP LP Recording time* 20 minutes 30 minutes 60 minutes Details High quality Standard play Long play ) mode. MANUAL SET PROGRAM AE P EFFECT D EFFECT WHT BAL AUTO SHTR [ SETUP ] : END 3 Use the multi-selector to select DISC SET REC MODE FORMAT...
Operating Instructions
Page 35
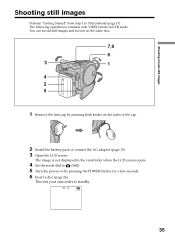
.... 2 Install the battery pack or connect the AC adaptor (page 15). 3 Open the LCD screen. The following operation is not displayed in the viewfinder when the LCD screen opens. 4 Set the mode dial to 5 beforehand (page 15). FINE 0 -R VIDEO 35 The image is common with VIDEO mode and VR mode. Shooting movies/still images Shooting still images Perform "Getting Started" from step 1 to (Still). 5 Turn the power on by pressing both knobs on the same disc. 7 8 6 3 1 4 2 5 1 Remove...
.... 2 Install the battery pack or connect the AC adaptor (page 15). 3 Open the LCD screen. The following operation is not displayed in the viewfinder when the LCD screen opens. 4 Set the mode dial to 5 beforehand (page 15). FINE 0 -R VIDEO 35 The image is common with VIDEO mode and VR mode. Shooting movies/still images Shooting still images Perform "Getting Started" from step 1 to (Still). 5 Turn the power on by pressing both knobs on the same disc. 7 8 6 3 1 4 2 5 1 Remove...
Operating Instructions
Page 37
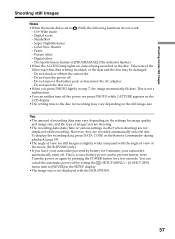
... power-off by battery for a few seconds. Take note of recording data may vary depending on the settings for recording may be damaged. - Shooting movies/still images Shooting still images Notes •When the mode dial is being recorded on the disc. Color Slow Shutter - Turn the power on again by pressing the POWER button for 5 minutes, your camcorder powered by setting the (SETUP MENU) - [A.SHUT OFF] menu item to (Still), the following functions do not work. - 16:9 Wide mode...
... power-off by battery for a few seconds. Take note of recording data may vary depending on the settings for recording may be damaged. - Shooting movies/still images Shooting still images Notes •When the mode dial is being recorded on the disc. Color Slow Shutter - Turn the power on again by pressing the POWER button for 5 minutes, your camcorder powered by setting the (SETUP MENU) - [A.SHUT OFF] menu item to (Still), the following functions do not work. - 16:9 Wide mode...
Operating Instructions
Page 39
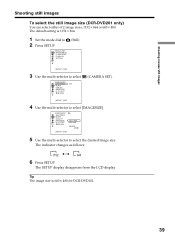
... 5 Use the multi-selector to select [IMAGESIZE]. Tip The image size is 1152 × 864. 1 Set the mode dial to select CAMERA SET SELFTIMER BURST QUALITY IMAGESIZE N. Shooting movies/still images Shooting still images To select the still image size (DCR-DVD201 only) You can select either of 2 image sizes, 1152 × 864 or 640 × 480. The indicator changes as follows: 1152 640 6 Press SETUP The SETUP display disappears from the LCD display.
... 5 Use the multi-selector to select [IMAGESIZE]. Tip The image size is 1152 × 864. 1 Set the mode dial to select CAMERA SET SELFTIMER BURST QUALITY IMAGESIZE N. Shooting movies/still images Shooting still images To select the still image size (DCR-DVD201 only) You can select either of 2 image sizes, 1152 × 864 or 640 × 480. The indicator changes as follows: 1152 640 6 Press SETUP The SETUP display disappears from the LCD display.
Operating Instructions
Page 41
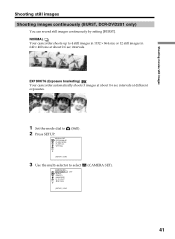
... [ SETUP ] : END (CAMERA SET). 41 EXP BRKTG (Exposure bracketing) Your camcorder automatically shoots 3 images at different exposures. 1 Set the mode dial to 2 Press SETUP. MANUAL SET PROGRAM AE FLASH MODE FLASH LVL WHT BAL (Still). [ SETUP ] : END 3 Use the multi-selector to 4 still images in 1152 × 864 size or 12 still images in 640 × 480 size at about 0.6 sec intervals at about 0.6 sec intervals. S. Shooting movies/still images Shooting still images Shooting images continuously (BURST, DCR-DVD201...
... [ SETUP ] : END (CAMERA SET). 41 EXP BRKTG (Exposure bracketing) Your camcorder automatically shoots 3 images at different exposures. 1 Set the mode dial to 2 Press SETUP. MANUAL SET PROGRAM AE FLASH MODE FLASH LVL WHT BAL (Still). [ SETUP ] : END 3 Use the multi-selector to 4 still images in 1152 × 864 size or 12 still images in 640 × 480 size at about 0.6 sec intervals at about 0.6 sec intervals. S. Shooting movies/still images Shooting still images Shooting images continuously (BURST, DCR-DVD201...
Operating Instructions
Page 63
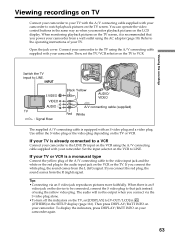
... the device to be output when you power your camcorder from a wall outlet using the A/V connecting cable supplied with your camcorder. If your TV is equipped with an S video plug and a video plug. Set the input selector on the VCR using the AC adaptor (page 18). You can operate the video control buttons in the SETUP display (page 116). Viewing recordings on TV Connect your camcorder to your TV with the A/V connecting cable supplied with your camcorder to watch playback pictures...
... the device to be output when you power your camcorder from a wall outlet using the A/V connecting cable supplied with your camcorder. If your TV is equipped with an S video plug and a video plug. Set the input selector on the VCR using the AC adaptor (page 18). You can operate the video control buttons in the SETUP display (page 116). Viewing recordings on TV Connect your camcorder to your TV with the A/V connecting cable supplied with your camcorder to watch playback pictures...

Operating Instructions
Page 91
... bit stereo sound card and stereo speakers Memory: 64 MB or more of the files edited) Display: Video card with your camcorder by connecting the camcorder to your computer using the USB cable: •Copying recorded scenes to your computer •Viewing scenes on your computer •Editing scenes copied to your computer •Duplicating a disc •Making an original DVD using a computer compatible with Hi-Speed USB. •When you open a still image file. •...
... bit stereo sound card and stereo speakers Memory: 64 MB or more of the files edited) Display: Video card with your camcorder by connecting the camcorder to your computer using the USB cable: •Copying recorded scenes to your computer •Viewing scenes on your computer •Editing scenes copied to your computer •Duplicating a disc •Making an original DVD using a computer compatible with Hi-Speed USB. •When you open a still image file. •...
Operating Instructions
Page 94
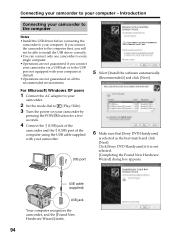
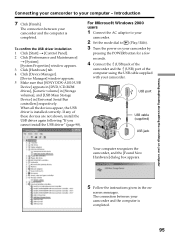
... [Sony DVD Handycam] is not selected. [Completing the Found New Hardware Wizard] dialog box appears. For Microsoft Windows XP users 1 Connect the AC adaptor to your camcorder. 2 Set the mode dial to (Play/Edit). 3 Turn the power on all the recommended environments. 5 Select [Install the software automatically (Recommended)] and click [Next]. If you connect the camcorder to the computer first, you will not be able to install...
... [Sony DVD Handycam] is not selected. [Completing the Found New Hardware Wizard] dialog box appears. For Microsoft Windows XP users 1 Connect the AC adaptor to your camcorder. 2 Set the mode dial to (Play/Edit). 3 Turn the power on all the recommended environments. 5 Select [Install the software automatically (Recommended)] and click [Next]. If you connect the camcorder to the computer first, you will not be able to install...
Operating Instructions
Page 95
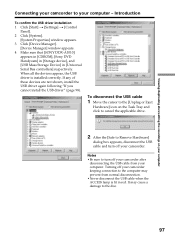
... instructions given in [Universal Serial Bus controllers] respectively. To confirm the USB driver installation 1 Click [Start] t [Control Panel]. 2 Click [Performance and Maintenance] t [System]. [System Properties] window appears. 3 Click [Hardware] tab. 4 Click [Device Manager]. [Device Manager] window appears. 5 Make sure that [SONY DDX-A1010 USB Device] appears in [DVD/CD-ROM drives], [Generic volume] in [Storage volumes], and [USB Mass Storage Device] in the on your camcorder by pressing the POWER button for a few seconds. 4 Connect...
... instructions given in [Universal Serial Bus controllers] respectively. To confirm the USB driver installation 1 Click [Start] t [Control Panel]. 2 Click [Performance and Maintenance] t [System]. [System Properties] window appears. 3 Click [Hardware] tab. 4 Click [Device Manager]. [Device Manager] window appears. 5 Make sure that [SONY DDX-A1010 USB Device] appears in [DVD/CD-ROM drives], [Generic volume] in [Storage volumes], and [USB Mass Storage Device] in the on your camcorder by pressing the POWER button for a few seconds. 4 Connect...
Operating Instructions
Page 96
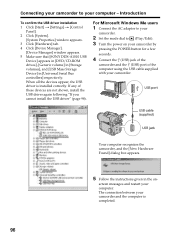
... the USB driver installation 1 Click [Start] t [Settings] t [Control Panel]. 2 Click [System]. [System Properties] window appears. 3 Click [Hardware] tab. 4 Click [Device Manager]. [Device Manager] window appears. 5 Make sure that [SONY DDX-A1010 USB Device] appears in [DVD/CD-ROM drives], [Generic volume] in [Storage volumes], and [USB Mass Storage Device] in the on your camcorder by pressing the POWER button for a few seconds. 4 Connect the (USB) jack of the camcorder and the (USB) port of these devices are...
... the USB driver installation 1 Click [Start] t [Settings] t [Control Panel]. 2 Click [System]. [System Properties] window appears. 3 Click [Hardware] tab. 4 Click [Device Manager]. [Device Manager] window appears. 5 Make sure that [SONY DDX-A1010 USB Device] appears in [DVD/CD-ROM drives], [Generic volume] in [Storage volumes], and [USB Mass Storage Device] in the on your camcorder by pressing the POWER button for a few seconds. 4 Connect the (USB) jack of the camcorder and the (USB) port of these devices are...
Operating Instructions
Page 97
... computer Connecting your camcorder to the disc. 97 If any of these devices are not shown, install the USB driver again following "If you cannot install the USB driver" (page 98). Turning off your camcorder. Introduction To confirm the USB driver installation 1 Click [Start] t [Settings] t [Control Panel]. 2 Click [System]. [System Properties] window appears. 3 Click [Device Manager]. [Device Manager] window appears. 4 Make sure that [SONY DDX-A1010] appears in [CDROM], [Sony DVD Handycam] in [Storage device], and [USB...
... computer Connecting your camcorder to the disc. 97 If any of these devices are not shown, install the USB driver again following "If you cannot install the USB driver" (page 98). Turning off your camcorder. Introduction To confirm the USB driver installation 1 Click [Start] t [Settings] t [Control Panel]. 2 Click [System]. [System Properties] window appears. 3 Click [Device Manager]. [Device Manager] window appears. 4 Make sure that [SONY DDX-A1010] appears in [CDROM], [Sony DVD Handycam] in [Storage device], and [USB...
Operating Instructions
Page 99
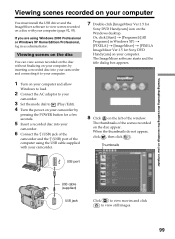
... computer and allow Windows to load. 2 Connect the AC adaptor to your camcorder. 3 Set the mode dial to (Play/Edit). 4 Turn the power on your camcorder by inserting a recorded disc into your camcorder. 6 Connect the (USB) jack of the camcorder and the (USB) port of the computer using Windows 2000 Professional or Windows XP Home Edition/Professional, log in Windows XP) t [PIXELA] t [ImageMixer] t [PIXELA ImageMixer Ver.1.5 for Sony DVD Handycam] on your computer...
... computer and allow Windows to load. 2 Connect the AC adaptor to your camcorder. 3 Set the mode dial to (Play/Edit). 4 Turn the power on your camcorder by inserting a recorded disc into your camcorder. 6 Connect the (USB) jack of the camcorder and the (USB) port of the computer using Windows 2000 Professional or Windows XP Home Edition/Professional, log in Windows XP) t [PIXELA] t [ImageMixer] t [PIXELA ImageMixer Ver.1.5 for Sony DVD Handycam] on your computer...
Operating Instructions
Page 124
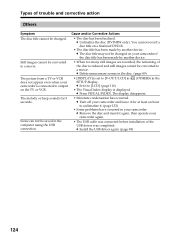
... USB cable was connected before installation of the disc is set to [V-OUT/LCD] in (OTHERS) in the disc. (page 89) • [DISPLAY] is reduced and still images cannot be converted to a movie. Types of trouble and corrective action Others Symptom The disc title cannot be changed on your camcorder if the disc title has been made by another device. Scene can not be saved in your camcorder. c Install the USB driver again...
... USB cable was connected before installation of the disc is set to [V-OUT/LCD] in (OTHERS) in the disc. (page 89) • [DISPLAY] is reduced and still images cannot be converted to a movie. Types of trouble and corrective action Others Symptom The disc title cannot be changed on your camcorder if the disc title has been made by another device. Scene can not be saved in your camcorder. c Install the USB driver again...
Operating Instructions
Page 135
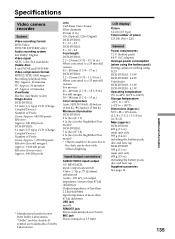
... the battery pack, disc and lens cap Supplied accessories See page 14. Additional information 135 Specifications Video camera recorder System Video recording format DVD-Video DVD-VR (DVD-RW only) Audio recording system 2ch Dolby* Digital Video signal NTSC color, EIA standards Usable discs 8 cm DVD-R and DVD-RW Video compression format MPEG2/JPEG (Still images) Recording/playback time HQ: Approx. 20 minutes SP: Approx. 30 minutes LP: Approx. 60 minutes Viewfinder Electric viewfinder (color) Image device DCR-DVD101: 3.0 mm (1/6 type) CCD (Charge Coupled Device) Number of Pixels...
... the battery pack, disc and lens cap Supplied accessories See page 14. Additional information 135 Specifications Video camera recorder System Video recording format DVD-Video DVD-VR (DVD-RW only) Audio recording system 2ch Dolby* Digital Video signal NTSC color, EIA standards Usable discs 8 cm DVD-R and DVD-RW Video compression format MPEG2/JPEG (Still images) Recording/playback time HQ: Approx. 20 minutes SP: Approx. 30 minutes LP: Approx. 60 minutes Viewfinder Electric viewfinder (color) Image device DCR-DVD101: 3.0 mm (1/6 type) CCD (Charge Coupled Device) Number of Pixels...
Operating Instructions
Page 145
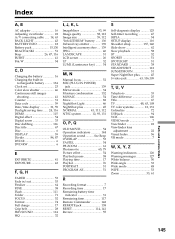
... Operation sound .......... Index A, B AC adaptor 16 Adjusting viewfinder 22 A/V connecting cable ...... 14, 63 BACK LIGHT 43 BATTERY INFO 18 Battery pack 15,130 BEACH & SKI 51 Beep 26, 47, 116 BURST 41 B & W 54 C, D Charging the battery 16 Charging the built-in rechargeable battery .......... 134 Clock set 23 Color slow shutter 46 Continuous still images shooting 41 Counter 31 Data code 59 Date/time display 31, 59 Daylight saving time ...... 24, 116 DEMO 115 Digital effect 54 Digital zoom 33 Disc...
... Operation sound .......... Index A, B AC adaptor 16 Adjusting viewfinder 22 A/V connecting cable ...... 14, 63 BACK LIGHT 43 BATTERY INFO 18 Battery pack 15,130 BEACH & SKI 51 Beep 26, 47, 116 BURST 41 B & W 54 C, D Charging the battery 16 Charging the built-in rechargeable battery .......... 134 Clock set 23 Color slow shutter 46 Continuous still images shooting 41 Counter 31 Data code 59 Date/time display 31, 59 Daylight saving time ...... 24, 116 DEMO 115 Digital effect 54 Digital zoom 33 Disc...


